
Diy: Cubby door assembly/springs **pictures included


After wrapping my center console last year when reassembling everything i had difficulties knowing how the springs on the cubby doors went back on. I ended up just putting it back together randomly and when finished my door wouldnt open by itself. id have to press the button and push on the top part to open it. today i decided to take it apart and try to figure it out and after about 3 hours i finally got it! i played around with the springs forever trying to figure how they went back on.
lets say you have everything taken apart and are ready to put it back together.
**IMPORTANT:
1-THE BLACK SPRING GOES ON THE PASSENGER SIDE
2-THE GOLD SPRING GOES ON THE DRIVER SIDE
ANY QUESTIONS FEEL FREE TO ASK.
STEP 1)
PLACE THE SPRING UPSIDE DOWN WITH THE SHORTER END FACING DOWNWARD AND THE LONGER END FACING UPWARDS.
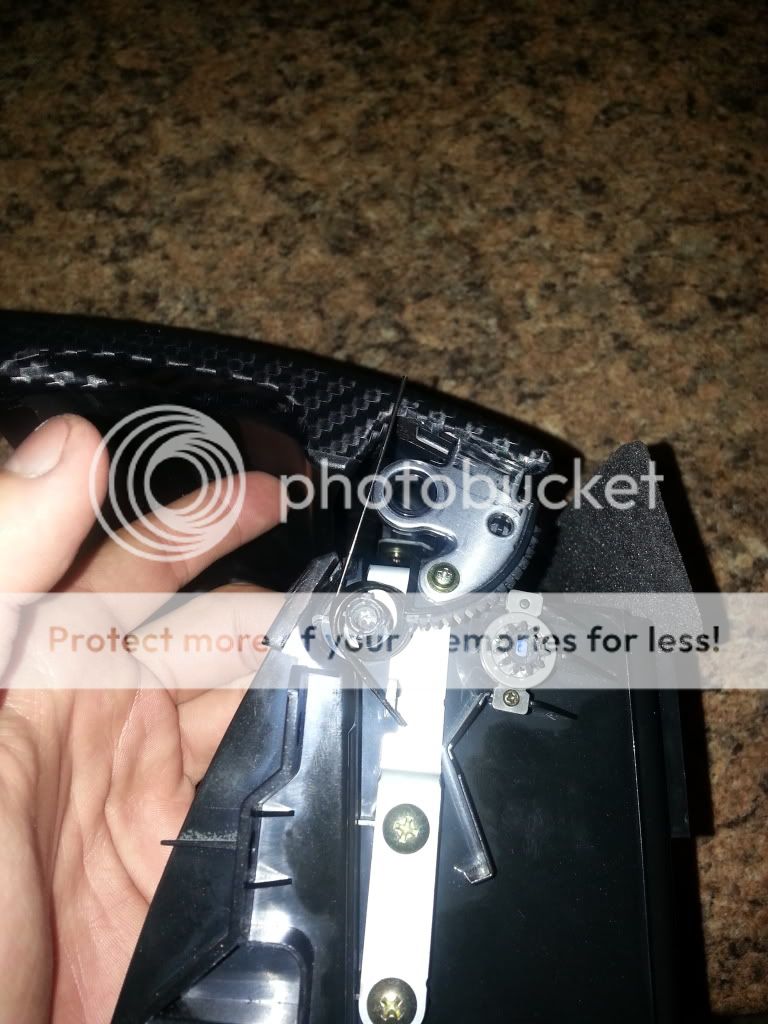
STEP 2)
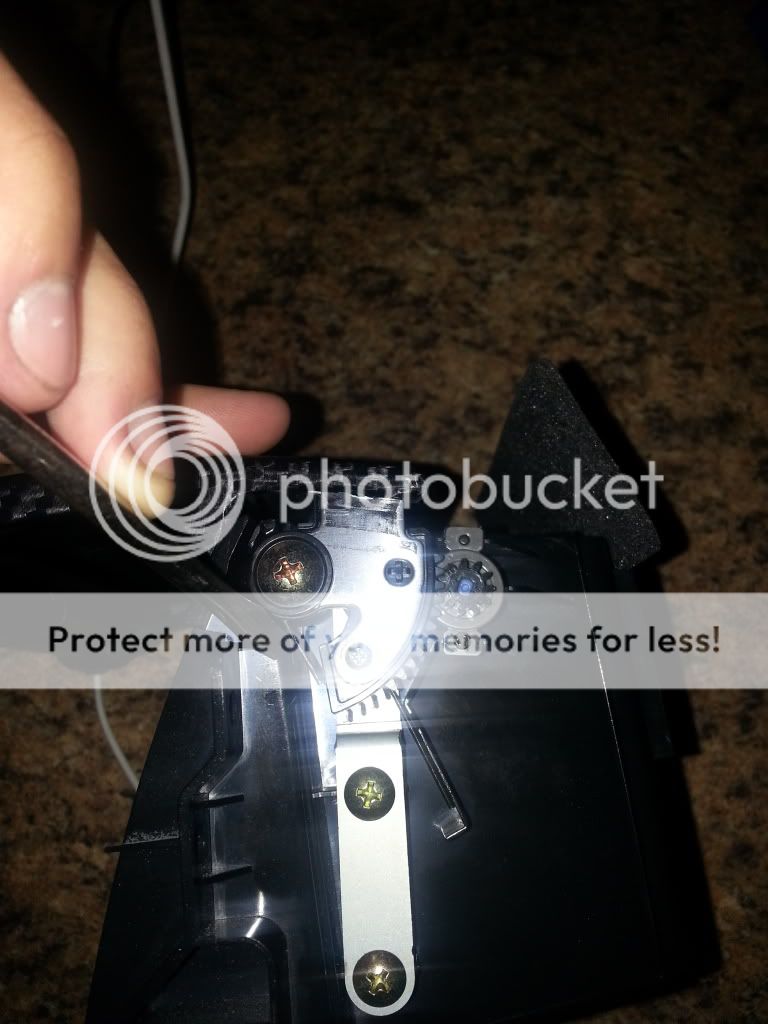
HOLD DOWN THE SHORTER END SO IT REMAINS BEHIND THE PLASTIC AS SEEN IN THE PICTURE WHILE YOU PULL THE LONGER END BETWEEN THE GEARS TO THE RIGHT
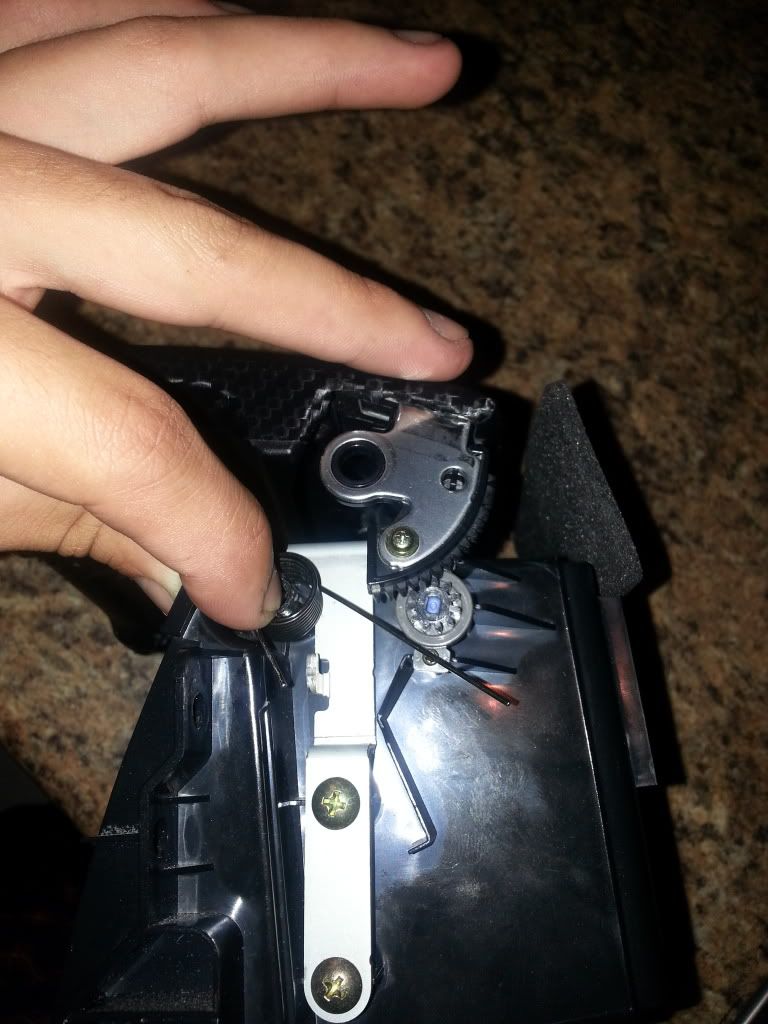
STEP 3)
SLIDE TO DOOR DOWN TILL YOU ARE ABLE TO PLACE THE WASHER ALONG WITH THE SCREW IN PLACE.. MAKE SURE THE SHORTER END DOES NOT FALL OUT OF PLACE SINCE ITS A PITA. AND SLIDE THE LONGER END OF THE SPRING INTO PLACE AS SEEN IN THE SECOND PICTURE WHERE MY FINGER IS.
STEP 4)
WITH A FLATHEAD SCREWDRIVER PUSH THE SHORTER END INWARDS WHILE AT THE SAME TIME PUSHING IT TOWARDS THE LONGER END AND CLIPPING IT IN PLACE BEHIND THE SMALL SCREW. YOU SHOULD HEAR IT CLICK IN PLACE.
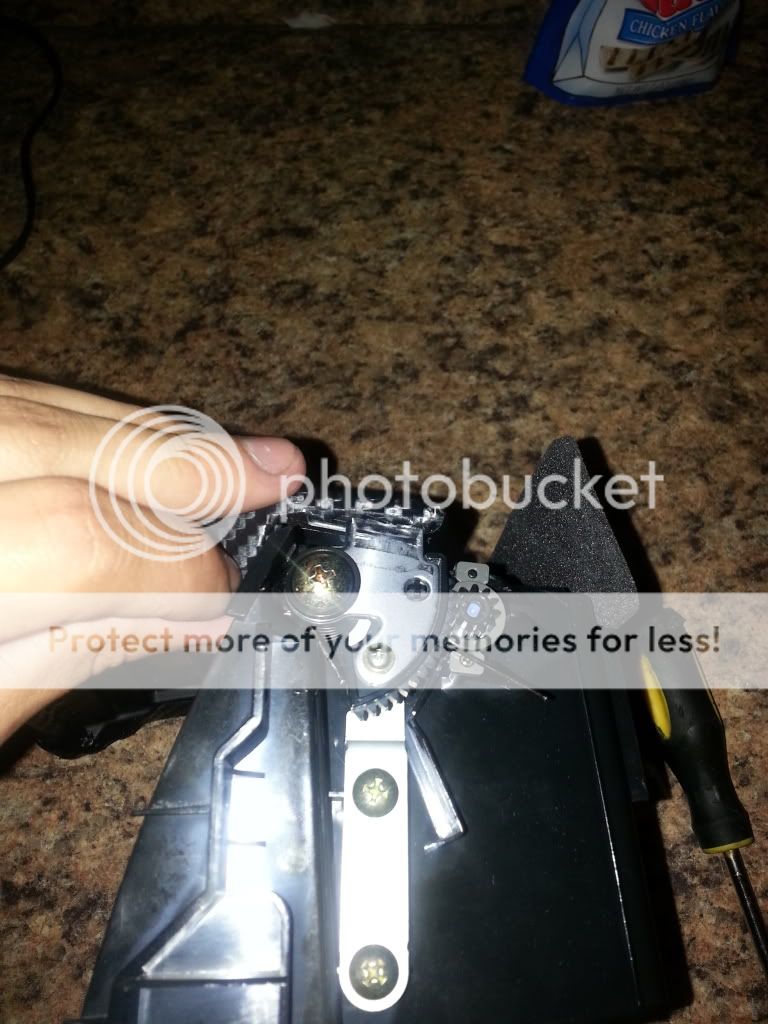
STEP 5)
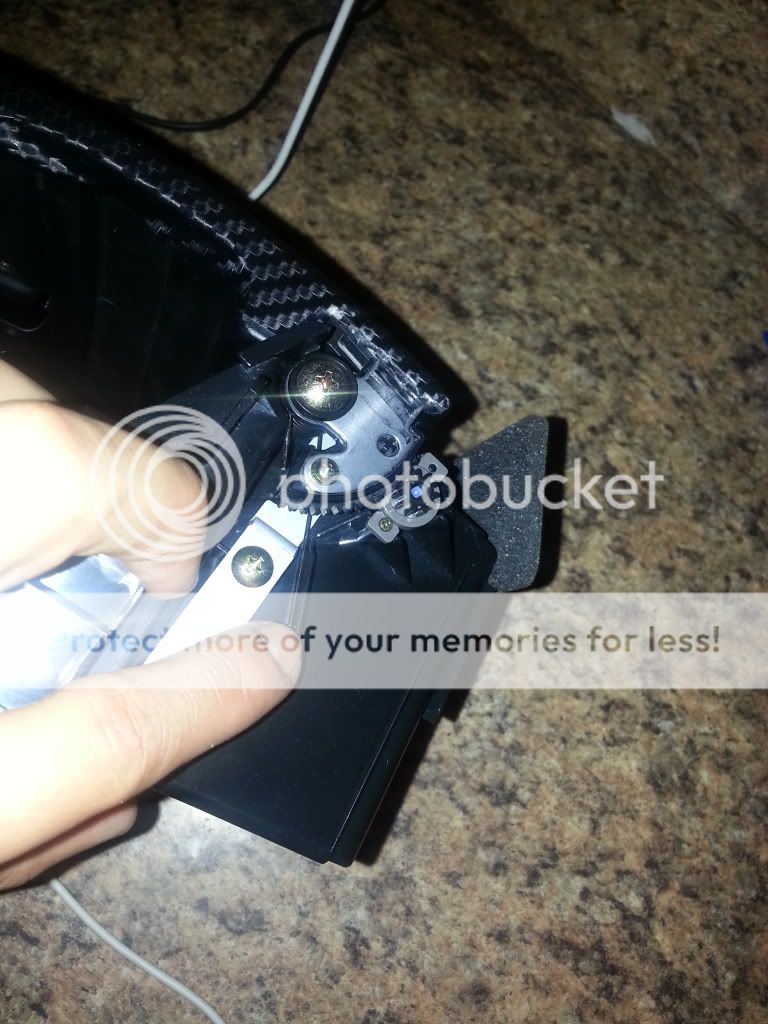
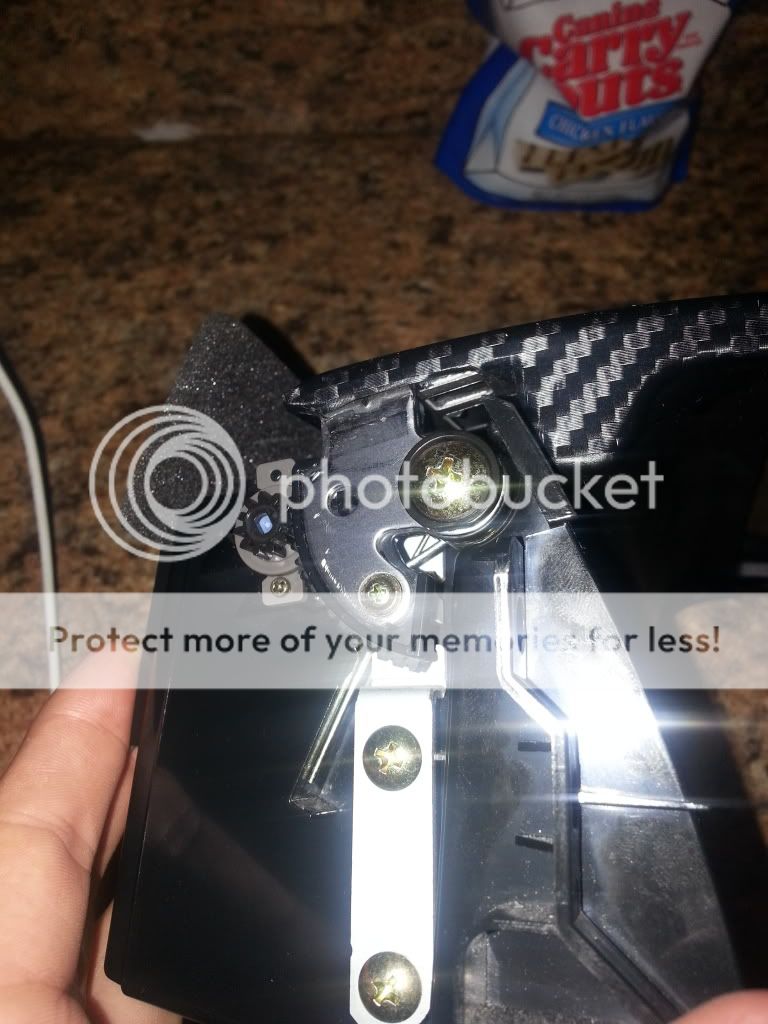
THIS IS WHAT IT SHOULD LOOK LIKE WHEN COMPLETED
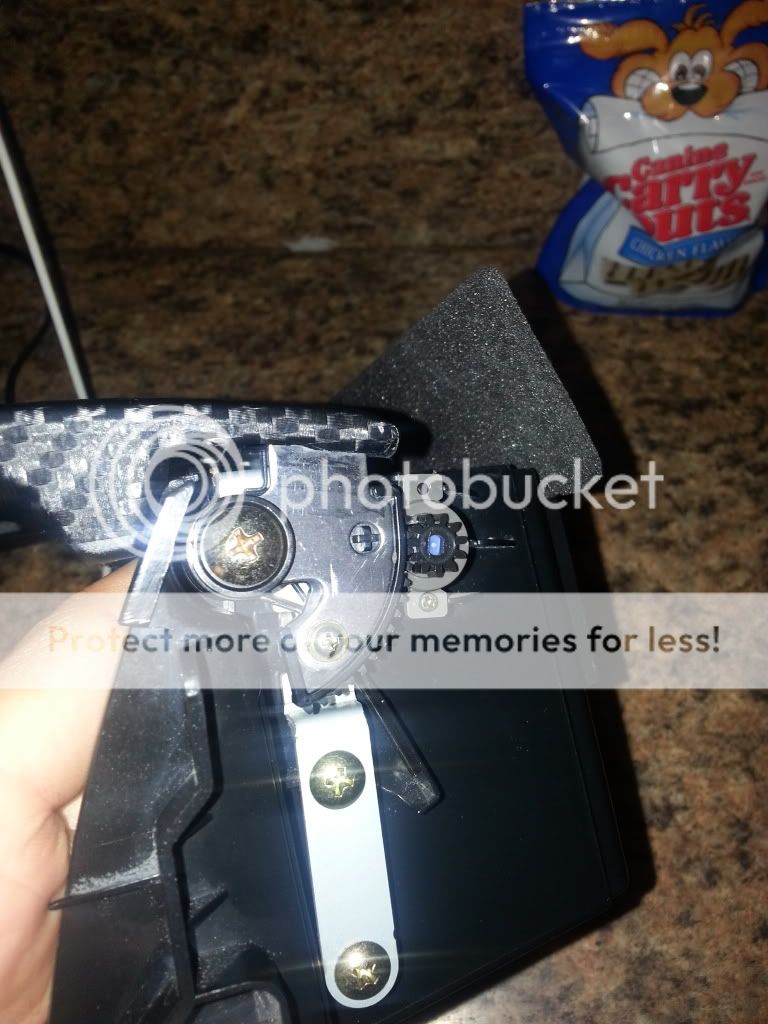
AND THE OTHER SIDE AS WELL
lets say you have everything taken apart and are ready to put it back together.
**IMPORTANT:
1-THE BLACK SPRING GOES ON THE PASSENGER SIDE
2-THE GOLD SPRING GOES ON THE DRIVER SIDE
ANY QUESTIONS FEEL FREE TO ASK.
STEP 1)
PLACE THE SPRING UPSIDE DOWN WITH THE SHORTER END FACING DOWNWARD AND THE LONGER END FACING UPWARDS.
STEP 2)
HOLD DOWN THE SHORTER END SO IT REMAINS BEHIND THE PLASTIC AS SEEN IN THE PICTURE WHILE YOU PULL THE LONGER END BETWEEN THE GEARS TO THE RIGHT
STEP 3)
SLIDE TO DOOR DOWN TILL YOU ARE ABLE TO PLACE THE WASHER ALONG WITH THE SCREW IN PLACE.. MAKE SURE THE SHORTER END DOES NOT FALL OUT OF PLACE SINCE ITS A PITA. AND SLIDE THE LONGER END OF THE SPRING INTO PLACE AS SEEN IN THE SECOND PICTURE WHERE MY FINGER IS.
STEP 4)
WITH A FLATHEAD SCREWDRIVER PUSH THE SHORTER END INWARDS WHILE AT THE SAME TIME PUSHING IT TOWARDS THE LONGER END AND CLIPPING IT IN PLACE BEHIND THE SMALL SCREW. YOU SHOULD HEAR IT CLICK IN PLACE.
STEP 5)
THIS IS WHAT IT SHOULD LOOK LIKE WHEN COMPLETED
AND THE OTHER SIDE AS WELL


Registered User
Joined: Jul 2020
Posts: 1
Likes: 0
From: ostrava
After wrapping my center console last year when reassembling everything i had difficulties knowing how the springs on the cubby doors went back on. I ended up just putting it back together randomly and when finished my door wouldnt open by itself. id have to press the button and push on the top part to open it. today i decided to take it apart and try to figure it out and after about 3 hours i finally got it! i played around with the springs forever trying to figure how they went back on.
lets say you have everything taken apart and are ready to put it back together.
**IMPORTANT:
1-THE BLACK SPRING GOES ON THE PASSENGER SIDE
2-THE GOLD SPRING GOES ON THE DRIVER SIDE
ANY QUESTIONS FEEL FREE TO ASK.
STEP 1)
PLACE THE SPRING UPSIDE DOWN WITH THE SHORTER END FACING DOWNWARD AND THE LONGER END FACING UPWARDS.

STEP 2)
HOLD DOWN THE SHORTER END SO IT REMAINS BEHIND THE PLASTIC AS SEEN IN THE PICTURE WHILE YOU PULL THE LONGER END BETWEEN THE GEARS TO THE RIGHT

STEP 3)
SLIDE TO DOOR DOWN TILL YOU ARE ABLE TO PLACE THE WASHER ALONG WITH THE SCREW IN PLACE.. MAKE SURE THE SHORTER END DOES NOT FALL OUT OF PLACE SINCE ITS A PITA. AND SLIDE THE LONGER END OF THE SPRING INTO PLACE AS SEEN IN THE SECOND PICTURE WHERE MY FINGER IS.


STEP 4)
WITH A FLATHEAD SCREWDRIVER PUSH THE SHORTER END INWARDS WHILE AT THE SAME TIME PUSHING IT TOWARDS THE LONGER END AND CLIPPING IT IN PLACE BEHIND THE SMALL SCREW. YOU SHOULD HEAR IT CLICK IN PLACE.

STEP 5)
THIS IS WHAT IT SHOULD LOOK LIKE WHEN COMPLETED

AND THE OTHER SIDE AS WELL

lets say you have everything taken apart and are ready to put it back together.
**IMPORTANT:
1-THE BLACK SPRING GOES ON THE PASSENGER SIDE
2-THE GOLD SPRING GOES ON THE DRIVER SIDE
ANY QUESTIONS FEEL FREE TO ASK.
STEP 1)
PLACE THE SPRING UPSIDE DOWN WITH THE SHORTER END FACING DOWNWARD AND THE LONGER END FACING UPWARDS.
STEP 2)
HOLD DOWN THE SHORTER END SO IT REMAINS BEHIND THE PLASTIC AS SEEN IN THE PICTURE WHILE YOU PULL THE LONGER END BETWEEN THE GEARS TO THE RIGHT
STEP 3)
SLIDE TO DOOR DOWN TILL YOU ARE ABLE TO PLACE THE WASHER ALONG WITH THE SCREW IN PLACE.. MAKE SURE THE SHORTER END DOES NOT FALL OUT OF PLACE SINCE ITS A PITA. AND SLIDE THE LONGER END OF THE SPRING INTO PLACE AS SEEN IN THE SECOND PICTURE WHERE MY FINGER IS.
STEP 4)
WITH A FLATHEAD SCREWDRIVER PUSH THE SHORTER END INWARDS WHILE AT THE SAME TIME PUSHING IT TOWARDS THE LONGER END AND CLIPPING IT IN PLACE BEHIND THE SMALL SCREW. YOU SHOULD HEAR IT CLICK IN PLACE.
STEP 5)
THIS IS WHAT IT SHOULD LOOK LIKE WHEN COMPLETED
AND THE OTHER SIDE AS WELL

Trending Topics

New Member


Joined: Nov 2009
Posts: 238
Likes: 57
From: Florida
@RedLine_ZR , another thanks for this great thread! Was exactly what I needed after trying to reassemble the door and couldn't quite remember how the spring went. 

Thread
Thread Starter
Forum
Replies
Last Post
Gruppe-S
Body Interior
13
May 16, 2016 10:42 PM