
WP Pro 8pot Front / 6 Pot rear Brakes, Install and Review.


Originally Posted by OnADimePBS
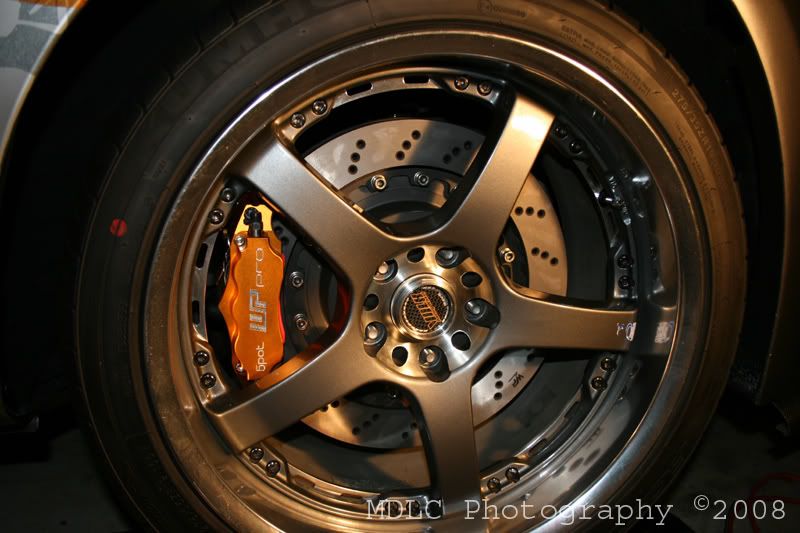
Looking very nice! Are those directional veined rotors?
As you can see on the WP Pro rotors, the channels and the rotation indicator.

Last edited by mdracer76; Apr 8, 2008 at 08:09 AM.

Originally Posted by mdracer76
Yup. Isn't it a standard now on performance braking applications? I've seen a few different styles of venting/veining up and including aptly named vented/veined rotors called the 'Kangaroo Paw' pattern from DBA (Disc Brakes Austrailia).
As you can see on the WP Pro rotors, the channels and the rotation indicator.
As you can see on the WP Pro rotors, the channels and the rotation indicator.

Thanks NA350Z
lol.. no worries!
LOL. well.. I hope to get some time tp post a picture by picture write up of the install. Car is still on jack stands in my garage. Rain has prevented me from taking it out to bed the brakes in. 
Originally Posted by OnADimePBS
Yea that's why I was asking, I thought you had your rotors on the wrong way for a second.
Originally Posted by buzzardmountain
Show-off........
So.. Install was pretty strait forward. I would recomend that if you are not familiar with changing your own brake pads and rotors, to not attempt this install and seek a reputable installer.
On to the pictures!
1: Jack up your car / Get out your tools / and observe your small, cute, stock brakes

notice the size diff in rotors..


2: Remove the 2 bolts holding your pads, then remove the next 2 bolts that hold the caliper to the hub assembly. Slide the calper off to the side. I dangled mine from the brake line.. normally you don't want to do that since you'd be re-using the lines, but since this kit came with stainless lines.. it did not matter.
Clean the hub face

3. The step that will save you an hour. Note in this next image the orientation of the new bracket. add lock-tight and torqe to spec as outlined in paperwork that came with the brakes.

4. Place the rotor on the hub, and rotate it. Note any rubbing on the heatshield sounds and bend / trim until you hear nothing.

you can hold the rotor on with your lug nuts.

5. mount the caliper to the new bracket. do not torque these on yet (as per the instructions)

6. load the pads!

7. Remove the old caliper and brake lines and install the SS line to the hardline. Be sure to route the lines similar to the path of the stock lines.

fronts ready to bleed:

8. Rears.. Break out the cutting wheel for extra duty!! LOL. OK.. so.. remove your old pads / calipers just like the fronts.

9. remove the rotors. you can be a sissy and tap it with a rubber mallet and try and save your rear rotors..or you can do what I did and take out some oppressed aggression on them. (i.e. beat with large hammer until free)
**the later is more fun.
9.5 you could also losen the drum brake using a flat head screw driver in the access window on the rotor.
10. Rotor is off.. time to cut the dust shield. It has a li that must go!


10A yes . I know I am fat.
10B yes.. I know I am balding.
10C Cutting tool provided by FunctionTuned LLC (Thanks Dave!!!!!)
11. A clean hub is a happy hub

12. TIME SAVER ALERT. Note the orientation of the bracket!


13. see that little wheel thing there? Thats how you adjust the drum brake.

make sure you orient THIS HOLE in the new caliper to it, or all the kids will laugh at you!
14. mount new caliper

15. install pads.


16. Remove brake line and install Stainless line.
Rears should now be ready to bleed.
17. Remember to bleed in this order:
1 Rear passsenger
2 Rear Driver
3 Front Passenger
4 Front driver
18. Bed the pads in according to the instructions. I have not yet, since its been raining here for the last few days.
hope you enjoyed my write up! I'll update this thread with some track info ( I also ordered some track pads) and my driving impressions! Enjoy!
If I did not already say, I'll say again
BIG Thanks to Dave @ FunctionTuned for letting me borrow some tools, and being great tech. support.
Randy, for help installing, and picha's! Brent, For being a bleeder, best damn bleeder you can find.
On to the pictures!
1: Jack up your car
/ Get out your tools / and observe your small, cute, stock brakesnotice the size diff in rotors..
2: Remove the 2 bolts holding your pads, then remove the next 2 bolts that hold the caliper to the hub assembly. Slide the calper off to the side. I dangled mine from the brake line.. normally you don't want to do that since you'd be re-using the lines, but since this kit came with stainless lines.. it did not matter.
Clean the hub face
3. The step that will save you an hour. Note in this next image the orientation of the new bracket. add lock-tight and torqe to spec as outlined in paperwork that came with the brakes.
4. Place the rotor on the hub, and rotate it. Note any rubbing on the heatshield sounds and bend / trim until you hear nothing.
you can hold the rotor on with your lug nuts.
5. mount the caliper to the new bracket. do not torque these on yet (as per the instructions)
6. load the pads!
7. Remove the old caliper and brake lines and install the SS line to the hardline. Be sure to route the lines similar to the path of the stock lines.
fronts ready to bleed:
8. Rears.. Break out the cutting wheel for extra duty!! LOL. OK.. so.. remove your old pads / calipers just like the fronts.
9. remove the rotors. you can be a sissy and tap it with a rubber mallet and try and save your rear rotors..or you can do what I did and take out some oppressed aggression on them. (i.e. beat with large hammer until free)
**the later is more fun.
9.5 you could also losen the drum brake using a flat head screw driver in the access window on the rotor.
10. Rotor is off.. time to cut the dust shield. It has a li that must go!
10A yes . I know I am fat.
10B yes.. I know I am balding.
10C Cutting tool provided by FunctionTuned LLC (Thanks Dave!!!!!)
11. A clean hub is a happy hub
12. TIME SAVER ALERT. Note the orientation of the bracket!
13. see that little wheel thing there? Thats how you adjust the drum brake.
make sure you orient THIS HOLE in the new caliper to it, or all the kids will laugh at you!
14. mount new caliper
15. install pads.
16. Remove brake line and install Stainless line.
Rears should now be ready to bleed.
17. Remember to bleed in this order:
1 Rear passsenger
2 Rear Driver
3 Front Passenger
4 Front driver
18. Bed the pads in according to the instructions. I have not yet, since its been raining here for the last few days.
hope you enjoyed my write up! I'll update this thread with some track info ( I also ordered some track pads) and my driving impressions! Enjoy!
If I did not already say, I'll say again
BIG Thanks to Dave @ FunctionTuned for letting me borrow some tools, and being great tech. support.
Randy, for help installing, and picha's! Brent, For being a bleeder, best damn bleeder you can find.
Last edited by mdracer76; Apr 16, 2008 at 06:25 AM.

a few observations.
1. wear some better eye / face protection when using rotary tools so close to your face. kick back and/or shards flying is no good. eye glasses dont count.
2. did u pop a stiffie after the install or are your jeans like super weird in this pict:

3. waiting for driving impressions.. that color is so awesome with your color scheme on the car
1. wear some better eye / face protection when using rotary tools so close to your face. kick back and/or shards flying is no good. eye glasses dont count.
2. did u pop a stiffie after the install or are your jeans like super weird in this pict:
3. waiting for driving impressions.. that color is so awesome with your color scheme on the car

Originally Posted by Chebosto
a few observations.
2. did u pop a stiffie after the install or are your jeans like super weird in this pict:
2. did u pop a stiffie after the install or are your jeans like super weird in this pict:

Sponsor
Works Concepts
Works Concepts
Joined: Jul 2006
Posts: 3,029
Likes: 1
From: So Cal
The color of those calipers are really nice, but I think it would be better if it didn't say 6/8 pot on them.
Like a lot of people, I've never heard of WP. How does the quality and pad selection compare with other brands? Does WP have the same quality as brembo and stoptech or is it more along the lines of rotora and wilwood?
Like a lot of people, I've never heard of WP. How does the quality and pad selection compare with other brands? Does WP have the same quality as brembo and stoptech or is it more along the lines of rotora and wilwood?
Originally Posted by Chebosto
a few observations.
1. wear some better eye / face protection when using rotary tools so close to your face. kick back and/or shards flying is no good. eye glasses dont count.
2. did u pop a stiffie after the install or are your jeans like super weird in this pic
3. waiting for driving impressions.. that color is so awesome with your color scheme on the car


Thanks C!

Looks sweet... the orange is a nice touch!
I noticed this kit is from a Taiwan company so I wonder if they're made at the same factory as Stoptech since Stoptech calipers are also made in Taiwan.
Chebosto -- Seriously!?!?! You get married last month and you're already checking out another dude's junk!
I noticed this kit is from a Taiwan company so I wonder if they're made at the same factory as Stoptech since Stoptech calipers are also made in Taiwan.
Chebosto -- Seriously!?!?! You get married last month and you're already checking out another dude's junk!
Last edited by wheatz; Apr 9, 2008 at 08:48 AM.
Registered User
Joined: Mar 2003
Posts: 462
Likes: 0
From: Funky Town
Originally Posted by wheatz
Looks sweet... the orange is a nice touch!
I noticed this kit is from a Taiwan company so I wonder if they're made at the same factory as Stoptech since Stoptech calipers are also made in Taiwan.
Chebosto -- Seriously!?!?! You get married last month and you're already checking out another dude's junk!
I noticed this kit is from a Taiwan company so I wonder if they're made at the same factory as Stoptech since Stoptech calipers are also made in Taiwan.
Chebosto -- Seriously!?!?! You get married last month and you're already checking out another dude's junk!