
Kinetix Camber Arm Adjustment? Install


Thread Starter
Registered User
Joined: Aug 2011
Posts: 6
Likes: 0
From: Atlanta
Hi Guys -
I installed my Kinetix Upper control arms last night and had a couple of questions since it did not come with any instructions. I have searched but cant find a definite answer on what i should do next as far as adjusting it before taking it to the alignment shop. I have added pictures of what I have so far and wanted to see if I can get some feedback before taking it in.
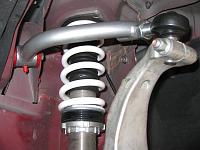
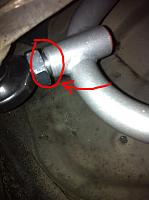
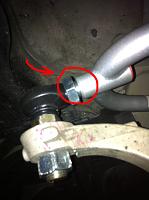
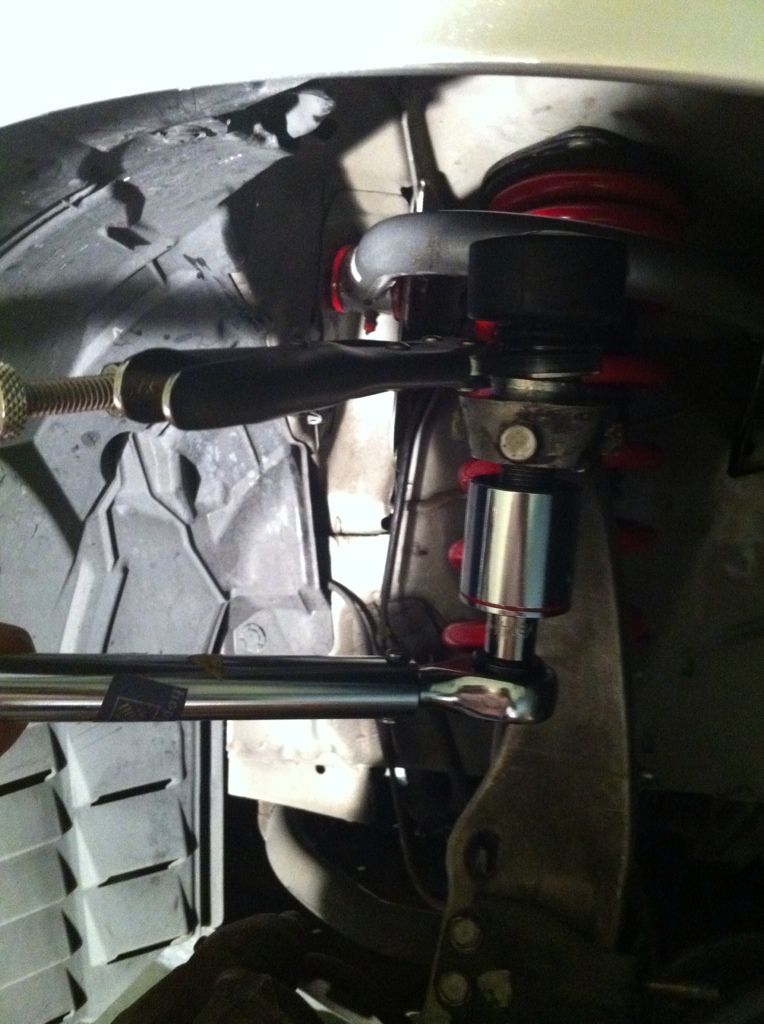
Basically as you can see in the first photo, There are some threads that go through the arm. Since it came with no instructions I am unsure how far I need to thread it through before stopping? So I just threaded it by hand until I couldnt turn it anymore and installed everything back. I have pictures of the driver side and the passenger side and they are threaded differently it seems. The driver side seems to be threaded in more than the passenger side.
My question is how much should it be threaded or how does it need to go in in general? I am not exactly sure if I should try to thread it all the way or keep it out and use that bolt for adjustment. Any help would be appreciated.
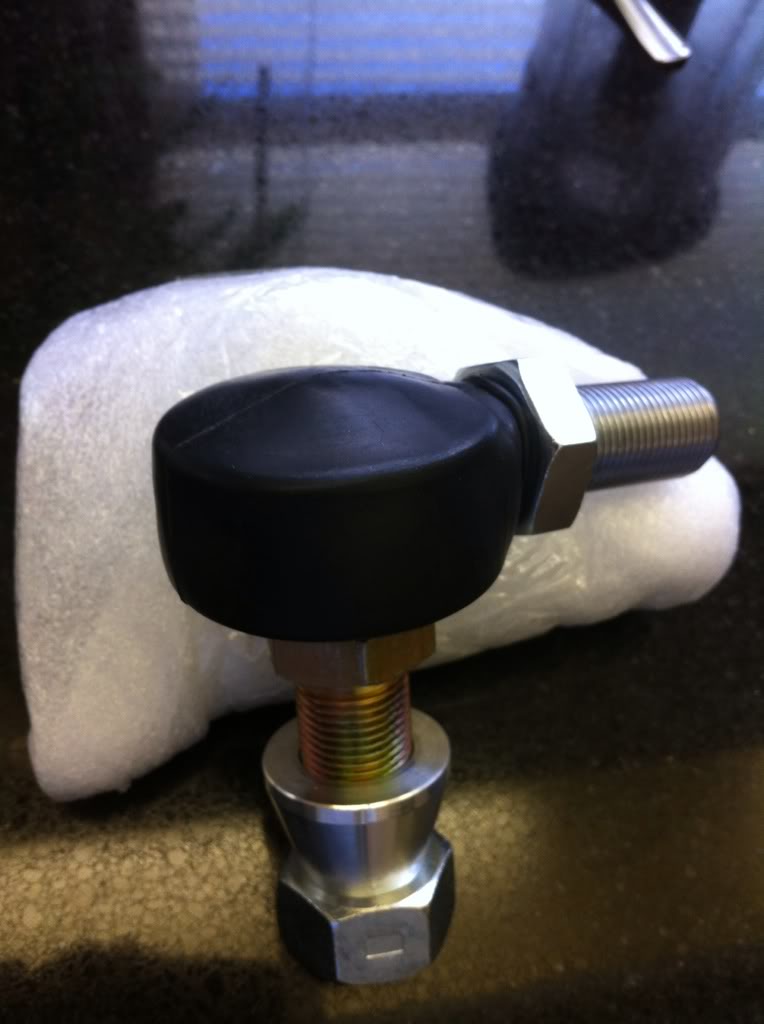
Below is another image (with the white springs) of another guy who had installed his. But he didnt provide any instructions.
Out of Car Shot
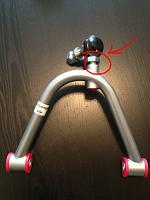
Driver Side
I installed my Kinetix Upper control arms last night and had a couple of questions since it did not come with any instructions. I have searched but cant find a definite answer on what i should do next as far as adjusting it before taking it to the alignment shop. I have added pictures of what I have so far and wanted to see if I can get some feedback before taking it in.
Basically as you can see in the first photo, There are some threads that go through the arm. Since it came with no instructions I am unsure how far I need to thread it through before stopping? So I just threaded it by hand until I couldnt turn it anymore and installed everything back. I have pictures of the driver side and the passenger side and they are threaded differently it seems. The driver side seems to be threaded in more than the passenger side.
My question is how much should it be threaded or how does it need to go in in general? I am not exactly sure if I should try to thread it all the way or keep it out and use that bolt for adjustment. Any help would be appreciated.
Below is another image (with the white springs) of another guy who had installed his. But he didnt provide any instructions.

Out of Car Shot

Driver Side


Last edited by Infini7y; Nov 22, 2011 at 09:58 AM.


Interesting. What I did on my kintix rear camber arms is make the thread equal (I counted the showing threads) and then took it to the alignment shop and did not have an issue. I don't know a lot about camber adjustment, but common sense tells me that making them even would be a safe bet.

Thread Starter
Registered User
Joined: Aug 2011
Posts: 6
Likes: 0
From: Atlanta
Interesting. What I did on my kintix rear camber arms is make the thread equal (I counted the showing threads) and then took it to the alignment shop and did not have an issue. I don't know a lot about camber adjustment, but common sense tells me that making them even would be a safe bet.
Yea, I didnt actually look at them until i was done to compare but someone mentioned leaving 3 or 4 threads showing on each side could work. Can anyone confirm this? I have an appointment at the alignment shop tomorrow morning so hopefully if that works I can report back here for anyone else needing information
Last edited by Infini7y; Nov 22, 2011 at 12:17 PM.

Your alignment shop had better know your coming with those arms bc they are quite involved to adjust, relatively.
As far as starting position, just for the drive to the alignment guys, I would screw the balljoint all the way in then back it out 3 full turns. Make sure you tighten down the locknuts as well.
I have a set of kinetix arms as well I'm waiting for them to release the fully covered joint boots before installing.
Im Getting ready to order my set, when do they come out with that fully covered joint boots?
Trending Topics
If somone want to call and ask they were very friendly folks to speak with.

Just get them even (all the way in, then back out the same number of turns per side) for the drive to the alignment shop. All the way in will give you the most negative camber, and the more you back them out the more positive the camber will be.


Im gonna be putting these in within the next week and i was wondering the same thing.
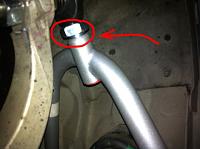
Also, on the bushing side, there seems to be grease nipple type things, am i supposed to do anything with these when i install them? add lube or something? if so what type. I read lithium based lube, but theres 4 types ranging from thin to thick.
Another question, i heard that these can creak if you torque the bushing ends without the full weight of the car on the wheels. Any truth to this?
Im gonna be putting these in within the next week and i was wondering the same thing.
Also, on the bushing side, there seems to be grease nipple type things, am i supposed to do anything with these when i install them? add lube or something? if so what type. I read lithium based lube, but theres 4 types ranging from thin to thick.
Another question, i heard that these can creak if you torque the bushing ends without the full weight of the car on the wheels. Any truth to this?

I have the OLD original Kinetix front camber arm, and mine creaked because at first I didn't have any lube put on them. Sprayed them with some lube, and the problem went away forever.

Registered User
Joined: Oct 2012
Posts: 16
Likes: 0
From: Quebec
Did you had any trouble installing them ? They come with HUGE nut right under the aluminum cone and it doesn't want to enter the heimjoint thread! Did you have the same problem ? Do i need to get rid of this nut and use the old one ? Please help me  I'm afraid that the nut will just go off if i roll with it...! Thanks
I'm afraid that the nut will just go off if i roll with it...! Thanks
Did you had any trouble installing them ? They come with HUGE nut right under the aluminum cone and it doesn't want to enter the heimjoint thread! Did you have the same problem ? Do i need to get rid of this nut and use the old one ? Please help me I'm afraid that the nut will just go off if i roll with it...! Thanks
I'm afraid that the nut will just go off if i roll with it...! ThanksSee below
Last edited by Diesel350; Jan 10, 2013 at 04:22 AM.
Registered User
Joined: Oct 2012
Posts: 16
Likes: 0
From: Quebec
No i didnt try to torque it with anything. I will use a torque wrench to torque everything at spec, but i didn't want to force anything. When i saw the nut was just entering a few threads i didnt want to break the threads by forcing it to enter....

Thread
Thread Starter
Forum
Replies
Last Post
Lt_Ballzacki
Brakes & Suspension
39
Aug 6, 2021 06:19 AM
350Z Project X
Suspension
9
Oct 10, 2015 09:23 AM