
How to install Lower Ball Joints


I got a set of eBay ball joints and i need my car running asap. I got the ball joint out of the upper assembly, now i cant get the actual ball joint out. Does it slide out the bottom or does it come out of the top? Either way, how can i get it out if everythings still on the car?
Nathan
(404) 915-0043
Nathan
(404) 915-0043
Last edited by bishop_98; Apr 4, 2012 at 05:19 PM.

C clamp?
edit:
ball joint clamp.
https://my350z.com/forum/8173332-post70.html
Step by step:
https://my350z.com/forum/8808268-post109.html
edit:
ball joint clamp.
https://my350z.com/forum/8173332-post70.html
Step by step:
https://my350z.com/forum/8808268-post109.html
Last edited by Voboy; Apr 4, 2012 at 06:12 PM.
C clamp?
edit:
ball joint clamp.
https://my350z.com/forum/8173332-post70.html
Step by step:
https://my350z.com/forum/8808268-post109.html
edit:
ball joint clamp.
https://my350z.com/forum/8173332-post70.html
Step by step:
https://my350z.com/forum/8808268-post109.html

I still can't get the damn thing off. I have the C-Clamp pressed against the bottom where it's pushing up. I have a breaker bar on it and it's gets to a point where it won't move anymore. What does NOT help is the fact the wheel assembly keeps pivoting.
I haven't hit it with any lubricant, as i don't see how it has anywhere to go. Any help on this would be appreciated. I'm barely getting to work thanks to friends that owe me. There has to be something i'm either doing wrong or not doing all together.
I haven't hit it with any lubricant, as i don't see how it has anywhere to go. Any help on this would be appreciated. I'm barely getting to work thanks to friends that owe me. There has to be something i'm either doing wrong or not doing all together.
OK: What i've noticed is after buying the Harbor Freight model # 38335 3-in-1 tool, it looks like the middle size cup is just barely too small; looks like its partially on the thread side of the ball joint.
After litterally nearly passing out from the blood rush, i seemed to of gotten it to budge..... SLIGHTLY. And it seems to be on just one side.
Tempted to rip everything out and take the whole f***ing assembly to where i work and attempt to get it out with the spring press.
Still wishing someone would chime-in. A tip; A similar story.... something.
Trending Topics


I found it is easier to take the whole knuckle off, and pound the ball joint out with a hammer and a punch. Then use one of the adapters in the ball joint remover kit to install the new ball joint with a hammer.
IT'S OUT!!!
Thanks for checking on things, Max. Here's the reason i was having such an issue; the ball joint was not fitting thru the sleeve. The new one slides right thru. IDK if everyone had that issue, but it was a *****. I also noticed the sleeve started to tilt as it was about to come out.
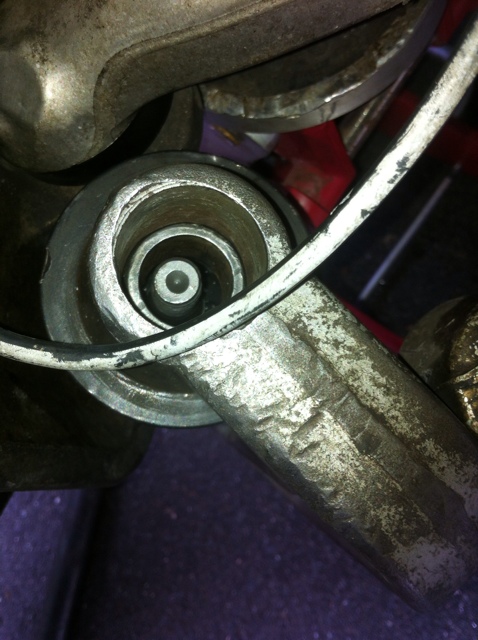
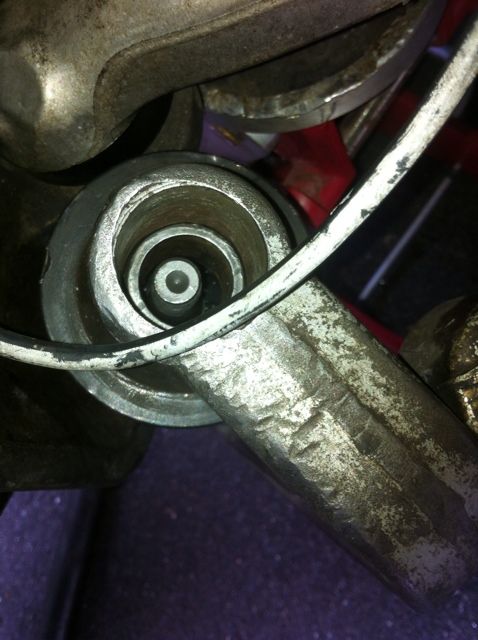
Word of advise; To everyone doing this with the joint still in the car, You'll more than likely have issues not mentioned in the videos. As you can see in the pic, the sleeve is slightly too small for the ball joint to fit thru. If you look closely in the pic, it even started to sheer-off some of the metal lip on the joint as it was coming out. The replacement ball-joint i got from eBay fits perfectly thru the sleeve. I used these parts:
-Snap ring pliers
-3-in-1 Clamp set (Harbor Freight part # 38335)
-1/2" breaker bar
-16" Aluminum pipe on end of breaker bar
I may be over-doing it on this, but i want to make sure everyones informed; especially since i could not get a straight answer about my issues.

Thanks for checking on things, Max. Here's the reason i was having such an issue; the ball joint was not fitting thru the sleeve. The new one slides right thru. IDK if everyone had that issue, but it was a *****. I also noticed the sleeve started to tilt as it was about to come out.
Word of advise; To everyone doing this with the joint still in the car, You'll more than likely have issues not mentioned in the videos. As you can see in the pic, the sleeve is slightly too small for the ball joint to fit thru. If you look closely in the pic, it even started to sheer-off some of the metal lip on the joint as it was coming out. The replacement ball-joint i got from eBay fits perfectly thru the sleeve. I used these parts:
-Snap ring pliers
-3-in-1 Clamp set (Harbor Freight part # 38335)
-1/2" breaker bar
-16" Aluminum pipe on end of breaker bar
I may be over-doing it on this, but i want to make sure everyones informed; especially since i could not get a straight answer about my issues.
Last edited by bishop_98; Apr 8, 2012 at 07:35 AM.

Registered User
Joined: Jan 2012
Posts: 42
Likes: 0
From: Seattle
Thanks for the helpful thread bishop_98 . Im in the exact same position right now as you were in, to the point where i figured out the sleeve is slighty too small for the OEM balljoint to slide out.
So if the sleeves you got from harborfrieght didnt work, what did you use that did work? Im using the balljoint puller from autozone and the middle sleeve is too small also. Not sure what to do from here..
. Im in the exact same position right now as you were in, to the point where i figured out the sleeve is slighty too small for the OEM balljoint to slide out. So if the sleeves you got from harborfrieght didnt work, what did you use that did work? Im using the balljoint puller from autozone and the middle sleeve is too small also. Not sure what to do from here..
Thanks for the helpful thread bishop_98. Im in the exact same position right now as you were in, to the point where i figured out the sleeve is slighty too small for the OEM balljoint to slide out.
So if the sleeves you got from harborfrieght didnt work, what did you use that did work? Im using the balljoint puller from autozone and the middle sleeve is too small also. Not sure what to do from here..
. Im in the exact same position right now as you were in, to the point where i figured out the sleeve is slighty too small for the OEM balljoint to slide out. So if the sleeves you got from harborfrieght didnt work, what did you use that did work? Im using the balljoint puller from autozone and the middle sleeve is too small also. Not sure what to do from here..
Thankfully, the replacement balljoint fit inside the sleeve no problem. Call if you are stuck.
Nathan
(404) 915-0043

OK First- DO NOT rent the AutoZone ball joint press. You need the press from Advance Auto, ONLY because it comes with the 2-7/16” I.D. adapter. You WILL NOT be able to press the OEM ball joint out with the 2-1/4” I.D. adapter; it's about 1/8” too narrow, cannot slide over the outer lip of the OEM ball joint. If you could find a 2-3/8” steel tube you would probably have the best fit. You will be able to use the 2-1/4” I.D. adapter if you are replacing an eBay Bremen ball joint- they have a barely smaller O.D. than OEM.
The job is not difficult, just a little challenging. Thanks to blak max for the inspiration to pop it off on the car. All you need is the correct size press adapters and a long steel pipe. You do not even need muscle for this (which is what I though would be the problem for me).
Here we go with a step by step similar to blak max-
MAKE SURE CAR IS ON FLAT GROUND AND SECURE BECAUSE YOU WILL BE ROCKING THE CAR
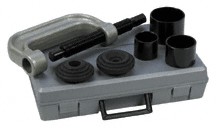
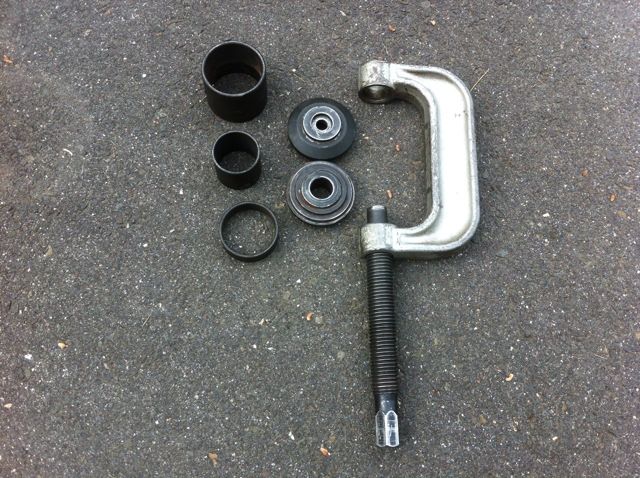
Top to bottom- 2-7/16” I.D. adapter for pressing old ball joint off car. Next, smaller diameter for pressing new ball joint on car and a short adapter to allow the ball joint to press completely through. Notice the end pieces have a smaller and larger I.D. Bigger I.D. always goes on top no matter if pressing in or out.

You need to remove the conical spacer off the old ball joint before you can use the adapters, unless you find a longer adapter. To do this use a fork like blak max did and hit it with a sledge hammer-go to town.
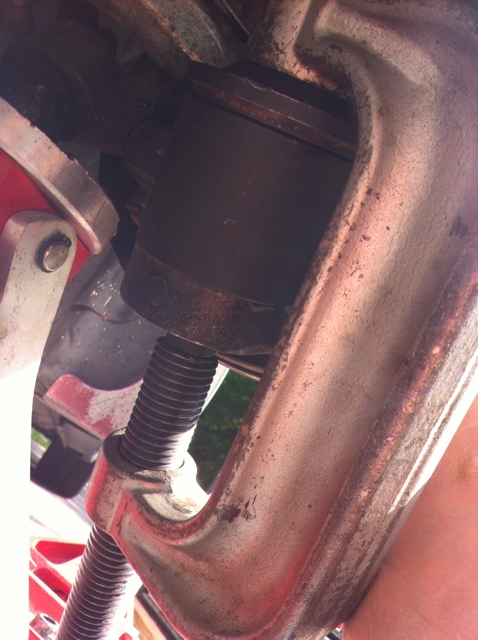
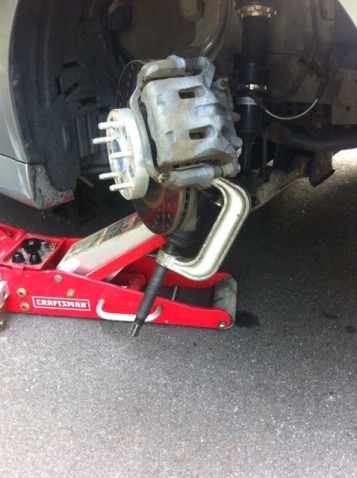
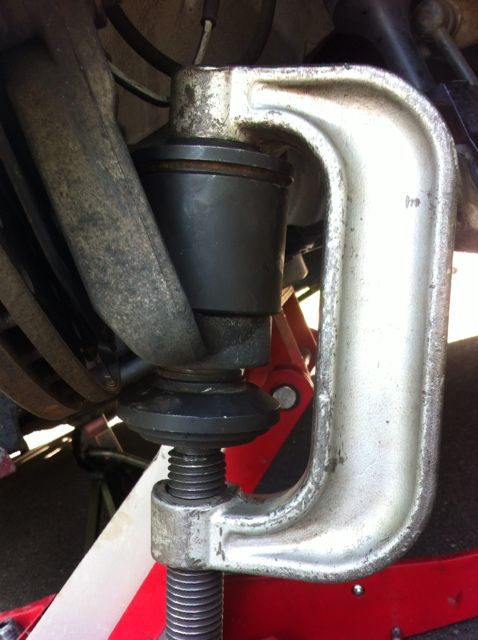
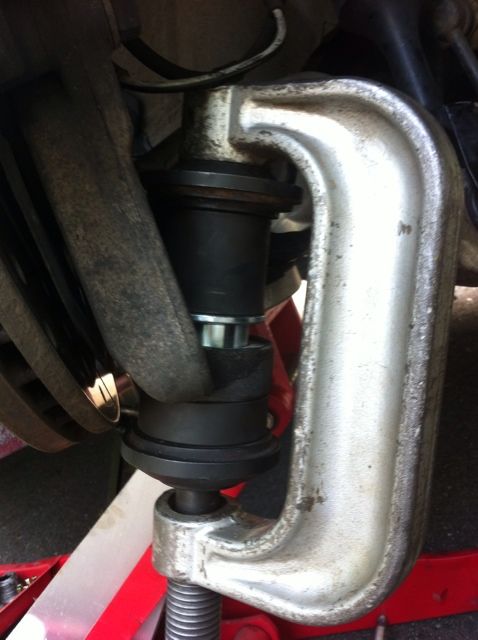
Set-up for pressing old ball joint off; will need to remove lower piece to press out completely. Make sure the pieces are lined up straight and not off center. It will make the job so much easier if you straighten it out and tighten by hand at first to secure it steady. This is where you MUST use a 2-7/16" adapter with the kit and NOT a 2-1/4". Too bad they don't make one size in between.

Stop here and remove lower end, it helped give you a great start, now the rest will be done without the bottom piece.
Turn til it gets out using this setup
Can’t do the job without the pipe

This is the setup for pressing new, notice the short spacer on the bottom so the new ball joint can go down completely.

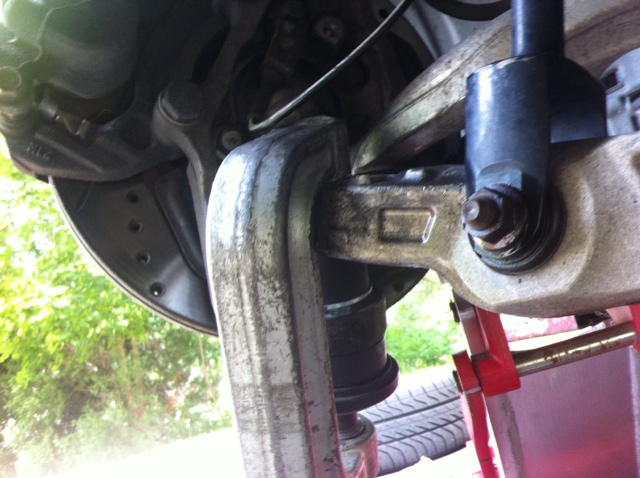
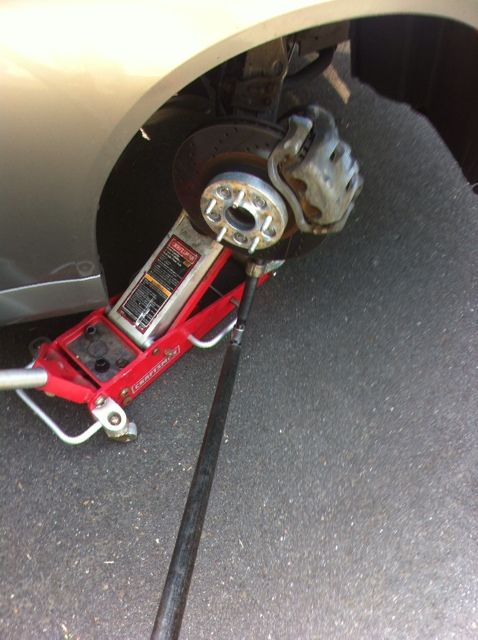
Here is the press positioned against the lower control arm. That will help so the hub doesn’t move all around. You will need to use the stop on the compression rod when pressing the driver side.
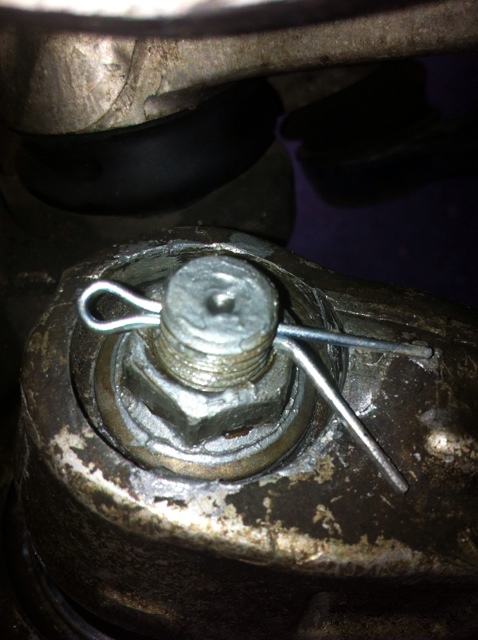
Make sure you anti-seize the stud and cotter pine hole.
If I’m missing anything let me know and I will answer any questions.
I don’t know of any specific symptoms for the lower ball joints. My car has about 165K on it so I was sure they needed to be replaced, thought I would give it a try. Basically my car feels “newer” and not as loose in the front with the new ball joints. Haven’t test drove it that much but I think the clunk when maxing out my steering is gone. And bumps/pot holes are a little less rough. Lets see how it acts on the highway..
The job is not difficult, just a little challenging. Thanks to blak max for the inspiration to pop it off on the car. All you need is the correct size press adapters and a long steel pipe. You do not even need muscle for this (which is what I though would be the problem for me).
Here we go with a step by step similar to blak max-
MAKE SURE CAR IS ON FLAT GROUND AND SECURE BECAUSE YOU WILL BE ROCKING THE CAR
Top to bottom- 2-7/16” I.D. adapter for pressing old ball joint off car. Next, smaller diameter for pressing new ball joint on car and a short adapter to allow the ball joint to press completely through. Notice the end pieces have a smaller and larger I.D. Bigger I.D. always goes on top no matter if pressing in or out.
You need to remove the conical spacer off the old ball joint before you can use the adapters, unless you find a longer adapter. To do this use a fork like blak max did and hit it with a sledge hammer-go to town.
Set-up for pressing old ball joint off; will need to remove lower piece to press out completely. Make sure the pieces are lined up straight and not off center. It will make the job so much easier if you straighten it out and tighten by hand at first to secure it steady. This is where you MUST use a 2-7/16" adapter with the kit and NOT a 2-1/4". Too bad they don't make one size in between.
Stop here and remove lower end, it helped give you a great start, now the rest will be done without the bottom piece.
Turn til it gets out using this setup
Can’t do the job without the pipe
This is the setup for pressing new, notice the short spacer on the bottom so the new ball joint can go down completely.
Here is the press positioned against the lower control arm. That will help so the hub doesn’t move all around. You will need to use the stop on the compression rod when pressing the driver side.
Make sure you anti-seize the stud and cotter pine hole.
If I’m missing anything let me know and I will answer any questions.
I don’t know of any specific symptoms for the lower ball joints. My car has about 165K on it so I was sure they needed to be replaced, thought I would give it a try. Basically my car feels “newer” and not as loose in the front with the new ball joints. Haven’t test drove it that much but I think the clunk when maxing out my steering is gone. And bumps/pot holes are a little less rough. Lets see how it acts on the highway..
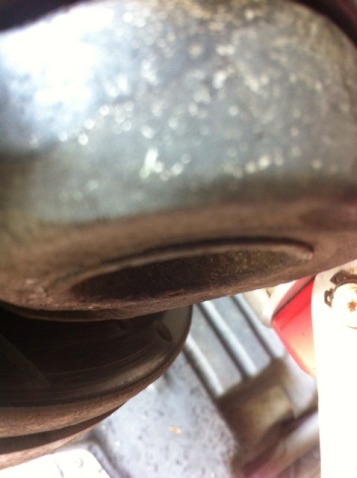
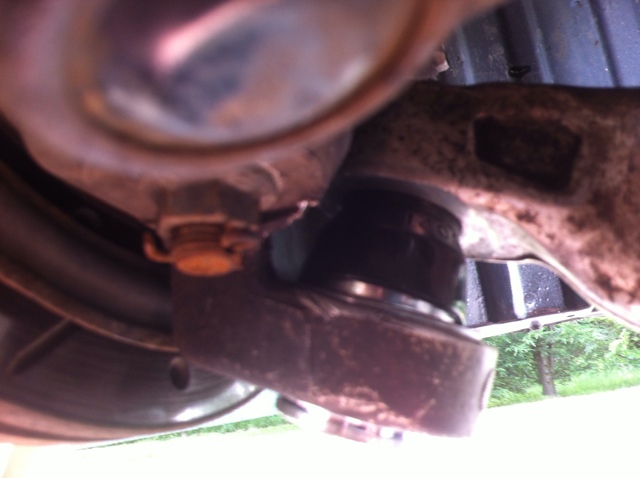
O forgot to mention- the ES bushing 9.13130 seems a little short. When the ball joint stud is bent, the boot rides up a little. If it was longer I think it would be a better set-up. One side is fully pushed down, the other side, shown below, is riding up

Hey guys I'm hopin someone can help me with this. I got the duralast ball joint and it's bigger than the eBay ones. Do I take the conical metal sleeve off the oem one and put it on the duralast one? It doesn't seem like it would fit properly in the lca without it. Thanks!
I probably would have tried the impact gun but I'm a backyard mechanic so don't have the air tools. I'd say it would be perfectly safe if the car is on flat ground WITH JACK STANDS and you make sure the hub will not jerk around. Have it positioned so it is hitting something stationary when you turn the press.
Last edited by AARONHL; Oct 5, 2013 at 11:08 AM.
Yes, the OEM conical seat is reused with any aftermarket ball joint.
It's probably best if you don't use an impact but it will make this process easier since you won't have to strain it to press the ball joints in/out. Just hit it very lightly and for very brief amounts of time so make sure everything is aligned. You don't want to use the impact, especially if you run into trouble like the above as that could potentially lead to damage.
It's kind of already been posted above but the below thread is much more comprehensive and has lots of people chiming in with their pos/neg experiences:
https://my350z.com/forum/brakes-and-...ll-joints.html


Registered User
Joined: May 2014
Posts: 22
Likes: 0
From: los angeles
OK First- DO NOT rent the AutoZone ball joint press. You need the press from Advance Auto, ONLY because it comes with the 2-7/16” I.D. adapter. You WILL NOT be able to press the OEM ball joint out with the 2-1/4” I.D. adapter; it's about 1/8” too narrow, cannot slide over the outer lip of the OEM ball joint. If you could find a 2-3/8” steel tube you would probably have the best fit. You will be able to use the 2-1/4” I.D. adapter if you are replacing an eBay Bremen ball joint- they have a barely smaller O.D. than OEM.
The job is not difficult, just a little challenging. Thanks to blak max for the inspiration to pop it off on the car. All you need is the correct size press adapters and a long steel pipe. You do not even need muscle for this (which is what I though would be the problem for me).
Here we go with a step by step similar to blak max-
MAKE SURE CAR IS ON FLAT GROUND AND SECURE BECAUSE YOU WILL BE ROCKING THE CAR
Top to bottom- 2-7/16” I.D. adapter for pressing old ball joint off car. Next, smaller diameter for pressing new ball joint on car and a short adapter to allow the ball joint to press completely through. Notice the end pieces have a smaller and larger I.D. Bigger I.D. always goes on top no matter if pressing in or out.
You need to remove the conical spacer off the old ball joint before you can use the adapters, unless you find a longer adapter. To do this use a fork like blak max did and hit it with a sledge hammer-go to town.
Set-up for pressing old ball joint off; will need to remove lower piece to press out completely. Make sure the pieces are lined up straight and not off center. It will make the job so much easier if you straighten it out and tighten by hand at first to secure it steady. This is where you MUST use a 2-7/16" adapter with the kit and NOT a 2-1/4". Too bad they don't make one size in between.
Stop here and remove lower end, it helped give you a great start, now the rest will be done without the bottom piece.

Turn til it gets out using this setup

Can’t do the job without the pipe
This is the setup for pressing new, notice the short spacer on the bottom so the new ball joint can go down completely.
Here is the press positioned against the lower control arm. That will help so the hub doesn’t move all around. You will need to use the stop on the compression rod when pressing the driver side.


Make sure you anti-seize the stud and cotter pine hole.

If I’m missing anything let me know and I will answer any questions.
I don’t know of any specific symptoms for the lower ball joints. My car has about 165K on it so I was sure they needed to be replaced, thought I would give it a try. Basically my car feels “newer” and not as loose in the front with the new ball joints. Haven’t test drove it that much but I think the clunk when maxing out my steering is gone. And bumps/pot holes are a little less rough. Lets see how it acts on the highway..
The job is not difficult, just a little challenging. Thanks to blak max for the inspiration to pop it off on the car. All you need is the correct size press adapters and a long steel pipe. You do not even need muscle for this (which is what I though would be the problem for me).
Here we go with a step by step similar to blak max-
MAKE SURE CAR IS ON FLAT GROUND AND SECURE BECAUSE YOU WILL BE ROCKING THE CAR
Top to bottom- 2-7/16” I.D. adapter for pressing old ball joint off car. Next, smaller diameter for pressing new ball joint on car and a short adapter to allow the ball joint to press completely through. Notice the end pieces have a smaller and larger I.D. Bigger I.D. always goes on top no matter if pressing in or out.
You need to remove the conical spacer off the old ball joint before you can use the adapters, unless you find a longer adapter. To do this use a fork like blak max did and hit it with a sledge hammer-go to town.
Set-up for pressing old ball joint off; will need to remove lower piece to press out completely. Make sure the pieces are lined up straight and not off center. It will make the job so much easier if you straighten it out and tighten by hand at first to secure it steady. This is where you MUST use a 2-7/16" adapter with the kit and NOT a 2-1/4". Too bad they don't make one size in between.
Stop here and remove lower end, it helped give you a great start, now the rest will be done without the bottom piece.
Turn til it gets out using this setup
Can’t do the job without the pipe
This is the setup for pressing new, notice the short spacer on the bottom so the new ball joint can go down completely.
Here is the press positioned against the lower control arm. That will help so the hub doesn’t move all around. You will need to use the stop on the compression rod when pressing the driver side.
Make sure you anti-seize the stud and cotter pine hole.
If I’m missing anything let me know and I will answer any questions.
I don’t know of any specific symptoms for the lower ball joints. My car has about 165K on it so I was sure they needed to be replaced, thought I would give it a try. Basically my car feels “newer” and not as loose in the front with the new ball joints. Haven’t test drove it that much but I think the clunk when maxing out my steering is gone. And bumps/pot holes are a little less rough. Lets see how it acts on the highway..

auto zone = no good
O'Reilly = no good
Pep Boys = prob the same
Harbor Freight = no good
Last edited by scotty68; Jun 20, 2014 at 07:51 PM.