
new audio stuff for the Z, install begins (pics)


APRIL 2009 UPDATE, POST #36
so i started ripping apart the Z, getting ready for the new audio setup
this is what is going in

and a **** load of wires
i also have to build a box, and iam going to make a custom false floor setup
THEN

NOW

THEN

NOW

and the parts pile


i have 100 sq feet of FATMAT, just like dynamat. i working on installing a bunch of it now
ill keep you updated
so i started ripping apart the Z, getting ready for the new audio setup
this is what is going in
and a **** load of wires
i also have to build a box, and iam going to make a custom false floor setup
THEN
NOW
THEN
NOW
and the parts pile
i have 100 sq feet of FATMAT, just like dynamat. i working on installing a bunch of it now
ill keep you updated
Last edited by XERMAN2001; Apr 21, 2009 at 04:15 PM.
Nice progress. My only gripe is the FATMAT. It's not good stuff. Not close to dynamat. I would of gone with RAMMAT. Not sure if you know the difference in Asphalt and butyl type sound deadener.
realy, oh well i ve got it now. i fig it may not have been as good as Dynamat. But if i had used Dynamat i would have used over $800 worth. theres no way i would have bought 100 sq feet of Dynamat.


Trending Topics
UPDATE:
This audio install is taking FOR EVER, I�ve already spent over 20 hours on it and I am still not done.
The hatch BEFORE:

And AFTER:

This is 2 pieces, = 50 sq feet of FAT MAT, I ve already used 50 feet in the car already and I just opened the 2nd roll, (shown in pic) so this pic is of half of what i have used this point

Seats coming out, then carpet

Pass floor BEFORE:

And AFTER:

Driver floor BEFORE:

And AFTER:


--------------
----------------
-------------
Getting ready to start on the door and front speakers now

This audio install is taking FOR EVER, I�ve already spent over 20 hours on it and I am still not done.
The hatch BEFORE:
And AFTER:
This is 2 pieces, = 50 sq feet of FAT MAT, I ve already used 50 feet in the car already and I just opened the 2nd roll, (shown in pic) so this pic is of half of what i have used this point
Seats coming out, then carpet
Pass floor BEFORE:
And AFTER:
Driver floor BEFORE:
And AFTER:
--------------
----------------
-------------
Getting ready to start on the door and front speakers now


i didnt spend that much, compaired to how much i bought.
allmost everything was bought at cost, so amps, speakers, sub, deck, wiring, fat mat, and others total around $1700 so far. retail would have been around $2100
and 35 hours in time ha ha
i found a good deal on the fatmat, Dynamat is around $10 a sq foot, maybe $6 if you buy a very large bulk pack localy. You can get a non Dynamat for around $6 a sq foot from a local audio shop. i found a store selling the fatmat in a 100 sq foot roll, in a wholesale box. only cost me $125 for the box, or $1.25 a sq foot.
the fatmat added around 50 pounds to the car, mine is a track pack so its not too bad

UPDATE
so far my 350 had not moved out of my driveway for 23 days. it suck not being able to drive it. i just bought it!!!!!!!!!
Well, I am stilling working on the never ending project here. 30 hours in so far.
Time to work on the doors

Skin off BEFORE

Stock front speaker

FAT MAT TIME -- AFTER

Now time to run the speaker wires. This was a PITA, it was the hardest part of this project so far. I spent like 5 hours just running the 2 wires........ DAM IT
So I ran them through the factory door harnesses. I removed the harness from both sides and carefully drilled out holed in the unused space to run the wires through.
(Not mine but gives a pic)
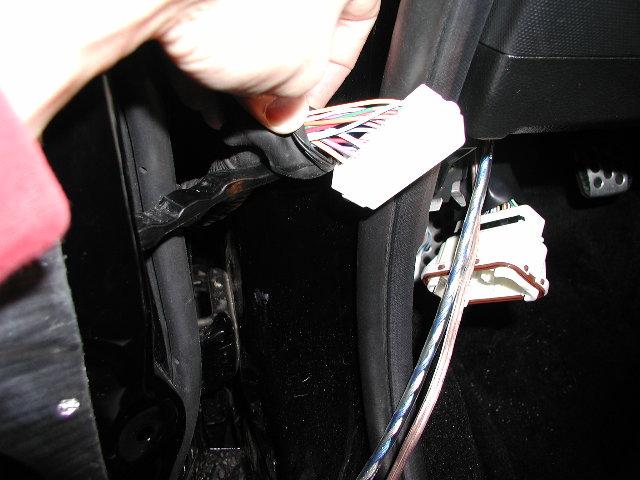

MINE AFTER IS DONE, see the blue wires on both sides. Nice and clean just like from the factory

Now it was time to make an adaptor plate for the aftermarket 6 � speaker. I wanted it to mount in the stock location for a first made a cardboard template of the stock speaker housing. Then I used it to make a bracket out of MDF, then a spacer ring and metal ring to bring the speaker further out to clear the window glass.

Then I applied 2 layers of fiberglass resin to the adaptor and sanded it smooth for extra strength. I drilled all of the holes, attached to door with factory screws, attached wires and the speaker.

door skin back on

Re cap
Stock speaker

Aftermarket speaker -- this barely fit, there is only like a 5mm of clearance between the speaker, door skin and window glass. That�s like 2 coins on each side.

THAT IS ALL FOR NOW
I WILL KEEP YOU UPDATED
so far my 350 had not moved out of my driveway for 23 days. it suck not being able to drive it. i just bought it!!!!!!!!!
Well, I am stilling working on the never ending project here. 30 hours in so far.
Time to work on the doors
Skin off BEFORE
Stock front speaker
FAT MAT TIME -- AFTER
Now time to run the speaker wires. This was a PITA, it was the hardest part of this project so far. I spent like 5 hours just running the 2 wires........ DAM IT
So I ran them through the factory door harnesses. I removed the harness from both sides and carefully drilled out holed in the unused space to run the wires through.
(Not mine but gives a pic)
MINE AFTER IS DONE, see the blue wires on both sides. Nice and clean just like from the factory
Now it was time to make an adaptor plate for the aftermarket 6 � speaker. I wanted it to mount in the stock location for a first made a cardboard template of the stock speaker housing. Then I used it to make a bracket out of MDF, then a spacer ring and metal ring to bring the speaker further out to clear the window glass.
Then I applied 2 layers of fiberglass resin to the adaptor and sanded it smooth for extra strength. I drilled all of the holes, attached to door with factory screws, attached wires and the speaker.
door skin back on
Re cap
Stock speaker
Aftermarket speaker -- this barely fit, there is only like a 5mm of clearance between the speaker, door skin and window glass. That�s like 2 coins on each side.
THAT IS ALL FOR NOW
I WILL KEEP YOU UPDATED
