
How-to: Swap your own built engine - By Bruschijr - Updated: 6.17.2005


Thread Starter
New Member
Joined: Dec 2003
Posts: 356
Likes: 0
From: Melville, NY
Ok so far tonight I decided to keep the a/c condensor and the front on> I spoke with Dave Shiroma from Altered Atmosphere who gave me some good tips about what to do with this. He mentioned taking out my light and putting the condenser up there.. I took out my headlight but im guessing Im going to have to see a picture of it cause I dont want to move or break those lines...
I took off the whole upper and lower plenum and took a whole bunch of pics, i drained the oil, and taped up the intake. I was thinking about disconnecting the fuel line.. but unfortunatley for me i didnt relase the fuel pressure before I did all this so im in for a squirt when I unhook the lines I'll wear a non-flammable poncho... I'm deciding to wait on that until sunday night since I'll be away till then... and id rather wait to make sure everything is plugged up right then finding out my house exploded....
I'm not gonna take the fuel rails or injectors off cause im gonna use a whole new system for fuel so I dont need to, but it looks really simple... just like removing the plenum was.
I still have the power steering to drain so im going to do that another day. I think i found the engine harness wiring but I dont know how to get to it or unhook it... anyone know.. I looked at it for like 30 seconds before i stopped... there is a big casing over it with clips... and in my case heat wrap... is this it?
It looks like all i have to disconnect is two pipes from the firewall on each side, the engine wire harness, the a/c pump and some other things... i dont really know what else i have to unhook... but it looks like im getting pretty close!!
I'll be asking a lot of questions about engine removal... when the time comes hope you guys can help me out..
Im gonna load some pics on in a few min... lets see how this works out... gotta install the software then load it up..... ill try to do another little writeup for something else.. for now im gonna just post a few pics of what i had done the first and second night so at least you know im not BS'ing you guys lol.. i;d like to put the pictures in the writeup so i have to organize them correctly.
I took off the whole upper and lower plenum and took a whole bunch of pics, i drained the oil, and taped up the intake. I was thinking about disconnecting the fuel line.. but unfortunatley for me i didnt relase the fuel pressure before I did all this so im in for a squirt when I unhook the lines
I'll wear a non-flammable poncho... I'm deciding to wait on that until sunday night since I'll be away till then... and id rather wait to make sure everything is plugged up right then finding out my house exploded.... I'm not gonna take the fuel rails or injectors off cause im gonna use a whole new system for fuel so I dont need to, but it looks really simple... just like removing the plenum was.
I still have the power steering to drain so im going to do that another day. I think i found the engine harness wiring but I dont know how to get to it or unhook it... anyone know.. I looked at it for like 30 seconds before i stopped... there is a big casing over it with clips... and in my case heat wrap... is this it?
It looks like all i have to disconnect is two pipes from the firewall on each side, the engine wire harness, the a/c pump and some other things... i dont really know what else i have to unhook... but it looks like im getting pretty close!!
I'll be asking a lot of questions about engine removal... when the time comes hope you guys can help me out..
Im gonna load some pics on in a few min... lets see how this works out... gotta install the software then load it up..... ill try to do another little writeup for something else.. for now im gonna just post a few pics of what i had done the first and second night so at least you know im not BS'ing you guys lol.. i;d like to put the pictures in the writeup so i have to organize them correctly.
Thread Starter
New Member
Joined: Dec 2003
Posts: 356
Likes: 0
From: Melville, NY
damn its taking a long time to set up the pics... so heres what im gonna do.. I wont have time to do any write ups... but ill show you some pics i have up on my server thingy... i dont have all of them i took a lot... as soon as i realized how long it was taking i just got some ones from today... good thing is this weekend ill be away from my engine to and have nothing to do so ill create some good writeups or i hope i will... enjoy a few pics i can put up at the moment.. more to come when im not falling asleep... its 230AM... gotta get up at 6 doh..
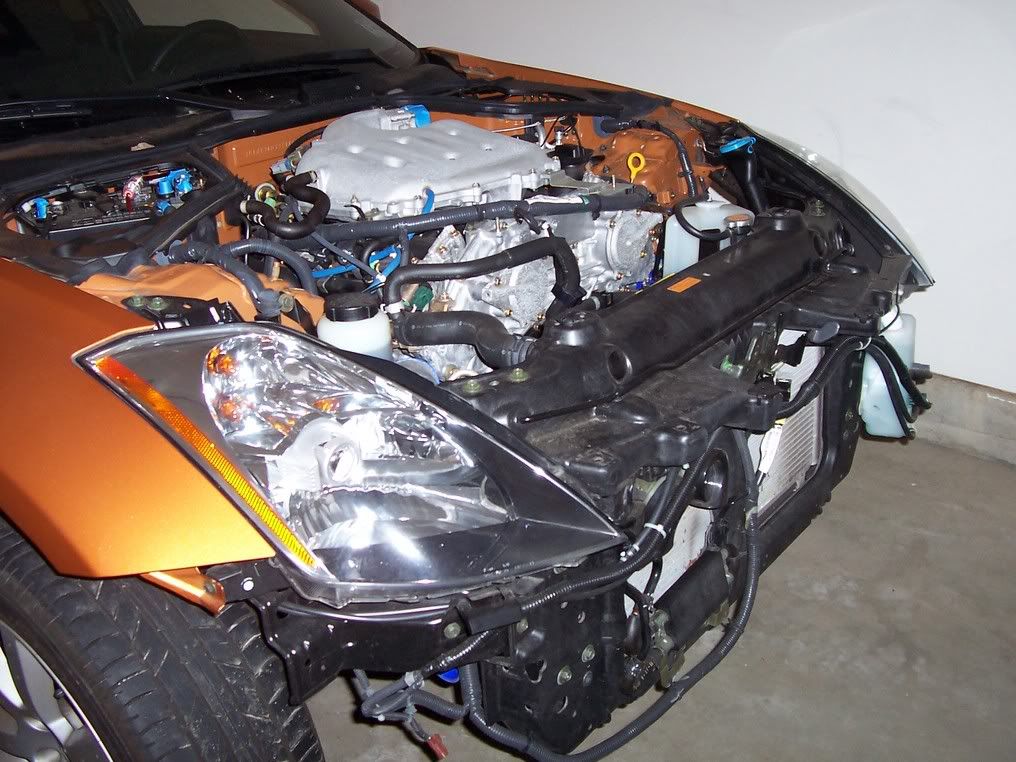
my car with the hood and bumper and undercovers off... oh and the IC and piping too..
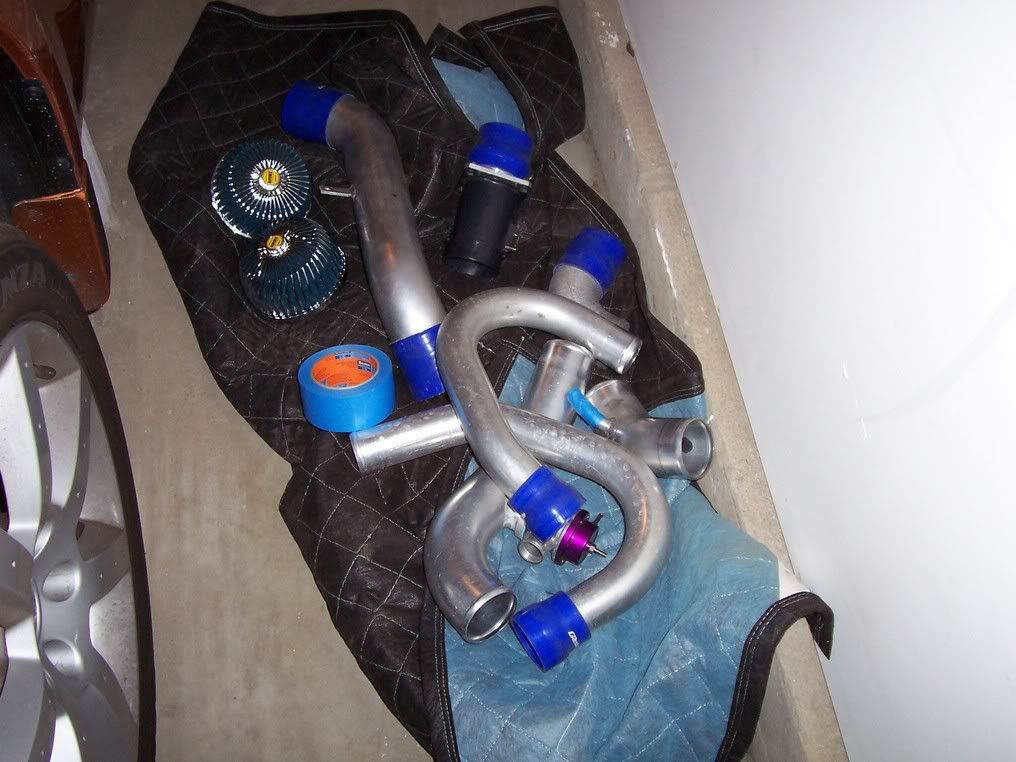
the piping waiting to be boxed up and i hope polished..
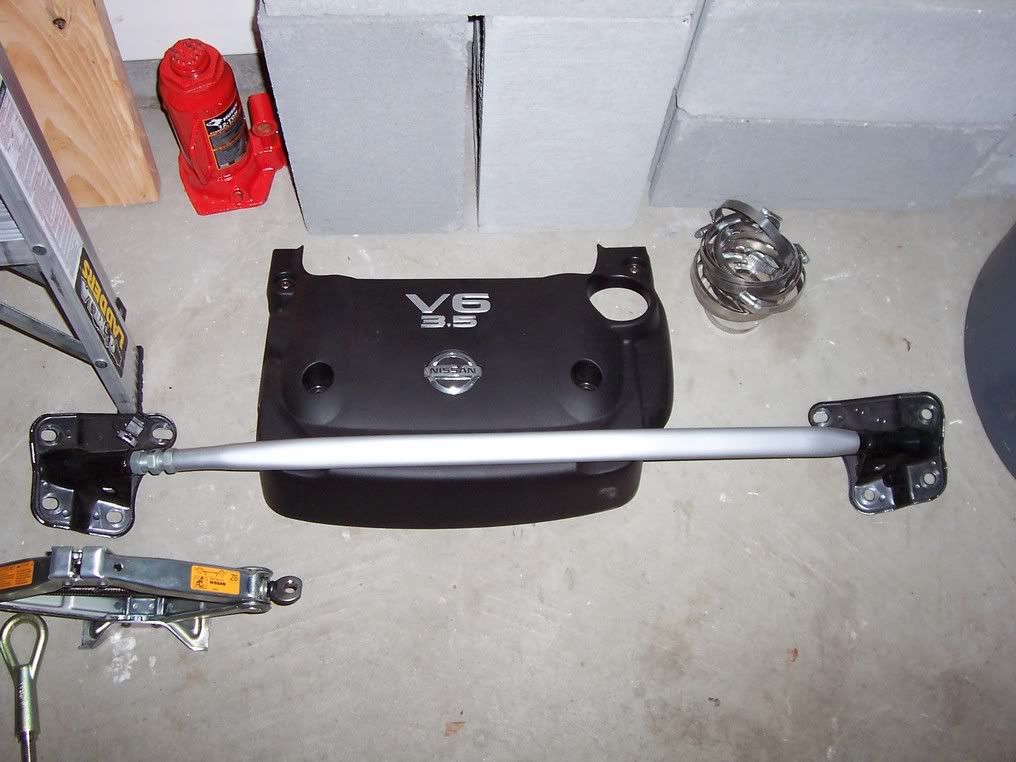
torque brace and engine cover..
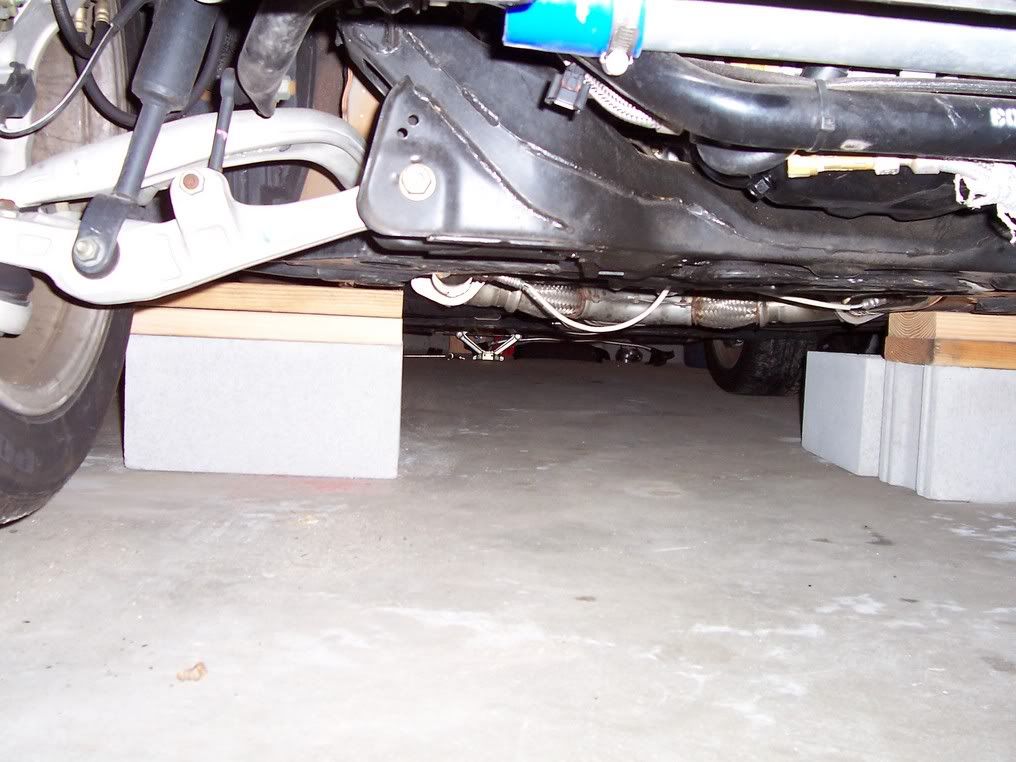
my car... probably unsafely on cynderblocks... there are a set behind them for backup too..
and im really tired... so heres where i am as of tonight..
ok me sweepy... need rest..... zzzzzz......zzzzzzz.....zzz... wha wha... oh i gotta go to bed... talk to you guys later.. ill get crackin this weekend.
my car with the hood and bumper and undercovers off... oh and the IC and piping too..
the piping waiting to be boxed up and i hope polished..
torque brace and engine cover..
my car... probably unsafely on cynderblocks... there are a set behind them for backup too..
and im really tired... so heres where i am as of tonight..
ok me sweepy... need rest..... zzzzzz......zzzzzzz.....zzz... wha wha... oh i gotta go to bed... talk to you guys later.. ill get crackin this weekend.
Dude...you're crazy, but cool for doing this for everyone to see/use.
BTW, you can download your FSM for $20, just follow these I copied off my forum:
BTW, you can download your FSM for $20, just follow these I copied off my forum:
1. goto http://www.nissan-techinfo.com/nissan/
2. pay for $20 1 day pass.
3. dont use the FSM Link in the body of the site, instead use the menu to search for publications. Search for year/model of choice
4. Open the foldout first, save to HD with save icon in reader.
5. repeat for all sections, save in same folder, then all links will work within the FSM
6. Now, seach for TSBs (again, in the menu search pubs link), DL all sections.
7. Its an all day pass, get all the cars you want/need
You can also go to
http://www.nissan-techinfo.com/infiniti/
your login will work there too.. get whatcha need..
**** please dont turn this into a sharing thread - Nissan/Tweddle (the publisher of this info) will shut this down if its abused. And I'd have to delete the thread, .org doesnt need the heat. Everyone loses. ****
$20 is cheaper than a tank of gas and you can get all the info for all the Nissan/Infiniti's you need.
enjoy..
Thread Starter
New Member
Joined: Dec 2003
Posts: 356
Likes: 0
From: Melville, NY
hey... im not crazy.. im just...
well...
ok im crazy....but its sure fun...
more stuff should be up in a few hours... gonna work on the engine harness tonight and the fuel lines... eek...
"goodness gracious great ***** of fire"
well...
ok im crazy....but its sure fun...
more stuff should be up in a few hours... gonna work on the engine harness tonight and the fuel lines... eek...
"goodness gracious great ***** of fire"
very cool that you are keeping us updated, step by step...if i knew how to do this/had the ***** to, i would love to get into this job myself, but, i don't....so is your other block (or longblock) built, done and back at your place?
TODD
TODD
Thread Starter
New Member
Joined: Dec 2003
Posts: 356
Likes: 0
From: Melville, NY
thanks.. nice to know people are interested
Its actually my first night all week i can have a late night.. had to spend some time with the fiance she was naggin tonight to do something with her... now its off to the car to get as much done as i can... and take some more pics..
My goal for me obiously is to actually do this without damaging my car... for two reasons...
1) to say i've done it... and know what im talking about
2) to help other people with the ***** to do it
Im going to try and write the tutorial pretty detailed so give me some time to organize it right... ill write up more tonight since i have some more time... I am hoping for this to be a supplement to all who are interested for the manual... it can only tell you so much... and at least you'll have a community member (me) who you'll be able to reference for help.
My engine as of right now is at SGP...Kyle told me it should be done next week sometime so it should be here in roughly two weeks. That time im hoping to fill with all the parts im going to need and things to replace after i remove the engine... (stiffer springs, coatings on turbos, etc...) Ill put some pics up tonight of some of the parts i have going in...


One suggestion besides doing this web writeup is to throw it in MS Word.
Glad you have a SM
Good luck and am looking forward to watching you do this. Maybe I'll do it myself someday now.
Glad you have a SM
Good luck and am looking forward to watching you do this. Maybe I'll do it myself someday now.
Thread Starter
New Member
Joined: Dec 2003
Posts: 356
Likes: 0
From: Melville, NY
good idea ed... i took a break right now... it took me an hour and a half to get the damn heat shielding off my car... so many freaking zip ties and metal wire wraps in such a small part.. my fingers are pretty mad at me now.. im taking a look in the service manual now before I finally unhook the fuel lines...
As i go through ill have nis organize it... then ill make a word file out of it as well and make a link to it somwhere... ok back to the car... time to disconnect the fuel lines.
im taking a look in the service manual now before I finally unhook the fuel lines...As i go through ill have nis organize it... then ill make a word file out of it as well and make a link to it somwhere... ok back to the car... time to disconnect the fuel lines.
Thread Starter
New Member
Joined: Dec 2003
Posts: 356
Likes: 0
From: Melville, NY
This is pretty straightforward as well. Give yourself some time and anyone who can turn a wrench and follow instructions could put on thier own plenum if they so desire. This section will cover the removal of the torque brace, the engine cover, the throttle, and the upper and lower plenums..
Tools required:
14mm (Deep Socket)
10mm (Deep Socket)
5mm Torx wrench
Socket Extender
Needle Nosed Pliers
Ratchet with good leverage if possible
As always disconnect the battery.. and use this only as a supplement to the service manual.
Drain Coolant to the engine... or plug up the tubes when you are finished... best thing to do would be to drain the coolant though. To do this you need to go under the car and look towards the one side of you radiator for a screw to unfasten. Here is a picture of it.
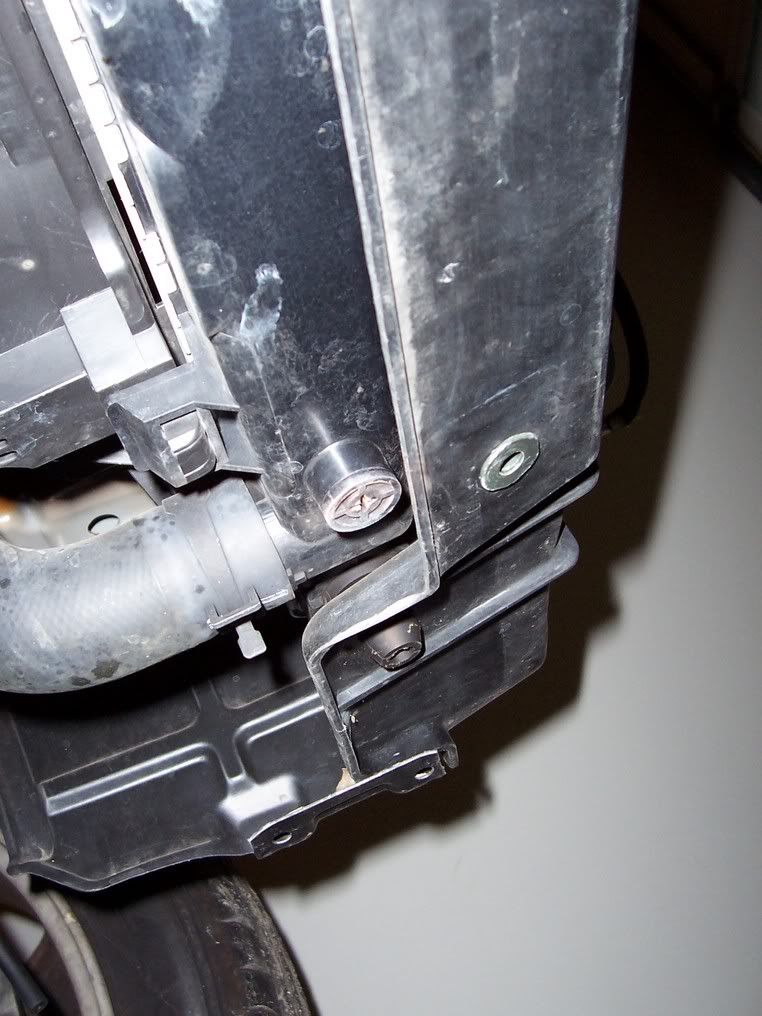
You need to be careful here because i think that is made of plastic.. It may not look like it but mine was already stripped. I put in a Phillips head screwdriver and as soon as I began to turn it... it stripped like crazy... maybe it was something the mechanic did who installed my turbo... Looks like i have to find a way to get that out of there. Or get a radiator thats better.. which i should probably do for the power I want. If you end up with the same problem i had... you can use a needle nose plier and do this... be cautioned though.. dont wear nice clothes like Sharif does it gets messy.. make sure you have a bucket to catch everything. Unhook the tube clamp and give the hose a good tug to unhook it.. splash.
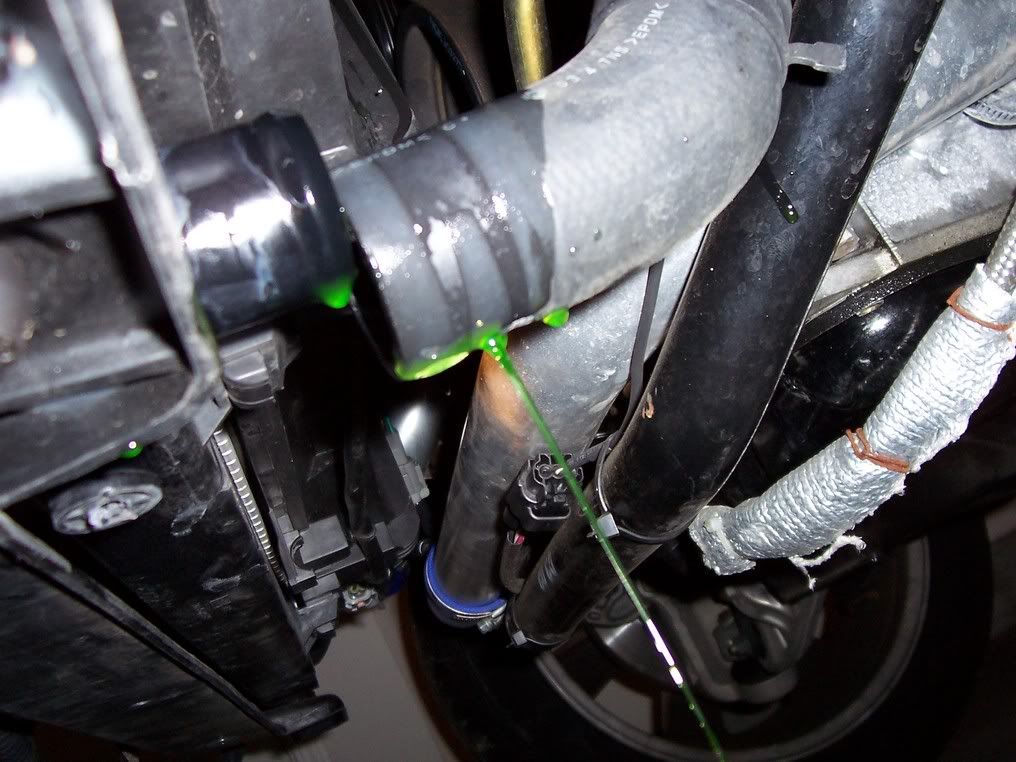
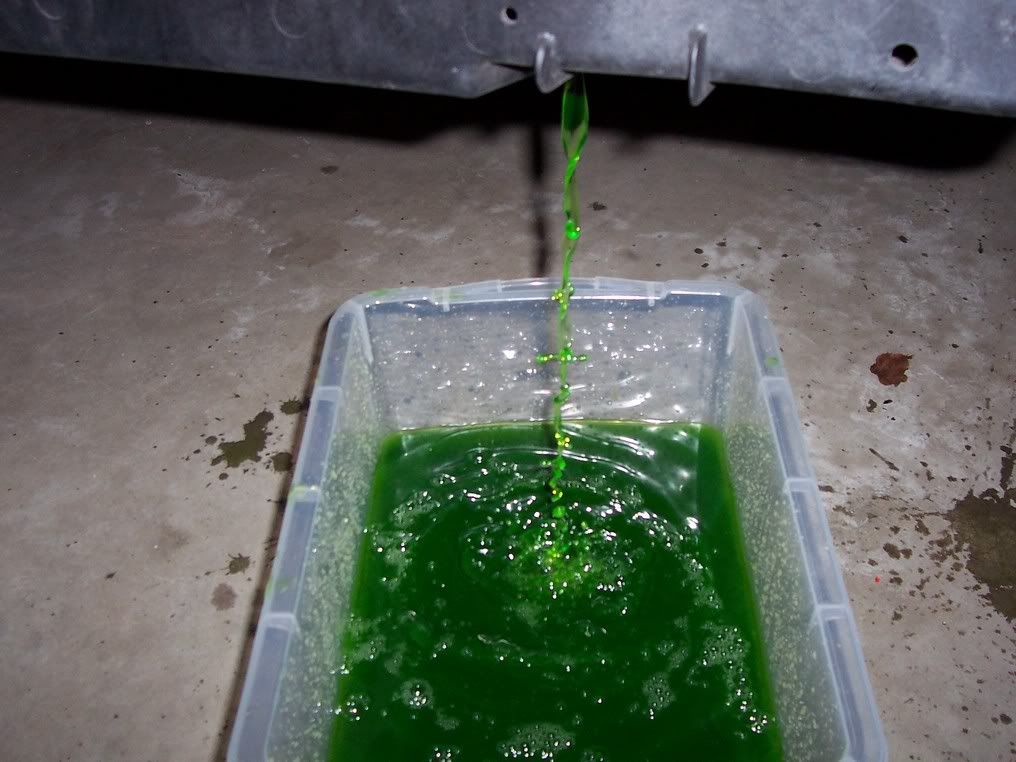
Once the coolant has drained keep the bucket there because it will continue to drip for a long time... and you dont want that coolant going anywhere do you?
With the hood open or off... Use the 14mm deep socket to take off the 4 Bolts on each side of the torque brace.. You need a forged set of sockets cause these things are on there pretty tight... get a ratchet with good leverage as well to make it easier on you.
There are 4 bolts total on the engine cover to remove as well. Use a 10mm socket to remove the 4 bolts and take off the engine cover.. make sure you keep track of where the bolts are!!
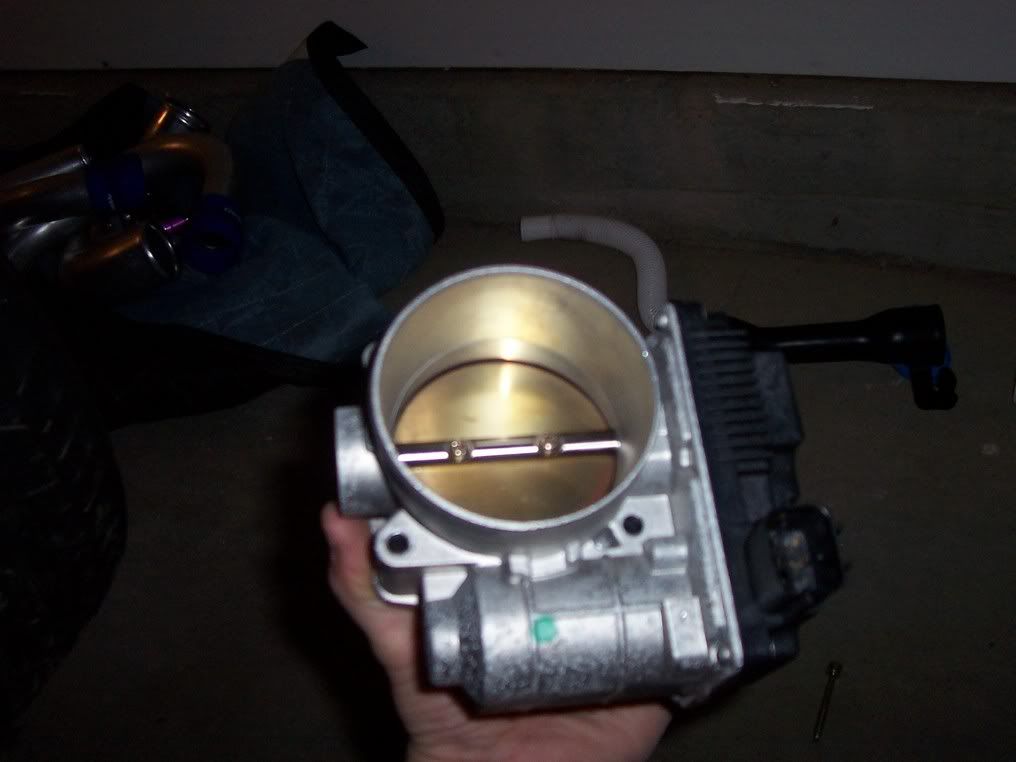
Next comes the throttle.. You first have to remove the large intake tube leading to the throttle itself. It may be different for certain setups... in my case with the greddy kit on.. The tube has to first be unsecured by removing a bolt on the plenum that connects the two.. you should be easily be able to see this so i didnt take a picture of it. Next you have to loosen the screw clamps that hold on the rubber hoses between the metal tube sections ( the blue greddy ones) or just take the clamps off... Give the tube a good wiggle and tug.. but dont bend or break anything... it will take a little bit of force to get this sucker off the throttle.
After you have removed it from the throttle.. disconnect the other side using the same process and be careful not to damage the Mass Air Flow on the other side.
Here you need to get your 5mm torx bit to take off the throttle. Follow the directions in the manual to loosent the bolts in the order the manual tells you to.... These were also on tight for me... I reccommend getting something like this...
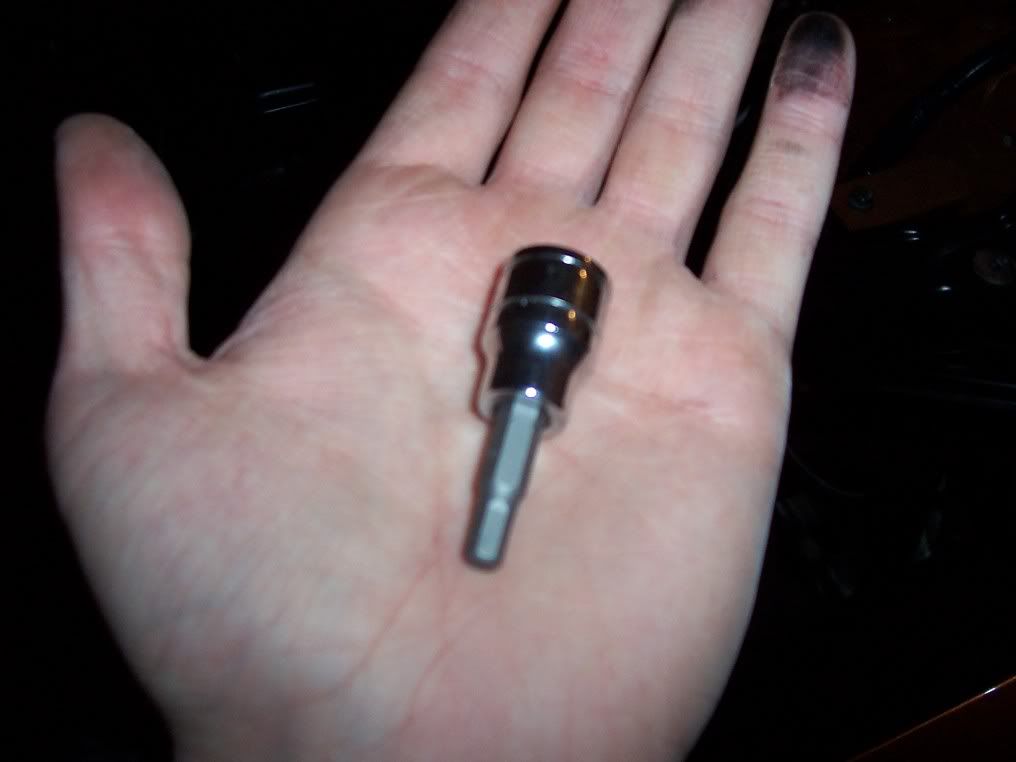
its a bit from HUSKY... its easier cause you can use a ratchet to get the leverage you need to loosen the bolts... The bottom most one however is way under there and you will need a regular had torx allan wrench... so it may be a little tough to remove that depending on how strong you are.. You can either disconnect the wire harness before or after the process. I thought it was eaiser after since you could move it to the eaisest place to unhook it...

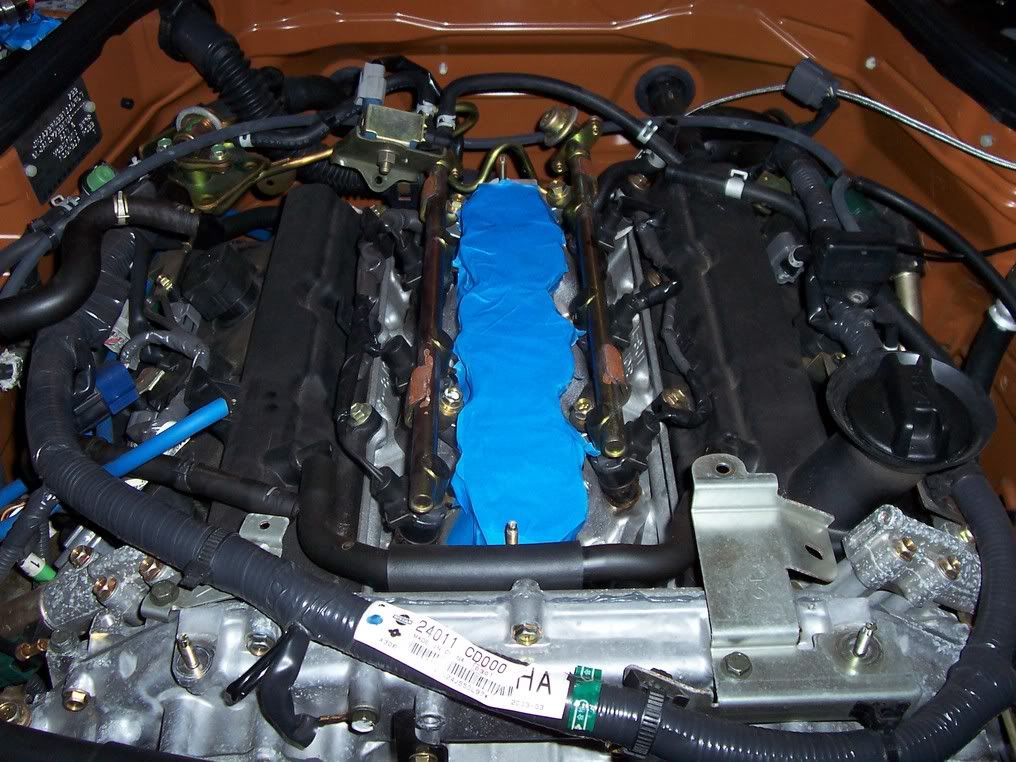
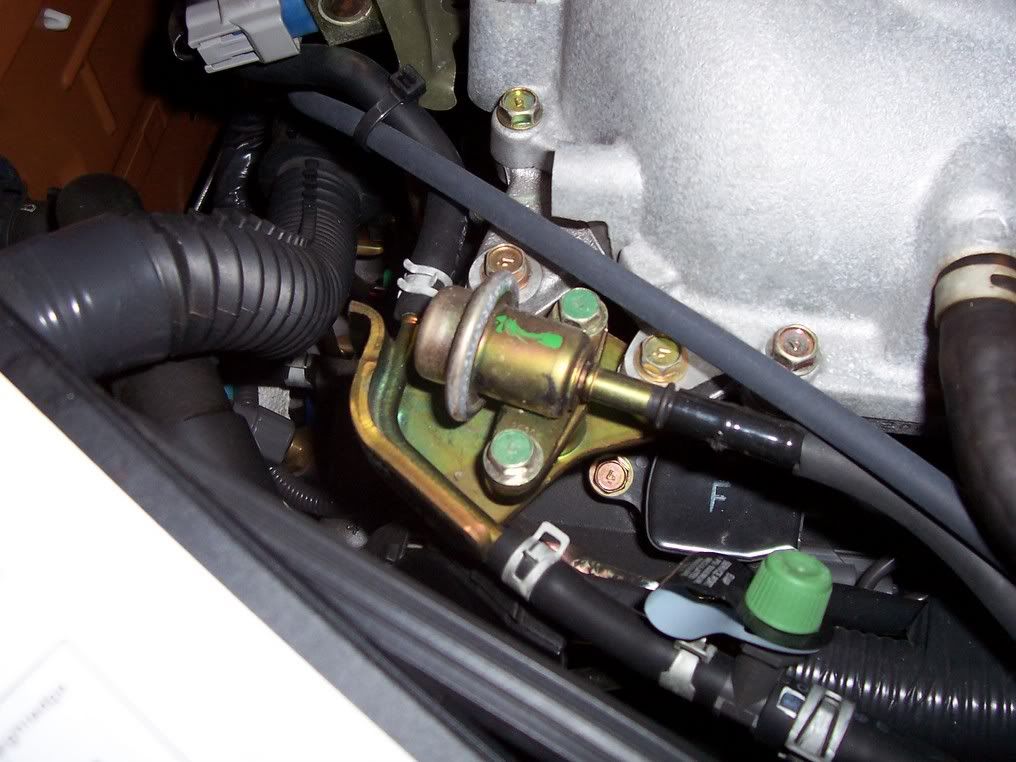
Alright onto the plenum... loosen the bolt in the back of the plenem to unhook the EVAP canister control valve... this thing here.
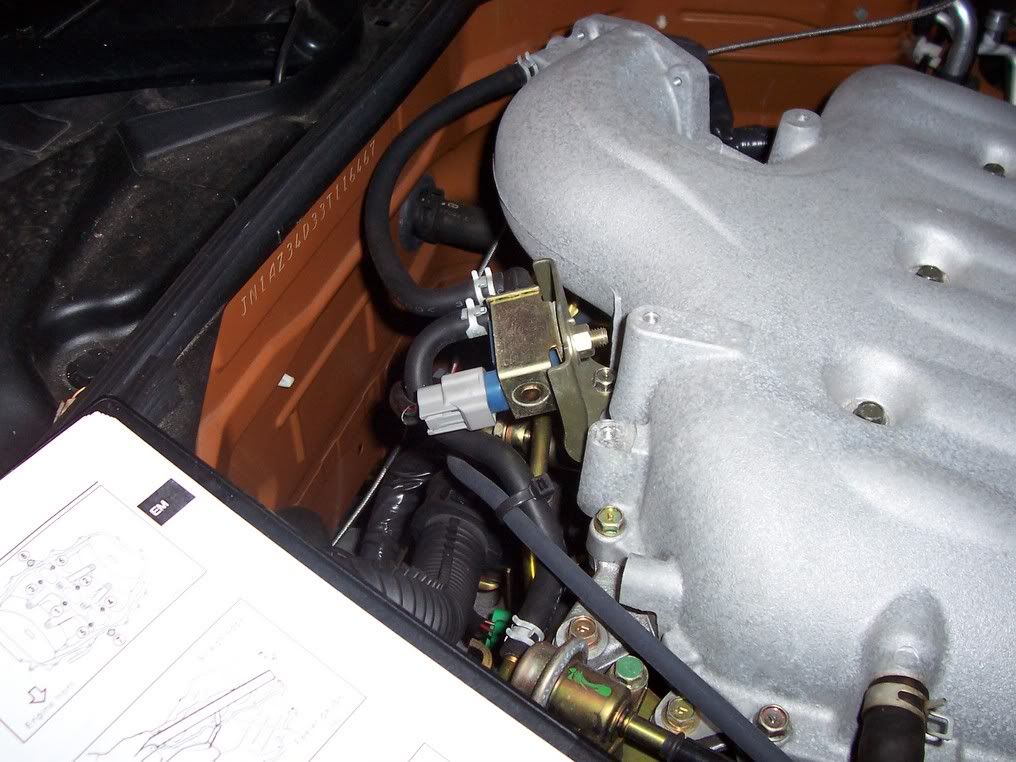
push the canister away from the plenum and disconnect all the hoses for the UPPER PLEUNUM ONLY... if you didnt release the coolant.. im not sure how much it will leak.. but be ready to plug some hoses. Some of these are a PITA to remove... use a needle nose plier to expand the clamps and move them down the hose until you can feel that they are not clamping on to metal... give these good tug and shimmy as well to get them loose.. I think they actually cook on a little due to the heat. This one here was the biggest PITA to remove mostly because of the location to get to the clamp... my last mechanich who put in the turbo kit was a jackass.. lol... you'll see later... I think he intentionally put most of the things on so you cant get to them... what a butthead..
Follow the manual to loosen the screws in the correct order (important) and put them somewhere so you can use find them again.... I had to remove what looks like a unit to feed the fuel in as shown here..
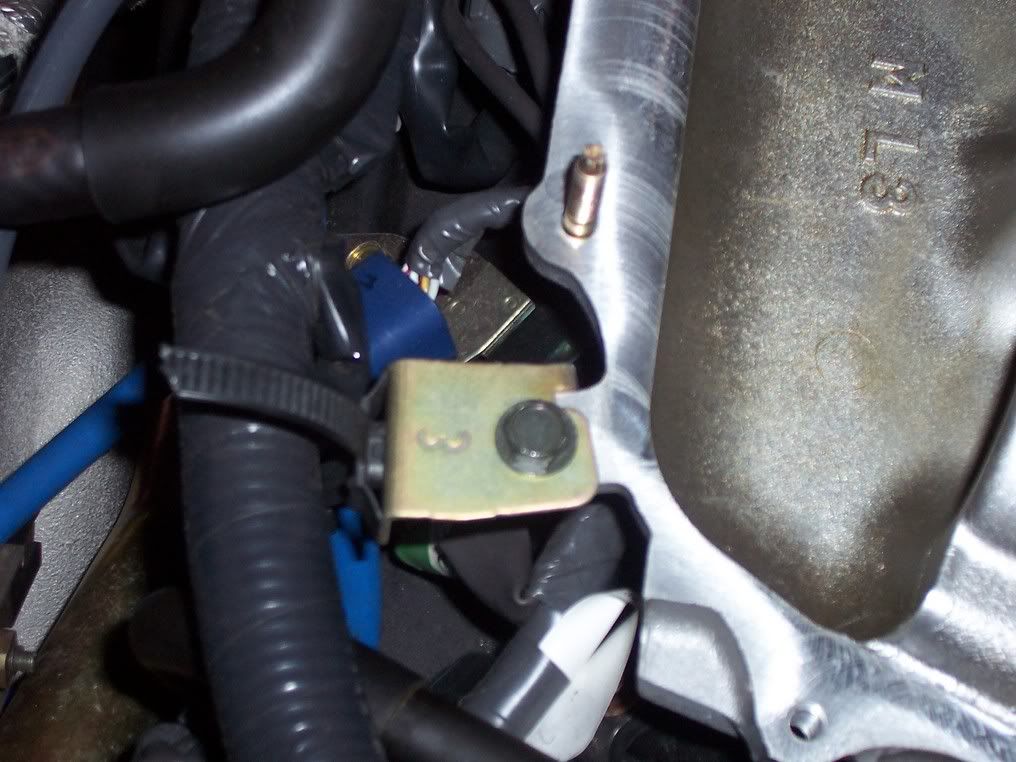
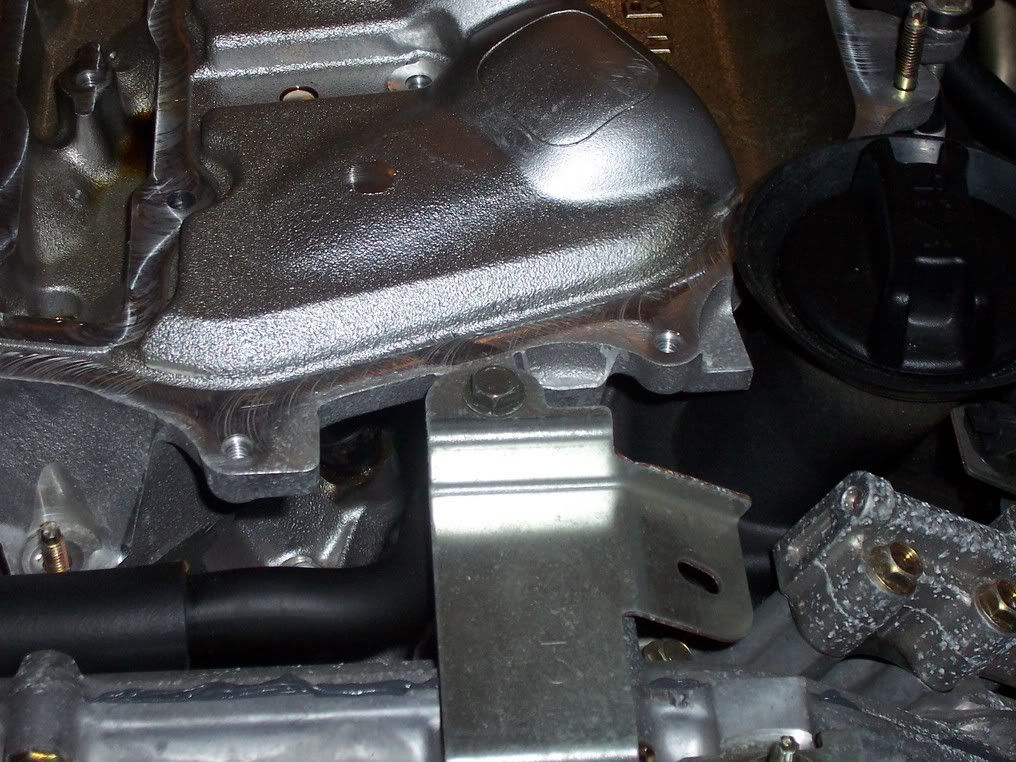
and a bracket in the front of the plenum which got in the way when i tried to take it off.. i put it back on after i removed the plenum. I love the sound of the gasket expanding as you loosen the last couple bolts... Here are two other things i needed to remove..
Heres the underside of the upper plenum and the lower plenum..
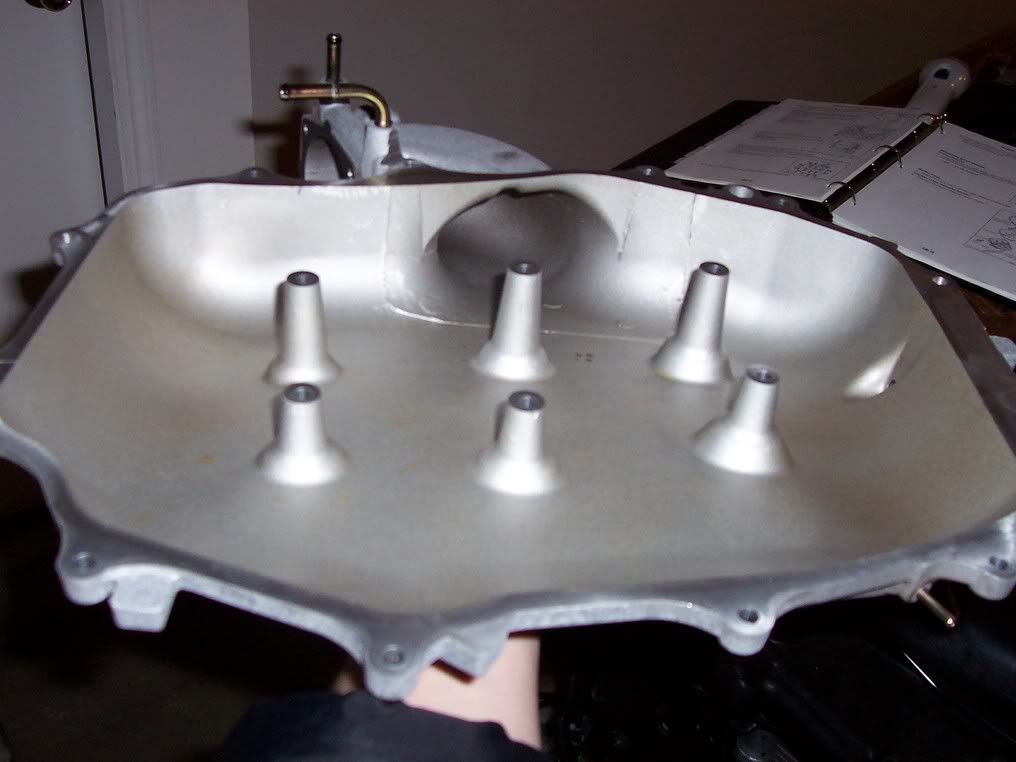
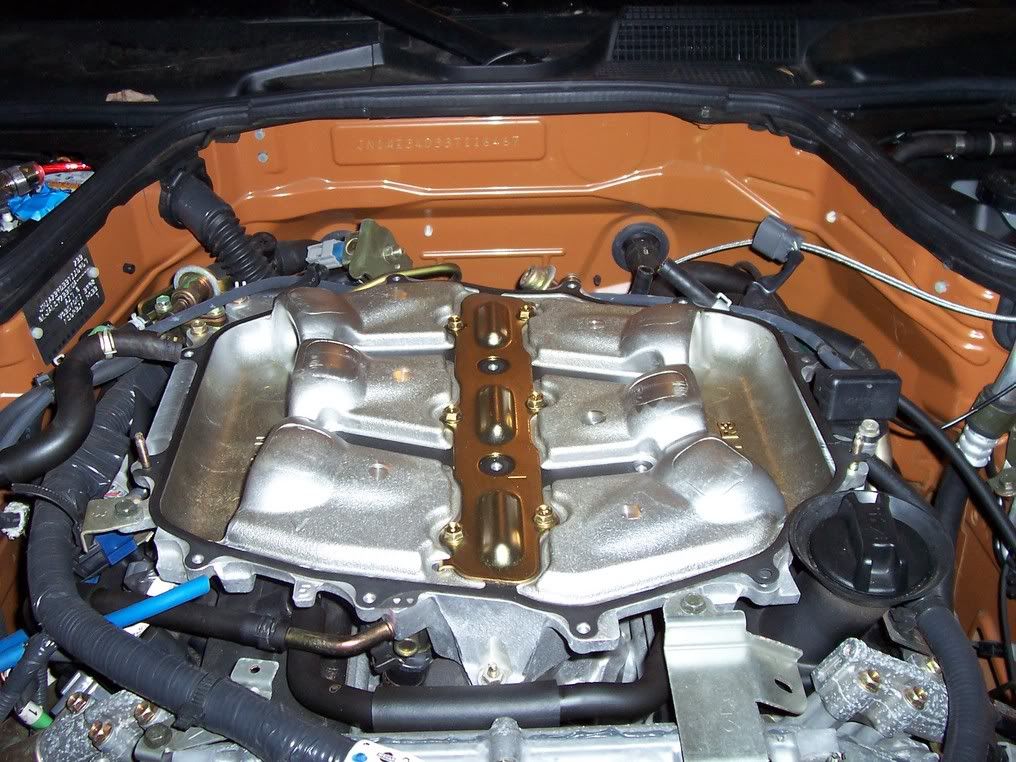
If you are installing anything like a new upper plenum.. well there you go.. follow the companies instructions to put it on and do everything ir reverse.. and you just put on your own plenum!! Make sure to follow the manual and use a torque wrench to tighten everything to thier required specs!!! Good job... you can now call yourself a tuner... well not really...
To continue on and remove the lower plenum remove all the remaining hoses for the lower plenum and secure them. Follow the manual to loosen the screws in the correct order...
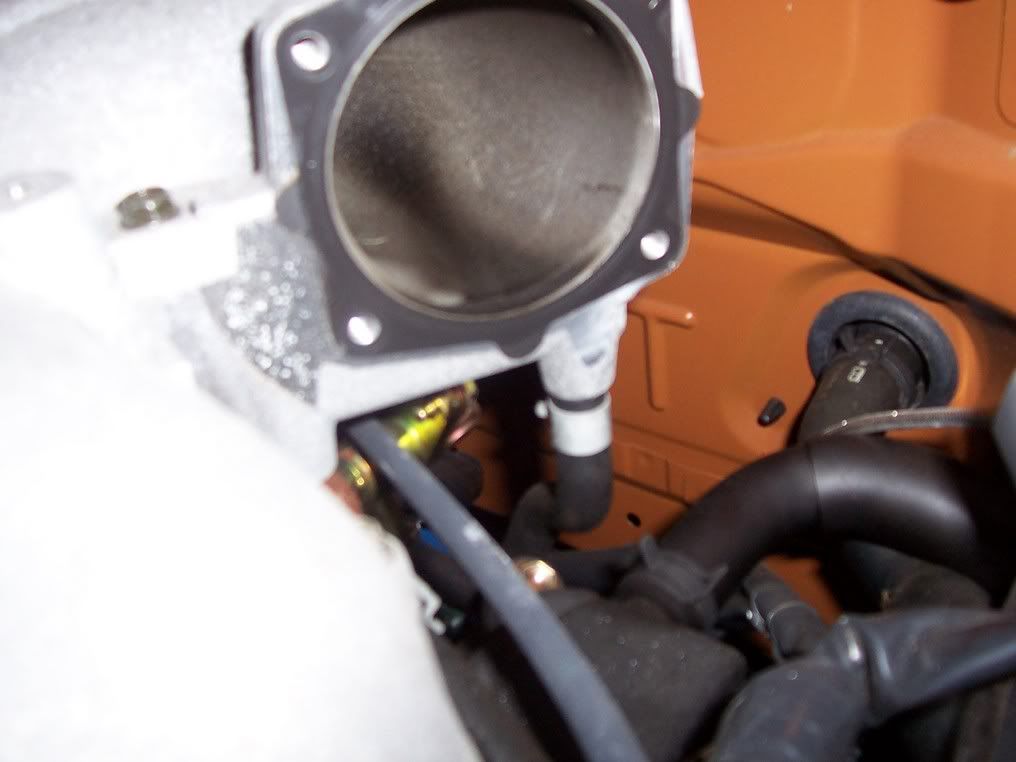
Remove the lower plenum... take a look at your valves throught the intake... holes.. there they are.. neat huh... make sure to tape up the intake so nothing bad gets in there.. like the beer your drinking while you are operating machinery...
Well there you go... this like i said is pretty simple and straightforward.. Make sure you use this only as a supplement to the manual... this may not be the 100% correct way to do everything.. but it sure is a way to get you there. Next write up ill cover the removal of the radiator. Im going to do that in word though so it may be easier for me.....
Special thanks to Sharif (www.forgedinternals.com) for help with the questions i had and booger for helping me out with the manuals. And to everyone else who has posted thier thoughts and ideas... as you are helping more than just me.. but everyone who uses this...
Tools required:
14mm (Deep Socket)
10mm (Deep Socket)
5mm Torx wrench
Socket Extender
Needle Nosed Pliers
Ratchet with good leverage if possible
As always disconnect the battery.. and use this only as a supplement to the service manual.
Drain Coolant to the engine... or plug up the tubes when you are finished... best thing to do would be to drain the coolant though. To do this you need to go under the car and look towards the one side of you radiator for a screw to unfasten. Here is a picture of it.
You need to be careful here because i think that is made of plastic.. It may not look like it but mine was already stripped. I put in a Phillips head screwdriver and as soon as I began to turn it... it stripped like crazy... maybe it was something the mechanic did who installed my turbo... Looks like i have to find a way to get that out of there. Or get a radiator thats better.. which i should probably do for the power I want. If you end up with the same problem i had... you can use a needle nose plier and do this... be cautioned though.. dont wear nice clothes like Sharif does
it gets messy.. make sure you have a bucket to catch everything. Unhook the tube clamp and give the hose a good tug to unhook it.. splash.Once the coolant has drained keep the bucket there because it will continue to drip for a long time... and you dont want that coolant going anywhere do you?
With the hood open or off... Use the 14mm deep socket to take off the 4 Bolts on each side of the torque brace.. You need a forged set of sockets cause these things are on there pretty tight... get a ratchet with good leverage as well to make it easier on you.
There are 4 bolts total on the engine cover to remove as well. Use a 10mm socket to remove the 4 bolts and take off the engine cover.. make sure you keep track of where the bolts are!!
Next comes the throttle.. You first have to remove the large intake tube leading to the throttle itself. It may be different for certain setups... in my case with the greddy kit on.. The tube has to first be unsecured by removing a bolt on the plenum that connects the two.. you should be easily be able to see this so i didnt take a picture of it. Next you have to loosen the screw clamps that hold on the rubber hoses between the metal tube sections ( the blue greddy ones) or just take the clamps off... Give the tube a good wiggle and tug.. but dont bend or break anything... it will take a little bit of force to get this sucker off the throttle.
After you have removed it from the throttle.. disconnect the other side using the same process and be careful not to damage the Mass Air Flow on the other side.
Here you need to get your 5mm torx bit to take off the throttle. Follow the directions in the manual to loosent the bolts in the order the manual tells you to.... These were also on tight for me... I reccommend getting something like this...
its a bit from HUSKY... its easier cause you can use a ratchet to get the leverage you need to loosen the bolts... The bottom most one however is way under there and you will need a regular had torx allan wrench... so it may be a little tough to remove that depending on how strong you are..
You can either disconnect the wire harness before or after the process. I thought it was eaiser after since you could move it to the eaisest place to unhook it... Alright onto the plenum... loosen the bolt in the back of the plenem to unhook the EVAP canister control valve... this thing here.
push the canister away from the plenum and disconnect all the hoses for the UPPER PLEUNUM ONLY... if you didnt release the coolant.. im not sure how much it will leak.. but be ready to plug some hoses. Some of these are a PITA to remove... use a needle nose plier to expand the clamps and move them down the hose until you can feel that they are not clamping on to metal... give these good tug and shimmy as well to get them loose.. I think they actually cook on a little due to the heat. This one here was the biggest PITA to remove mostly because of the location to get to the clamp... my last mechanich who put in the turbo kit was a jackass.. lol... you'll see later... I think he intentionally put most of the things on so you cant get to them... what a butthead..
Follow the manual to loosen the screws in the correct order (important) and put them somewhere so you can use find them again..
.. I had to remove what looks like a unit to feed the fuel in as shown here..and a bracket in the front of the plenum which got in the way when i tried to take it off.. i put it back on after i removed the plenum. I love the sound of the gasket expanding as you loosen the last couple bolts...
Here are two other things i needed to remove..Heres the underside of the upper plenum and the lower plenum..
If you are installing anything like a new upper plenum.. well there you go.. follow the companies instructions to put it on and do everything ir reverse.. and you just put on your own plenum!! Make sure to follow the manual and use a torque wrench to tighten everything to thier required specs!!! Good job... you can now call yourself a tuner... well not really...
To continue on and remove the lower plenum remove all the remaining hoses for the lower plenum and secure them. Follow the manual to loosen the screws in the correct order...
Remove the lower plenum... take a look at your valves throught the intake... holes.. there they are.. neat huh... make sure to tape up the intake so nothing bad gets in there.. like the beer your drinking while you are operating machinery...
Well there you go... this like i said is pretty simple and straightforward.. Make sure you use this only as a supplement to the manual... this may not be the 100% correct way to do everything.. but it sure is a way to get you there. Next write up ill cover the removal of the radiator. Im going to do that in word though so it may be easier for me.....
Special thanks to Sharif (www.forgedinternals.com) for help with the questions i had and booger for helping me out with the manuals. And to everyone else who has posted thier thoughts and ideas... as you are helping more than just me.. but everyone who uses this...


Thread Starter
New Member
Joined: Dec 2003
Posts: 356
Likes: 0
From: Melville, NY
Lol.. thanks monsta..
As for the SGP package... I bought my parts on my own and had SGP do all the work from there...
Not sure which way would have been the cheapest... probably through SGP... but I wanted to take the used engine apart myself so I went out and bought one from the junkyard..
If you go on thier website www.sgpracing.com you can check out thier section reguarding engine work... then have the vq35de with an explanation of all thier services and packages.. I pretty much got every service they offer but i sourced the parts... except the bearnings and gaskets and stuff... which they were very quick about getting... it took them a week and a half to do my whole bottom end...
Thread Starter
New Member
Joined: Dec 2003
Posts: 356
Likes: 0
From: Melville, NY
latest update if you guys wanna know....
Got most of everything done... unhooked all the Engine harnesses under the passenger side tonight....
Let me tell you... what a ****** pain in the ****.... My neck is going to kill me tomorrow... that was the most difficult thing i have done so far... not only the way i had to bend to get in there and hold a flashlight... but trying to figure out how to unhook those damn harnesses was a deal in itself... gosh...
I dont have them all the way out... trying to get that rubber cover off the engine bay where all the cables are..... looks like a bathroom plunger with wires (under the wiper panels) i dont want to damage it.. ill take a look in the book...
If anyone has one they can go to the section reguarding engine removal and take a look at the page where they begin to lower the engine... thats where I am!!!
Just a few more things to do with the suspension and stuff and its ready to come out... I scheduled the lift for saturday so thats the plan... I'll keep up with the tutorials... I just wanted to get the engine out on Saturday since i will have 4 people there to help... we plan on taking out the engine without the tranny... ill do a writeup on that too
Got most of everything done... unhooked all the Engine harnesses under the passenger side tonight....
Let me tell you... what a ****** pain in the ****.... My neck is going to kill me tomorrow... that was the most difficult thing i have done so far... not only the way i had to bend to get in there and hold a flashlight... but trying to figure out how to unhook those damn harnesses was a deal in itself... gosh...
I dont have them all the way out... trying to get that rubber cover off the engine bay where all the cables are..... looks like a bathroom plunger with wires (under the wiper panels) i dont want to damage it.. ill take a look in the book...
If anyone has one they can go to the section reguarding engine removal and take a look at the page where they begin to lower the engine... thats where I am!!!
Just a few more things to do with the suspension and stuff and its ready to come out... I scheduled the lift for saturday so thats the plan...
I'll keep up with the tutorials... I just wanted to get the engine out on Saturday since i will have 4 people there to help... we plan on taking out the engine without the tranny... ill do a writeup on that too

Hey, Just noticed from you rlast post that you are dropping the motor out the bottom... Any reason for this? We have found it easier to pull it from the top and still leave the trans in place... Either way, looks like its coming along, I know your not in a rush so its all good!
Thread Starter
New Member
Joined: Dec 2003
Posts: 356
Likes: 0
From: Melville, NY
yeah thats what i plan on doing... i have gathered some info on how to do it.. i think i still need to give a call out to someone to make sure everything is right.
I have a guy coming this weekend whos pulled an engine twice with the tranny in.. but that was in a ford.. so hopefully we can figure it out...
I'm working on the writeups i still have to do the radiator writeup and preping the car for the removal of the engine, then the actual engine lift... im just trying to get everything ready for saturday when the lift is here.