
DIY- How to install CAMS

Thread Starter
Registered User
iTrader: (6)
Joined: May 2005
Posts: 3,682
Likes: 0
From: King of Materbation
*****NOT COMPLETED YET*****
Will be completed by January 5th 07
POSTPONED TO JANUARY 30th
PLEASE DON'T COMMENT UNTIL I AM FINISHED WRITING THIS UP.
This is a long process and on a difficulty of 1-10. This is a 8. Don't attempt without quite a bit of experience. I will generalize a lot of the steps since if you are attempting on your own you should already know where they are and what they do.
I will be adding pictures, diagrams, steps and examples as I go along. This will take me about a week to complete.
In my steps we are not pulling the motor. Although I do recommend pulling the motor!
Total time to complete-
No power tools*14-16 Hours
Power tools*12-14 Hours
MOST IMPORTANT Tools needed-
3/8 Ft/lb torque wrench
3/8 in.lb torque wrench (Be sure it can do a minimum of ** In.LB's)
3/8 Ratchet
3/8 Extended handle ratchet (Huskey makes a great one)
Deep wall 10MM,12MM,14MM,17MM
Every extension size imaginable in 3/8
Products/Parts needed-
2 Tubes High Temp Grey RTV
I RECOMMEND REPLACING THE FOLOWING
16 Cam Cradle bolts (Short) Nissan Part # **********
8 Cam Cradle bolts (Long) Nissan Part # **********
1 Upper Plenum Gasket Nissan Part # ********** (Might need 2 if you have a plenum spacer)
2 Plastic clips for Radiator assembly Nissan Part # **********
1 Large piece of cardboard to protect radiator
1 Tube of assembly lube
1 Roll of Duct tape
Directions-
1. Pull off salt shield
2. Drain oil
3. Drain Anitfreeze. (The plug is on the driver side.) (PHILLIPS)
Remove large coolant hose (TOP) from Radiator to coolant pipe. PASSENGER SIDE
Remove large coolant hose (BOTTOM) from Radiator to lower motor. DRIVER SIDE
Remove all brackets for wiring harness all the way around from side to side back to front.
Take the entire wiring harness and place it towards the rear of motor
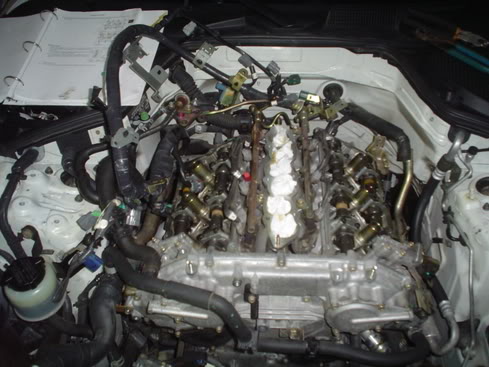
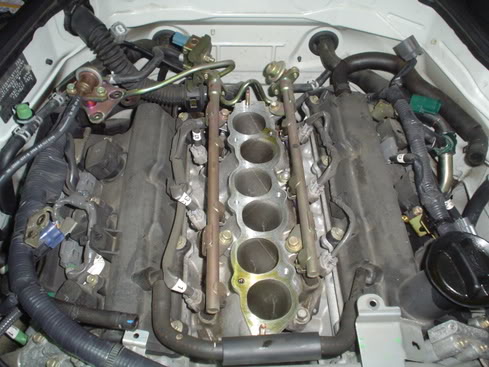
Remove Upper plenum
Remove Lower plenum
Cover intake manifold with duct tape
Remove both valve covers in order shown below
**PICTURE
Remove coolant overflow tank
4. Remove radiator fan assembly (I cut off the plastic clips that held the wires to it and bought new ones.)
Place cardboard against radiator to protect it and duck tape it.
Loosen both belt tensioners for AC side and Altenator side. (12MM)
6. Pull off both belts
7. Remove Altenator & Bracket assembly.
8. Remove Power Steering pump and braket.
9. Remove idler pulleys/Brackets.
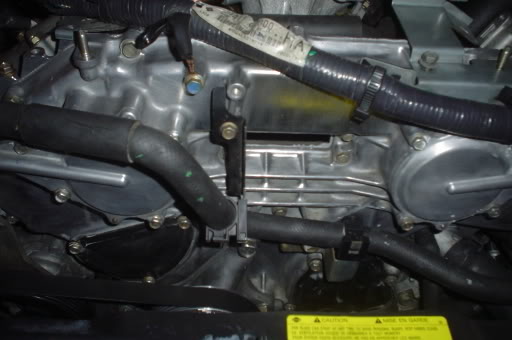
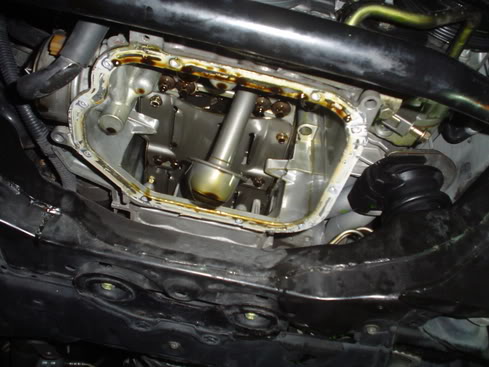
Remove oil pan as shown in diagram below
**PICTURE
Remove two front upper oil pan bolts (Long Extension)
**PICTURE
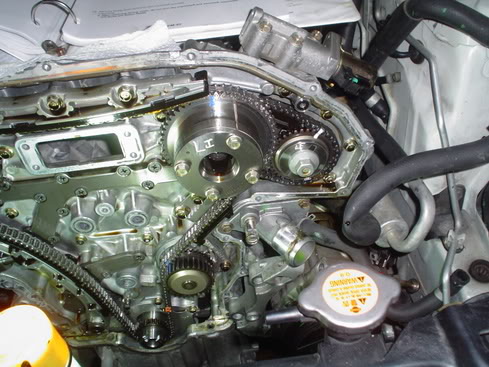
Remove all 10MM bolts as shown below. Remove 17MM BOLT located in the center <--Don't miss this one or you will be trying to pry the front timing cover for a year.
**PICTURE
The hardest part of the cam install is removing the front timing cover. Double check you have removed all the bolts. I bought a special nissan tool to remove the timing cover, but broke three of them in the process . I recommend taking 2 small fine tipped phillips screw drivers and inserting them in the notched holes and gently tap them between the front and rear timing cover. After it begins to seperate put another fine tipped screwdriver between the two notches and try to seperate the middle. Work from top to bottom seperating the sealant.
REFRENCE
FRONT TIMING COVER WITH PULLEYS
OIL PAN REMOVED
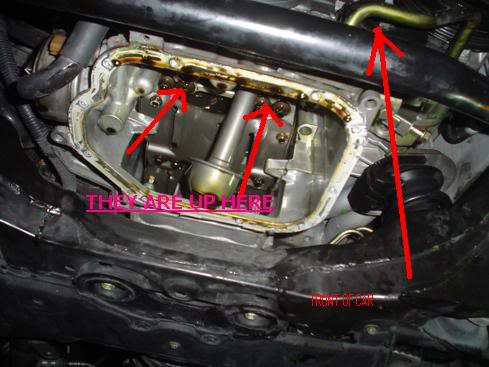
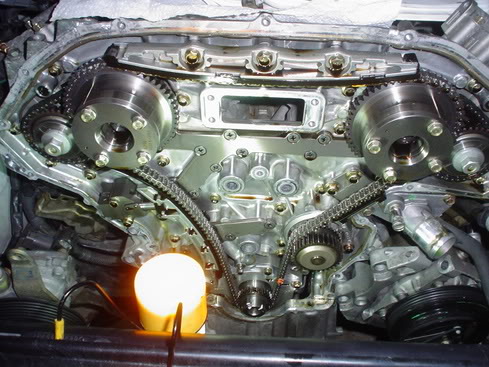
TIMING COVER OPEN
CAM GEAR RIGHT BANK
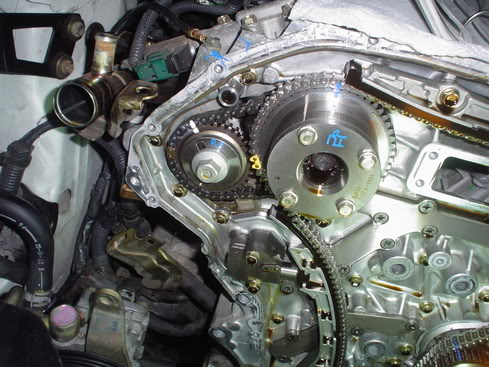
CAM GEAR LEFT BANK
LOWER PLENUM
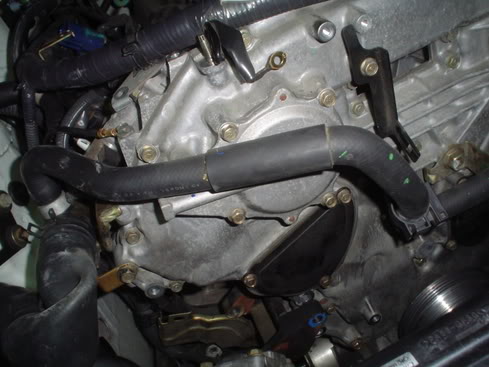
ALTENATOR TIMING COVER
LOWER OIL PAN
Lower Plenum
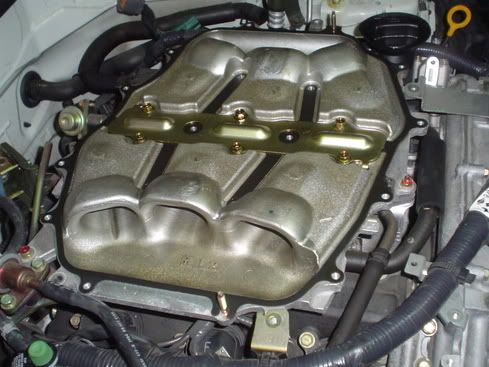
Intake Manifold
Will be completed by January 5th 07
POSTPONED TO JANUARY 30th
PLEASE DON'T COMMENT UNTIL I AM FINISHED WRITING THIS UP.
This is a long process and on a difficulty of 1-10. This is a 8. Don't attempt without quite a bit of experience. I will generalize a lot of the steps since if you are attempting on your own you should already know where they are and what they do.
I will be adding pictures, diagrams, steps and examples as I go along. This will take me about a week to complete.
In my steps we are not pulling the motor. Although I do recommend pulling the motor!
Total time to complete-
No power tools*14-16 Hours
Power tools*12-14 Hours
MOST IMPORTANT Tools needed-
3/8 Ft/lb torque wrench
3/8 in.lb torque wrench (Be sure it can do a minimum of ** In.LB's)
3/8 Ratchet
3/8 Extended handle ratchet (Huskey makes a great one)
Deep wall 10MM,12MM,14MM,17MM
Every extension size imaginable in 3/8
Products/Parts needed-
2 Tubes High Temp Grey RTV
I RECOMMEND REPLACING THE FOLOWING
16 Cam Cradle bolts (Short) Nissan Part # **********
8 Cam Cradle bolts (Long) Nissan Part # **********
1 Upper Plenum Gasket Nissan Part # ********** (Might need 2 if you have a plenum spacer)
2 Plastic clips for Radiator assembly Nissan Part # **********
1 Large piece of cardboard to protect radiator
1 Tube of assembly lube
1 Roll of Duct tape
Directions-
1. Pull off salt shield
2. Drain oil
3. Drain Anitfreeze. (The plug is on the driver side.) (PHILLIPS)
Remove large coolant hose (TOP) from Radiator to coolant pipe. PASSENGER SIDE
Remove large coolant hose (BOTTOM) from Radiator to lower motor. DRIVER SIDE
Remove all brackets for wiring harness all the way around from side to side back to front.
Take the entire wiring harness and place it towards the rear of motor
Remove Upper plenum
Remove Lower plenum
Cover intake manifold with duct tape
Remove both valve covers in order shown below
**PICTURE
Remove coolant overflow tank
4. Remove radiator fan assembly (I cut off the plastic clips that held the wires to it and bought new ones.)
Place cardboard against radiator to protect it and duck tape it.
Loosen both belt tensioners for AC side and Altenator side. (12MM)
6. Pull off both belts
7. Remove Altenator & Bracket assembly.
8. Remove Power Steering pump and braket.
9. Remove idler pulleys/Brackets.
Remove oil pan as shown in diagram below
**PICTURE
Remove two front upper oil pan bolts (Long Extension)
**PICTURE
Remove all 10MM bolts as shown below. Remove 17MM BOLT located in the center <--Don't miss this one or you will be trying to pry the front timing cover for a year.
**PICTURE
The hardest part of the cam install is removing the front timing cover. Double check you have removed all the bolts. I bought a special nissan tool to remove the timing cover, but broke three of them in the process
. I recommend taking 2 small fine tipped phillips screw drivers and inserting them in the notched holes and gently tap them between the front and rear timing cover. After it begins to seperate put another fine tipped screwdriver between the two notches and try to seperate the middle. Work from top to bottom seperating the sealant.REFRENCE
FRONT TIMING COVER WITH PULLEYS
OIL PAN REMOVED
TIMING COVER OPEN
CAM GEAR RIGHT BANK
CAM GEAR LEFT BANK
LOWER PLENUM
ALTENATOR TIMING COVER
LOWER OIL PAN
Lower Plenum
Intake Manifold
Last edited by EM-EFER; Jan 24, 2007 at 10:44 AM.

This will be very interesting to see, are you gonna have everything off to the point where you can take the heads off ? I have been holding back from changing head gaskets to HKS because people are saying you need to remove the motor to get the timing cover off and heads off.
Thread Starter
Registered User
iTrader: (6)
Joined: May 2005
Posts: 3,682
Likes: 0
From: King of Materbation
Originally Posted by Dirty Dave
This will be very interesting to see, are you gonna have everything off to the point where you can take the heads off ? I have been holding back from changing head gaskets to HKS because people are saying you need to remove the motor to get the timing cover off and heads off.
These are pictures from over summer when I built my motor
You don't need to remove the motor to get the heads off or the timing cover. I have did both inside the car without many issues besides space.

dude, please pull the front radiator brace and bumper off, it will help you out soooo much and you are making my back hurt...
it takes about 15 minutes and you wont have to lean all the way over, not sure if you have finished all this, the thread is old...
it takes about 15 minutes and you wont have to lean all the way over, not sure if you have finished all this, the thread is old...
Thread Starter
Registered User
iTrader: (6)
Joined: May 2005
Posts: 3,682
Likes: 0
From: King of Materbation
Originally Posted by Audible Mayhem
dude, please pull the front radiator brace and bumper off, it will help you out soooo much and you are making my back hurt...
it takes about 15 minutes and you wont have to lean all the way over, not sure if you have finished all this, the thread is old...
it takes about 15 minutes and you wont have to lean all the way over, not sure if you have finished all this, the thread is old...
I already did this over summer
Now Iam just giving a walk through.. I will add that in there to.. I didnt do it but Iam sure it would help all the old men on this board.

Registered User
Joined: Feb 2006
Posts: 152
Likes: 0
From: ct
i know it differs from car to car and the average gain is supposed to be about 10 to 13 whp but, what kind of gains are likely with intake, and exhaust? and what if i got it tuned? does tuning with the camshafts bring much more out?
Trending Topics

haha i think ima have to finish this DIY thread when i do mine....LoL. if anyone can give me some feedback on taking cams out...i will gladly post pictures of my experience and finish this thread.
Dan
Dan


lol... yeah I'm getting some cams in and will be doing it myself. updates/tips would be nice... past the removing the timing cover part.
reading the service manual they want me to set the engine to TDC for the first piston. Can I just put the new cams in the same position as the old ones and go on with my life? or must I reset it?
reading the service manual they want me to set the engine to TDC for the first piston. Can I just put the new cams in the same position as the old ones and go on with my life? or must I reset it?


Registered User
Joined: Apr 2013
Posts: 551
Likes: 46
From: texas
^haha! at this point completing it should be
1. remove chain tensioners
2. remove whatever the hell else is holding the cams in place (cam holders and big other half of the chain case.) and they should come right out?
3. swap over gears to new cams making sure to line up dowels
4. put them hoes back in. (hopefully they accept OEM valvesprings like the BC stage II)
5. button up the rest of what was taken off
6. tune it
7. vroom vroom yay 1000+ bucks for 15 hp!


Thread
Thread Starter
Forum
Replies
Last Post
Colombo
Forced Induction
35
Nov 9, 2020 10:27 AM