
Another Oil Catch Can DIY - Pix


Registered User
Joined: Oct 2009
Posts: 1
Likes: 0
From: Manassas VA
I recently removed the MREV2 and reinstalled my revup lower plenum. In the process, I discovered where all the oil that my engine 'misplaced' went to. It pooled into several areas on the lower plenum, and from there it apparently was drawn into the engine through the tiny orifices drilled into each runner. I read up on this a little bit and found that several high performance cars, including the S2000 and Corvette, suck a lot of oil through the PCV into the intake manifold at high RPMs. Consequently, there is a number of products specifically made for these cars, to catch the oil that comes out of the crankcase before it gets into the intake manifold.
I ordered a nice billet aluminum unit from Custom Corvette Accessories. There are good pics of the catch can and available accessories on the website. BTW, do NOT get the one for the C6, it uses a custom mounting bracket.
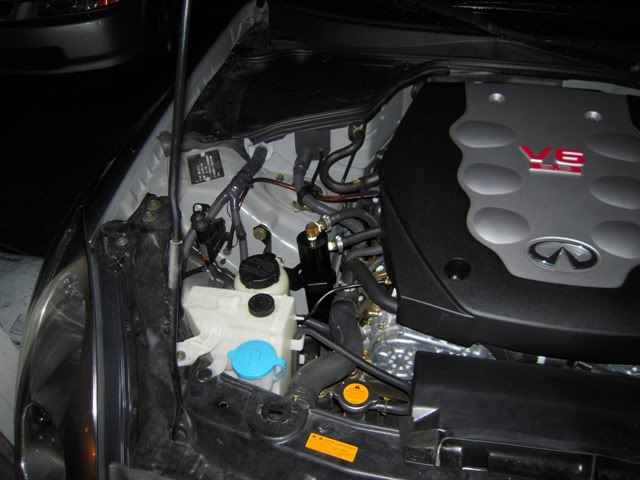
Here's what the 35th Anniversary revup looked like before I started.
P471

The installation is pretty much self explanatory, but I want to mention a couple of things that may make the job even easier. Although it took me over 4 hours, an hour of that was trying to find a place to mount it. Space under the hood comes at a premium. If it weren't for the close quarters, this would be a 20 minute task. Another hour was wasted looking for parts and tools that I dropped through the engine bay. The best place to put the catch can is on the passenger side, using the upper mounting screw for the power steering (PS) reservoir bracket.
The first thing to do is pull off the plastic engine cover so we can get to both ends of the PCV hose and the passenger side body-to-timing cover ground strap.
P472

Next, remove the single screw (P478) on the radiator overflow tank and pull it up and forward so you can get to the ground strap - you don’t need to disconnect the hose to the radiator. The ground strap is attached to the timing cover at two places with one bolt each (P472), and to the passenger side body, underneath the overflow tank, with two bolts through a single lug. The second lug on the timing cover is very hard to see, but you can follow the strap over from the other end, and it’s pretty easy to unbolt. Slide the two clamps off, and remove the PCV hose (P472) that connects the plenum to the PCV on the valve cover.
This is what the area looks like after it’s readied for the catch can.
P476

P478

Remove the top bolt (P478) off of the PS reservoir bracket and slide the rubber grommet off. Slice the grommet in half (but not the metal insert). Insert the original bolt through the metal grommet insert, the first half of the rubber grommet, the catch can bracket, the PS tank bracket, and the second half of the rubber grommet - just 'snug up' the bolt for now. Mount the hose fittings on the catch can using teflon tape - see pic P480 for proper orientation.
You will need to unscrew the bottom of the can in order to slide it into the bracket from the top, then reinstall the bottom. There is an English size allen screw through the back of the bracket to secure the can in place. Finally, tighten the top screw of the PS bracket to the passenger side strut tower.
Measure and cut the length of hose you need, and connect the top can fitting to the PCV. The braided hose looks great, but it is also a royal PITA to work with. I would stick with the standard 3/8" fuel service rubber hose and SS hose clamps instead.
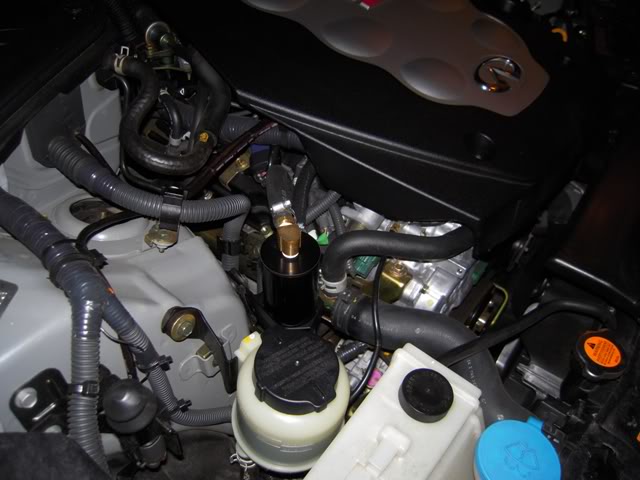
Now we’re almost done, and it looks like this:
P480

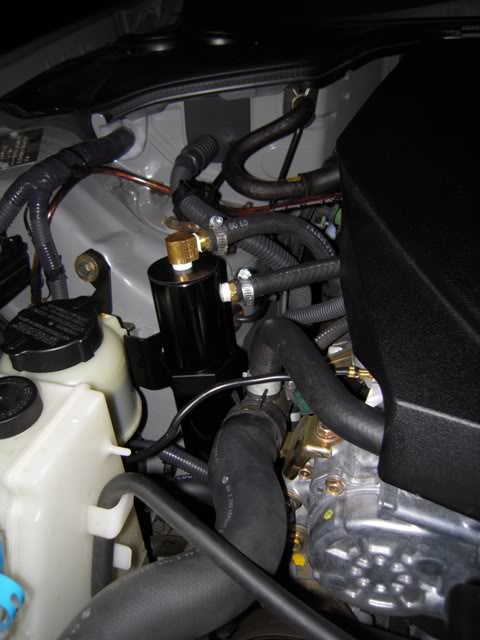
P481

Measure and cut hose for the lower can fitting and connect it to the nipple on the front of the lower plenum. Reinstall the ground strap, and route it in front of the catch can (P487), and then across toward the timing cover. Bend the larger lug at the timing cover as necessary, to make the connection easier. Slide the radiator overflow tank into its bracket and secure. If everything is oriented as shown in the pics, no part of the catch can should be touching the strut tower or the PS suction hose.
P482

P483

P487

After driving about 400 miles, which included a lot of 6000+ RPM shifts, I opened the drain valve and some oil trickled out. I unscrewed the bottom of the can and found the inside coated with a light film of oil around the drain valve. It WORKS!
This is an inexpensive, simple mod, and it will keep the intake manifold, combustion chamber, and exhaust piping clean. Especially useful for those of us lucky enough to own a revup with the 'hide the oil' feature. I am very pleased with it. Good luck!
I ordered a nice billet aluminum unit from Custom Corvette Accessories. There are good pics of the catch can and available accessories on the website. BTW, do NOT get the one for the C6, it uses a custom mounting bracket.
Here's what the 35th Anniversary revup looked like before I started.
P471
The installation is pretty much self explanatory, but I want to mention a couple of things that may make the job even easier. Although it took me over 4 hours, an hour of that was trying to find a place to mount it. Space under the hood comes at a premium. If it weren't for the close quarters, this would be a 20 minute task. Another hour was wasted looking for parts and tools that I dropped through the engine bay. The best place to put the catch can is on the passenger side, using the upper mounting screw for the power steering (PS) reservoir bracket.
The first thing to do is pull off the plastic engine cover so we can get to both ends of the PCV hose and the passenger side body-to-timing cover ground strap.
P472
Next, remove the single screw (P478) on the radiator overflow tank and pull it up and forward so you can get to the ground strap - you don’t need to disconnect the hose to the radiator. The ground strap is attached to the timing cover at two places with one bolt each (P472), and to the passenger side body, underneath the overflow tank, with two bolts through a single lug. The second lug on the timing cover is very hard to see, but you can follow the strap over from the other end, and it’s pretty easy to unbolt. Slide the two clamps off, and remove the PCV hose (P472) that connects the plenum to the PCV on the valve cover.
This is what the area looks like after it’s readied for the catch can.
P476
P478
Remove the top bolt (P478) off of the PS reservoir bracket and slide the rubber grommet off. Slice the grommet in half (but not the metal insert). Insert the original bolt through the metal grommet insert, the first half of the rubber grommet, the catch can bracket, the PS tank bracket, and the second half of the rubber grommet - just 'snug up' the bolt for now. Mount the hose fittings on the catch can using teflon tape - see pic P480 for proper orientation.
You will need to unscrew the bottom of the can in order to slide it into the bracket from the top, then reinstall the bottom. There is an English size allen screw through the back of the bracket to secure the can in place. Finally, tighten the top screw of the PS bracket to the passenger side strut tower.
Measure and cut the length of hose you need, and connect the top can fitting to the PCV. The braided hose looks great, but it is also a royal PITA to work with. I would stick with the standard 3/8" fuel service rubber hose and SS hose clamps instead.
Now we’re almost done, and it looks like this:
P480
P481
Measure and cut hose for the lower can fitting and connect it to the nipple on the front of the lower plenum. Reinstall the ground strap, and route it in front of the catch can (P487), and then across toward the timing cover. Bend the larger lug at the timing cover as necessary, to make the connection easier. Slide the radiator overflow tank into its bracket and secure. If everything is oriented as shown in the pics, no part of the catch can should be touching the strut tower or the PS suction hose.
P482
P483
P487
After driving about 400 miles, which included a lot of 6000+ RPM shifts, I opened the drain valve and some oil trickled out. I unscrewed the bottom of the can and found the inside coated with a light film of oil around the drain valve. It WORKS!
This is an inexpensive, simple mod, and it will keep the intake manifold, combustion chamber, and exhaust piping clean. Especially useful for those of us lucky enough to own a revup with the 'hide the oil' feature. I am very pleased with it. Good luck!

Thanks so much for the post and pictures.
We are glad you like it
Regards
Chip
Last edited by Willfulone; Oct 29, 2009 at 04:25 PM.


If anyone can help I have a question which I think belongs here. I've had a catch can on my car for a while well I decided to change the pcv like 1 week ago.I went to autozone and got a replacement after the install my car started shaking at low rpm. So I opened the hood and saw the sound was coming from pcv I put fingers around it and it vibrated.It made sounds like when you run out of soda in a cup with a straw ha. I dont have any cel but whats weird is when Im on my driveway rpms jump up and down by 200. Could it be that its doing this because its autozone quality and not nissan oem part? It just bothers me that when Im idle I hear that sucking sound at red light Thanks


Registered User
Joined: Oct 2007
Posts: 913
Likes: 1
From: Nor Cal
My first thought too until I visualized the PCV valve only installs one way on valve cover (threads are only on one side).
I'll say the valve is defective and/or your existing catch can is full causing PCV to chatter.
I'll say the valve is defective and/or your existing catch can is full causing PCV to chatter.
so I replaced pcv and still made the sound. Then I ended cutting off about 5in and it pretty much went away where I don't hear it from inside the car anymore. Im thinking the oem pcv has a weaker spring inside which makes it suck air out fine and the autozone one has a stronger spring which is harder to let air go by? Or my catch can had too much hose in it?

Registered User
Joined: Oct 2007
Posts: 913
Likes: 1
From: Nor Cal
Got mine a few days ago. Well made, looks nice, installing today.
-edit-
Installed:

-edit edit-
A little modification I did to mine:

Now my install 100% done. No copy-cats allowed

Cheers
Last edited by 06CPV35; Nov 18, 2009 at 12:21 PM. Reason: Installed pix added...

I ordered one and had to mount it on the front of the motor because of my Greddy TT air filter piping. I couldn't use the power steering bracket, the catch can would sit too high.
Ive seen other people use this (front of motor) location but my only concern would be a drop of oil hitting the belt or something.
Ive seen other people use this (front of motor) location but my only concern would be a drop of oil hitting the belt or something.


