
DIY homemade urethane transmission mount

Thread Starter
Registered User
iTrader: (39)
Joined: Jul 2006
Posts: 2,359
Likes: 1
From: Way North, New York
I'm in the middle of some changes to my track toy, and one of the things I wanted to change was the stock trans mount.
I spent a while looking for an aftermarket solid or urethane transmission mount to replace the stock rubber one, without much luck. Most of the places that sell them seem to be out of stock, and the only place I found that did have any only stocked the 60A durometer version, which was not as firm as I was looking for. So after seeing a post on here suggesting someone just make their own, I decided it should be easy enough.
First, remove your stock transmission mount. Takes about 2 mins, and there are plenty of DIY's on that already. Follow Adam from Z1's instructions if you're not already familiar with this step: Aftermarket transmission mount DIY
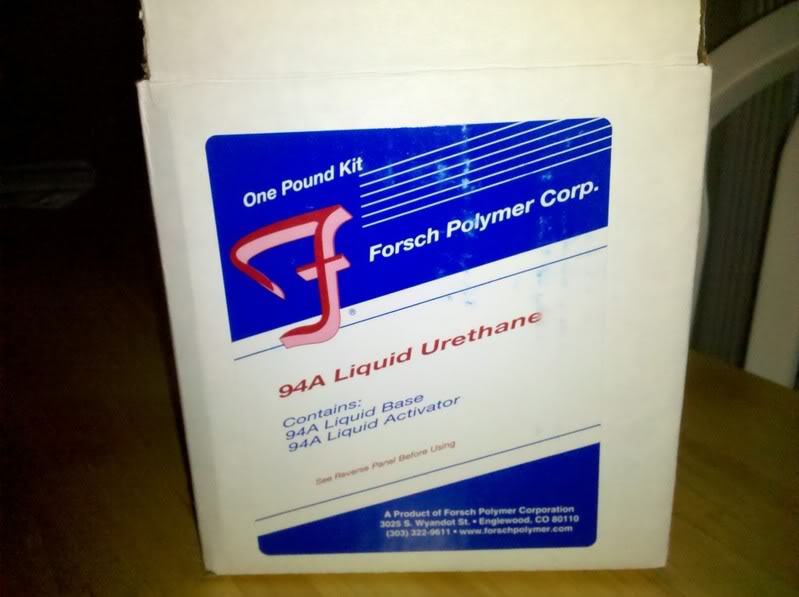
You'll need some of this liquid urethane. I got mine from Energy Suspension Parts. Note that this is not an energy suspension product, just off the shelf industrial liquid urethane. But ESP has the best price I could find online in a quick search, so I bought it from them. They offer 60A, 80A, and 94A hardness's. I went with the 94A. Liquid urethane
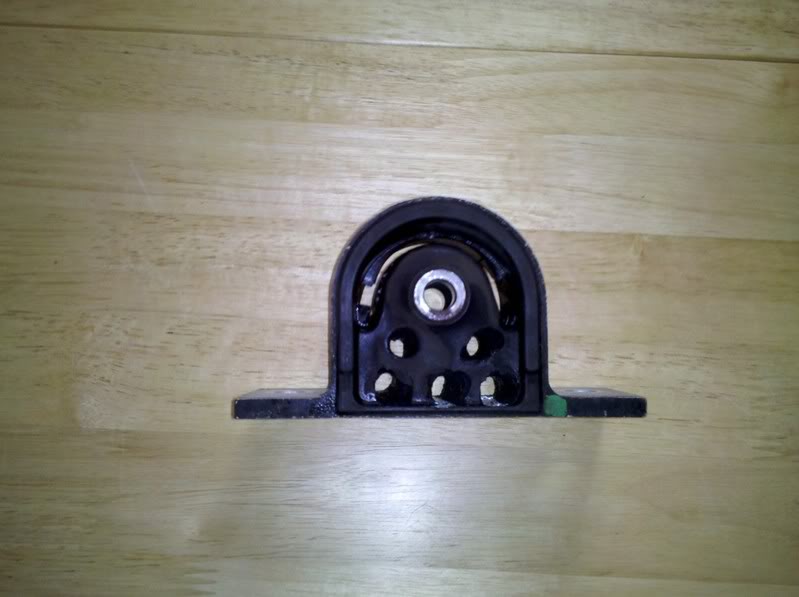
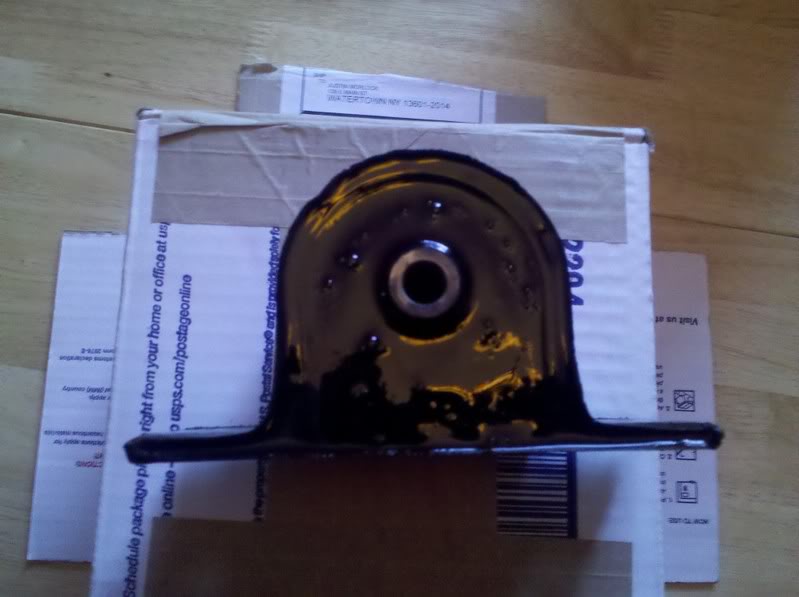
After I got the mount out, I decided to drill a bunch of holes in the rubber to provide more free space for the urethane to fill in. You'll notice the stock mount already has a decent amount of free space along the curved side of it.
I used blue painter's tape to form a frame around one side of the mount, and also to cover the metal bushing where the bolt goes thru it (this picture was taken after that tape was removed). I blocked off the other side of the mount with blue tape to prevent the liquid urethane from running out. Then, mix the two parts of the urethane kit together (base + catalyst). Stir for 2 mins as per the instructions. Now pour the urethane into your mount "mold".
The working time of the urethane is only about 15 minutes so dont wander off and have a beer until you've filled the mount up completely.
After about an hour, the urethane is firm to the touch, and you can remove the tape. Give it 24 hours to cure completely before you reinstall.
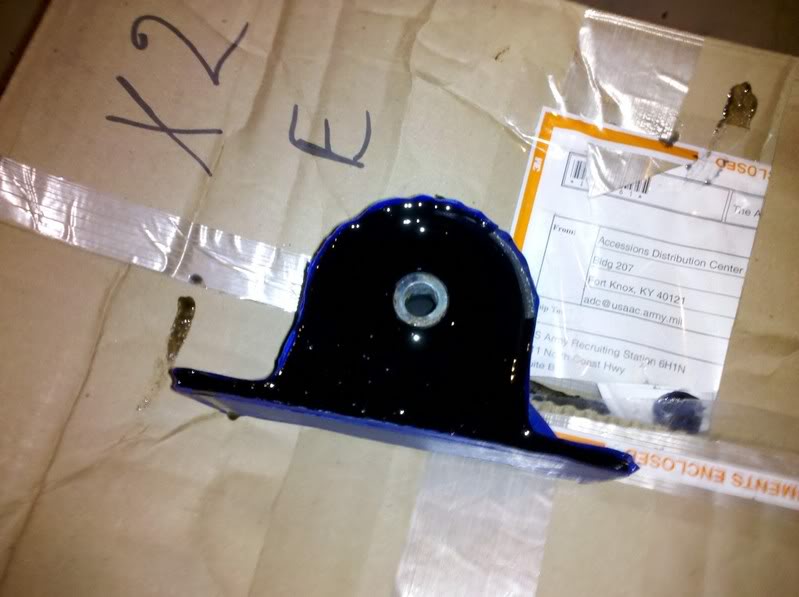
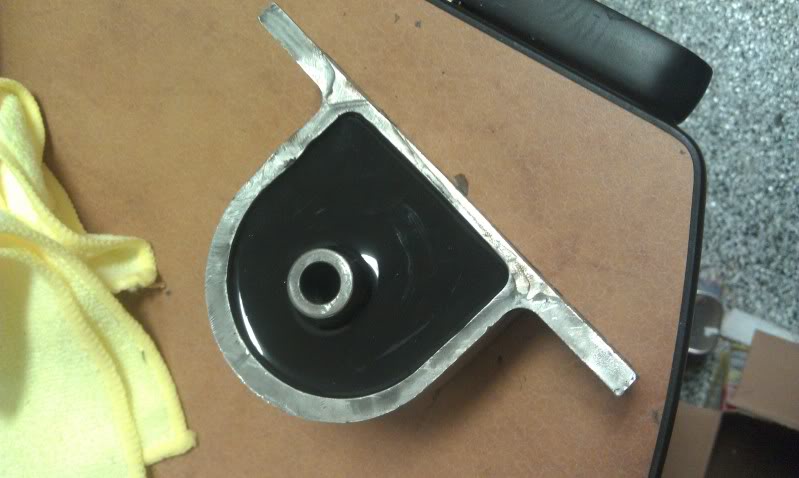
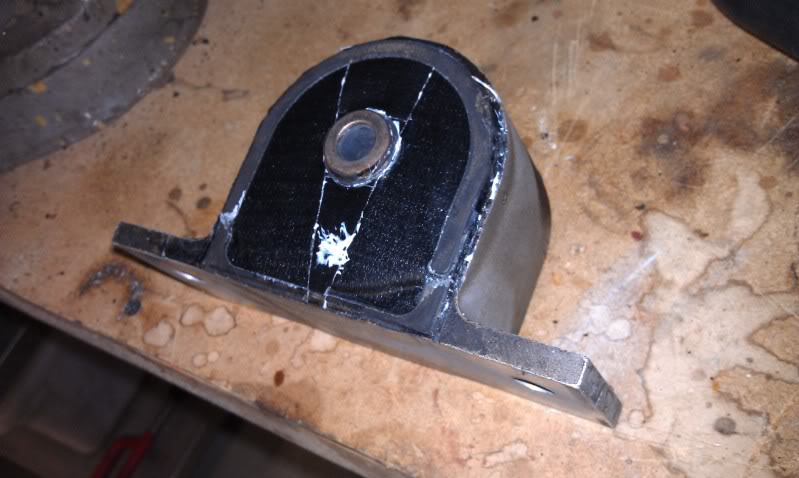
Here it is all done:
Pretty as an aftermarket one? Nope. But I'm sure it'll do just as nicely, and you'll never see it again once its back under your car. And it'll cost you only $40 (or less if you can find liquid urethane for cheaper) vs. $100+ for an aftermarket one
I spent a while looking for an aftermarket solid or urethane transmission mount to replace the stock rubber one, without much luck. Most of the places that sell them seem to be out of stock, and the only place I found that did have any only stocked the 60A durometer version, which was not as firm as I was looking for. So after seeing a post on here suggesting someone just make their own, I decided it should be easy enough.
First, remove your stock transmission mount. Takes about 2 mins, and there are plenty of DIY's on that already. Follow Adam from Z1's instructions if you're not already familiar with this step: Aftermarket transmission mount DIY
You'll need some of this liquid urethane. I got mine from Energy Suspension Parts. Note that this is not an energy suspension product, just off the shelf industrial liquid urethane. But ESP has the best price I could find online in a quick search, so I bought it from them. They offer 60A, 80A, and 94A hardness's. I went with the 94A. Liquid urethane
After I got the mount out, I decided to drill a bunch of holes in the rubber to provide more free space for the urethane to fill in. You'll notice the stock mount already has a decent amount of free space along the curved side of it.
I used blue painter's tape to form a frame around one side of the mount, and also to cover the metal bushing where the bolt goes thru it (this picture was taken after that tape was removed). I blocked off the other side of the mount with blue tape to prevent the liquid urethane from running out. Then, mix the two parts of the urethane kit together (base + catalyst). Stir for 2 mins as per the instructions. Now pour the urethane into your mount "mold".
The working time of the urethane is only about 15 minutes so dont wander off and have a beer until you've filled the mount up completely.
After about an hour, the urethane is firm to the touch, and you can remove the tape. Give it 24 hours to cure completely before you reinstall.
Here it is all done:
Pretty as an aftermarket one? Nope. But I'm sure it'll do just as nicely, and you'll never see it again once its back under your car. And it'll cost you only $40 (or less if you can find liquid urethane for cheaper) vs. $100+ for an aftermarket one


awesome man,............let us know how it holds up............heck i bet more stock ones are cheap to buy or yank off junk yard dead Z's if ever needing replacing..
-J
-J

I'm actually about to do the same thing, except i welded up a jig to hold the center sleeve in the same position when you remove all the OEM rubber.
I'll show some pics here when i get this little project finished.
I'll show some pics here when i get this little project finished.
Are the instructions for the Forsch Urethanes to mix all the catalyst into the can and you have a one shot deal?
Or do they give a specific mix ratio so you don't blow all the material in one mixing?
Also, do you have the specific Forsch Urethane Systems # you used. I don't see any material on their website that is a black color.
Or do they give a specific mix ratio so you don't blow all the material in one mixing?
Also, do you have the specific Forsch Urethane Systems # you used. I don't see any material on their website that is a black color.
Last edited by ian99rt; Apr 20, 2011 at 06:42 PM.
Moving sure does put projects on back order.....
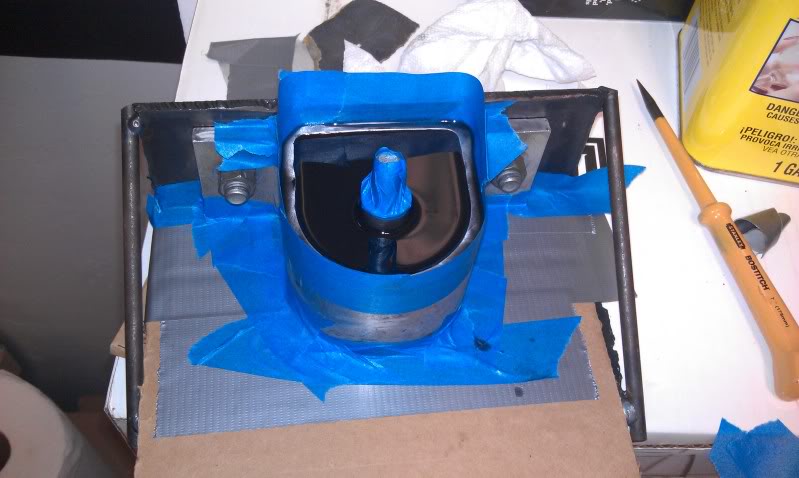
So I actually made a jig to hold the center steel bushing in to aluminum housing. This allowed me to remove all of the OEM rubber, which was a major PITA. I suggest using a MAPP gas blow torch and cooking the rubber until its a self sustaining flame. Keep scraping the rubber out so the ash doesn't choke out the flames.
Then I used a dremel tool and wire wheel to remove the remainder of rubber, Goof-Off worked very well for taking of the last gooey bits of rubber.
Finally I could make my urethane using the Mcmaster sourced Forsche 80A shore black urethane rubber (http://www.mcmaster.com/#8644k11/=dsu1it).
During mixing of rubbers it is usually required to degas after you've completely mixed the rubber, so i got my vacuum chamber rigged up (b/c everyone should have one laying around ).
).
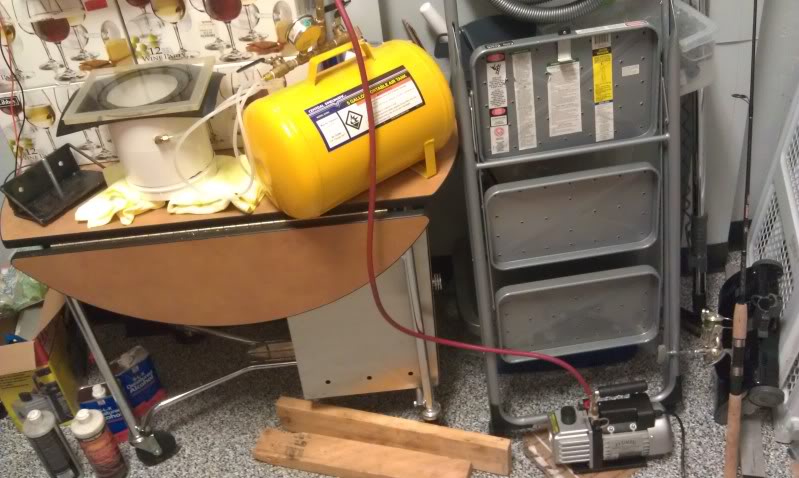
When i degassed the mixture (holding 30 in/Hg for 5 mins.) it was evident there was ALOT of air in there. After the bubbling mixture swelled up, bubbles popped, and fell back down I was ready to pour.
Here are some shots of the final product:
So I actually made a jig to hold the center steel bushing in to aluminum housing. This allowed me to remove all of the OEM rubber, which was a major PITA. I suggest using a MAPP gas blow torch and cooking the rubber until its a self sustaining flame. Keep scraping the rubber out so the ash doesn't choke out the flames.
Then I used a dremel tool and wire wheel to remove the remainder of rubber, Goof-Off worked very well for taking of the last gooey bits of rubber.
Finally I could make my urethane using the Mcmaster sourced Forsche 80A shore black urethane rubber (http://www.mcmaster.com/#8644k11/=dsu1it).
During mixing of rubbers it is usually required to degas after you've completely mixed the rubber, so i got my vacuum chamber rigged up (b/c everyone should have one laying around
). When i degassed the mixture (holding 30 in/Hg for 5 mins.) it was evident there was ALOT of air in there. After the bubbling mixture swelled up, bubbles popped, and fell back down I was ready to pour.
Here are some shots of the final product:
Last edited by ian99rt; Aug 27, 2011 at 04:56 AM.
Trending Topics


BTW, I had plenty of material to do 2 fully hogged out transmission mounts. If you were to drill holes all over it and leave some of the OEM rubber in place you could probably get 4 transmission mounts out of one $33 can. I'll be doing a 60A mount for a friend using the mount i just pulled out (not removing all the OEM rubber). He actually bought the mount i modified.
If anyone else has a a spare OEM mount they'd like to me to do for them (60A urethane) i'll gladly do the same i am for my buddy for $25 + return shipping.
The liquid urethanes are usually shipped with a nitrogen blast in the can b/c they will absorb the moisture in the air.
If you have a precise grams scale and very quick about getting the material out of the can and resealing it, you can probably use the material in 2 batches within a week or so.
The data sheet with the material did specify a mixing ratio for small batches, but warned against it.
Additionally the material is extremely viscous before adding the catalyst so be prepared to scoop material out and then flounder around getting it off your scooping tool (spoon).


UPDATE:
Pulled the mount today b/c i'm changing the clutch/flywheel.
Found the inner steel sleeve had separated from the urethane. It was still tightly held but obviously did not bond terribly well.
I did everything possible to make it stick, roughed it with 80 grit sand paper, and acetone wiped 3x.
Gonna take the other mount i have, drill a bunch of holes in it at diagonal making Xs thru the solid area (if your looking at a cross section from front to back). Then fill as I previously did.
That way the sleeve is still bonded to the oem rubber but the oem rubber is more rigidly supported like OPs.
Was a good try anyways

Registered User
Joined: Apr 2003
Posts: 281
Likes: 0
From: chicago burbs
Just curious if Round 2 has been installed. Thoughts? How much has the noise and vibrations gone up and have you been in a Z with any other mounts to compare it to? I also have made my own but in hoping to cut down on the vibration some I added some Flexane to bring the durometer down somewhere in the 60's. I have yet to install, hopefully next week.
Just curious if Round 2 has been installed. Thoughts? How much has the noise and vibrations gone up and have you been in a Z with any other mounts to compare it to? I also have made my own but in hoping to cut down on the vibration some I added some Flexane to bring the durometer down somewhere in the 60's. I have yet to install, hopefully next week.
Due to the previous owner butchering the rear cubby whole sheet metal structure i have no sound insulation over the fuel tank so i've got a good amount of whining from the pump.
In all honesty i'm a bad person to ask this opinion. I love the sound of all the road noise and gear whine from solid diff bushings, and solid suspension pivot points.
Registered User
Joined: Apr 2003
Posts: 281
Likes: 0
From: chicago burbs
Road noise and gear whine would sound better than my rattle trap. Next week it getting somewhat of an overhaul, dif and subframe bushings, front bushings going SPL on the compression, nismo flywheel and the trans mount. Just about the only thing I could change back with not to much of an issue is the trans mount. Sure its going to be a big change for me but i'm sure for the better.