
Oil Temperature and Oil Pressure Install


Thread Starter
Registered User
iTrader: (2)
Joined: Dec 2011
Posts: 270
Likes: 2
From: KW Ontario Canada
Just thought I'd drop it here in case someone was wondering about placement options, as I was. I didn't come up with much in my searches.
Shout-outs to Binder for letting me know about the Oil Pressure sensor install, he made it easier for me.
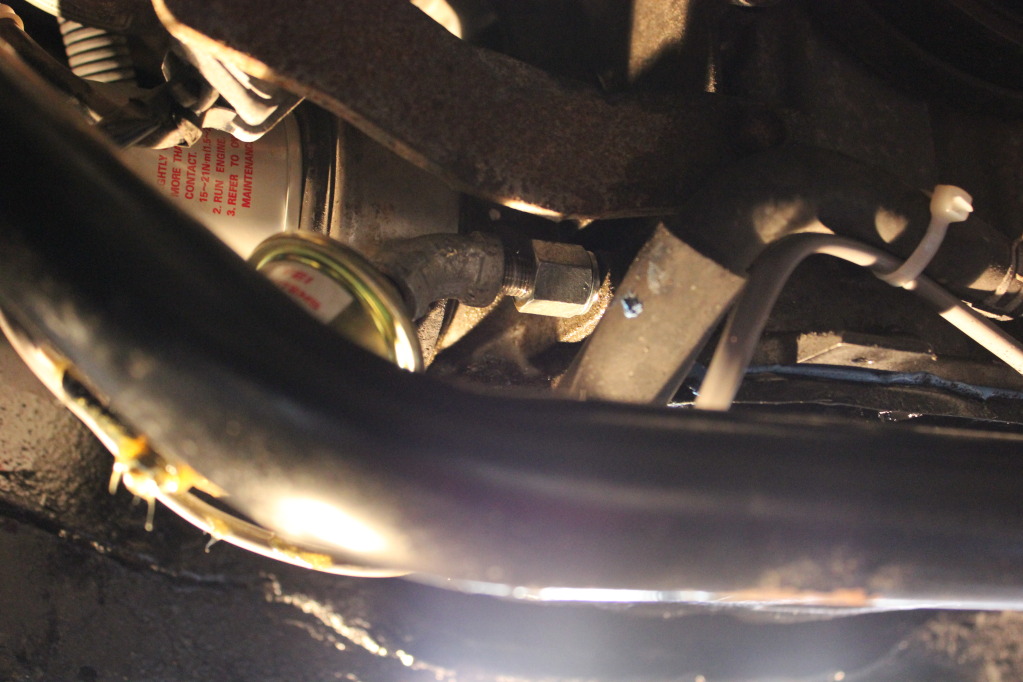
Elaborate: OEM has either a stock Pressure sensor (350) or Pressure sensor Switch (G). These are wired without a default, this means that you can simply leave it disconnected and it won't trip your oil light.
So if installing an aftermarket setup like I did, you simply replace the stock one with aftermarket. No need to "T" off or anything like that, as you do with some cars.
I'd assume you'll need to do what I did though unless your Sending unit is signifiantly smaller than the one I got.
Need, recommend cast, black, or steel fittings for this application, NOT BRASS:
1x 1/8" Male BSPT (British Standard Pipe Taper) to Female 1/8" NPT
Stock threads are Metric (BSPT) and you can NOT put the normal NPT threads in there, it will leak. FYI: You CAN pay a ridiculous amount ($10-30+) Online for this fitting. OR you can go to your local Hydraulic Supplier and get it for $3. They may have to order it, but it'll be faster and WAAAAAY cheaper. Same or better quality.
1x 1/8" NPT nipple
1x 1/8" NPT 45* female
OR
1x 1/8" NPT extruded 45* (unsure if this will work, I didn't try it, but it would be nicer to use the lease amount of fittings as necessary.
Also-- Don't use Teflon tape. This can/will break down and get into your oil galleries, potentially plugging the system and causing catastropic failure. If you need to use some due to leaks put it only on the back-side of the threads (last couple threads to go in before it's tight.
Installed:
Temp Sensor. This is the one that will suck a bit, and take some DIY. You can use common measures such as
1. Oil filter spacer
2. Oil Pan spacer
And so on. These have fittings and are used commonly with the V1 and V2 Superchargers for oil lines. If you don't mind putting the cash up, have at it.
If you want to DIY, here. Keep in mind, this Pan is thin steel, this is only recommended for skilled/experienced welders. Don't yell at me if you blow it, but you can PM me and I'll try to help :
:
Need:
1x 1/8" NPT STEEL (weldable) coupler
(recommend-- 1x JB Waterweld)
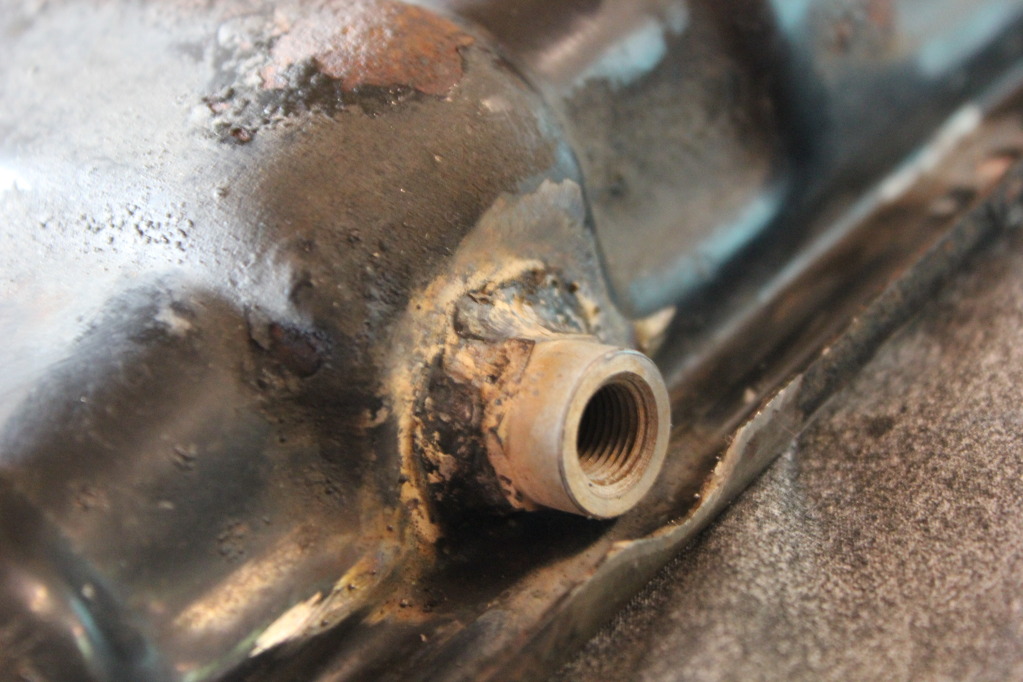
Remove oil pan. Locate suitable position for sensor. Ensure clearance to Sway Bar.
Once you found where you want it, mark it and drill it out. I drilled mine to the O.D. of the coupler so I could slide it in, otherwise you can't weld the top section close to the lip. this way you can weld the inside AND outside of it.
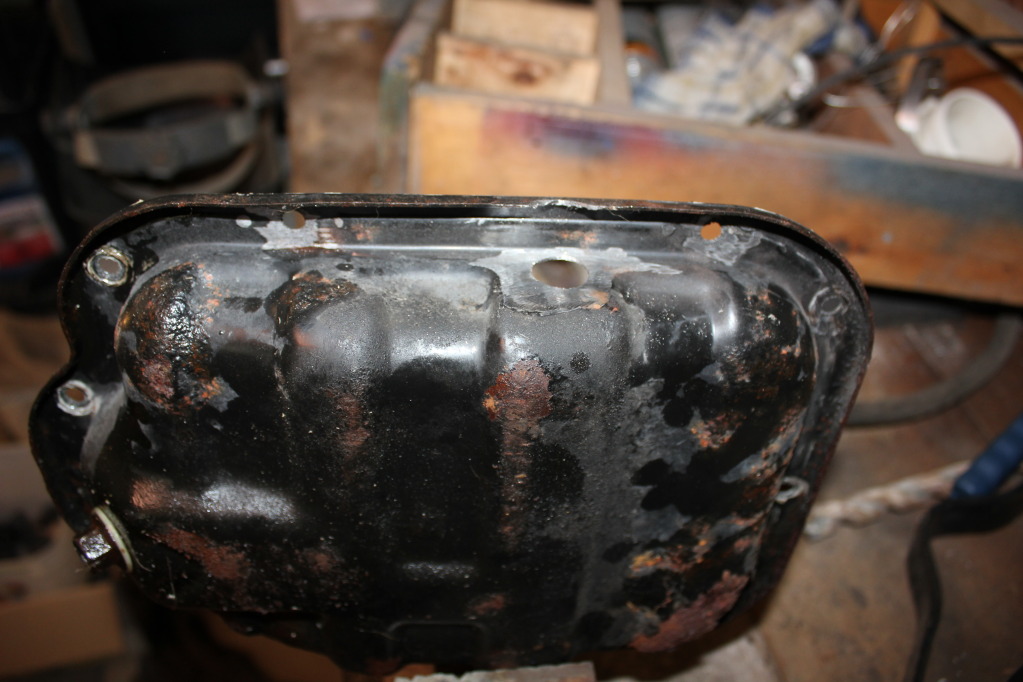
Grind areas around hole down clean as heck, one little bit of dirt or contamination and your weld is junk, it'll leak.
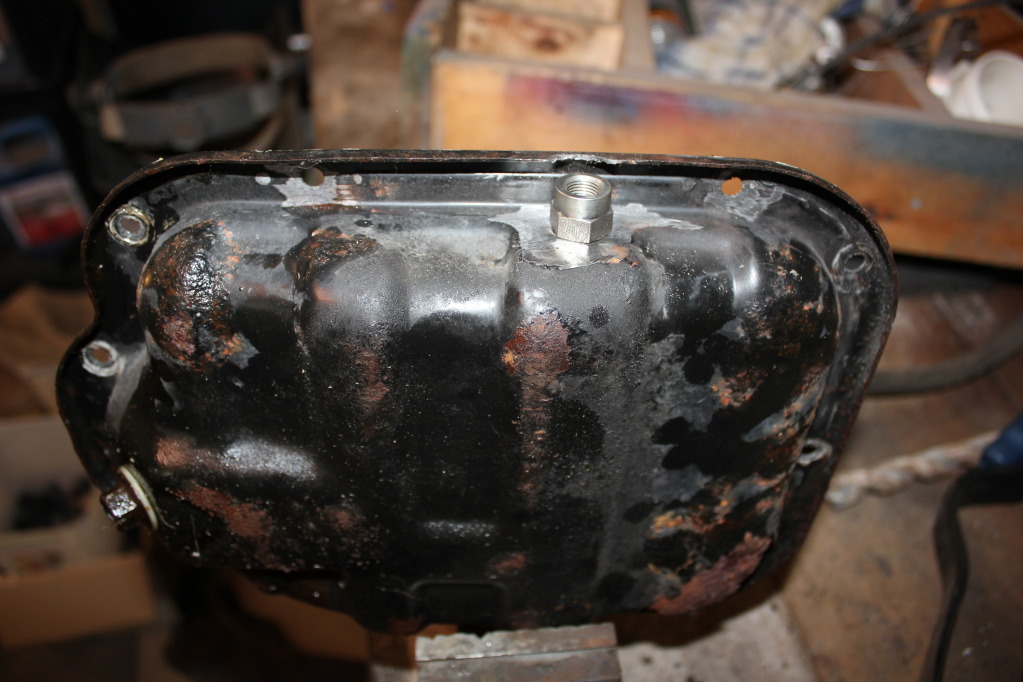
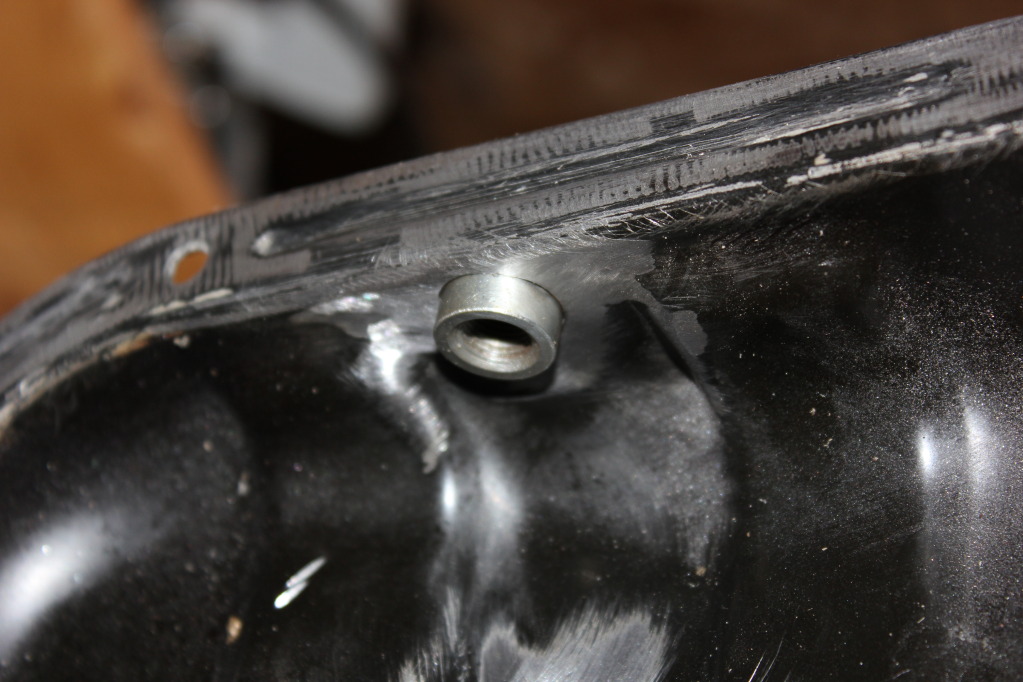
CLEAN THE FITTING BEFORE WELDING. The welding heat will melt it off if you forget thi step, but there's a coating on even these steel fittings to prevent corrosion and it can contaminate the weld. Just take a wire wheel to it first, no biggie. This steel is thin and you need all the tricks/help you can utilize.
Weld inside and outside. Slowly, one tiny little pass at a time, allow to cool gratiously. Clean again before doing the next little pass. 1 cm at a time is a good idea for this stuff.
Once Dry, I recommend buffing it clean as heck and putting JB waterweld around the joint and surrounding areas as added insurance. You'll obviously need to buff and brake-clean/acetone any areas you will apply it and allow them to dry first.
Run a 1/8" NPT pipe tap through the fitting to make sure it's GTG. Then test fit with the Temp sensor fully installed to make sure it's all good.
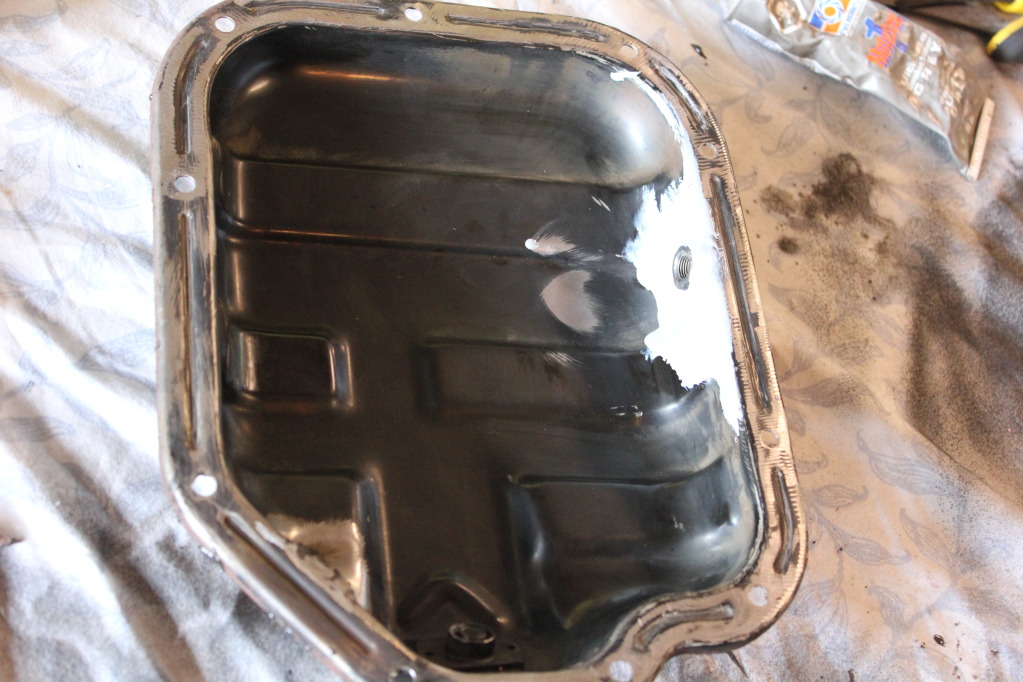
Clean Oil pan mating surfaces of any paint and all silicone, ALL. Acetone/brake clean, allow to dry. Install using ULTRA blue or ULTRA grey silicone. Recommend 1 dab of blue lock-tite on each oil pan bolt.

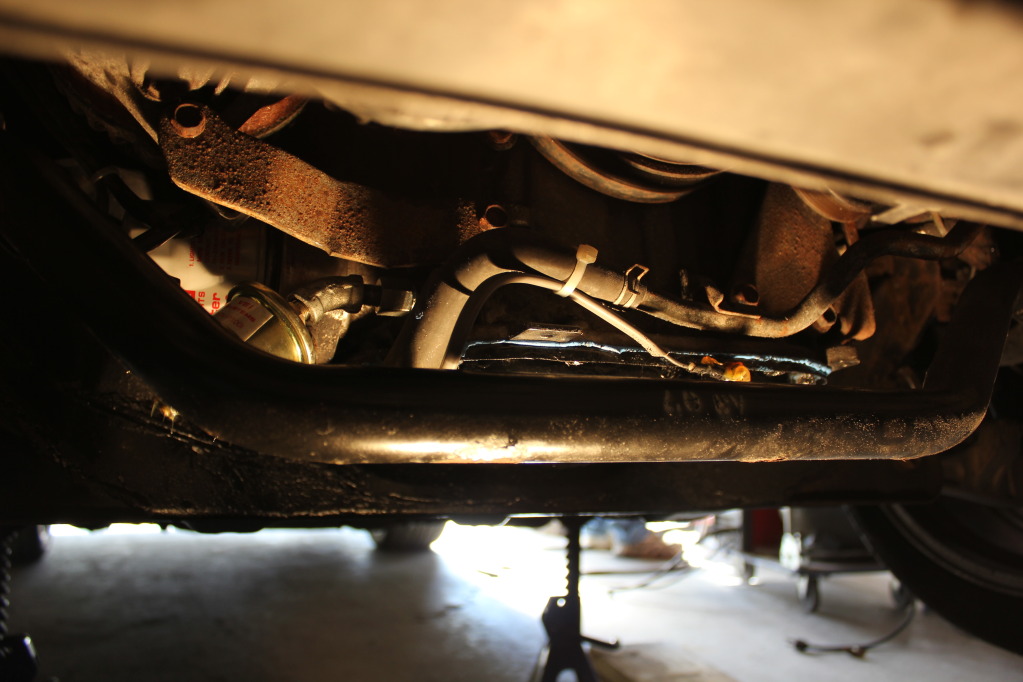
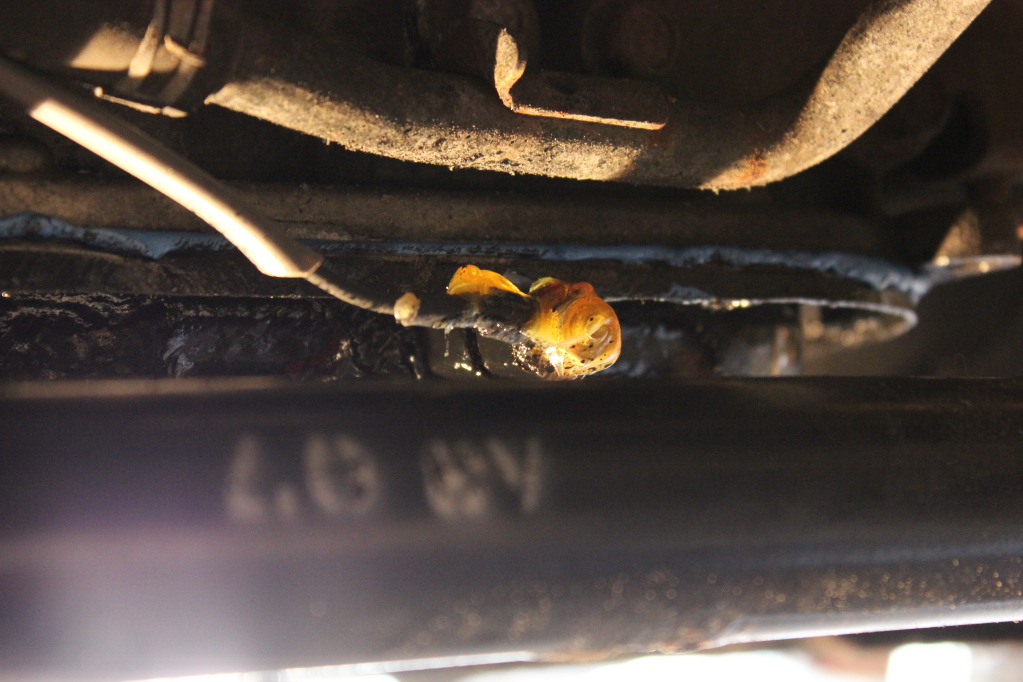
Wire in. recommend shrink tube, quality wire, keep wiring away from exhaust manifold, obviously, and die-electric grease on all connections.
I also used rock-guard on the oil pan to protect from rust.
Shout-outs to Binder for letting me know about the Oil Pressure sensor install, he made it easier for me.
Elaborate: OEM has either a stock Pressure sensor (350) or Pressure sensor Switch (G). These are wired without a default, this means that you can simply leave it disconnected and it won't trip your oil light.
So if installing an aftermarket setup like I did, you simply replace the stock one with aftermarket. No need to "T" off or anything like that, as you do with some cars.
I'd assume you'll need to do what I did though unless your Sending unit is signifiantly smaller than the one I got.
Need, recommend cast, black, or steel fittings for this application, NOT BRASS:
1x 1/8" Male BSPT (British Standard Pipe Taper) to Female 1/8" NPT
Stock threads are Metric (BSPT) and you can NOT put the normal NPT threads in there, it will leak. FYI: You CAN pay a ridiculous amount ($10-30+) Online for this fitting. OR you can go to your local Hydraulic Supplier and get it for $3. They may have to order it, but it'll be faster and WAAAAAY cheaper. Same or better quality.
1x 1/8" NPT nipple
1x 1/8" NPT 45* female
OR
1x 1/8" NPT extruded 45* (unsure if this will work, I didn't try it, but it would be nicer to use the lease amount of fittings as necessary.
Also-- Don't use Teflon tape. This can/will break down and get into your oil galleries, potentially plugging the system and causing catastropic failure. If you need to use some due to leaks put it only on the back-side of the threads (last couple threads to go in before it's tight.
Installed:
Temp Sensor. This is the one that will suck a bit, and take some DIY. You can use common measures such as
1. Oil filter spacer
2. Oil Pan spacer
And so on. These have fittings and are used commonly with the V1 and V2 Superchargers for oil lines. If you don't mind putting the cash up, have at it.
If you want to DIY, here. Keep in mind, this Pan is thin steel, this is only recommended for skilled/experienced welders. Don't yell at me if you blow it, but you can PM me and I'll try to help
:Need:
1x 1/8" NPT STEEL (weldable) coupler
(recommend-- 1x JB Waterweld)
Remove oil pan. Locate suitable position for sensor. Ensure clearance to Sway Bar.
Once you found where you want it, mark it and drill it out. I drilled mine to the O.D. of the coupler so I could slide it in, otherwise you can't weld the top section close to the lip. this way you can weld the inside AND outside of it.
Grind areas around hole down clean as heck, one little bit of dirt or contamination and your weld is junk, it'll leak.
CLEAN THE FITTING BEFORE WELDING. The welding heat will melt it off if you forget thi step, but there's a coating on even these steel fittings to prevent corrosion and it can contaminate the weld. Just take a wire wheel to it first, no biggie. This steel is thin and you need all the tricks/help you can utilize.
Weld inside and outside. Slowly, one tiny little pass at a time, allow to cool gratiously. Clean again before doing the next little pass. 1 cm at a time is a good idea for this stuff.
Once Dry, I recommend buffing it clean as heck and putting JB waterweld around the joint and surrounding areas as added insurance. You'll obviously need to buff and brake-clean/acetone any areas you will apply it and allow them to dry first.
Run a 1/8" NPT pipe tap through the fitting to make sure it's GTG. Then test fit with the Temp sensor fully installed to make sure it's all good.
Clean Oil pan mating surfaces of any paint and all silicone, ALL. Acetone/brake clean, allow to dry. Install using ULTRA blue or ULTRA grey silicone. Recommend 1 dab of blue lock-tite on each oil pan bolt.
Wire in. recommend shrink tube, quality wire, keep wiring away from exhaust manifold, obviously, and die-electric grease on all connections.
I also used rock-guard on the oil pan to protect from rust.
Last edited by TunerMax; Sep 9, 2012 at 08:45 PM.


thanks bro.. I really needed that cuz I was trying to figure it out... but I'm kinda concerned about the thread size between the stock vs the after market, is there any deference or is it universal to all??
EDIT: ops sorry never mind just didn't read all of it...
EDIT: ops sorry never mind just didn't read all of it...
Last edited by dj lizard; Sep 10, 2012 at 12:41 AM.

Good write up. Glad I could help.
I like how you welded the fitting right into the pan instead of drilling into the upper pan so you can easily replace it back to stock.
FYI, the defi oil PRESSURE sensor is smaller than the OEM unit so it will screw right into the block with their supplied adapter in the box.
I like how you welded the fitting right into the pan instead of drilling into the upper pan so you can easily replace it back to stock.
FYI, the defi oil PRESSURE sensor is smaller than the OEM unit so it will screw right into the block with their supplied adapter in the box.
Last edited by binder; Sep 14, 2012 at 06:41 PM.


Thread Starter
Registered User
iTrader: (2)
Joined: Dec 2011
Posts: 270
Likes: 2
From: KW Ontario Canada
NP happy to help put some more info out. It's interesting watching oil temp vs. pressure changes.
You mean Temp or Pressure?
Good write up. Glad I could help.
I like how you welded the fitting right into the pan instead of drilling into the upper pan so you can easily replace it back to stock.
FYI, the defi oil temp sensor is smaller than the OEM unit so it will screw right into the block with their supplied adapter in the box.
I like how you welded the fitting right into the pan instead of drilling into the upper pan so you can easily replace it back to stock.
FYI, the defi oil temp sensor is smaller than the OEM unit so it will screw right into the block with their supplied adapter in the box.
Trending Topics


Thread
Thread Starter
Forum
Replies
Last Post