
DIY: Torque Solutions Transmission Mount

Thread Starter
Retired Admin
iTrader: (95)
Joined: Dec 2000
Posts: 1,337,017,813
Likes: 78
From: Dallas / Chicago
Adam's DIY thread (click) does a great job as far as installation and review goes.
I mainly wanted to create this thread so that those with, or those interested in, this particular mount can become more knowledgeable prior to install/purchase. You'll see what I mean soon.
Most urethane transmission mounts you'll see will be a Torque Solution one like this:
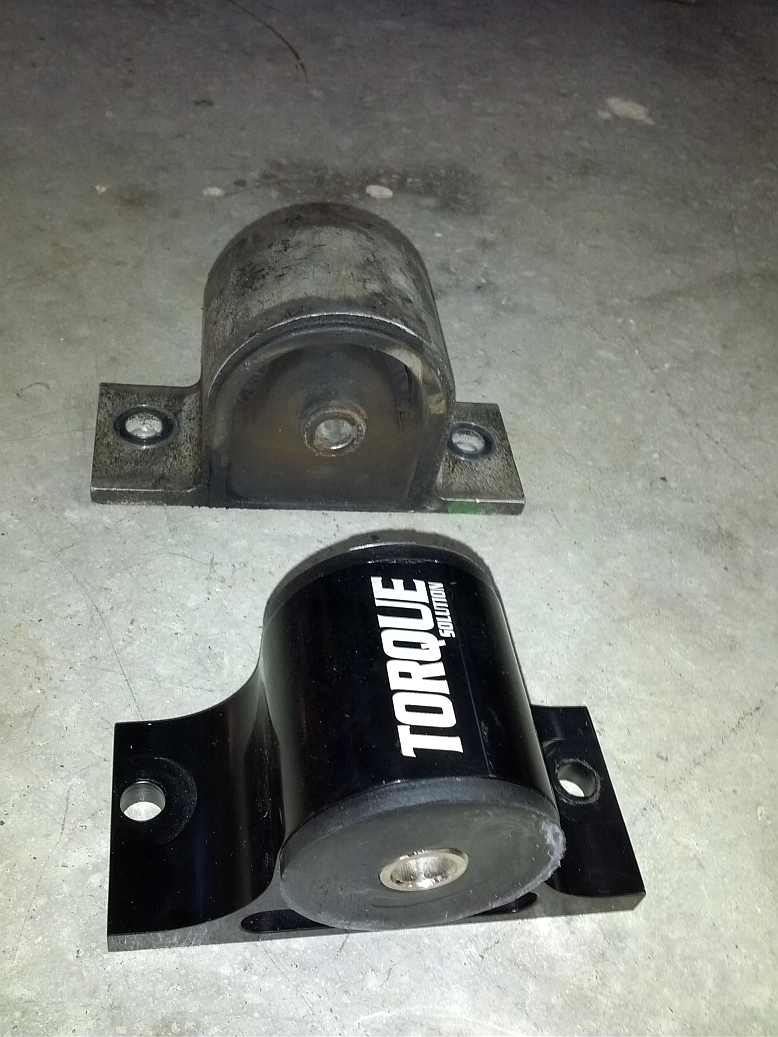
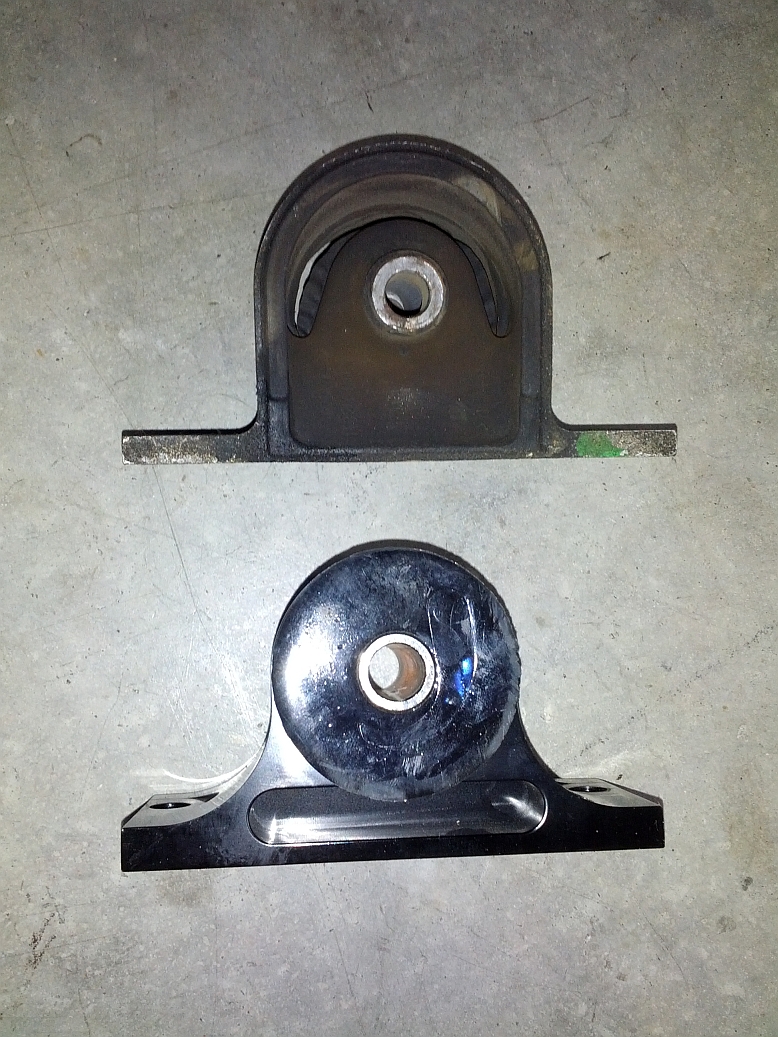
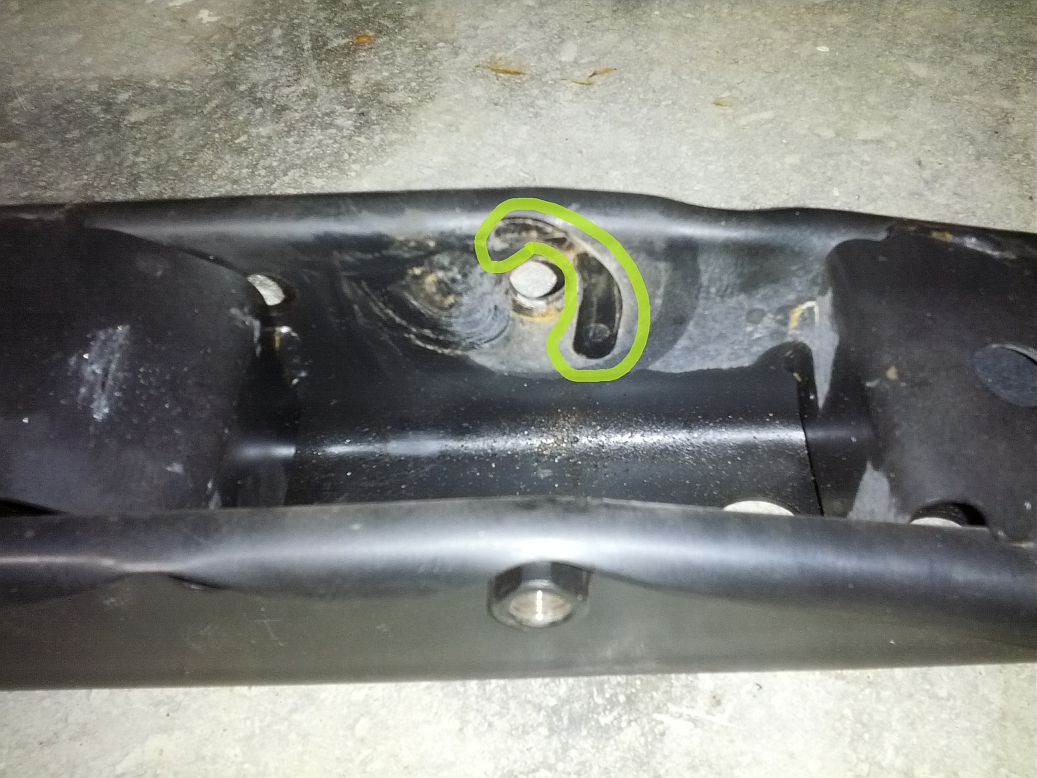
Unfortunately, a lot of the pics and those being sold in the Private Classifieds here have the wrong size pins, causing extreme NVH. That's why so many people install this and immediately take it off then sell. Here's what I'm talking about and a comparison with OEM:

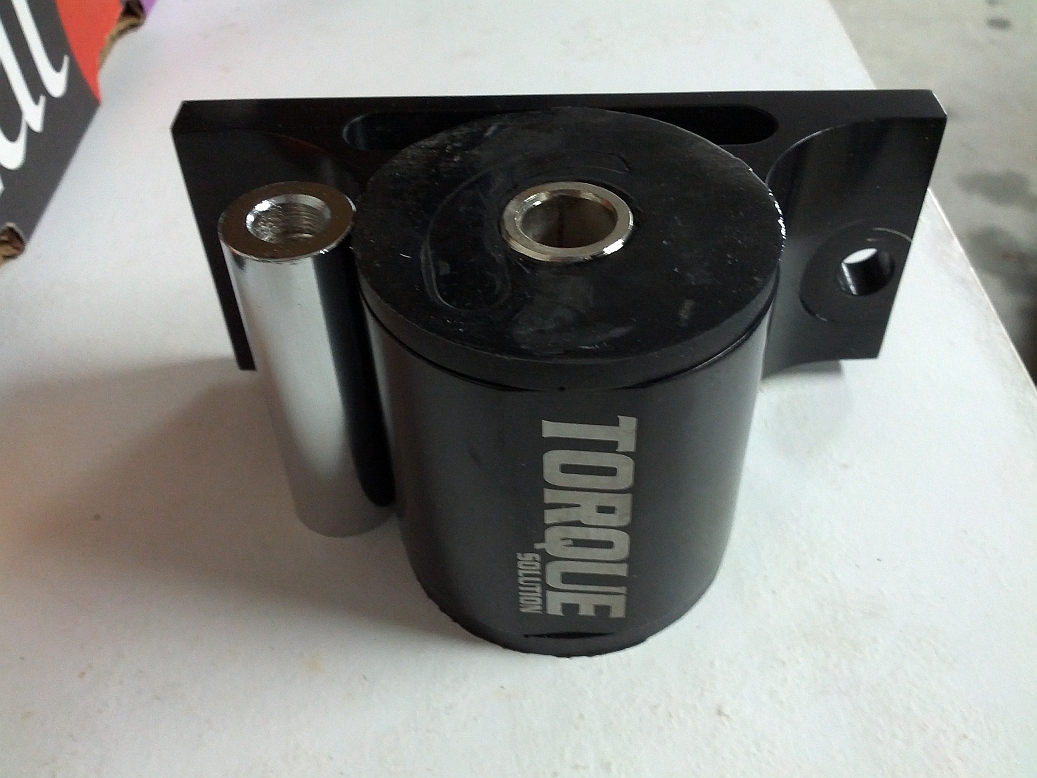
I contacted Mike@torquesolution.com and told him how I bought this about a year back from a forum member and was only recently installing just to find out it doesn't fit properly. He emailed me back in about 30 min and told me he'd send out the correct size pin, no questions asked! That already says a lot about the company, imo. Then a few days later, the correct size pin arrived:
So, I got to work:

__________________
Time to install! I'm going to assume that if you're attempting, you know how to get your car in the air. Make sure you support your transmission with a floor jack or a transmission jack first. Take out the four 14mm bolts that are holding the cross member (black metal) and large 14mm bolt.
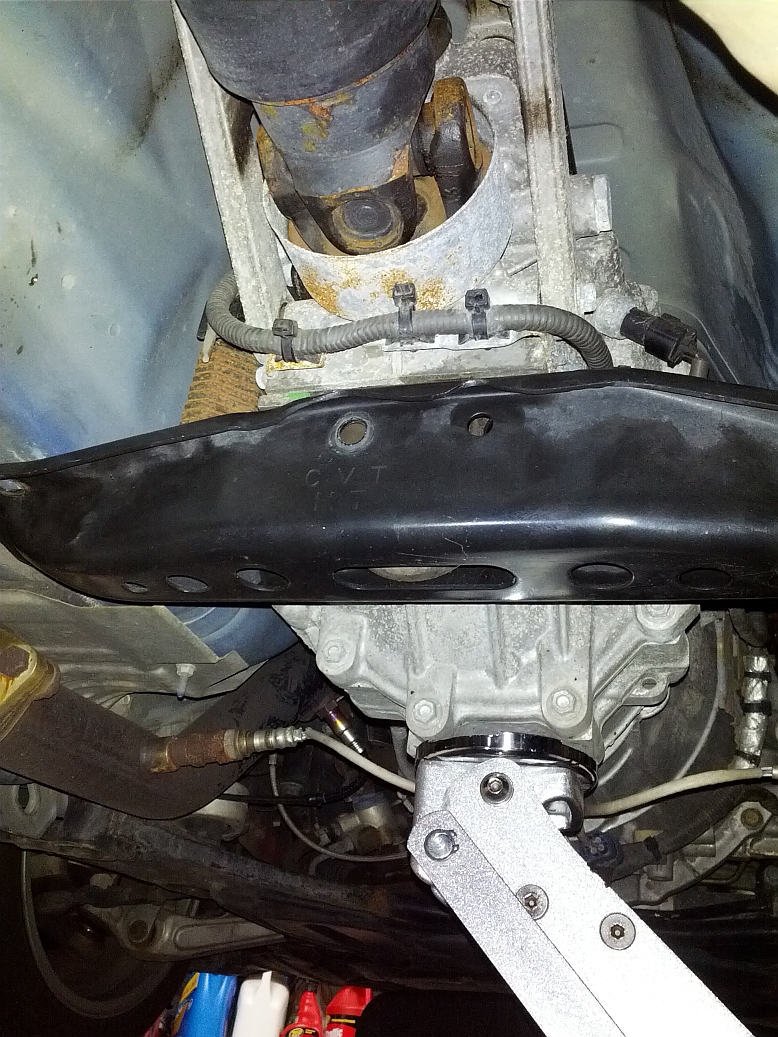

Once you take out the bolts, it'll help a lot to slightly lower the transmission so you can wrestle out the cross member. You have to wiggle it, but you mostly want to push up toward the car and then to the driver's side. This is because there's a hook, meant for the oem pin.
You then remove the two 14mm bolts that hold the transmission mount and replace it with the Torque Solutions mount. Lol, you can see in my picture that I initially installed it with the wrong size pin first and had to find out the hard way.

The rest is easy. You just work up backwards and everything you took off gets torqued down to 32-40 ft-lbs. Installation of the cross member with the aftermarket mount is easier because there's nothing for it to hook onto -- just bang it into place then line up the hole with a screwdriver. Maneuver the jack to line up everything before tightening everything. And you're done!
I mainly wanted to create this thread so that those with, or those interested in, this particular mount can become more knowledgeable prior to install/purchase. You'll see what I mean soon.
Most urethane transmission mounts you'll see will be a Torque Solution one like this:
Unfortunately, a lot of the pics and those being sold in the Private Classifieds here have the wrong size pins, causing extreme NVH. That's why so many people install this and immediately take it off then sell. Here's what I'm talking about and a comparison with OEM:
I contacted Mike@torquesolution.com and told him how I bought this about a year back from a forum member and was only recently installing just to find out it doesn't fit properly. He emailed me back in about 30 min and told me he'd send out the correct size pin, no questions asked!
That already says a lot about the company, imo. Then a few days later, the correct size pin arrived:So, I got to work:
__________________
Time to install! I'm going to assume that if you're attempting, you know how to get your car in the air. Make sure you support your transmission with a floor jack or a transmission jack first. Take out the four 14mm bolts that are holding the cross member (black metal) and large 14mm bolt.
Once you take out the bolts, it'll help a lot to slightly lower the transmission so you can wrestle out the cross member. You have to wiggle it, but you mostly want to push up toward the car and then to the driver's side. This is because there's a hook, meant for the oem pin.
You then remove the two 14mm bolts that hold the transmission mount and replace it with the Torque Solutions mount. Lol, you can see in my picture that I initially installed it with the wrong size pin first and had to find out the hard way.
The rest is easy. You just work up backwards and everything you took off gets torqued down to 32-40 ft-lbs. Installation of the cross member with the aftermarket mount is easier because there's nothing for it to hook onto -- just bang it into place then line up the hole with a screwdriver. Maneuver the jack to line up everything before tightening everything. And you're done!


Thread Starter
Retired Admin
iTrader: (95)
Joined: Dec 2000
Posts: 1,337,017,813
Likes: 78
From: Dallas / Chicago
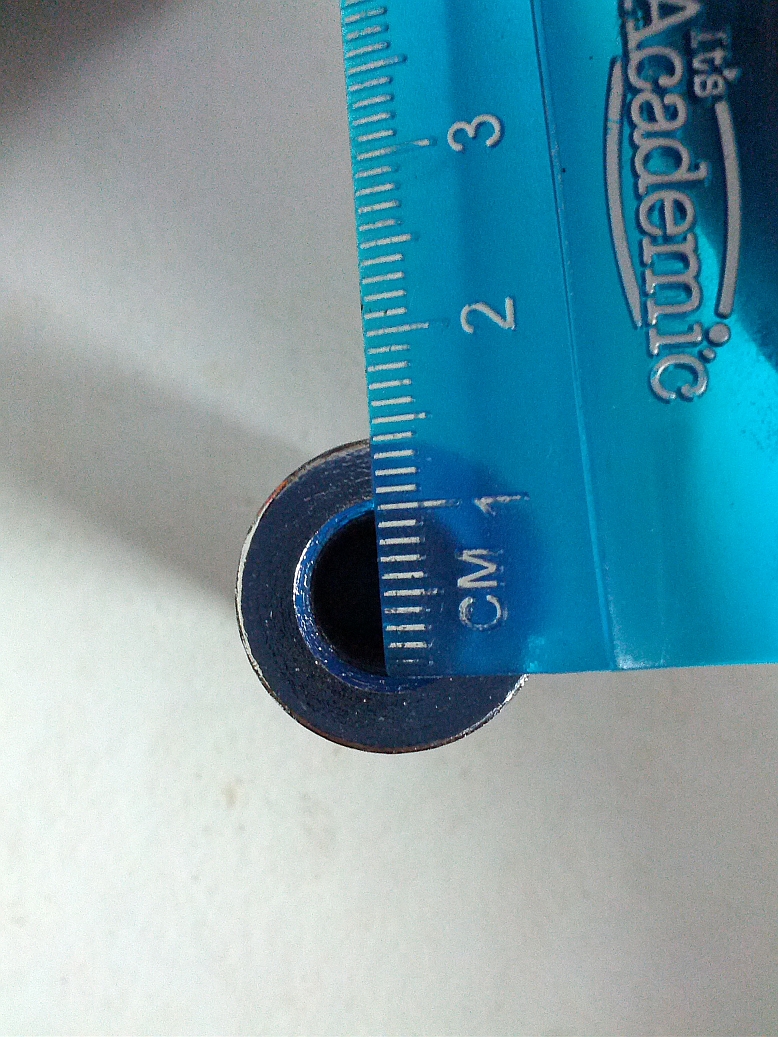
I finally found my digital caliper and measured the IDs of the OEM mount and the old pin for the Torque Solutions mount. You can see why people would want to get rid of this thing immediately with the wrong pin. Unfortunately, the new pin is already installed and I'm not going to take it out just to measure it. 
As for the review with the proper sized pin, I'm just going to quote Adam from his old DIY/review thread.
Adam's is 75a. I forget which one the Torque Solution one is but it's either 60a or 75a.
As for the review with the proper sized pin, I'm just going to quote Adam from his old DIY/review thread.
The car immediately has a much deeper tone inside the cabin just by virtue of the fact that the new mount has much less slop in it, and has a full radius bushing (if you look in the picture showing the comparison with the stock mount, you can see daylight with the stock mount!). This disconnect keeps things quiet and Camry like, but also gives the car a much vaguer feeling compared to the new mount. It was so much different sounding I thought my Y pipe was still disconnected! The shifter has a much more positive feel to it, which is very noticeable especially at higher rpm shifts. Engaging first and running through the gears from a dead stop, you immediately notice that the car has a much more direct overall feel. If you are in a higher rpm and just crusing (for example 2nd, entering a turn) the slight rocking back and forth that the car used to have is completely gone. I’ll drive the car through the weekend provided the weather is nice and post any noticeable changes.


Registered User
Joined: Aug 2022
Posts: 1
Likes: 0
From: Pennsylvania
I finally found my digital caliper and measured the IDs of the OEM mount and the old pin for the Torque Solutions mount. You can see why people would want to get rid of this thing immediately with the wrong pin. Unfortunately, the new pin is already installed and I'm not going to take it out just to measure it.
As for the review with the proper sized pin, I'm just going to quote Adam from his old DIY/review thread.
Adam's is 75a. I forget which one the Torque Solution one is but it's either 60a or 75a.
As for the review with the proper sized pin, I'm just going to quote Adam from his old DIY/review thread.
Adam's is 75a. I forget which one the Torque Solution one is but it's either 60a or 75a.

New Member
Joined: Dec 2022
Posts: 7
Likes: 0
From: California
I have a 04 350z and I just got the torque solution trans mount, installed it right away torque every bolt to 35 ft, started the car and vibrations where as expected but had a disk �like� grinding sound but once I pressed my clutch in it went away (tought to myself maybe that�s how aggressive the feel is) so I backed it up and could not even pass 3500 rmp it was shaking like my car was literally broken apart, took it off now have the stock one back on, now this pin would get rid of that feeling? Kinda weird bc I�m YouTube nobody talks bout it they straight up mount it.
Trending Topics


Thread
Thread Starter
Forum
Replies
Last Post