
install Bat's overlays

Thread Starter
Registered User
iTrader: (24)
Joined: Aug 2005
Posts: 2,947
Likes: 0
From: NewCastle, WA
I had installed Bat's overlays more than a year ago and loved the look (6/10 on head/tail lights), but I had a few imperfections that I wanted to fix...I had used a heat gun instead of a hair dryer (at the time, I was un-married and didn't have access to one); needless to say, the heat gun was way too hot and I had a few wrinkles that up close, didn't look the best.
here's my process:
1) I removed the old overlays...intially I was scared that this would be a PITA, but it's actually very easy; I heated the overlays up with my wife's hair dryer and just pealed them off.
this is before using the hair dryer...it was much harder to get the overlay off w/out the extra heat...btw, the car was filthy when I was taking them off...it had been snowing a lot and the car sat in the garage for almost 2 months


2) I unrolled the new overlays and put a few items on top of them to get them flat.
3) I then washed the head lights really really well.
4) I then peeled off the back and dipped the overlays into a water/soap mixture
5) sprayed the headlight w/ the water/soap mixture
6) Aligned the overlay and began useing a credit card w/ soft towel over it to move the bubbles/water out.


(I have a lot more pics, but it's really hard to tell the difference w/ the lighting)
7) after that, I began using the hair dryer to soften the curved portions...and slowly-slowly wiped those areas to get the overlays to lay down. As I did this, I tried to evenly disperse the waviness...that way, the heat could help to lie all of it down properly; if you leave big waves, it's harder for the material to shrink enough to be flat.

you can see that the waviness is smaller and it's starting to lay down...this is the part that takes patience.

8) on the edges, I used a bit more heat to get the excess mateiral to curl around the edges.
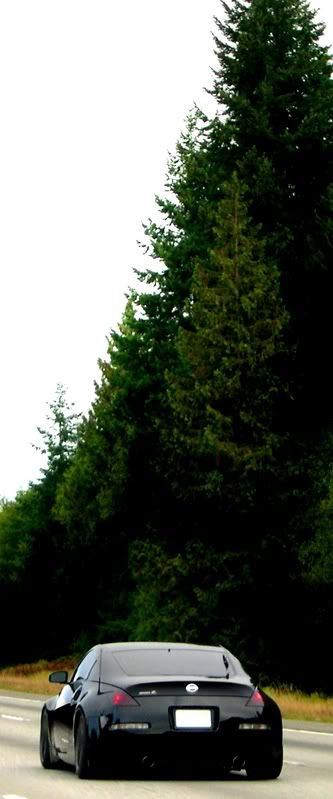
here's the finished product:
w/out flash:

here's a few old shots of the car w/ th overlays...from a distance, you can't tell a difference; but up close, you can.


*In all, this took me around 2 hrs total...I'm really bad at exterior type of things, so there's probably ppl in this section that could do it much faster and better then me
I'm also doing my front/rear side markers...I'[ll post a separate thread on those.
-Peter
here's my process:
1) I removed the old overlays...intially I was scared that this would be a PITA, but it's actually very easy; I heated the overlays up with my wife's hair dryer and just pealed them off.
this is before using the hair dryer...it was much harder to get the overlay off w/out the extra heat...btw, the car was filthy when I was taking them off...it had been snowing a lot and the car sat in the garage for almost 2 months
2) I unrolled the new overlays and put a few items on top of them to get them flat.
3) I then washed the head lights really really well.
4) I then peeled off the back and dipped the overlays into a water/soap mixture
5) sprayed the headlight w/ the water/soap mixture
6) Aligned the overlay and began useing a credit card w/ soft towel over it to move the bubbles/water out.
(I have a lot more pics, but it's really hard to tell the difference w/ the lighting)
7) after that, I began using the hair dryer to soften the curved portions...and slowly-slowly wiped those areas to get the overlays to lay down. As I did this, I tried to evenly disperse the waviness...that way, the heat could help to lie all of it down properly; if you leave big waves, it's harder for the material to shrink enough to be flat.
you can see that the waviness is smaller and it's starting to lay down...this is the part that takes patience.
8) on the edges, I used a bit more heat to get the excess mateiral to curl around the edges.
here's the finished product:
w/out flash:
here's a few old shots of the car w/ th overlays...from a distance, you can't tell a difference; but up close, you can.
*In all, this took me around 2 hrs total...I'm really bad at exterior type of things, so there's probably ppl in this section that could do it much faster and better then me
I'm also doing my front/rear side markers...I'[ll post a separate thread on those.
-Peter
Last edited by first350; Feb 12, 2007 at 06:53 PM.


Thread Starter
Registered User
iTrader: (24)
Joined: Aug 2005
Posts: 2,947
Likes: 0
From: NewCastle, WA
Originally Posted by Voboy
i liked the smoked look, but the only reason I don't want to do it is that I'm losing light output  but this is like a cheap alternative to getting your headlights painted.
but this is like a cheap alternative to getting your headlights painted.
Originally Posted by first350
I agree that it's cheaper than painting your headlights, but it's also not permanent (A new headlight housing would be $$). As for light output, I've found that my high beams w/ overlays is about the same as low beams w/out...so I just drive around w/ high beams on. i really don't miss the difference in light output at all.
Trending Topics


 .
.
Thread
Thread Starter
Forum
Replies
Last Post
Gruppe-S
Body Interior
13
May 16, 2016 10:42 PM