
Interior LED Conversion


After converting all the gauges, window switches, and a/c gauges i realized that illuminated ring around the ignition is bright amber  .
.
So I pulled the bulb/socket and pigtail that lights the ring. The bulb is a #74 wedge incandescent with an amber rubbber "condom" over it (like the older Autometer gauges).
The ring itself appears to be untinted so I went on the hunt for a RED #74 bulb to make my light ring match my blue with red accent theme.
I ended up buying 3 different types of Red #74 bulbs: 1 incandescent, 1 LED with a single SMD LED facing straight up, and 1 LED with an inverted lens. I chose these b/c they are the same size as the standard bulb.
Source for #74 colored bulbs: http://autolumination.com/74.htm
This weekend i will try each bulb and post the results.
LED Conversion Results:

.So I pulled the bulb/socket and pigtail that lights the ring. The bulb is a #74 wedge incandescent with an amber rubbber "condom" over it (like the older Autometer gauges).
The ring itself appears to be untinted so I went on the hunt for a RED #74 bulb to make my light ring match my blue with red accent theme.
I ended up buying 3 different types of Red #74 bulbs: 1 incandescent, 1 LED with a single SMD LED facing straight up, and 1 LED with an inverted lens. I chose these b/c they are the same size as the standard bulb.
Source for #74 colored bulbs: http://autolumination.com/74.htm
This weekend i will try each bulb and post the results.
LED Conversion Results:
Last edited by ian99rt; May 16, 2012 at 05:00 PM.


Registered User
Joined: Jan 2012
Posts: 44
Likes: 0
From: virginia
so i am having a hard time with the right angle leds i cant get any of them to work i ts due to my soldering skills (which is 0) so if anyone is in the 757 who knows how to do this and wants to make money pm me
Right angle LEDs where? I didnt have any right angled LEDs other than the buttons on the side of the steering wheel cluster.
Last edited by ian99rt; Jun 2, 2012 at 08:40 PM.


I just did this and all I can say is wow. Definately one of the more satisfying mods Ive done. I did the swap on my old eclipse GSX and it was the most satisfying thing I did to that car. Definately an awesome mod.
I bought my LEDs from blackcatcustoms. Ive used their gauge faces on my GSX and they are beautiful. Their 350z LED kit does not include the 4 LEDs in the center console on the left and right side to control brightness, and the tach/mpg/mph switch. So make sure to buy these on top of their kit.
I also couldnt get the indicators on the 12 right angle LEDs to work after the swap. Looking at it, it looks like they are wired in series, so if one isnt connected properly, none of them will work. This is an all day job, i think i spent like 14 hours on it, and by the end of the day i said **** it for the 12 right angle ones. The AC control pannel is the easiest to access, so Ill go back later if it bothers me.
Also, get your self a good soldering iron, and a proper soldering station. It makes the job 100times easier. If you are still using that $15 20watt one from radio shack, then you are doing it wrong. Look at it as an investment. Weller, American Beauty, etc all make great ones.
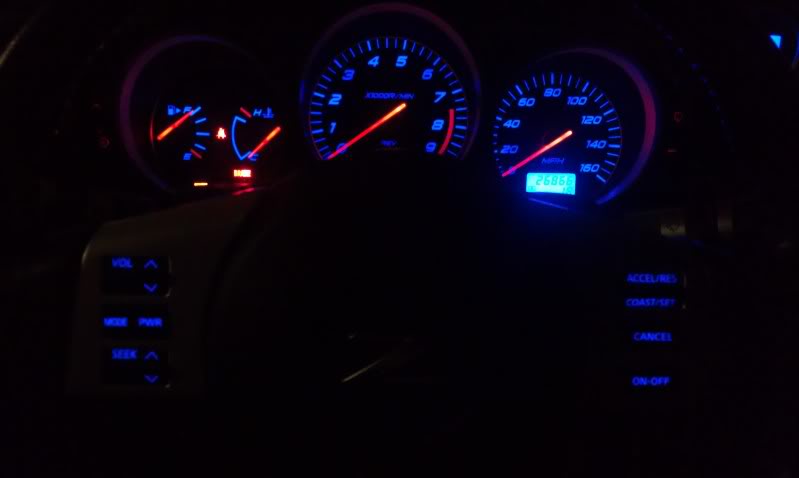
Before (nasty orange):

After!:

*I do not apologize for craptastic iPhone pics
I bought my LEDs from blackcatcustoms. Ive used their gauge faces on my GSX and they are beautiful. Their 350z LED kit does not include the 4 LEDs in the center console on the left and right side to control brightness, and the tach/mpg/mph switch. So make sure to buy these on top of their kit.
I also couldnt get the indicators on the 12 right angle LEDs to work after the swap. Looking at it, it looks like they are wired in series, so if one isnt connected properly, none of them will work. This is an all day job, i think i spent like 14 hours on it, and by the end of the day i said **** it for the 12 right angle ones. The AC control pannel is the easiest to access, so Ill go back later if it bothers me.
Also, get your self a good soldering iron, and a proper soldering station. It makes the job 100times easier. If you are still using that $15 20watt one from radio shack, then you are doing it wrong. Look at it as an investment. Weller, American Beauty, etc all make great ones.
Before (nasty orange):
After!:
*I do not apologize for craptastic iPhone pics
Last edited by yomike007; Sep 1, 2012 at 09:42 AM.


The only thing I couldnt get totally finished on mine was the turn signal overlays. I totally hosed the stock ones then found some material at work that would probably work as replacement. If I ever get off my a$$ someday I'll see if the laser etch operator will create a pattern and knock out a whole sheet of them.
Meanwhile, only one LED has burned out since I first did my mod, one of the through hole LEDs behind one of the silver buttons off the left side of the main cluster.
Meanwhile, only one LED has burned out since I first did my mod, one of the through hole LEDs behind one of the silver buttons off the left side of the main cluster.
He's talking about the ones that light up the AC dials on the 03-05 models. They can be mounted to shine straight up or laid on their side and shine to the side, into the light tube that surrounds each dial.
Disregard any of my mentions regarding changing out resistors. The PDF of this procedure has been updated with those mentions removed. I've removed the table from the first page of this thread that showed resistor details. I'm in the process of replacing images that indicate resistors that should be replaced. Reason: My information was not validated. So far I've not gotten reports of problems which is a relief. Acree posted links to his threads which I believe may contain info on changing out the resistors though I've not checked those links out yet.
Also, there's good information, not yet included in my PDF, starting at post #180 about an alternative way of changing out the LEDs for the 06 - 08 AC dial pointers. Another post a bit further back from that mentions using PLCC-4 LEDs instead of PLCC-2 like I used. If memory serves, I started with PLCC-2 LEDs because that's what I got when I bought the kit off Ebay.
If you decide you want the PDF, PM me with your email address and I'll send it but I highly recommend also reading through this thread to get additional information and ideas.
Last edited by lbz; Feb 4, 2013 at 10:41 PM.

Registered User
Joined: Feb 2013
Posts: 1
Likes: 0
From: oregon

I have found another method for changing out the pointers for the 06+ HVAC. Instead of taking off any of the leads, since I tried with another unit, getting them to line up with the contact board made the LED's not always contact correctly, I used an exacto knife to gently pry up the contacts near the LED, replace it with a soldered LED and then push the contacts back down. After they are in contact (Use a magnifying glass) then just tap the soldering iron to them to make the connection. A lot less complicated and mine work flawlessly. Thanks goes out to lbz and this thread, here is the finished product. EVERYTHING orange is now gone.
I also sanded, then used a scratch pad on my pointers to give them the frosted look.
I also added some diffuser around the tach, especially at the 12 o'clock to spread it out more evenly. This was a 3 week job for me, but I took my time, an hour here or there until completion. It is still not done, but I am a perfectionist. Trying to get rid of hotspots takes some serious time.


After working for a while on other ways to diffuse the light.

Going to take the steering wheel back apart and go with 1206's as they have a closer hue to the HVAC and Stereo. The results..

And after changing out all the PLCC-4's and running 1206's in the instrument cluster and pods so they all match. Along with 1206's in the Steering Wheel.


I also sanded, then used a scratch pad on my pointers to give them the frosted look.
I also added some diffuser around the tach, especially at the 12 o'clock to spread it out more evenly. This was a 3 week job for me, but I took my time, an hour here or there until completion. It is still not done, but I am a perfectionist. Trying to get rid of hotspots takes some serious time.
After working for a while on other ways to diffuse the light.
Going to take the steering wheel back apart and go with 1206's as they have a closer hue to the HVAC and Stereo. The results..
And after changing out all the PLCC-4's and running 1206's in the instrument cluster and pods so they all match. Along with 1206's in the Steering Wheel.
Last edited by rlw1979777; Mar 30, 2013 at 08:51 PM.

Registered User
Joined: Mar 2013
Posts: 4
Likes: 0
From: bolton
Hi I was wondering if you know or who I can ask. reguarding 2 questions.
I sent my stuff to a nice gentleman in texas who has done these leds before for 2003-2005 models. My 350z is a 2006
for some reason he is not able to get the 2 right heater control **** to work with the leds. I changed them from orange to blue. The first one works fine but the other 2 wont turn on.
Also if anyone knows how to change the led out of the power mirror control switch as we are also unsure how to do that the rest of the car was changed. ? can anyone help? my model is a 2006.
Registered User
Joined: Mar 2013
Posts: 4
Likes: 0
From: bolton
hey I have a friend out in texas doing this led convestion for me as well. he is having 2 issues. (I have a 2006 350z)
1. how do we remove the power mirror switch *** to do the l.e.d in that?
2. for some reason we got the ac *** to light up blue but the other 2 controls we are having trouble with... can anyone help please?
1. how do we remove the power mirror switch *** to do the l.e.d in that?
2. for some reason we got the ac *** to light up blue but the other 2 controls we are having trouble with... can anyone help please?
I just did this and all I can say is wow. Definately one of the more satisfying mods Ive done. I did the swap on my old eclipse GSX and it was the most satisfying thing I did to that car. Definately an awesome mod.
I bought my LEDs from blackcatcustoms. Ive used their gauge faces on my GSX and they are beautiful. Their 350z LED kit does not include the 4 LEDs in the center console on the left and right side to control brightness, and the tach/mpg/mph switch. So make sure to buy these on top of their kit.
I also couldnt get the indicators on the 12 right angle LEDs to work after the swap. Looking at it, it looks like they are wired in series, so if one isnt connected properly, none of them will work. This is an all day job, i think i spent like 14 hours on it, and by the end of the day i said **** it for the 12 right angle ones. The AC control pannel is the easiest to access, so Ill go back later if it bothers me.
Also, get your self a good soldering iron, and a proper soldering station. It makes the job 100times easier. If you are still using that $15 20watt one from radio shack, then you are doing it wrong. Look at it as an investment. Weller, American Beauty, etc all make great ones.
Before (nasty orange):
After!:
*I do not apologize for craptastic iPhone pics
If the AC control ***** are not making contact, it may be because the riders that slide around the contact ring may not have been aligned correctly, or after rebuilding they might be slightly crooked. This can cause them to not contact.
The LED for the Rear View Mirror is one I am about to tackle in the next week or so. But still working out some of the hotspots in the Speedometer and changed out all the LED's in the entire car to 1206's to get the right hue to the white.
The LED for the Rear View Mirror is one I am about to tackle in the next week or so. But still working out some of the hotspots in the Speedometer and changed out all the LED's in the entire car to 1206's to get the right hue to the white.
Last edited by rlw1979777; Mar 30, 2013 at 08:37 PM.
Registered User
Joined: Mar 2013
Posts: 4
Likes: 0
From: bolton
Hi I was wondering if you know or who I can ask. reguarding 2 questions.
I sent my stuff to a nice gentleman in texas who has done these leds before for 2003-2005 models. My 350z is a 2006
for some reason he is not able to get the 2 right heater control **** to work with the leds. I changed them from orange to blue. The first one works fine but the other 2 wont turn on.
Also if anyone knows how to change the led out of the power mirror control switch as we are also unsure how to do that the rest of the car was changed. ? can anyone help? my model is a 2006.
I sent my stuff to a nice gentleman in texas who has done these leds before for 2003-2005 models. My 350z is a 2006
for some reason he is not able to get the 2 right heater control **** to work with the leds. I changed them from orange to blue. The first one works fine but the other 2 wont turn on.
Also if anyone knows how to change the led out of the power mirror control switch as we are also unsure how to do that the rest of the car was changed. ? can anyone help? my model is a 2006.
Very nice work on the latest conversions! I like the detail of even converting some of the warning indicators. I'll dig out the master procedure and add the options for the 06 - 08 AC dial pointers described in posts #192 and #180 so future generations can benefit. I'll attribute the new info to the screen names that posted it. Feel free to post diffusion and pointer frosting techniques if you are inclined.
lbz,
Diffusion was tough. It was a matter of trial and error. You have to work on the white ballast inbetween the board and the faceplate. I worked with placing "Frost #1" to the backside of the faceplate with little new results. Once I lowered it into the ballast it started working on spreading out the light a tad. I still have a small Low spot at the 80mph marker on the speedo, but it is exactly half way between the two LEDs in that part of the cluster. You can use 1206's on the Instrument cluster, as running to just two of the contacts. One pos, one cathode. The diffusion is about playing with it, have a glue stick, to get better light transfer to the rest of the faceplate. Mine was done with a new custom faceplate, that had no diffusion, so this might not be a problem for everyone but I HATE hotspots.
The frosting was easier than it sounds. The HVAC pointers did not want to give up that orange goop on them on mine. I ended up soaking them in soapy water with some bleach to get the adhesive to let up a tad. Then sanded them down till I could peel them. I then took them once clear, and sanded on dry 1600 grit sandpaper. at different angles really gently. Then I took a scotch bright pad to them in the opposite direction to get a uniformed look. Took a few hours, but no more shocking light out of them, more like OEM. I was all about making it look like it was built that way.
For the Emergency indicators, a lot more has been changed than is shown. I changed my Cruise to white with a white "Set" as well. The VDC is now blue also. These are all PLCC-2's and can be changed out for 1206's quite easily.
Last edited by rlw1979777; Apr 4, 2013 at 03:33 PM.
