
So I decided to black-house my lights...


Thread Starter
Registered User
iTrader: (5)
Joined: Nov 2008
Posts: 427
Likes: 1
From: Birmingham, AL
Let me start by saying that this is not my first DIY black housing job. I did my accord a few years back and was very proud of the results. But that was then, and THIS is a 350Z with HIDs. This sucks.
I am currently waiting on the final coat of paint to dry. I would never - for ANY amount of money - do this again. Pulling the lens apart from the backing was retarded hard. It took me about 3 tries on the first light, and about 27 on the second for some reason. FUUUUUUUUUUUUUUU!
I'll post up a few of the pics from beginning to final product asap. At this rate, I don't think I'll be putting them back on the car until tomorrow. UGH!


Sorry you had such a hard time, but your rant has no merit with out an explanation of how you attempted it so we can see where you may have veered off......awaiting pics...
I did mine using the oven method on a wet piece of cardboard and about 18 minutes each side......the lense pulled apart no problem....
I would follow the how to's on doing this and anyone should be fine.....
its not super easy but its not as you described either......i would say its a 4 out of 10..
-J
Last edited by JasonZ-YA; Dec 7, 2009 at 03:37 PM.
Thread Starter
Registered User
iTrader: (5)
Joined: Nov 2008
Posts: 427
Likes: 1
From: Birmingham, AL
I did it the same way. With a wet piece of cardboard in the oven at about 200 degrees (because 250 just seemed like it was getting too hot - maybe its just me) But my wet cardboard was smoking, so I turned it down. But it was just killing me to get the thing apart. I was letting it cook in 5 minute intervals until completely apart.
EDIT: And yes, I AM mostly bitching.
EDIT: And yes, I AM mostly bitching.
Last edited by 350ZToeRing; Dec 7, 2009 at 03:42 PM.

Thread Starter
Registered User
iTrader: (5)
Joined: Nov 2008
Posts: 427
Likes: 1
From: Birmingham, AL
Thanks for the good will, anyways, here's where I'm at. Hopefully its all down hill from here.
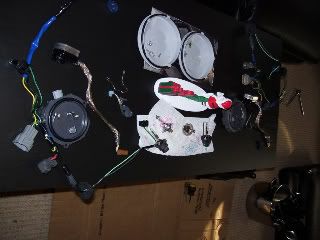
In the beginning...
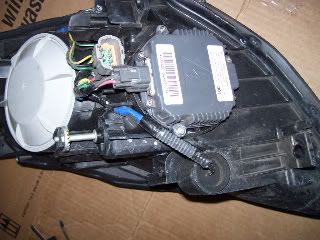
Good LORD thats a bunch of crap!
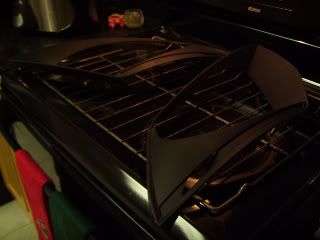
In the oven.
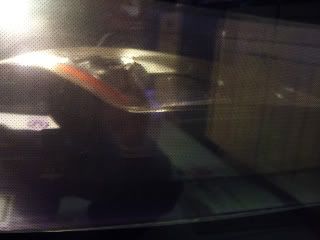
And we wait....
Does anyone know how long I need to let the final coat cure before putting it back together and in the oven? According to duplicolor the paint can be handled in three hours. Will it be okay to start baking it again that early?
In the beginning...
Good LORD thats a bunch of crap!
In the oven.
And we wait....
Does anyone know how long I need to let the final coat cure before putting it back together and in the oven? According to duplicolor the paint can be handled in three hours. Will it be okay to start baking it again that early?
Last edited by 350ZToeRing; Dec 7, 2009 at 03:58 PM.
I did it the same way. With a wet piece of cardboard in the oven at about 200 degrees (because 250 just seemed like it was getting too hot - maybe its just me) But my wet cardboard was smoking, so I turned it down. But it was just killing me to get the thing apart. I was letting it cook in 5 minute intervals until completely apart.
EDIT: And yes, I AM mostly bitching.
EDIT: And yes, I AM mostly bitching.
I know it seems scary for everyone being that its your set of headlights, but the best you can do is watch with the oven light on and let it warm up for the length of time needed.....
most of the threads on this talk about 7 or 8 minutes, but they all mention that it takes hulk grip to pull it apart....i let mine sit in there and then they came apart easy...
-J
Last edited by JasonZ-YA; Dec 7, 2009 at 04:02 PM.
Trending Topics
Thread Starter
Registered User
iTrader: (5)
Joined: Nov 2008
Posts: 427
Likes: 1
From: Birmingham, AL
OMG 18 minutes at 250!!??!? Too scary. Maybe I'm a vigina but theres no way I could have done that. I let initial baking go for 8 minutes at 250 and it was smoking like hell. I saw the Sticky that said to let it back 7-8 minutes at 250, but ....everyones oven is different. I just didn't want to risk it, which i guess warrants the difficult-*** time I had.
OMG 18 minutes at 250!!??!? Too scary. Maybe I'm a vigina but theres no way I could have done that. I let initial baking go for 8 minutes at 250 and it was smoking like hell. I saw the Sticky that said to let it back 7-8 minutes at 250, but ....everyones oven is different. I just didn't want to risk it, which i guess warrants the difficult-*** time I had.
not sure why your cardboard smoked, other than it wasn't completely soaked..
i dunno..
-J

250 at 15+ minutes, no problems. Longer the better.
Do not need wet cardboard at all. Just put them on a cookie sheet, and make sure no part of the headlight is too close to a heating element.
Do not need to disassemble the lights beforehand - There is nothing in there that can't stand 250 degrees for 20 mins. Some electrical tape might get a little soft, but that's it. Sure, take out the bulbs first but frankly those bulbs probably see over 250 in their duty cycle anyway.
Thread Starter
Registered User
iTrader: (5)
Joined: Nov 2008
Posts: 427
Likes: 1
From: Birmingham, AL
perhaps you right, but I read too many DIY's that specified removal of all electrical components. Plus, I do not know enough about what sensitive components might be in the harness and the ballast. Therefore, I figured it best to follow "protocal" . Has anyone else baked their lights without removing the electrical components?

haha I did mine really fast.
Ive done a lot of my buddys lights also
its simple to me now.
The trick is to oven them first (easy pull apart)
Then oven them after your done putting them together so your sealant seals again.
Haven't had one leak yet.
Ive done a lot of my buddys lights also
its simple to me now.
The trick is to oven them first (easy pull apart)
Then oven them after your done putting them together so your sealant seals again.
Haven't had one leak yet.
perhaps you right, but I read too many DIY's that specified removal of all electrical components. Plus, I do not know enough about what sensitive components might be in the harness and the ballast. Therefore, I figured it best to follow "protocal" . Has anyone else baked their lights without removing the electrical components?
its easy to remove those parts......so no need to do it with any of them on...
-J
Thread Starter
Registered User
iTrader: (5)
Joined: Nov 2008
Posts: 427
Likes: 1
From: Birmingham, AL
hmmm...never thought about using a heat gun. god forbid I ever have to tear them about again I might try that instead.
well, as of now, I have rebaked them and pushed them back together the best I can. I am also going across the entire lamp with Permatex Flowable silicone to get into any left over cracks and cervices.
god forbid I ever have to tear them about again I might try that instead.well, as of now, I have rebaked them and pushed them back together the best I can. I am also going across the entire lamp with Permatex Flowable silicone to get into any left over cracks and cervices.
Last edited by 350ZToeRing; Dec 8, 2009 at 05:33 AM.

heat gun is a lot of heat at a single spot, and you have to be quick with it..... i like the oven method since - if done right - allows you to ensure the sealant is loose uniformly and the lens pulls apart no problem at all.
-J
-J

