
What to cut CF hood with for latch install?


Thread Starter
Design Engineer
iTrader: (22)
Joined: Jan 2007
Posts: 28,233
Likes: 33
From: The Marketplace

http://vimeo.com/997195
Definitely not an easy D.I.Y. unless you are skilled. I wouldn't attempt it.
Definitely not an easy D.I.Y. unless you are skilled. I wouldn't attempt it.
Last edited by Hexxus; Jun 27, 2010 at 02:17 PM.
Trending Topics


Registered User
Joined: Sep 2009
Posts: 320
Likes: 0
From: carson
I was thinking of doing some cutting on my CF hood too... I have these tow hooks I want to install for track use only. It's similar to these: http://www.more-japan.com/home.php?cat=624 the ones that hooks on the strut tower.

I just installed my Aerocatch pins about 2 months ago...its a pita bro.
You will need a Dremel with circular cutting blade (looks like a round hard sandpaper piece. It doesnt look like its a cutting blade, but it is.) Use the one that says to cut plastic.
This is important: Make sure you blue tape the chit out of the entire area on the surface of the hood, do 3 layers of blue tape, and it will cut the c/f like butter man. When i cut mine, it looked like it was laser cut, so percise with NO fraying or rough edges.
Cut just the straight portions with the circular blade, for the rounded edges you have to use a sanding bit and just sand them out until curve lines up with your sharpie outline.
Catches come with stencils as well. These are mucho important to use.
TAKE YOUR TIME with the measurements, the aerocatch latches leave NO ROOM for error. The hole in the aerocatch portion is JUST big enough for the pin to fit through, so you must be DEAD ON with your measurements.
Also, when doing your measurements, take the curve of the hood into account when measuring for the catch portion on the surface of the hood. You will run into this problem when you place your catch and pins, it is unavoidable: (the red dot is where the pin will hit/rub inside the catch portion due to the curved hood we have. In order to close my hood, alittle force is required to get the pin in place so that the latch will slide into hole on pin)
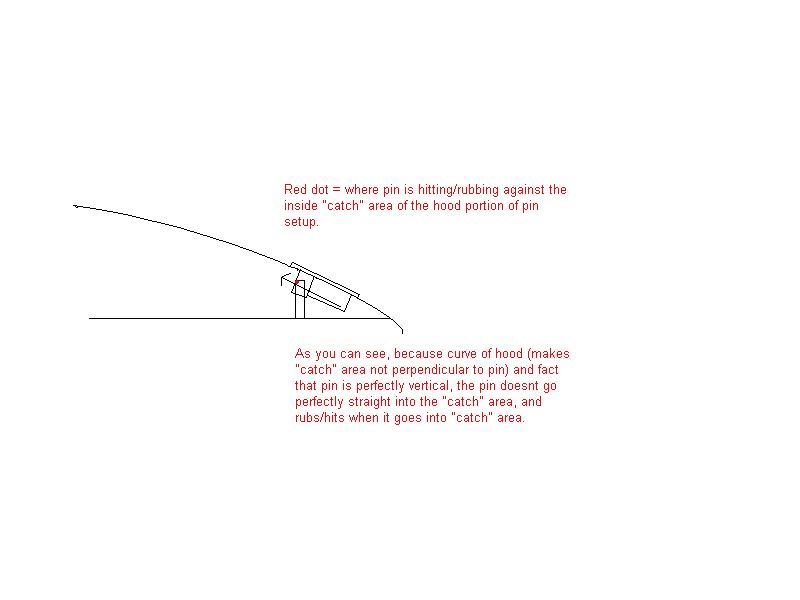
Also remember that the actual 'catch' portion is recessed into the hood, not directly on the surface of hood. This is also very important when doing your measurements.
Start install placing PINS FIRST, then catch portion to match pin location. Pins should be placed in the already provided by Nissan blank holes between radiator support bolts on each side of the plastic radiator cover/support.
If you have any questions during install, feel free to pm me.
You will need a Dremel with circular cutting blade (looks like a round hard sandpaper piece. It doesnt look like its a cutting blade, but it is.) Use the one that says to cut plastic.
This is important: Make sure you blue tape the chit out of the entire area on the surface of the hood, do 3 layers of blue tape, and it will cut the c/f like butter man. When i cut mine, it looked like it was laser cut, so percise with NO fraying or rough edges.
Cut just the straight portions with the circular blade, for the rounded edges you have to use a sanding bit and just sand them out until curve lines up with your sharpie outline.
Catches come with stencils as well. These are mucho important to use.
TAKE YOUR TIME with the measurements, the aerocatch latches leave NO ROOM for error. The hole in the aerocatch portion is JUST big enough for the pin to fit through, so you must be DEAD ON with your measurements.
Also, when doing your measurements, take the curve of the hood into account when measuring for the catch portion on the surface of the hood. You will run into this problem when you place your catch and pins, it is unavoidable: (the red dot is where the pin will hit/rub inside the catch portion due to the curved hood we have. In order to close my hood, alittle force is required to get the pin in place so that the latch will slide into hole on pin)
Also remember that the actual 'catch' portion is recessed into the hood, not directly on the surface of hood. This is also very important when doing your measurements.
Start install placing PINS FIRST, then catch portion to match pin location. Pins should be placed in the already provided by Nissan blank holes between radiator support bolts on each side of the plastic radiator cover/support.
If you have any questions during install, feel free to pm me.
You can def do this by yourself, it is just very time consuming and tedious.
No shop in my area would do it for less than $175-$200, and almost NONE of them had done it before so i said *** it. Im not gonna pay a shop to learn how to do it, might as well do myself.
It came out perfect, but took like 10 hours, lol, cause we ran into line-up problems and went super slow with it. I have NO body shop experience whatsoever, just mechanical, so its def doable for those who have not attempted anything similar.


Registered User
iTrader: (14)
Joined: Oct 2007
Posts: 1,314
Likes: 9
From: Greenwell Springs, Weeziana
I know the picture sucks, but this is the bit I used with my Dremel. Use alot of blue tape and take your time. Mine cut like butta'. Wear a dust mask too, or you'll have CF lungs after.
I feel your pain bro.
I was scared chitless to cut teh carbonz. My buddy who was helping had to give me the "***** up and lets do this bisch" speech.
It really isnt hard, just take your time, take your time, take your time.
Also, good rule of thumb is to cut alittle INSIDE your sharpie stencil to be safe, then use little 'bullet tip' looking sanding bit to finalize the curves and edges.
The cut outs dont have to look perfect, and it takes acouple of tries to fit catch latch into cut outs, then take out and sand alittle more, then try and fit again, then take out and sand alittle more, etc.
Use this as your main cutting wheel:

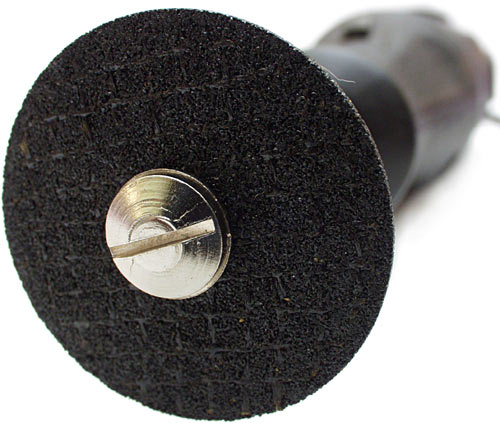
And this for sanding:

And wear safety glasses and mask. I did and one of ^ those effin wheels broke while cutting and flew into glasses. I would have lost eye.
And this for sanding:
And wear safety glasses and mask. I did and one of ^ those effin wheels broke while cutting and flew into glasses. I would have lost eye.
Last edited by GeauxLadyZ; Jun 28, 2010 at 02:14 PM.

Thread Starter
Design Engineer
iTrader: (22)
Joined: Jan 2007
Posts: 28,233
Likes: 33
From: The Marketplace
I have everything but the tape. I'll have to take a closer look at the hood when I go to the shop. They're still gutting and prepping the interior for paint.