
2+2 Backseat Project- Lookin for advice


the weight removed is substantial enough that it affected my ride height. so be prepared for that. if you don't have adjustable coils, be prepared to cut springs if you have aftermarket. if you have hotchkis you will have to cut, torch and rebend the coil spring from the bottom so it sits properly in the spring bucket.
*notes* don't waste money on a drill doctor, learn how to sharpen it with bench grinder. youtube diy sharpening is fail, but it gives you an idea how it's done.

Thread Starter
Registered User
Joined: Jan 2010
Posts: 608
Likes: 3
From: Kansas city
^ Jeez power2rice take it away, guess there's no need for me here anymore.....
oh wait ur giving false info, let me interject here quick before you get to happy, lets remember who here is the copier.
(am glad to see you finished it tho, was a lil worried at first)
I don't really feel like getting into it about which way is best, but there's no way to get all the metal out with just a saw. its gunna take a combo of drill/grinder/saw
and idk what this none sense about sharping bits. maybe cuz u didn't the right product. i buzzed thru 50+ with the same bit, at app. 30sec a piece. no problem here so idk what you were up to. Dont mislead just cuz you couldn't figure it out.
i did crack one of the teeth due to use error, so then i just flipped it and kept going.....
Last edited by Jackson0927; Jul 10, 2012 at 07:24 AM.
sorry op, didn't mean to come in that way. those bits are exactly what i bought. bought two, usa made, seemed to work okay only if the area is completely flat but even then it would dull out too quickly  . unfortunately the reason why they shatter for me (in my opinion) is any spot weld that is unusually larger than the diameter would cause too much load and 1 by 1 the teeth would just break off. 30 sec a piece generates a lot of heat on the bit :/
the 7/16 bit with constant sharpening i would quickly thin out each spot weld (not puncture through of course) roughly under 10 sec each shot. for me this worked out better as it was less tiring.
the technique to sharpening drill bits seems difficult, i just need to explain it and show how it's done. just need to grind at the same or more aggressive angle of sharpening when studying the bits to mimic how they are forged and sharpened at the manufacture. it was a technique my dad showed me during his 40+ years in the machining industry.
. unfortunately the reason why they shatter for me (in my opinion) is any spot weld that is unusually larger than the diameter would cause too much load and 1 by 1 the teeth would just break off. 30 sec a piece generates a lot of heat on the bit :/the 7/16 bit with constant sharpening i would quickly thin out each spot weld (not puncture through of course) roughly under 10 sec each shot. for me this worked out better as it was less tiring.
the technique to sharpening drill bits seems difficult, i just need to explain it and show how it's done. just need to grind at the same or more aggressive angle of sharpening when studying the bits to mimic how they are forged and sharpened at the manufacture. it was a technique my dad showed me during his 40+ years in the machining industry.
Thread Starter
Registered User
Joined: Jan 2010
Posts: 608
Likes: 3
From: Kansas city
you sprayed lube while you drilling right? shouldn't get THAT hot.
idk maybe my experience was different. never the less, all this info in already in this thread over and over. im sure he'll figure it out.
idk maybe my experience was different. never the less, all this info in already in this thread over and over. im sure he'll figure it out.

elfin great idea.... if seat belts could be added and safety could be assured i would for sure want this in my z... i have 2 smaller children that would be ecstatic ::thumbsup::


 keep in mind the op jackson was the original to post his work to motivate the rest of us to tackle the job too.

Ok I have read it front to back...
Anyone ever thought of perhapse using harnesses bolted directly to the subframe for rear restraints?? I'm sure you could even bolt the shoulders into the rear cross beam/sway? Might take some decent Upholstry work to get it to look solid but I'm sure secure restraints could be added.
As stated above, I have 2 smaller children 4 & 8.... I wouldn't need much room for a rear passenger riding behind shotgun to get a little one to fit but secure restraints are my biggest concern
Bolting and welding to chassis?is that a possibility?
Last edited by m808six; Jul 12, 2012 at 02:15 PM.
sawzall is mentioned as one of the needed tools (reciprocating saw) or plasma cutter. grinder is used to clean up things. it'll all makes sense as you're doing it. one can never have enough tools  so don't be afraid to invest in them to take on projects like this
so don't be afraid to invest in them to take on projects like this
Thread Starter
Registered User
Joined: Jan 2010
Posts: 608
Likes: 3
From: Kansas city
I'm really not a rude guy but you guys come at me with this **** sometimes. Like of you were even remotely considering doing this how would not read EVERY LAST WORD of this thread.
^^ I was worried this was gunna happen. There's TONS of reasons why no one ever did this. Fact is its for my dog to ride. And I honestly can't rationalize any other reason to go thru with it.
SERIOUSLY!!! Read this whole thread, multiple times if you have to.
(I really am nice guy...)

Joined: May 2009
Posts: 4,293
Likes: 2
From: Spartanburg(SparkleCity), SC
I used an air powered cut off wheel to take it all out:
http://www.northerntool.com/shop/too...5415_200305415
It's really fast, and you can be pretty precise with your cuts & have really straight cut lines. A little tricky in the corners, but I used tin snips for the tight spots.
http://www.northerntool.com/shop/too...5415_200305415
It's really fast, and you can be pretty precise with your cuts & have really straight cut lines. A little tricky in the corners, but I used tin snips for the tight spots.

i found rear seats for $300, the abs plastic panels were $50 plus the epoxy and glues were $20. the rest is all labor and tools. if you do fiber glass panels like how jackson made his, expect to pay additional $600-800 to have custom-made ones of same quality unless you already know how to DIY.
if you asked a custom shop to convert your car into a 4 seater.. most won't do it, and if they even consider doing it...labor alone i would expect it to be close to $1500-3000 probably even $5000 if it was some well known customz shop (i actually called around to see who was willing to attempt this without ever having seen or done this before). it took me 3 full days to finish but thats because i'm use to cutting up cars and fab work AND because the OP jackson had posted pictures to allow me to visualize what i was up against.
FYI, the reason behind why labor rates are so high for custom work is because no regular car mechanic can do the job. it requires a person that multi skilled in the areas of electronics, metal work/fabrication, upholstery, fiberglass molding (OP jackson), etc.
so basically, 2by2 is for those willing to DIY.

Registered User
Joined: Jul 2012
Posts: 56
Likes: 0
From: Washington
This is awesome. I was checking the fourms in boredom today, just checking everything out and saw this. AWESOME JOB JACKSON! My girlfriend has a dog aswell that hates my frontseat when i take her places, but i dont have the ***** to cut the back of my car up. >.> Still super duper neat, and looks fantastic. +10 points for you sir! And to the rest ive seen, looking pretty awesome aswell!

Registered User
Joined: Feb 2013
Posts: 2
Likes: 0
From: Texas
------------------------------------Progress 04-11-2011-----------------------------
so just have a couple little things to button up, mainly the gap where the consoles meet up. and gotta make a padded slip cover for the dog to lay on to keep it lookin fresh
wow now what am I gunna work on now ............... ?
thats for reading, your support really means a lot.
------------------------------------Progress 03-01-2011-----------------------------
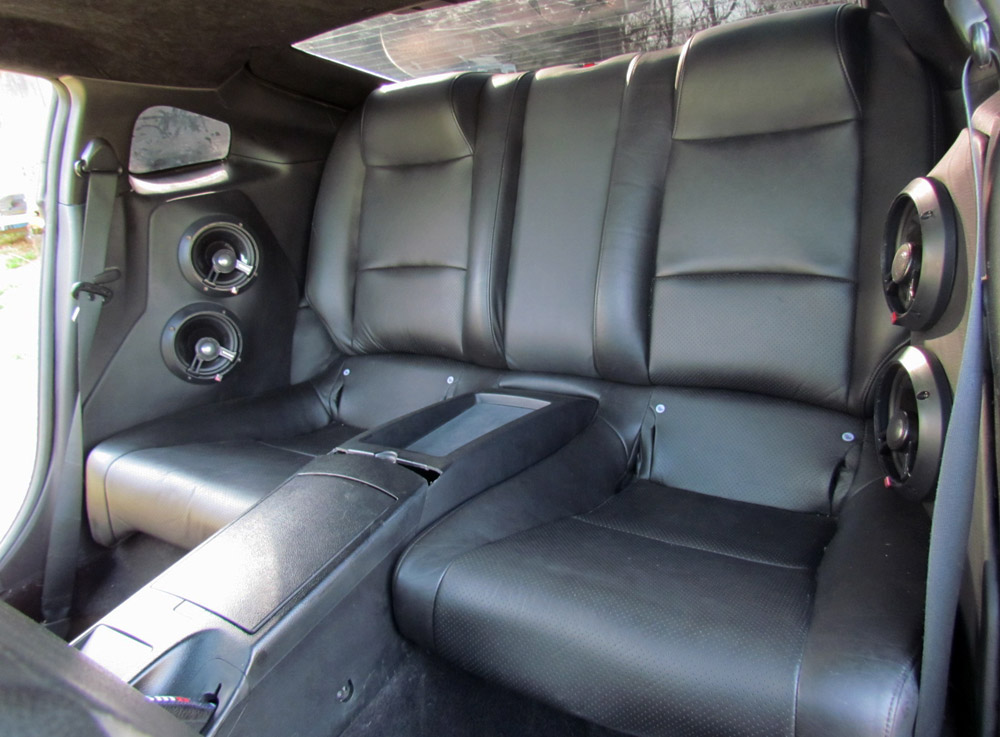
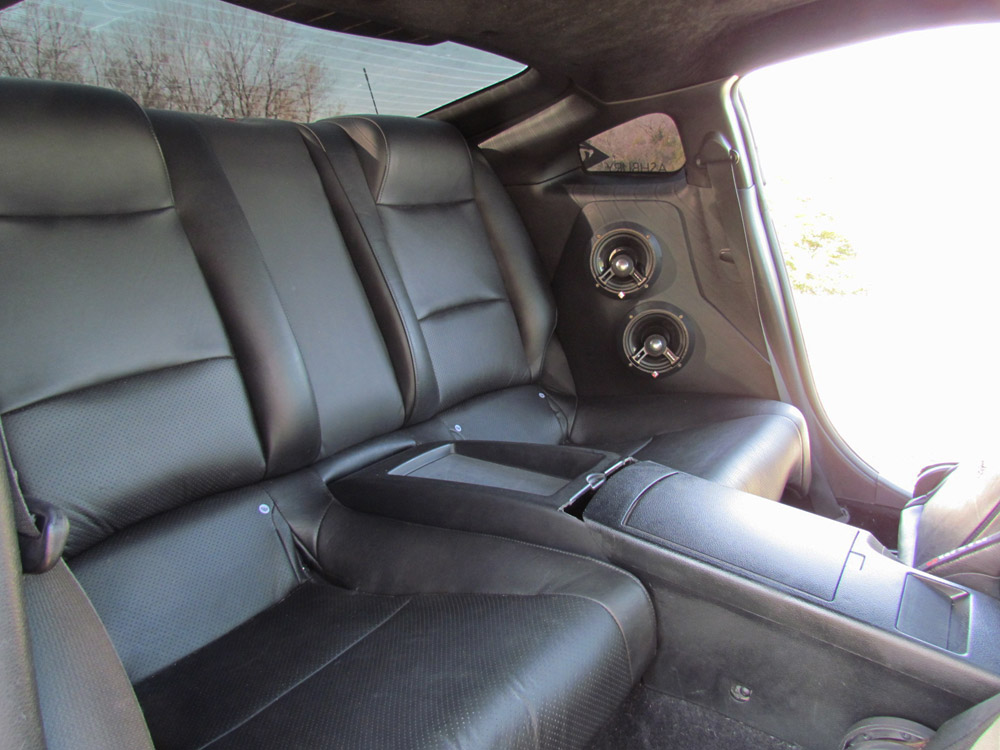
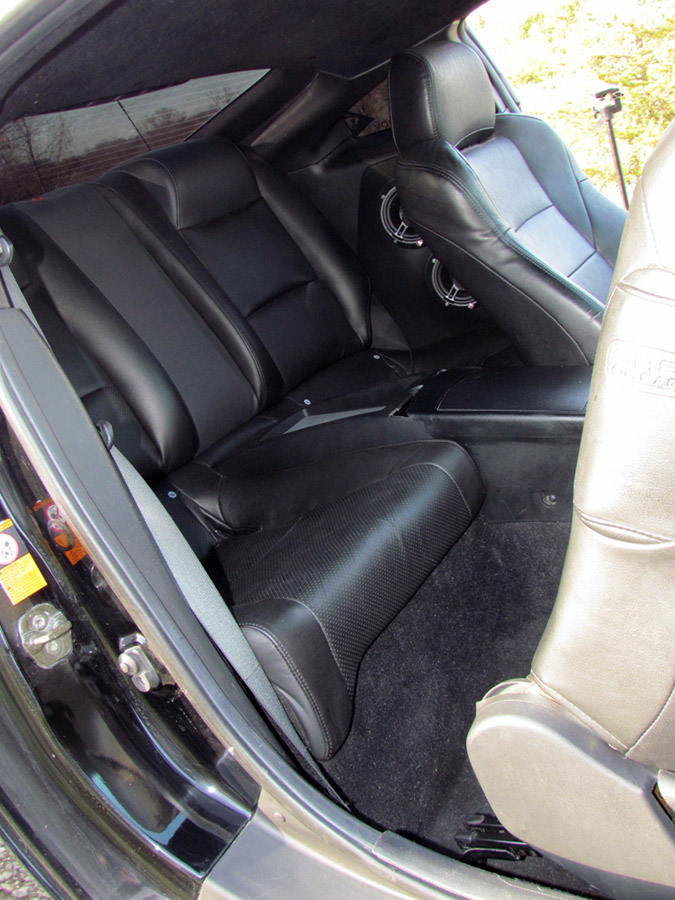
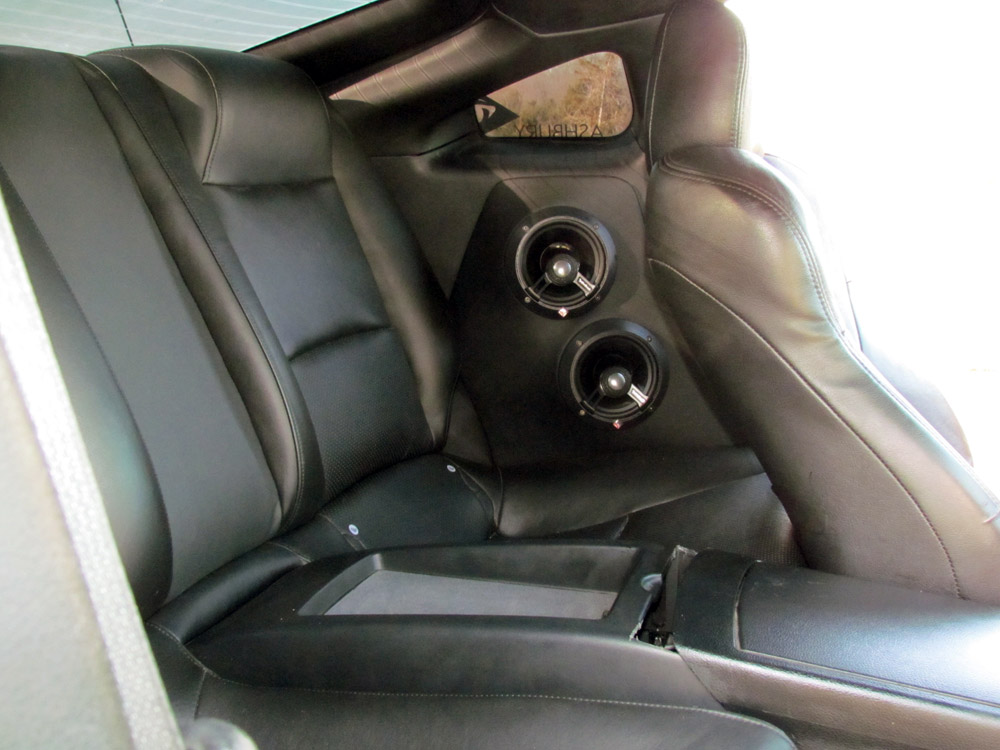
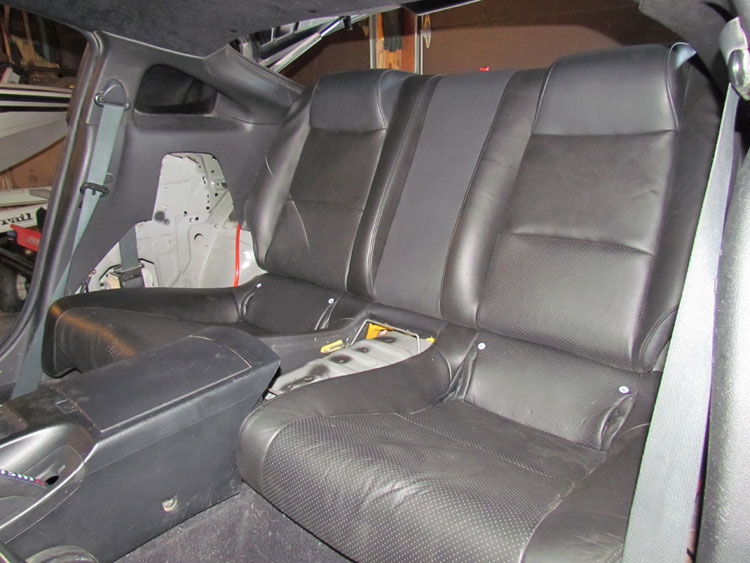
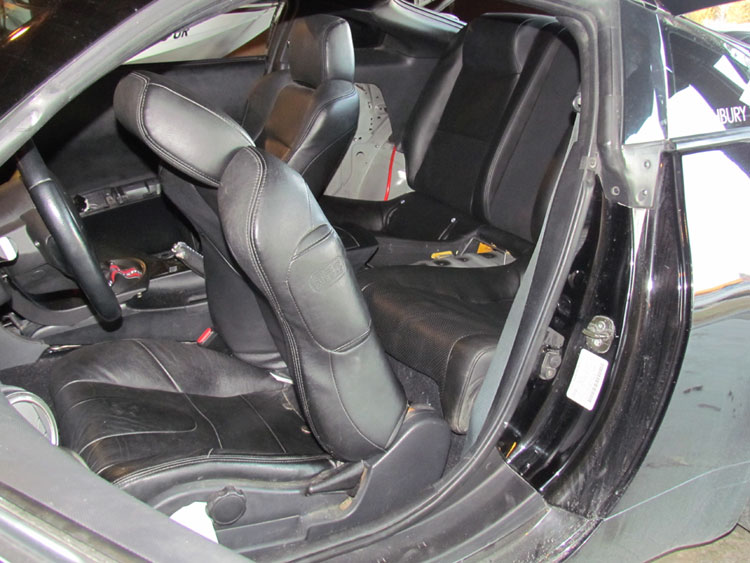
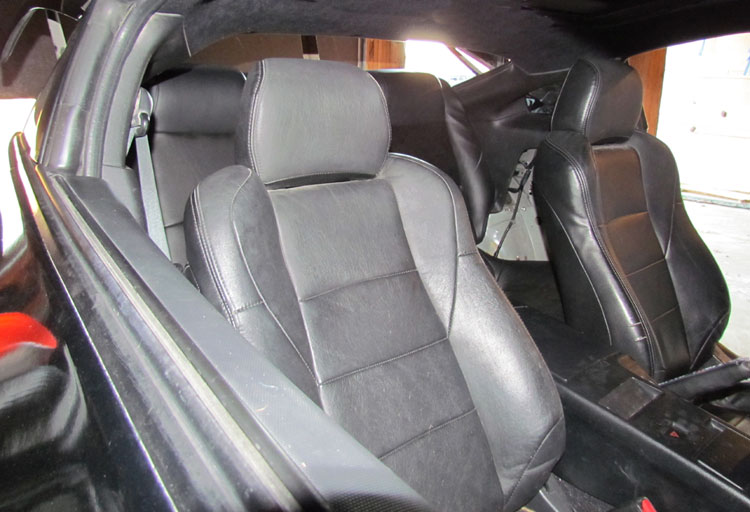
so I got the seat in looks pretty good. fitment is slightly less than I expected but it's not that far off by any means.
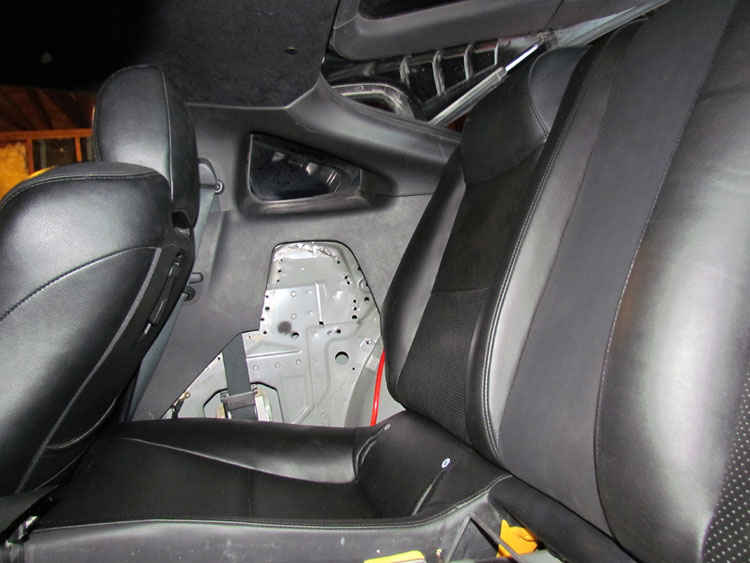
- 350z console runs into the wire rods in the rear seat (took box out for temp. fit. see pic) and the g35c console is no where near fitting, but i could tell that from pictures
- the back of the seat to about 4-5 inches too tall (saw that coming) the problem lies that unlike the bottom half the the seat which is only foam and plastic the back is composed of big steel bars, wood and a lot of wire rods. the back is very very heavy unlike the bottom half. In some of the pics I pulled the bottom of the seat out a lil to close the hatch. (dad came over to see and he thinks i shouldn't cut the back up and I just leave it pulled out at the bottom.) see pics
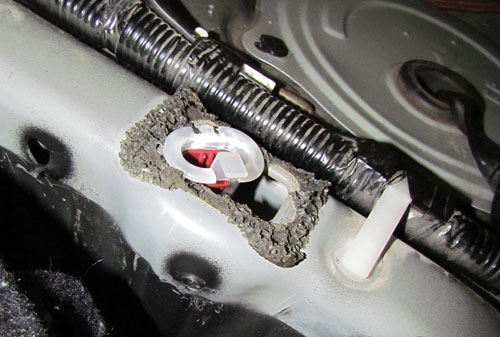
- got the plastic plugs off a g35 for the bottom of the seat but they are too small. shouldn't be too hard to fix (see last pic)
- asked them for 2 other brackets that I thought held the bottom half. they dont hold anything. guess they are just guides for the seatbelts. so other than these plugs(that are too small) the bottom is only held down by back half
really excited to start my interior side panels tonight.
picture time!!!


---------------------------------Original Post (12-28-2011) -------------------------
Let me start this out with PLEASE DONT HATE, I love my car as a 2 seater. 4 seaters are for moms, and have no intention of building this for HUMAN PASSENGERS. (Although if she were hot enough I would throw her in the back)
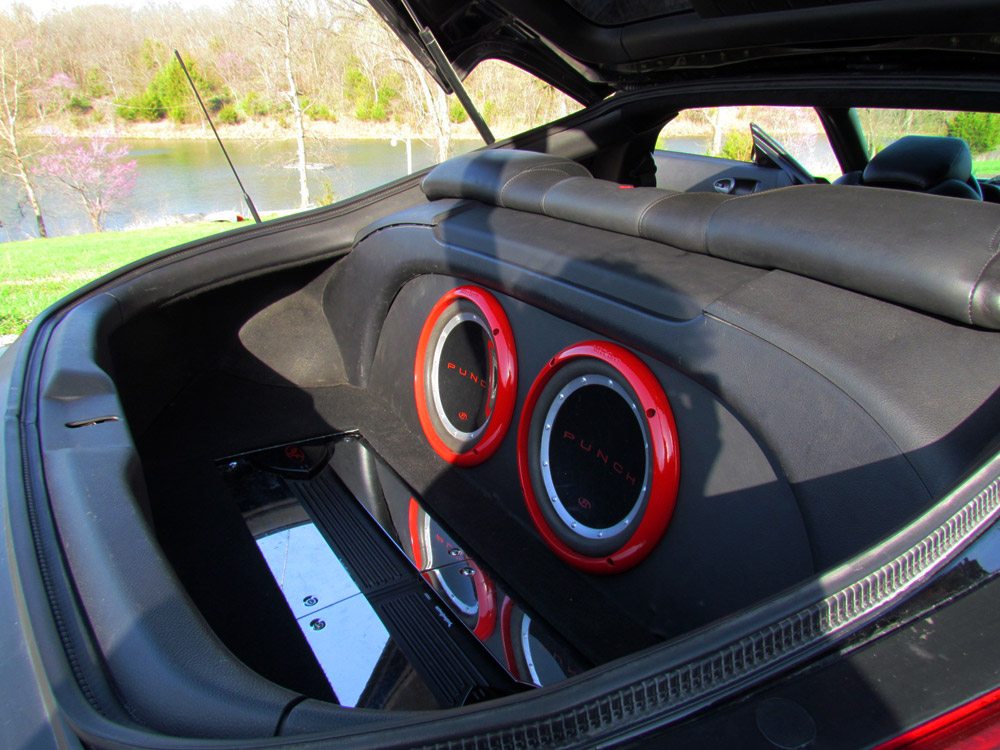
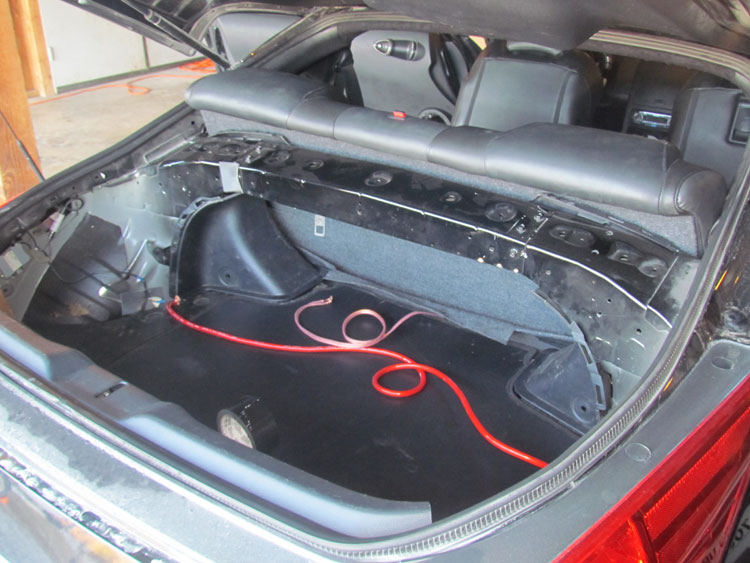
Ever since I removed all the plastic in the rear I wanted to cut all those stupid flippin cubbies out along with those horribly positioned speakers. I can't believe people custom fab up all these crazy sub boxes and amp panels that fill the entire trunk area to the top, or that nissan wasted all that valuable space with these boxes.
my vizsla (dog) rides with me literally everywhere. goes to work with me, runs errands with me, EVERYWHERE!!! most of the time I got her posted up on the front seat but when i have a passenger she has to get in the back, and goes back there quite a bit more now that she is growing bigger.


So with my z sittin in the garage all the time i though about this..........
(sorry if i used your photos, i found some of these on here)
Incase you weren't already aware or how much space its actually under there
more than i want to cut out but wow!
(pictures removed march 1, 2011 irrelevant)
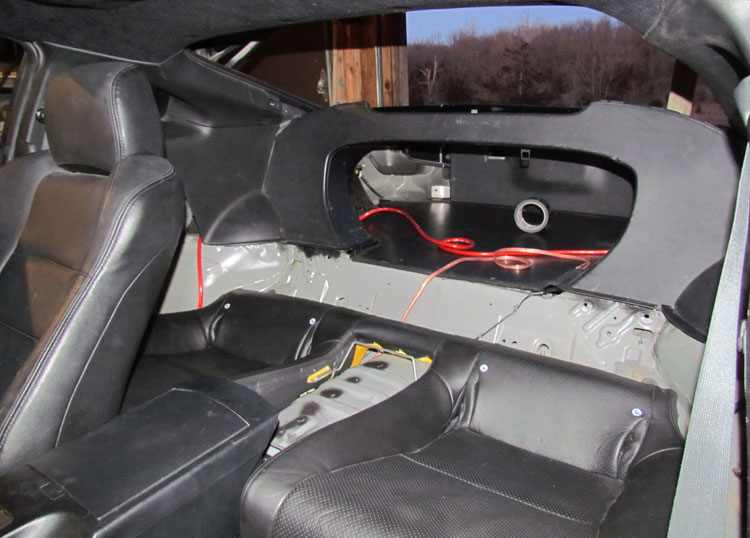
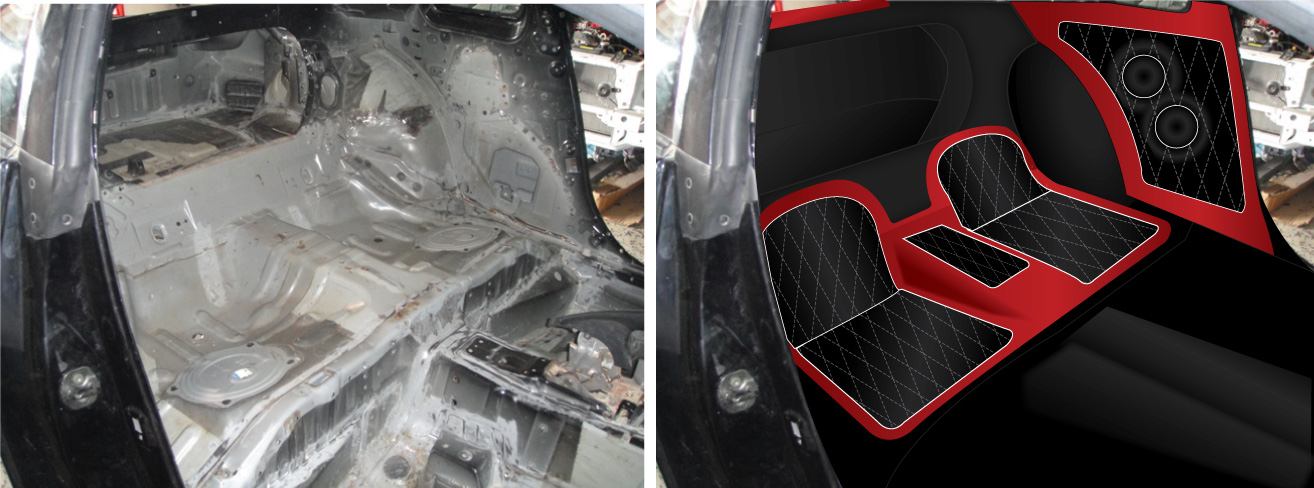
I more or less want to cut out the glove boxes and speakers. I have no intention of removing any of the rear strut brace, but cut out exactly as seen below. I got a pretty good idea of how I'm gunna fab up the lower seat for something one-off and super clean. As well as some panels for speakers. It even looks like that pan is molded for a pair seats
My one question is i've only seen this removed in the case of a roll cage. The frame for it all is tack welded in but i don't think it holds any structural support. would I need a rear hoop or for harness bar to help hold through the middle of the car? looking for input
heres a rough idea of something I tried to get out in illustrator. looks nicer in my head. colors may change
so just have a couple little things to button up, mainly the gap where the consoles meet up. and gotta make a padded slip cover for the dog to lay on to keep it lookin fresh
wow now what am I gunna work on now ............... ?
thats for reading, your support really means a lot.
------------------------------------Progress 03-01-2011-----------------------------
so I got the seat in looks pretty good. fitment is slightly less than I expected but it's not that far off by any means.
- 350z console runs into the wire rods in the rear seat (took box out for temp. fit. see pic) and the g35c console is no where near fitting, but i could tell that from pictures
- the back of the seat to about 4-5 inches too tall (saw that coming) the problem lies that unlike the bottom half the the seat which is only foam and plastic the back is composed of big steel bars, wood and a lot of wire rods. the back is very very heavy unlike the bottom half. In some of the pics I pulled the bottom of the seat out a lil to close the hatch. (dad came over to see and he thinks i shouldn't cut the back up and I just leave it pulled out at the bottom.) see pics
- got the plastic plugs off a g35 for the bottom of the seat but they are too small. shouldn't be too hard to fix (see last pic)
- asked them for 2 other brackets that I thought held the bottom half. they dont hold anything. guess they are just guides for the seatbelts. so other than these plugs(that are too small) the bottom is only held down by back half
really excited to start my interior side panels tonight.
picture time!!!
---------------------------------Original Post (12-28-2011) -------------------------
Let me start this out with PLEASE DONT HATE, I love my car as a 2 seater. 4 seaters are for moms, and have no intention of building this for HUMAN PASSENGERS. (Although if she were hot enough I would throw her in the back)
Ever since I removed all the plastic in the rear I wanted to cut all those stupid flippin cubbies out along with those horribly positioned speakers. I can't believe people custom fab up all these crazy sub boxes and amp panels that fill the entire trunk area to the top, or that nissan wasted all that valuable space with these boxes.
my vizsla (dog) rides with me literally everywhere. goes to work with me, runs errands with me, EVERYWHERE!!! most of the time I got her posted up on the front seat but when i have a passenger she has to get in the back, and goes back there quite a bit more now that she is growing bigger.
So with my z sittin in the garage all the time i though about this..........
(sorry if i used your photos, i found some of these on here)
Incase you weren't already aware or how much space its actually under there
more than i want to cut out but wow!
(pictures removed march 1, 2011 irrelevant)
I more or less want to cut out the glove boxes and speakers. I have no intention of removing any of the rear strut brace, but cut out exactly as seen below. I got a pretty good idea of how I'm gunna fab up the lower seat for something one-off and super clean. As well as some panels for speakers. It even looks like that pan is molded for a pair seats
My one question is i've only seen this removed in the case of a roll cage. The frame for it all is tack welded in but i don't think it holds any structural support. would I need a rear hoop or for harness bar to help hold through the middle of the car? looking for input
heres a rough idea of something I tried to get out in illustrator. looks nicer in my head. colors may change
How are the panels made or where do they come from