When you click on links to various merchants on this site and make a purchase, this can result in this site earning a commission. Affiliate programs and affiliations include, but are not limited to, the eBay Partner Network.
OK, before I pull the steering wheel off and start replacing things I will see if IPP can do it or the Z shop I went to last week. Last resort, I will go to Nissan, although they may be taken aback as I have the roof off etc. LOL. By the way, once I get this issue corrected and the interior put back together I am going to pause and just drive the car and do some minor things. In summary, what was done:
1. Fixed Headlight(bulbs and ballast)
2. Installed wheel well
3. Bumper fix
4. Installed and reconnected airbags
5. Removed Momo steering wheel and replaced with OEM wheel, Which also got the horn and cruise working again.
6. New Michelin tires ( Got the TCS light off with this one.)
7. New Legal tint
8. Replaced numerous interior parts. I mean a LOT like at least half of the interior stuff was broken and needed to be replaced.
He broke every piece he took off for his stereo system and rear window wiper delete.
It's been fun, really. The previous owner still has the original stock exhaust system and he is good with me coming to pick it up. I may do it, as the current exhaust is too loud for me. I want to rev the motor and not have the entire neighborhood be aware! LOL
Thanks again for all the suggestions and help. Will update the thread after I get the Consult 3 work done.
Last edited by Jim Stephens; Oct 29, 2019 at 12:05 PM.
Well, unfortunately the tech was unable to clear the code for the driver airbag. We talked through it and I ordered a new clockspring to see if that clears it. He mentioned that after I get the clockspring installed to come back and he will reset the center point for the "yaw" censor with the computer. He did agree all the other bags I install were not throwing any errors and looked good. On a funny side note, the Z Store guys were quite happy to hear I had removed the Momo steering wheel and replaced it with an OEM wheel with an airbag. They said this was a "first" for them. At first I thought they were being sarcastic with me, so I asked them, and he said absolutely they were thrilled I was putting in the OEM wheel. Apparently, they have seen to many would be racers with aftermarket steering wheels that will not be of help in an accident. His point was if it is a track car with full racing set up then fine, otherwise stick with the OEM wheel.
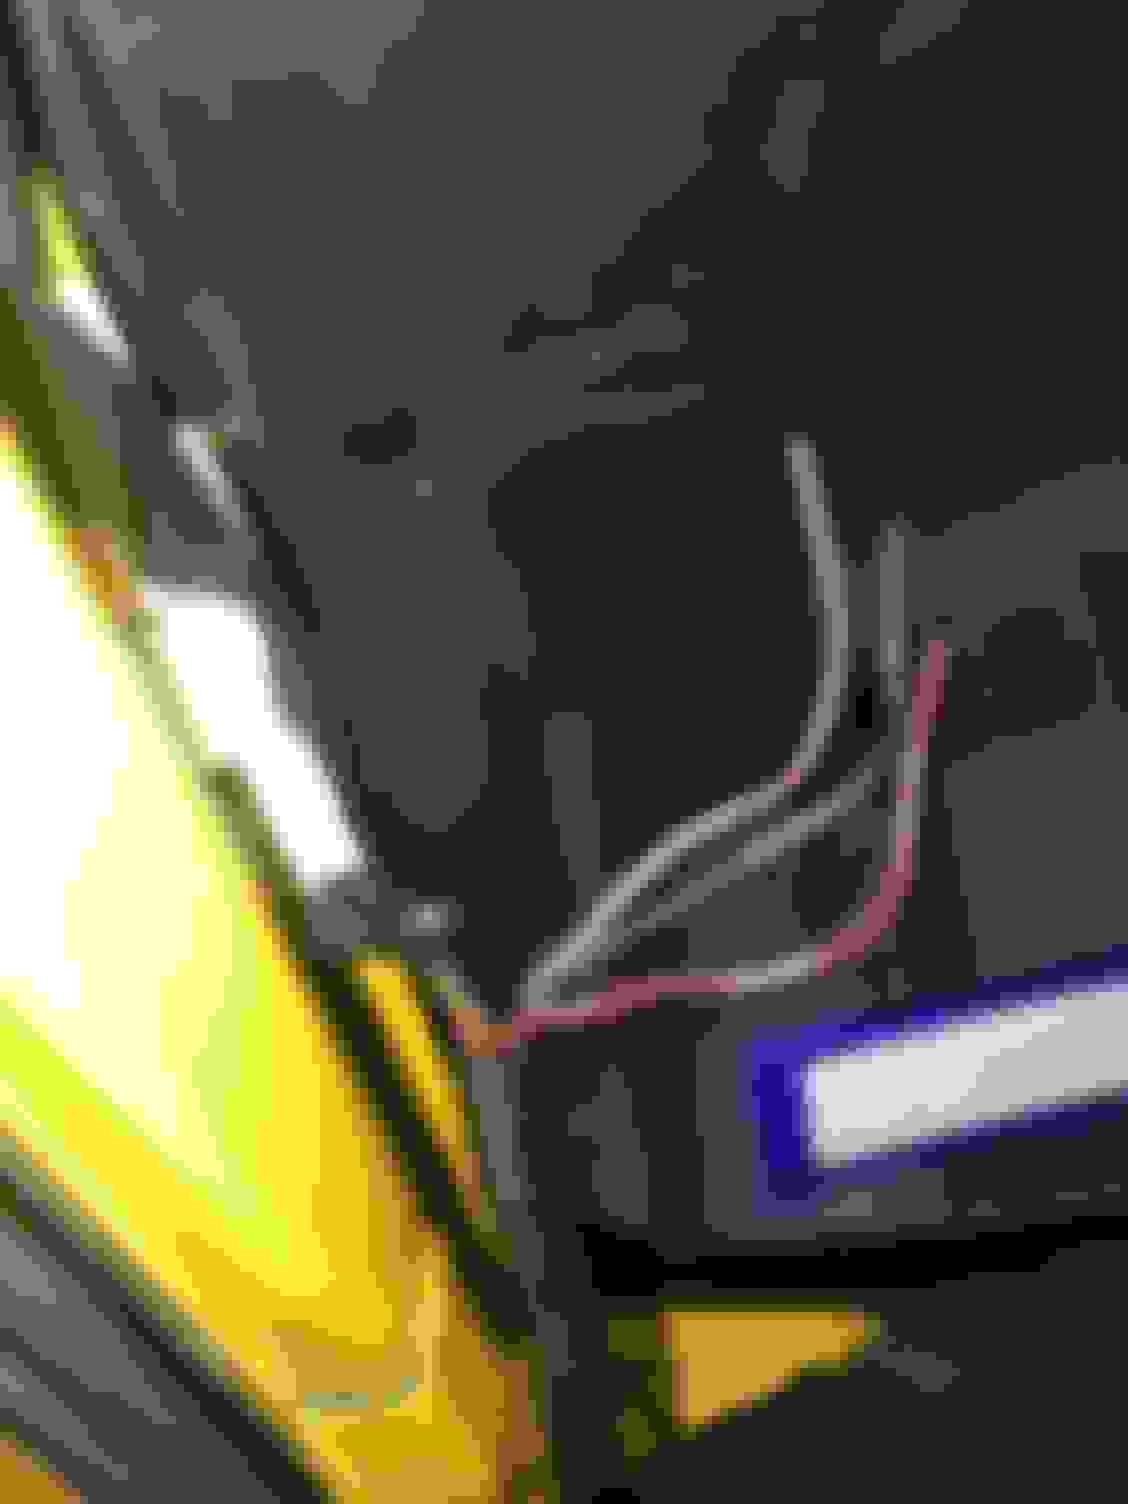
With that news I decided to put the headliner in. As I am reinstalling it I discover that, hmm, all the wiring for the dome light and vanities is non existent or just wrong. Why did he cut that? Who knows. For the dome light there was a wire that had a female plug spliced in which does not plug into the female plug at the harness. Wow. What a mess. This, I will add to the project list.
The first picture if the wiring harness coming up from the dash to power up the vanities and dome light. Note the three wires I found just coiled around the harness. I am guessing these three wires might be for the left and right visor vanity lights with a common ground. The second picture is the wire that plugs into the dome light coming down to supposedly connect to the harness. Note the read tape where they spliced in a connector that is incorrect and will not plug into the harness. Definitely going to need a wiring diagram to figure this all out.
Let's enjoy at least the win that I now have a perfectly spotless clean headliner re-installed with sun visor's installed.
Last edited by Jim Stephens; Nov 1, 2019 at 05:13 AM.
Well, after further reflection, I found a wiring harness on Ebay for the ceiling. All I need do now is re-pin the harness coming up from the dash or just solder them one for one at the A pillar.
Will say, Jim, your thread is a welcome one to the community. Taking the car from a known point somewhere in the "condition 4" position and getting after it with plenty of research to methodically get it back to at least a condition 8 and above state is not something we see here often enough anymore. Thank you for sharing. Guessing you're an old school hot rodder. Hahahahaha.
Thanks MicVelo. My goal is to get everything that is "wrong" and make it right. After I complete that on the interior items, I am going to get some of the Mechanical maintenance done (rear bushing, leak on Valve cover(neither is urgent) done. Then, I am going to go improve the the suspension, brakes, and exhaust. Also adding some "fun" things that my son wants along the way. Well, I am down for the count this weekend. Apparently, the two guys I met with in Michigan earlier in the week who have small kids who got them sick and now I have it. Looks like a football on the couch and get better weekend. So, having coffee and Kleenex and studying wiring diagrams and learning, slowly, how to read them.
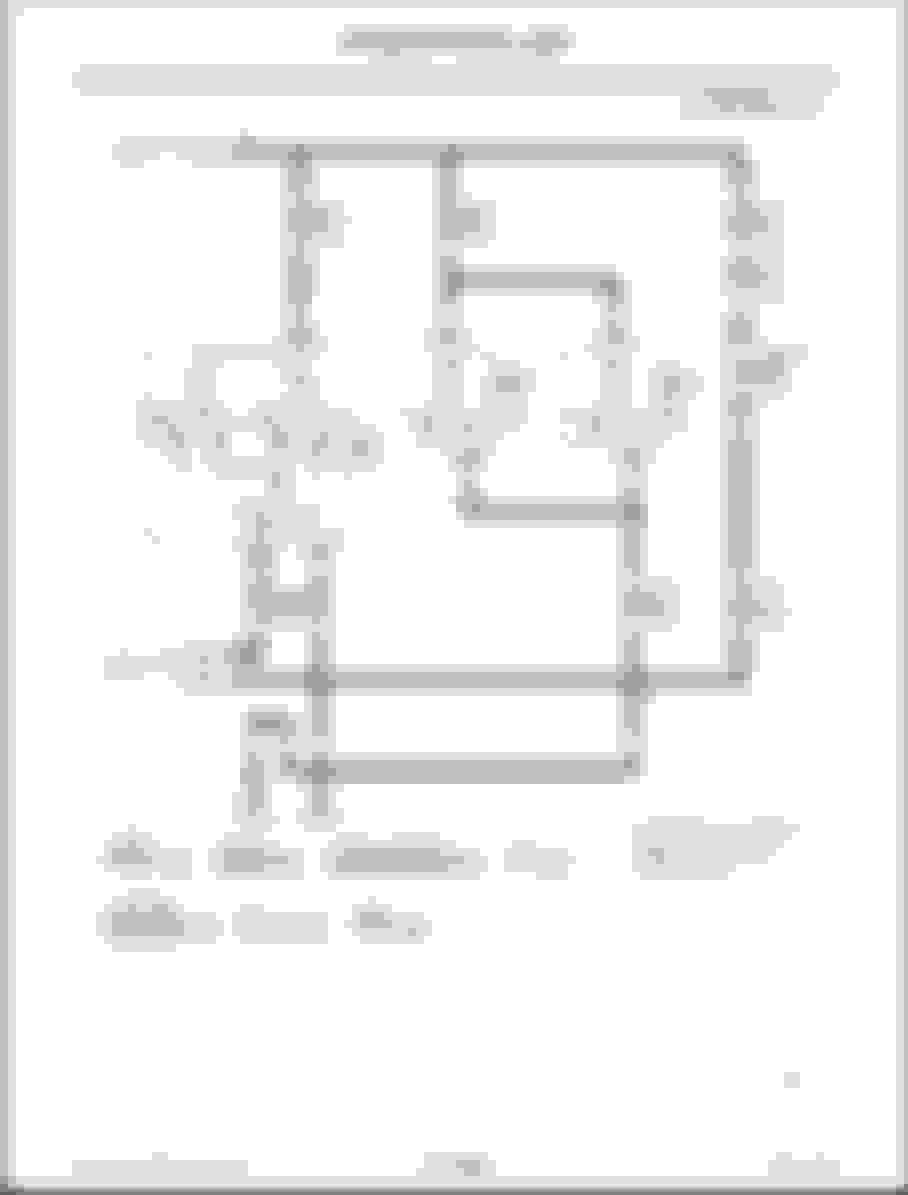
So, judging from the wiring diagram I am interested in the three wires that he cut(See picture in previous post). They are R/B, PU/W, Black. Those three wires look like everything I need to make the dome and vanity mirror lights work . So, I need to find some plugs of this type to re-pin it(which I have never done). I think it is designated a "M70/4 pin plug" in the drawing the "RS51" is the plug type into the dome light. Think I have that right? Where do I get an M70 plug? So, now that I have that, what the heck are the Red and Green wires for?? LOL. He left them in the plug unmolested, so maybe they are for an option the car did not have up in the ceiling like the review mirror or something? No where on the electrical Diagram that I have seen those two wires yet?
Last edited by Jim Stephens; Nov 2, 2019 at 08:34 AM.
I am back up from a full day asleep in bed. Hoping to get this thing around the corner tomorrow and start getting better. Kids have the worst viruses! I remember when my kids were small we would all spend quite a bit of time sick during the winter. So, doing some more FSM reading and I found this picture. The one circled in green is the replacement I ordered that will use the cut wires I took a picture of and matches the diagram. See that other harness in red? That one is kind of a mystery and maybe for another optional dome light that some cars might have in the center as an option? Any one have a dome light in the center of the car, not the one in the front center? Or maybe it's standard with the single line for the map light and the lighted vanities require the other wiring harness?
Last edited by Jim Stephens; Nov 3, 2019 at 02:18 AM.
Figured it out! The other two wires are for the Auto-Dimming on the rear view mirror. You can see the wires are G/Y and R/W which is what I have. There is also a black wire involved (Ground) The base models does not have that, but the enthusiast and up do have it. Now that I understand it, I should be able to sort it all out.
After google'ing a bit, I think I will go to my local donor car and clip the wires on either side of the connector and solder it together with some shrink wrap. Luckily, one of my other hobbies is racing electric boats and I do a LOT of soldering with that hobby. These boats use lithium polymer batteries and race at the 55mph to 75mph speed on the oval track. Over 100mph on straight away runs. Lot's of fun!
Last edited by Jim Stephens; Nov 3, 2019 at 07:04 AM.
Flu has slowed me down a bit, but my son and I hit a milestone yesterday. Got the wiring harness installed and we now have working interior lights and mirror. The interior is completely done. Now to fix the driver airbag and get the last warning light put out. Son wanted blue lights. They do look pretty cool. He and his friend are sitting the car in the garage listening to the stereo. LOL. I used to do that at 15. We took it out Sunday and I walked him through the basics of washing a car for the first time and did another round of learning how to use a stick in the parking lot. He is getting better at it and soon we will leave the parking lot for a little bit of driving around. He is determined to master it. We went to a local race this weekend here in Houston for the first time where a highschool friend was running a car. Learned a lot about what that is all about. They were doing endurance racing with low priced cars. Two 8 hour days of solid running with multiple drivers. Crazy the cars can hold up to that. He actually changed the transmission in his overnight to complete the sunday race. Looked like a lot of fun. Will post a picture of his car he raced and the one he was selling for 1k when I was there. It's the $500 dollar class of cars. LOL
Last edited by Jim Stephens; Nov 11, 2019 at 05:37 PM.
Post of me with his $1000 car for sale. Lol. It was rough. He got it sold that weekend though. Stripped down to the bare metal with roll bar and racing seat. The guy is a retired mechanical engineer so he has no problem doing anything with a car. I saw him post a build of a 67' or 68? convertible corvette he built in like three months. It was crazy he moved so fast doing it including all new paint job and interior. Turns out he built it for his son's wedding car so he had a deadline. Came out beautiful.
Last edited by Jim Stephens; Nov 11, 2019 at 03:07 PM.
And this beauty got him fifth place for the weekend. It was fun to watch because there were El Camino�s to old 928 Porsche's running. By the way the El Camino was flat haulin' butt. Found out today the guy driving it was some well know motor cross guy. Should have know. He was driving hard. This one was called Team Orca. This thing ran 15 hours in two days on the track. Incredible. Those cars were getting flogged all day long. Talk about mechanical durability test!
Last edited by Jim Stephens; Nov 11, 2019 at 04:38 PM.
Well, I found out two things about my current exhaust system. It’s high quality and known to be among the loudest. It’s called Agency Power. It does have a great sound, but you literally have to crank up the stereo just driving down the street to hear it. After an hour of that noise level I am done. The good news is apparently the 20 year old set loves this exhaust, so I should be able to get some money for it. So, after some research, I decided on the Nismo S dual exhaust. I know there are a lot of options out there and everyone has their favorite. It’s not a true dual exhaust, but still think I will be fine with it. It is on the way and will be the weekend project. Putting off the airbag project a bit as this seems more fun.
Loud is cool when you are young due to not thinking of others. Am sure you will be alot happier with the new system and some kid will be very happy with the AP.
Taking a detour from the srs will give you some new motivation going forward. After the electrical troubleshooting am sure you need some fun mods. Love seeing the progress on this build.
Well, I found out two things about my current exhaust system. It’s high quality and known to be among the loudest. It’s called Agency Power. It does have a great sound, but you literally have to crank up the stereo just driving down the street to hear it. After an hour of that noise level I am done. The good news is apparently the 20 year old set loves this exhaust, so I should be able to get some money for it. So, after some research, I decided on the Nismo S dual exhaust. I know there are a lot of options out there and everyone has their favorite. It’s not a true dual exhaust, but still think I will be fine with it. It is on the way and will be the weekend project. Putting off the airbag project a bit as this seems more fun.
Interesting.... the S-Tune offered now is a re-do of the original S-Tune offered from Nissan when the Z33 was still in production. If I'm not mistaken, you will be the first my350Z member running the new version. An honest review will be appreciated by those too cautious to be the first. Hahaha.
One thing to note between this new system and old is that the original came with a smoother flowing Y-pipe and hence, that is where most of the (very) few additional ponies come from. The new system connects aft of the Y. If you're interested in trying to make that power (it's like less than 10bhp), you may need to invest in a performance Y-pipe, like the companion Nissan S-Tune Y-pipe (sold separately and at additional four bills or so) or one of the many other units available. But I'd guess you'll be happy hanging the new exhaust off the back of the stock Y pipe.
Well, I got the new Nismo exhaust in. Looks nice. I checked underneath and the bracket on the passenger side was removed when they put the single exhaust in. I already had that on order, .but it will not be in until Monday. So, I will not get this installed until Thanksgiving week. Tomorrow we will be putting in carbon fiber struts for the hood. I also took off each door today and replaced the scratched up door inserts. One of the previous owners had been in there for the stereo install. Replaced all the plastic clips with new ones. That little install of the door inserts made a big difference in the look of the entire interior. I did not realize how much of an eyesore it was until I did it.
Last edited by Jim Stephens; Nov 15, 2019 at 02:02 PM.