
Custom HKS G35 Turbo Project is Done!


Well after more hours than I care to admit, my custom turbo project is �done�.
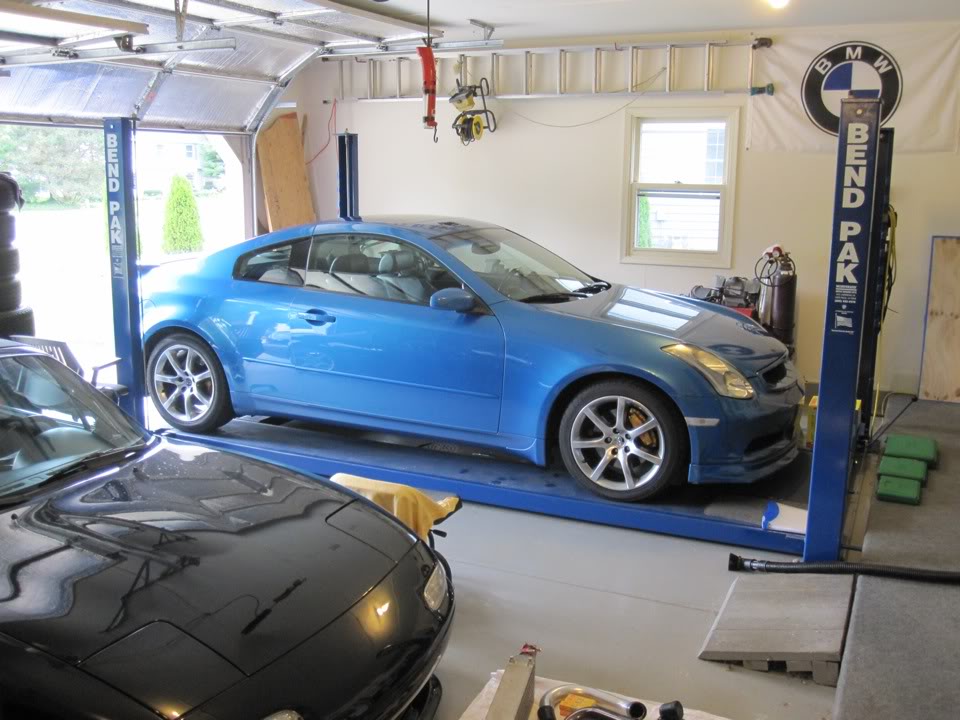
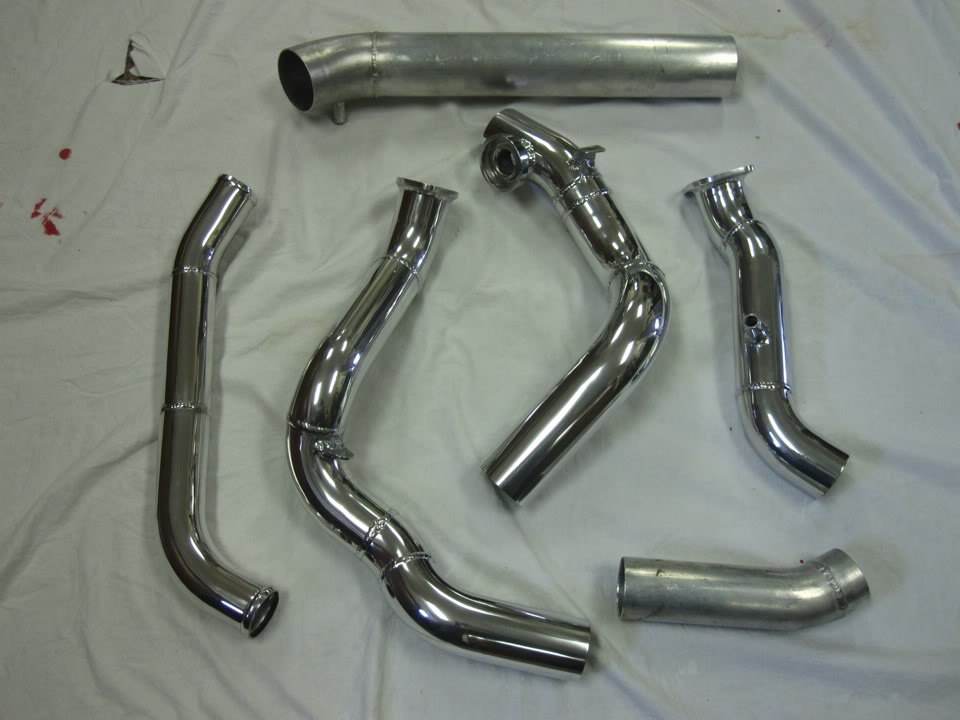
About four months ago I began the task of building my own turbo system for my 03 G35 coupe. I decided that I was going to build the system using various components from different kits along with many custom pipes, brackets, heat shields, etc. I have fabricated two turbo systems previously (both for Miatas) so I felt pretty confident about tackling this project. I also have access to a lift, TIG welder, band saw, mill, lathe, and a buffer in my fathers garage so I can fabricate almost anything I want.
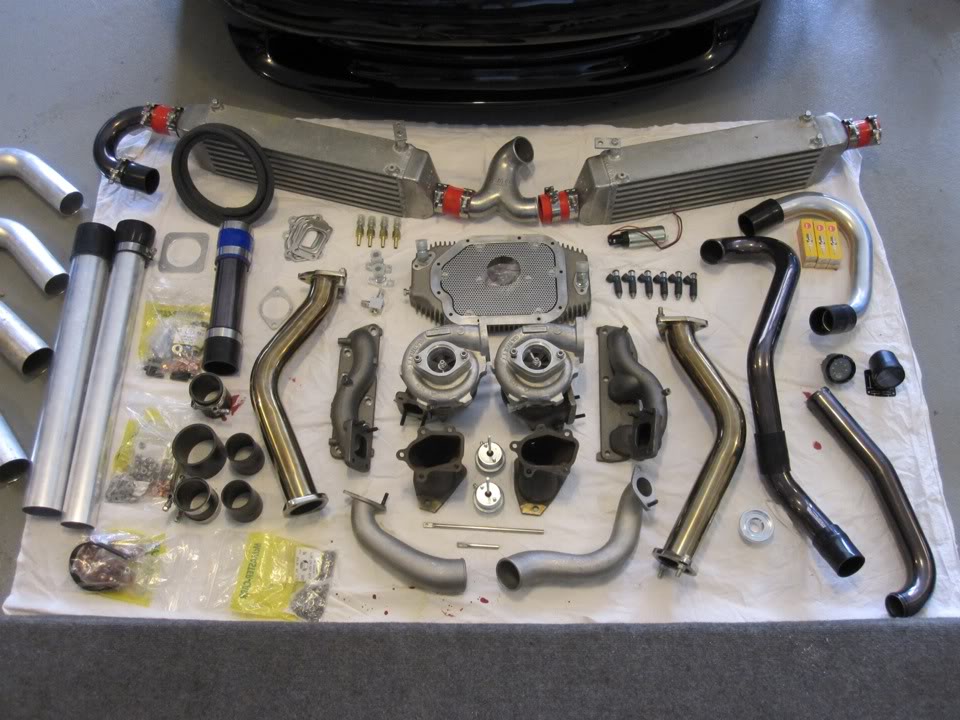
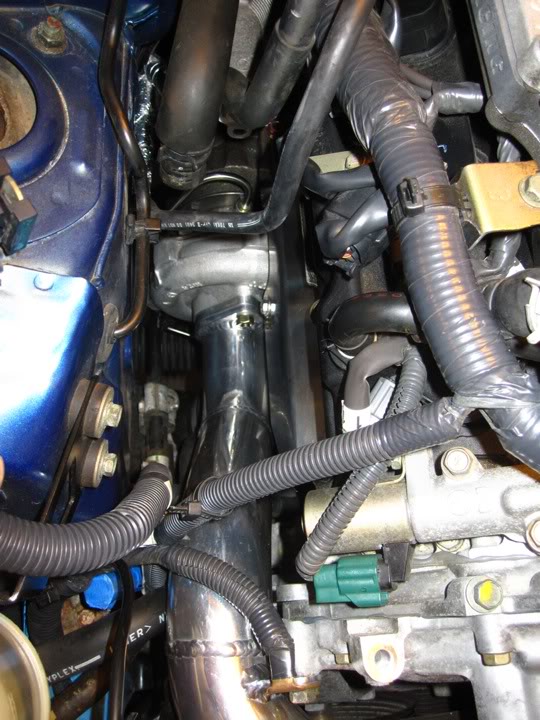
The heart of the system is an HKS GTRS "turbo setup kit" that I purchased used from a my350z forum member. Apparently this kit was installed on a SEMA show car and saw approximately 200 miles of use, at which point GTM removed the main pieces and sold it. It changed hands twice more before I got it but it was never installed. It was missing a few pieces, such as wastegate brackets and rods, all hardware, gaskets, and oil drain fittings. For those of you who are unfamiliar with the HKS kit, it's basically just two turbos, two manifolds, two compressor outlet pipes, two 02 housings, and an oil pan. The rest is left up to the fabricator. Couple that with the fact that it retails for $6300 and you can see why it's not very popular.
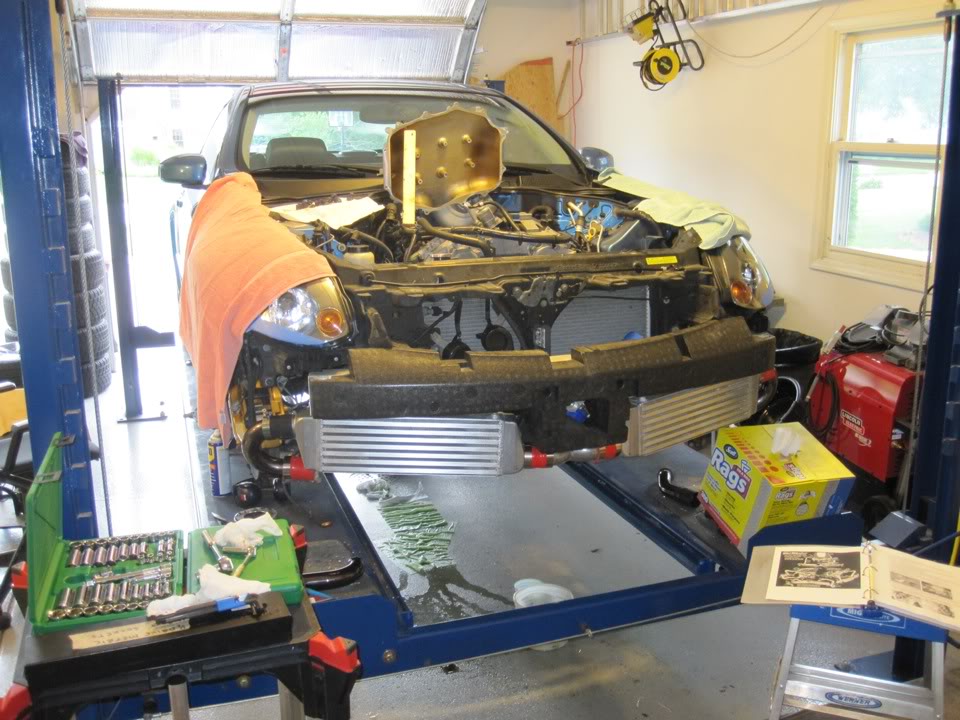
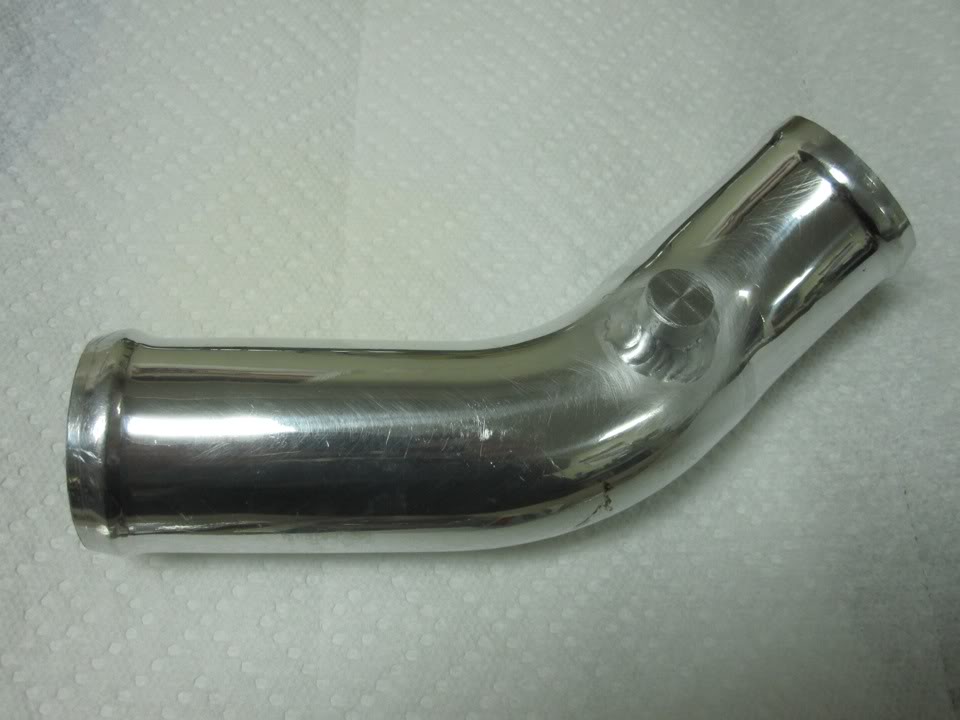
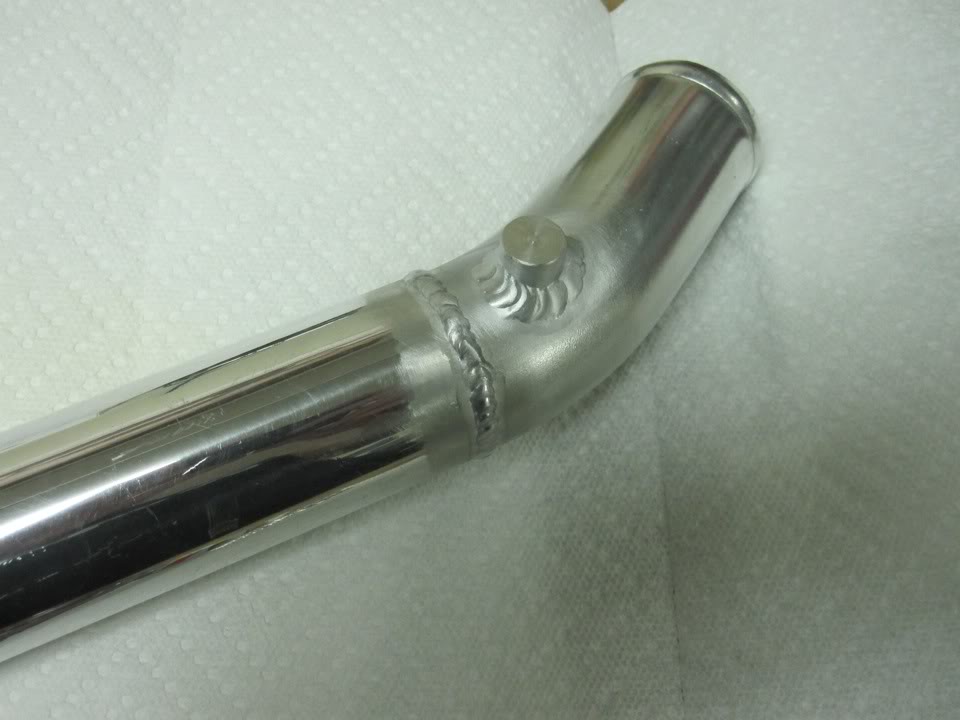
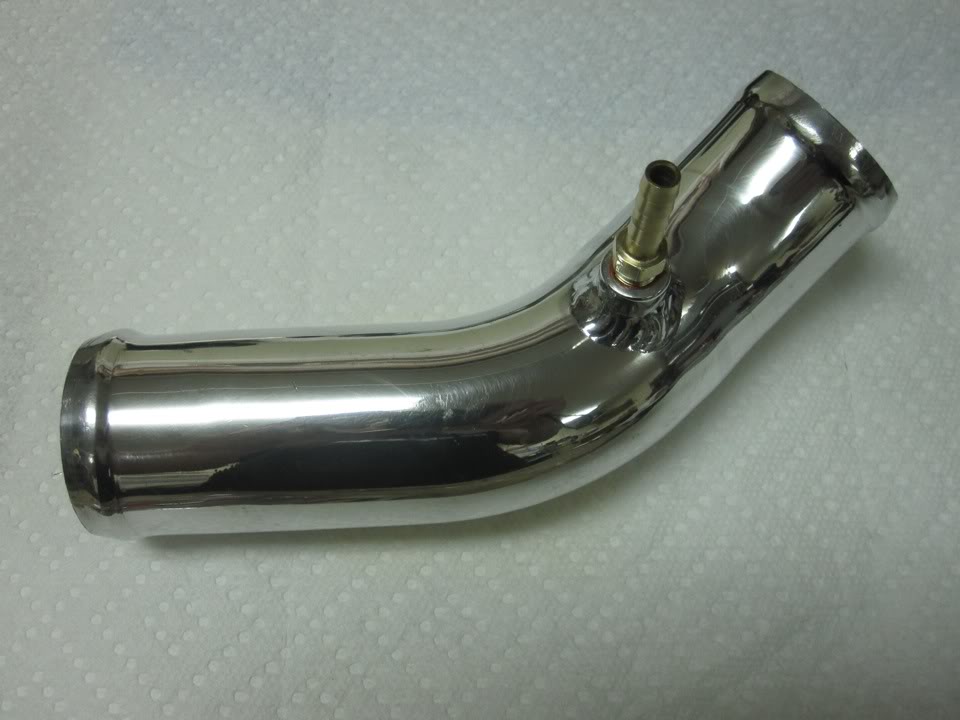
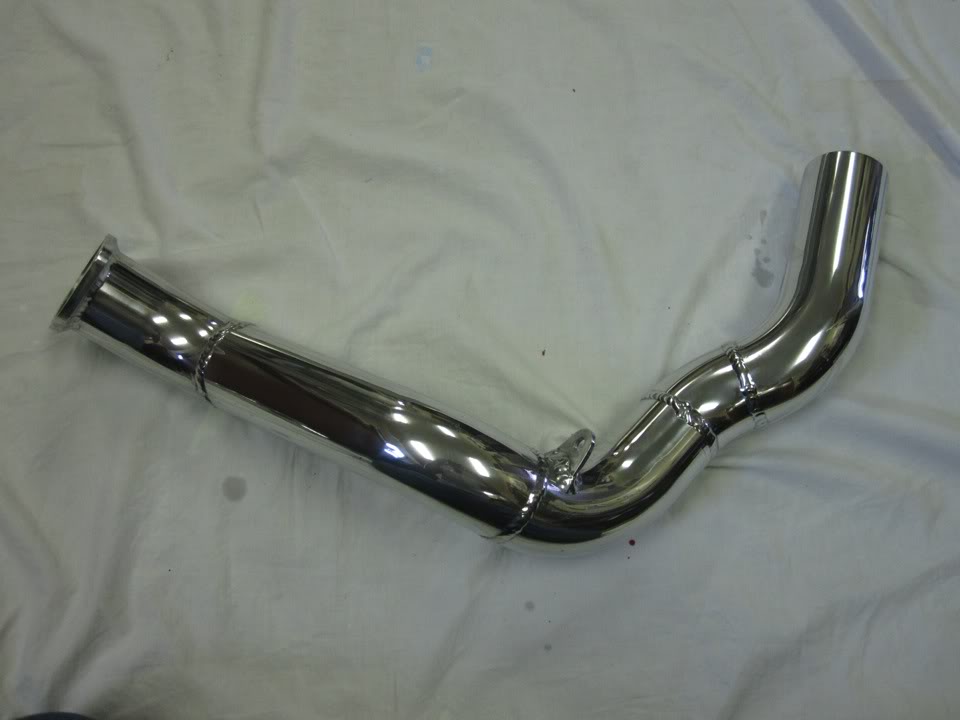
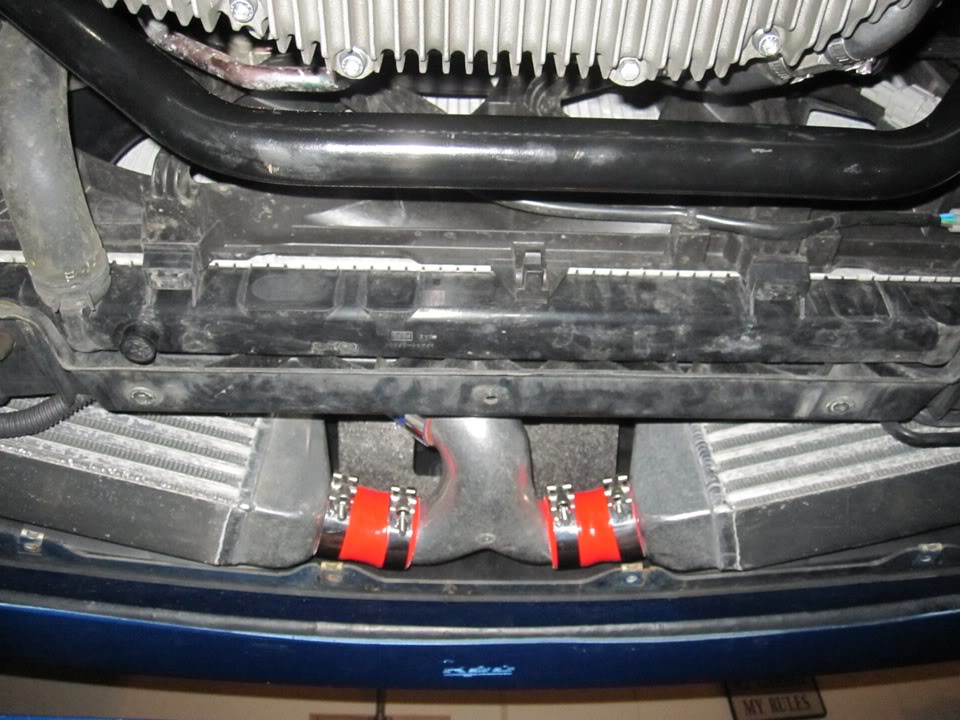
For an intercooler I decided to look for a used JWT twin intercooler setup. I wanted to keep my stock bumper and I always thought the twin intercooler design was a very elegant solution. I ended up getting a really sweet deal on one from a forum member who had upgraded to a GReddy intercooler. He also included a few pipes from the JWT kit so that helped me out tremendously. In fact, the drivers side turbo outlet mated up to the JWT piping with no modification needed, so all I had to do was fabricate one pipe to connect the passenger side turbo outlet to the intercooler.
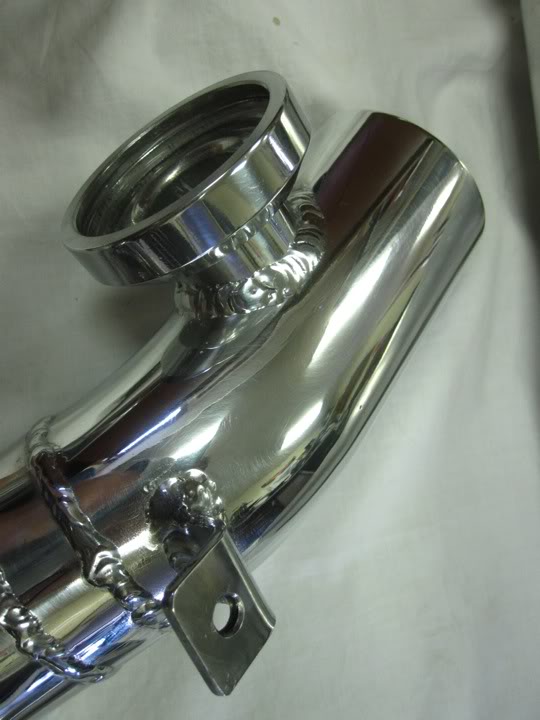
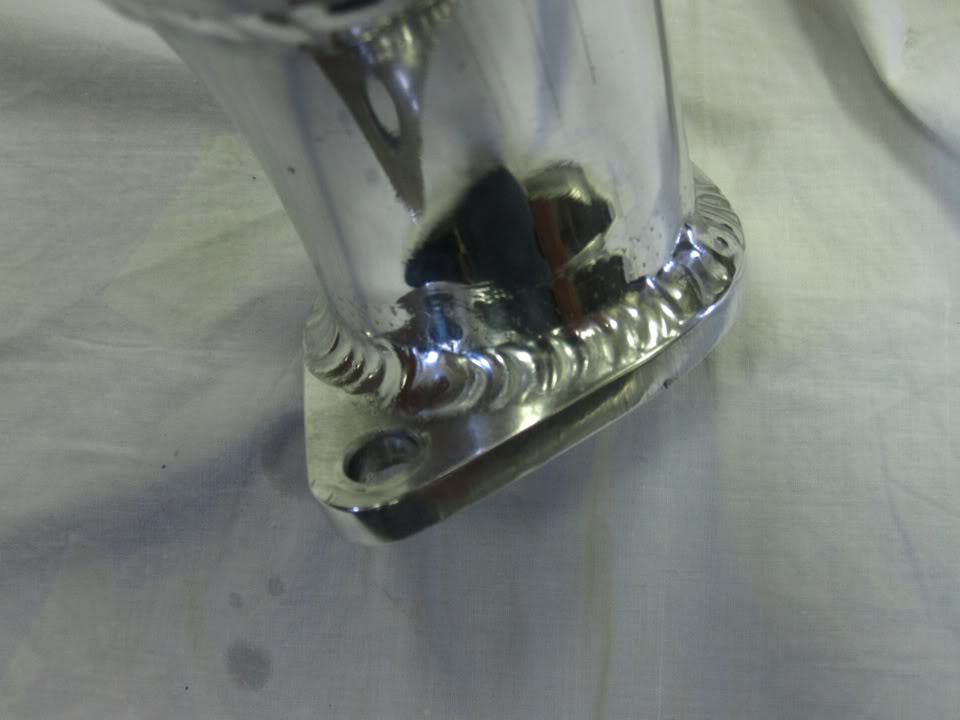
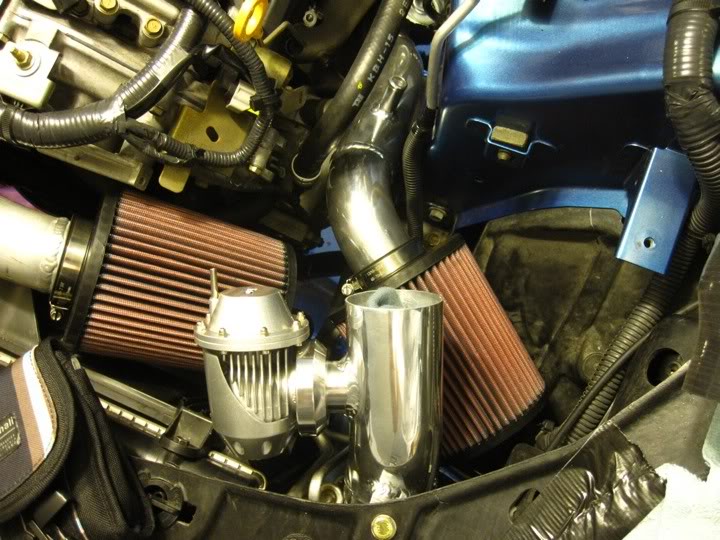
For the turbo intakes I used 2.25� mandrel bent aluminum u-bends, and routed them to two separate K&N filters right where the stock airbox used to be. This is similar to the JWT setup, but since I am using a blow-thru MAF setup I was able to run two filters instead of one. I also fabricated flanges and welded them to the pipes so that the intake pipes actually bolt to the compressor housings...one less silicone coupler to worry about!
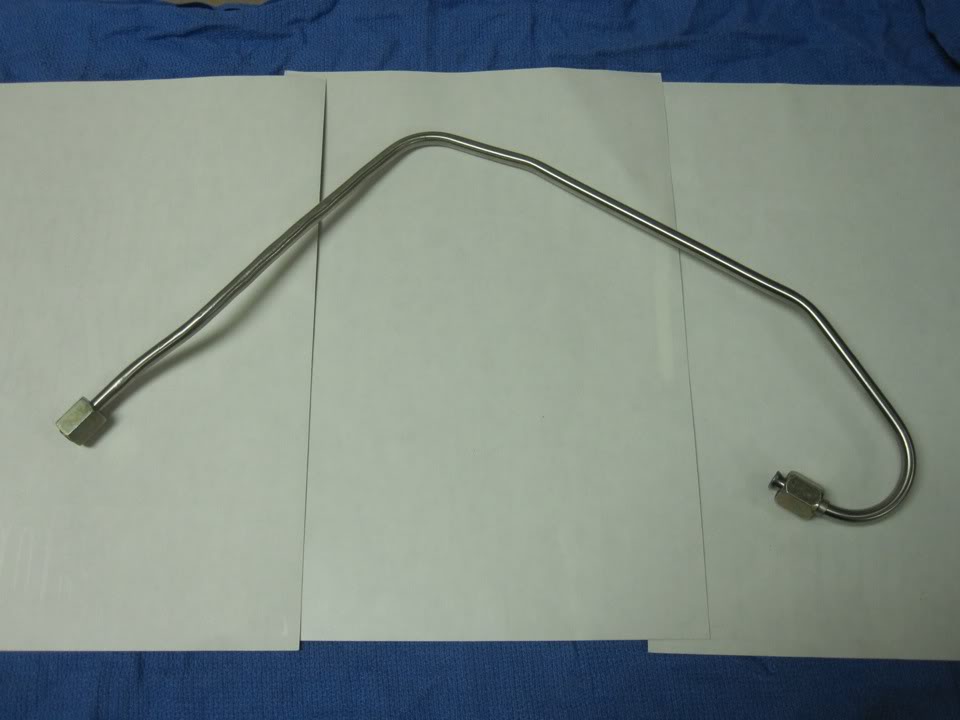
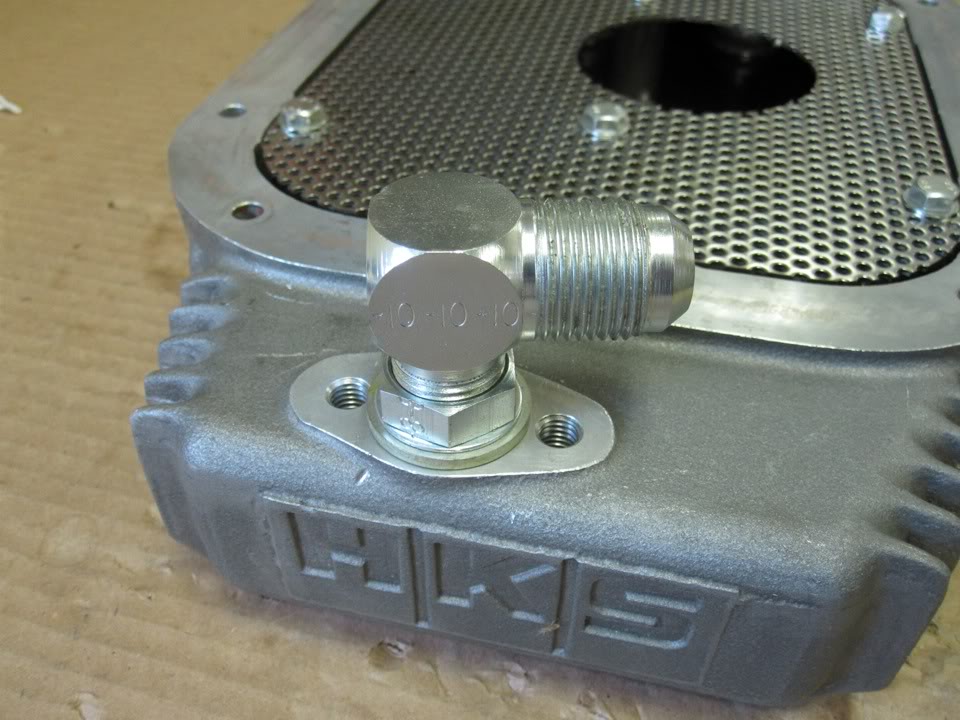
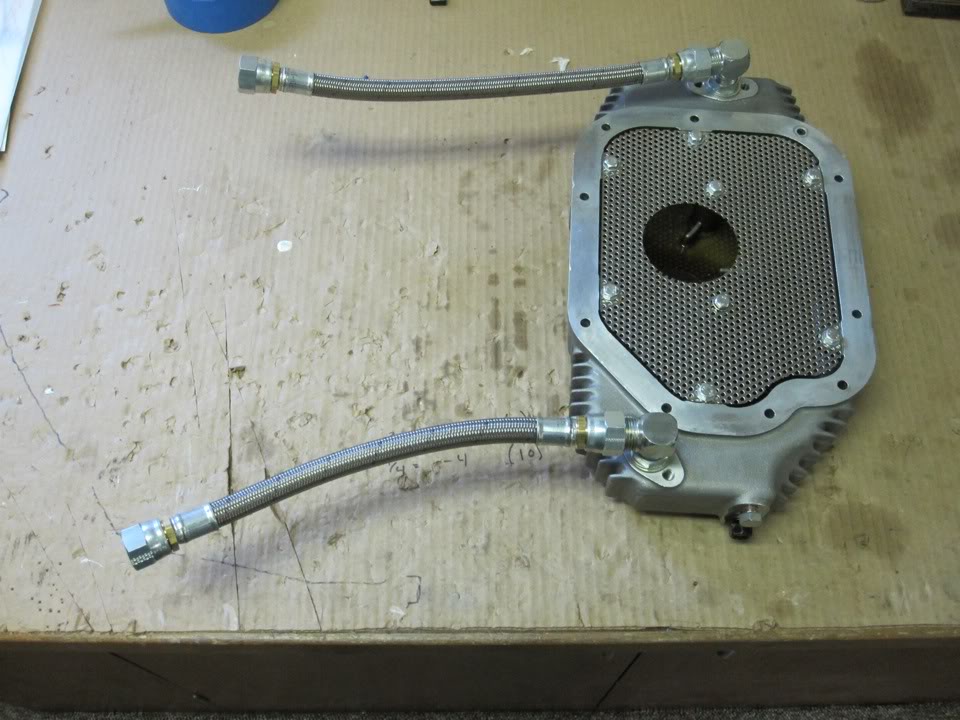
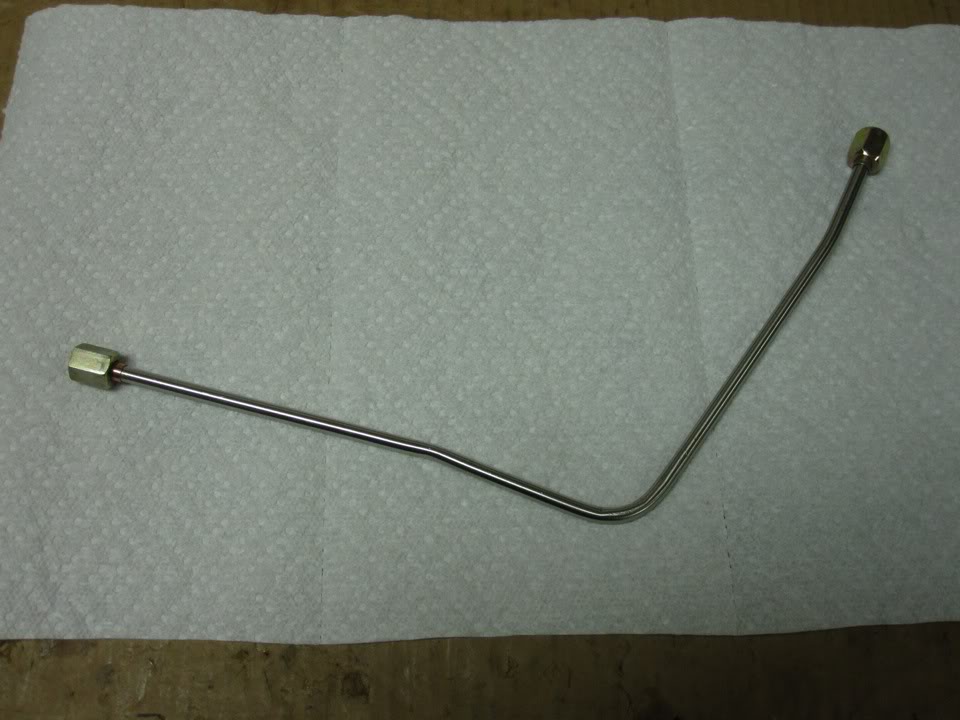
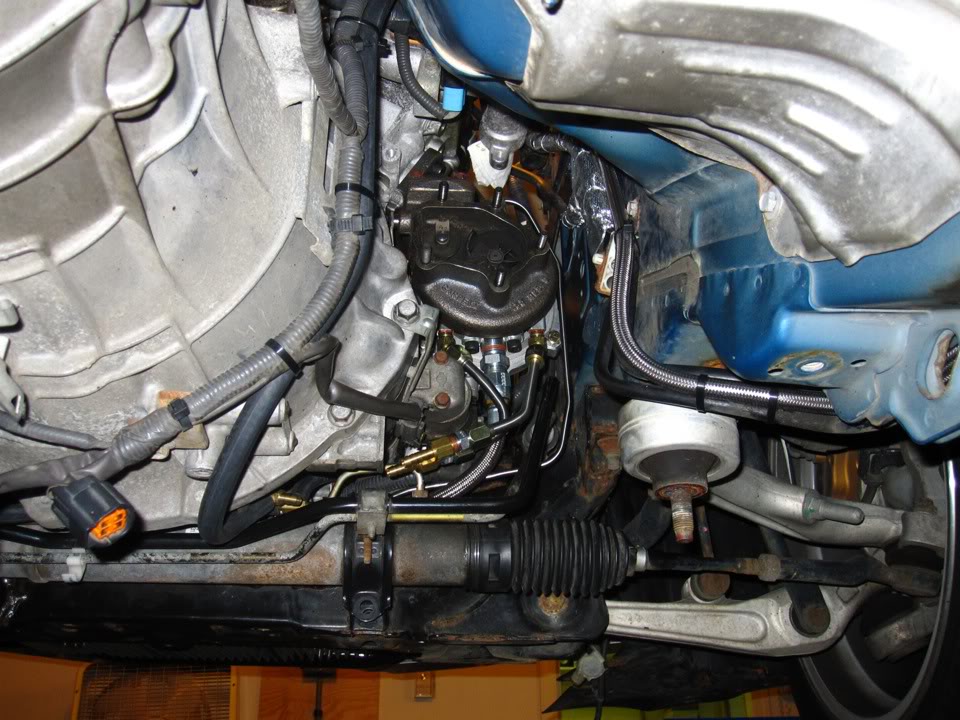
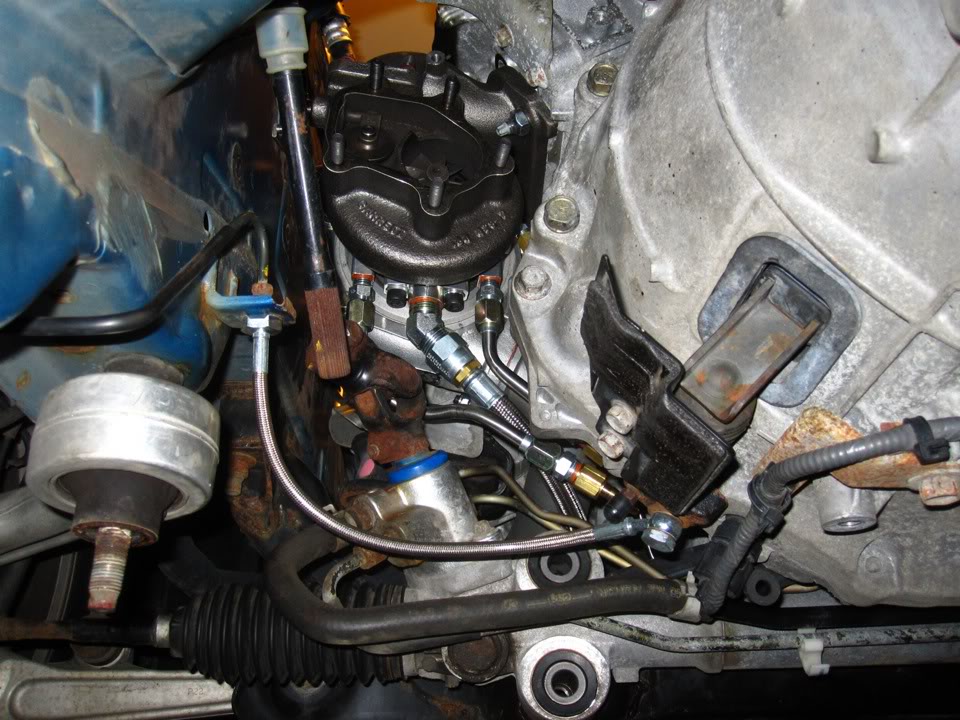
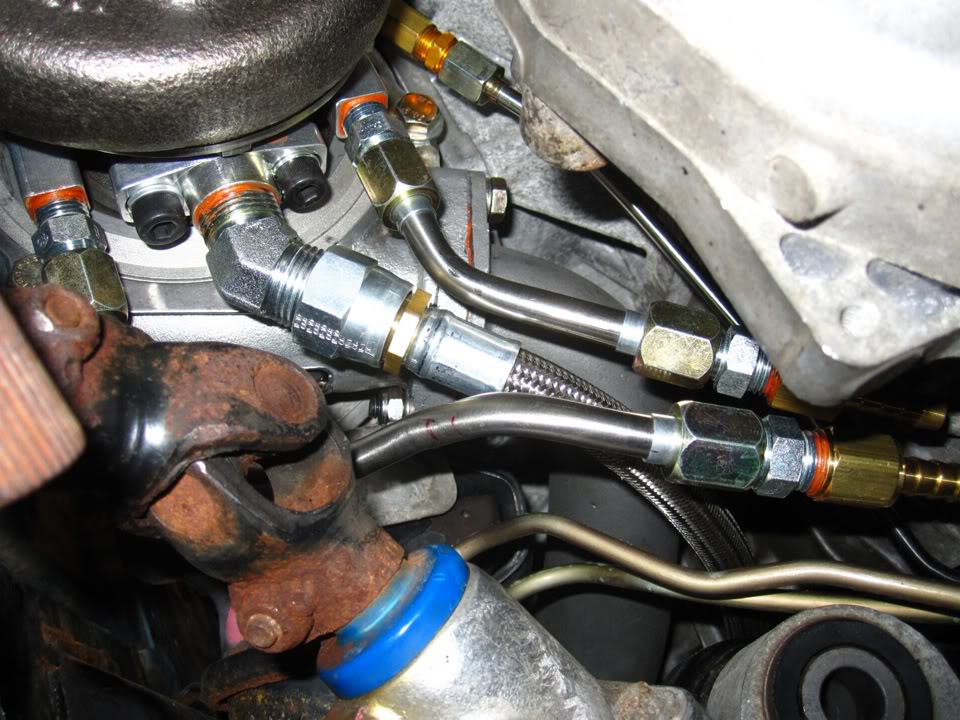
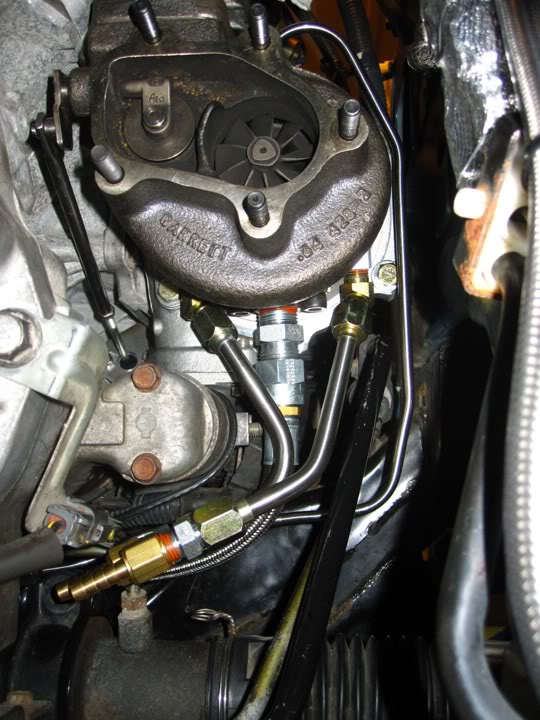
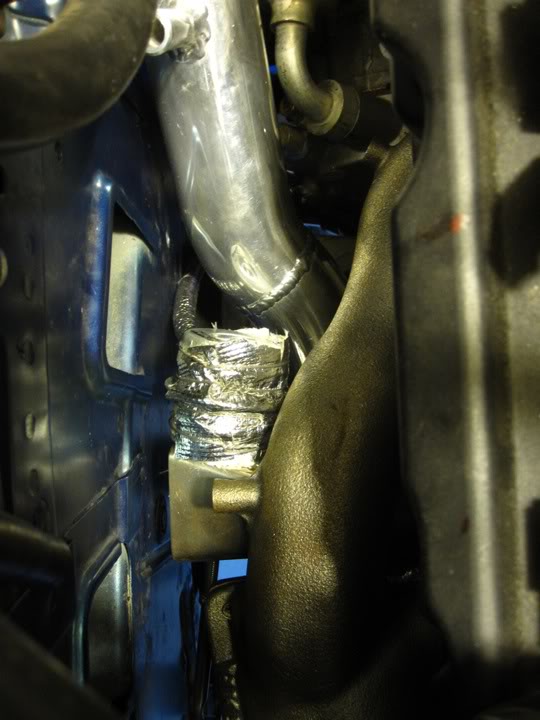
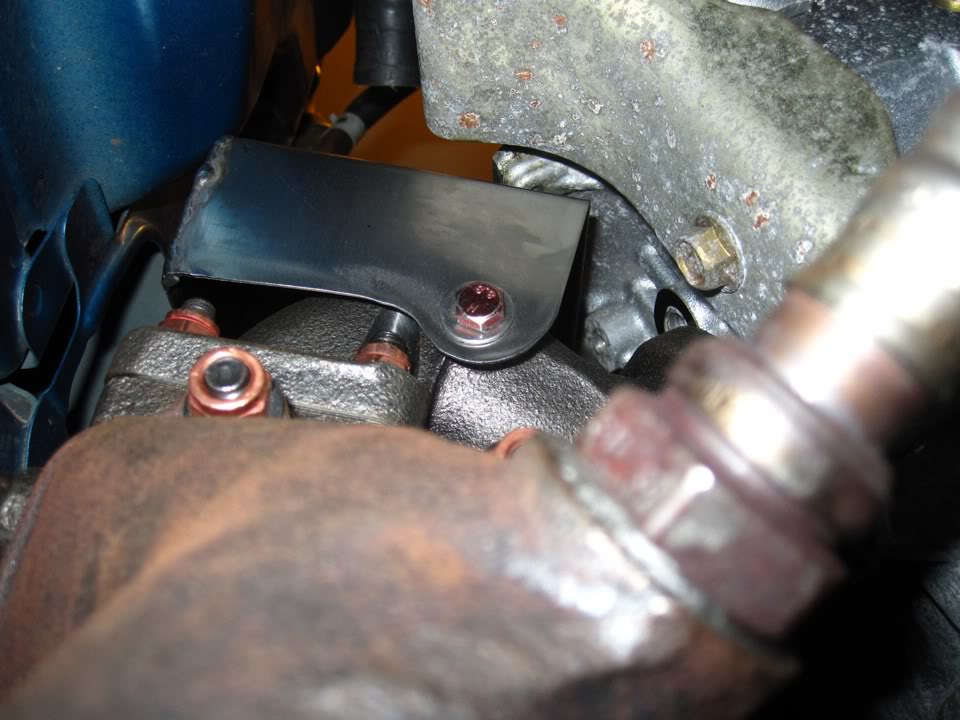
For oil and water lines I used stainless steel tubing which I bent and flared for use with 37 degree JIC flare fittings. I always had problems on my Miata with the water lines cooking and eventually failing at the turbo, even with high temperature silicone tubing. I converted the Miata to stainless hard lines this past summer and it worked great, so I decided to do it the first time around on the G. The hard lines are just long enough to get away from the hot turbine housing at which point they go to hose barbs and regular rubber coolant hose. The oil feed line for the drivers side turbo was a bit of a pain in the *** because there was not much room between the turbo and the manifold above it to route the lines. Plus I was trying to use an oil inlet restrictor which normally would go right into the turbo but there was no room. I ended up using an inverted flare fitting with a short stainless line directly into the turbo and then bent the line 180 degrees so it ran down alongside the turbo. Then I attached the oil restrictor to that line and adapted it back to 37 degree JIC flare to attach to the longer line which runs over to the T fitting by the steering rack. The oil feed comes from a custom adapter block that I fabricated which screws in between the oil pressure sender and the block. It�s basically a 1� cube of aluminum that has four ports, two of which are tapped 1/8� NPT and two of which are 1/8� BSPT (I had to buy a tap from McMaster Carr because BSPT is kinda rare in the states). Then I got a 1/8� BSPT nipple to screw into the engine block, and then screwed the adapter onto that. This was the best (and most cost effective way) I found to do it, while still having the proper BSPT thread. I plugged the extra NPT port in case I ever need it for an aftermarket oil pressure gage sender.
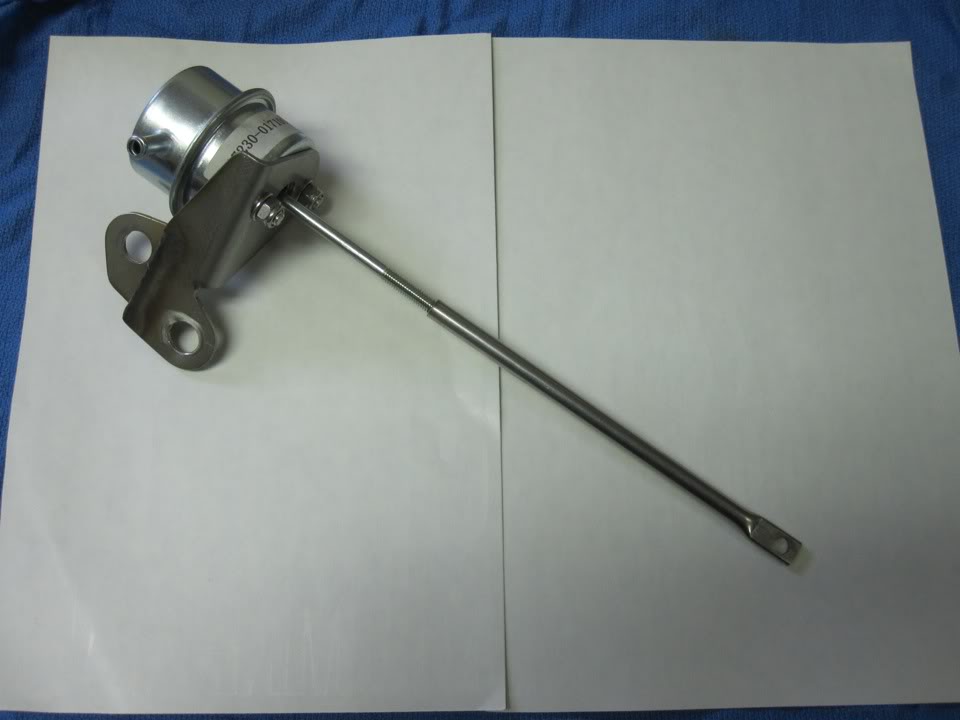
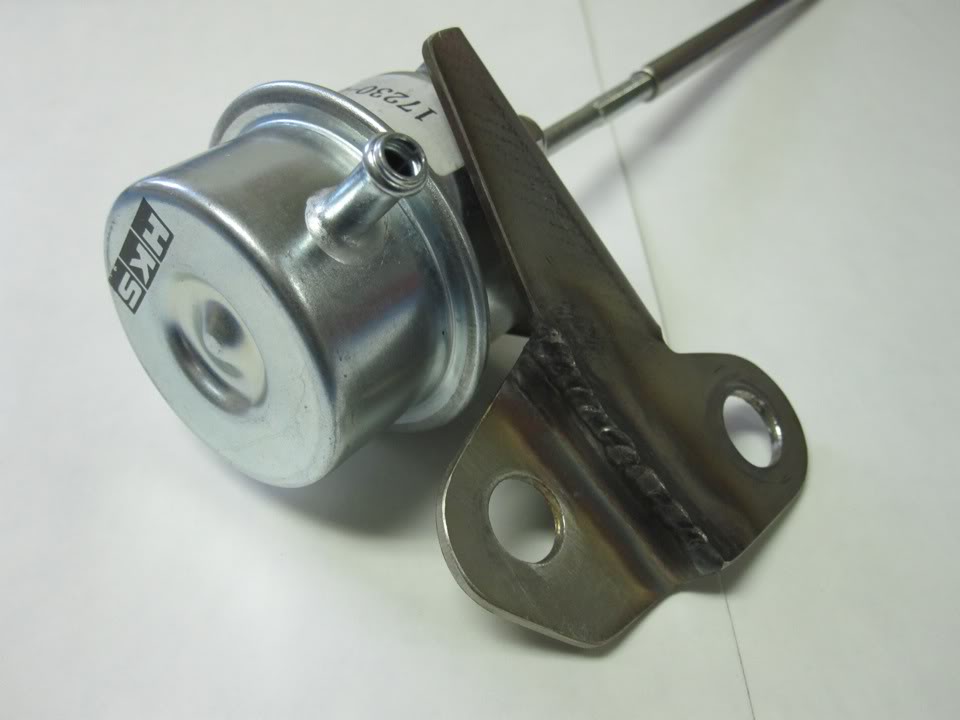
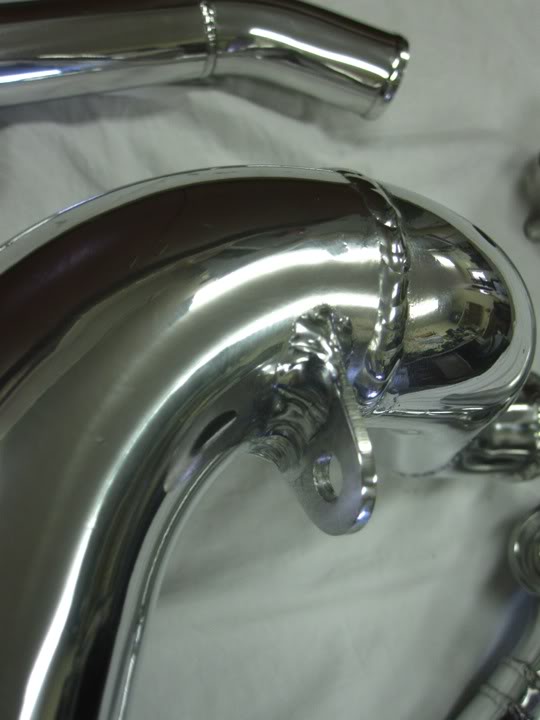
As I said earlier the wastegate actuator brackets and rods were missing from the kit so I decided to fabricate my own from stainless. HKS wanted something like $80 each for these brackets and I thought to myself �I can make those�. If I had to do it all over again I would have just bought the damn brackets. These brackets were probably the hardest part of the entire project. I was able to make them by looking at the pictures in the instructions, measuring the pictures and measuring the car but the drivers side bracket took me more than one try. Let�s just say that there is very little space where these actuators go and very little room for error with the brackets. Especially with the engine still in the car! I also fabricated the missing actuator rods from stainless tubing.
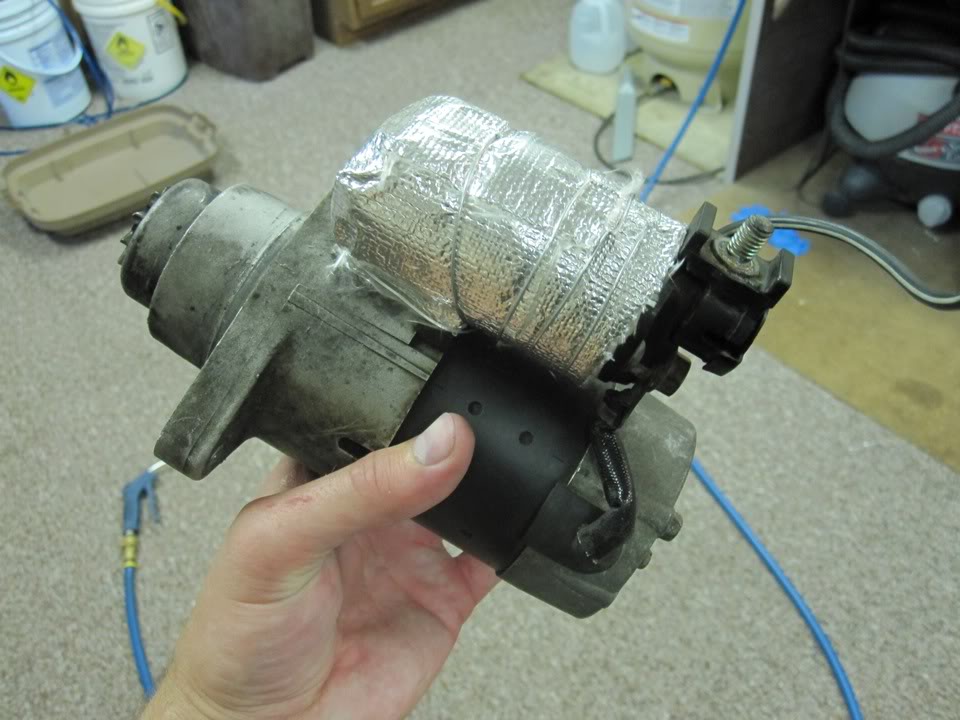
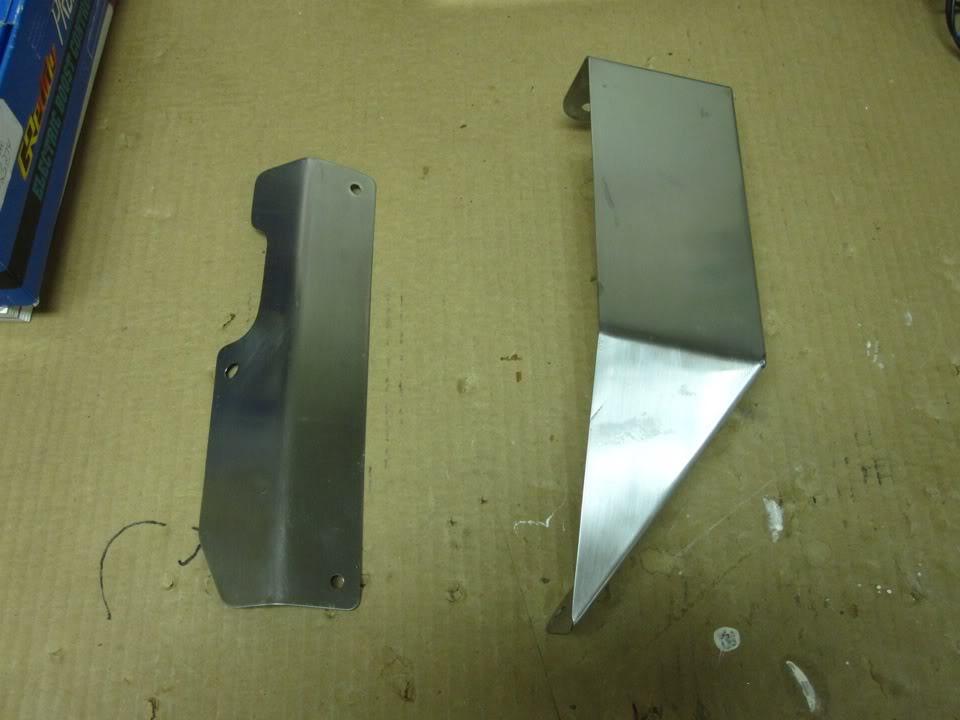
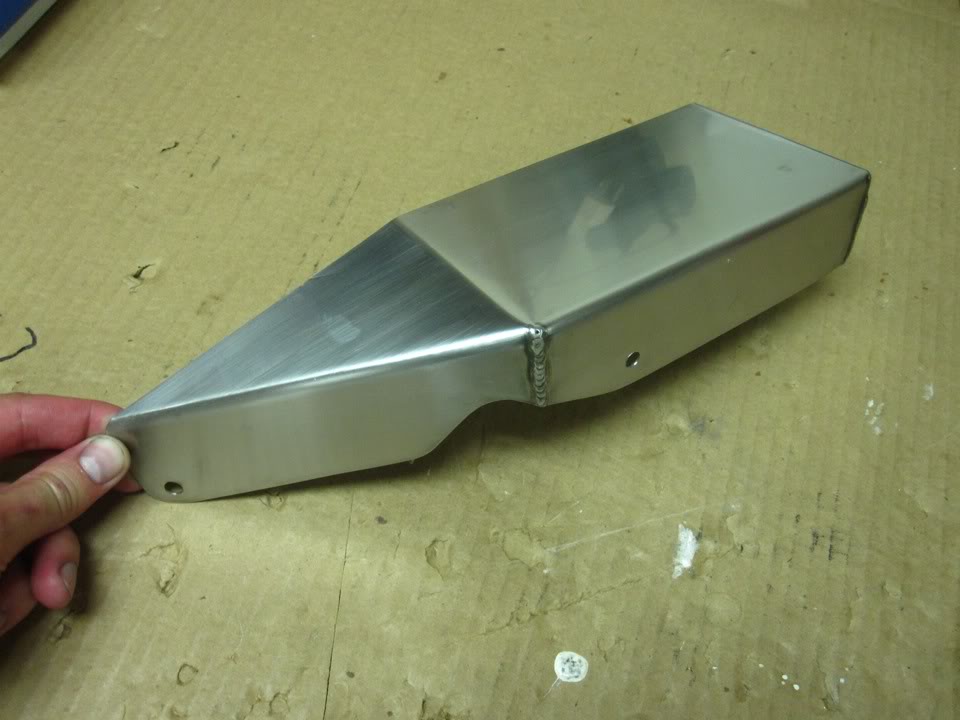
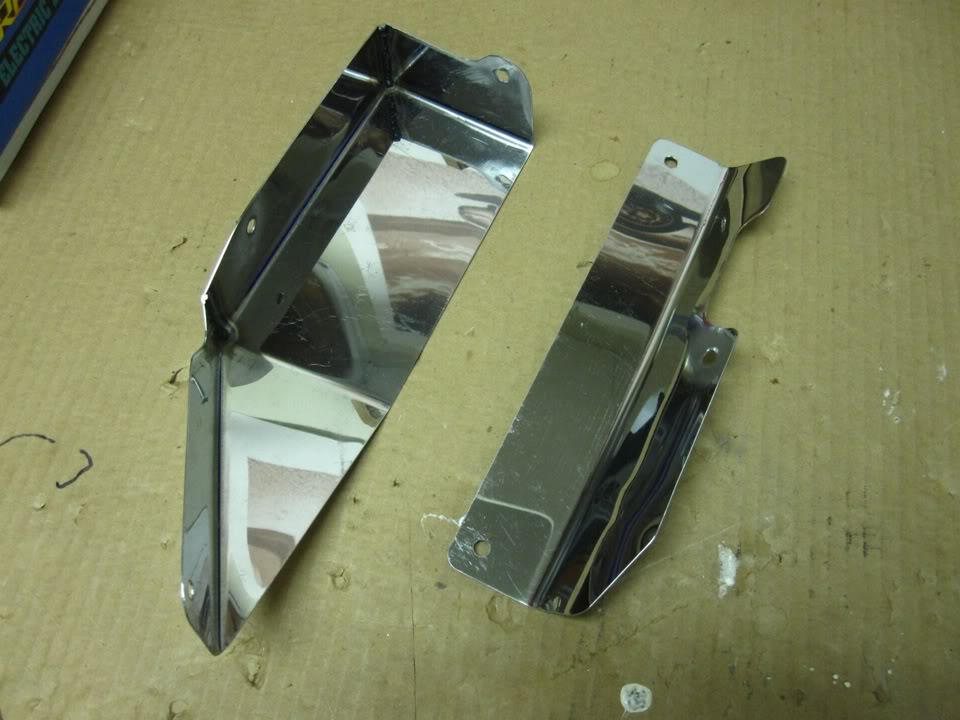
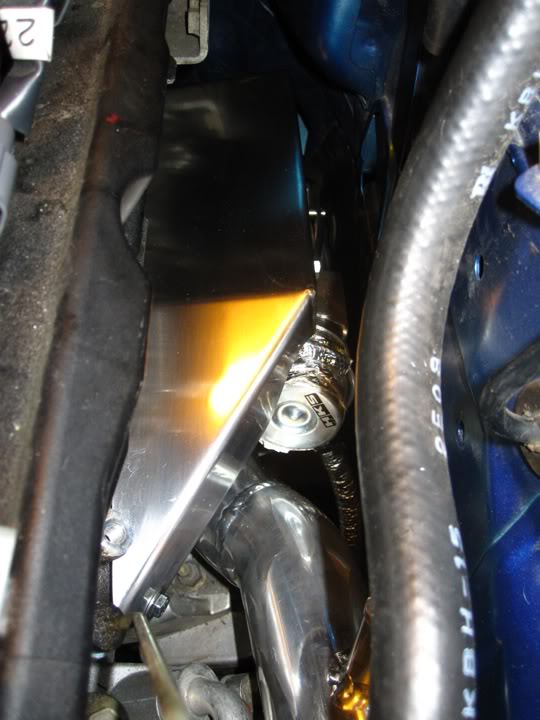
I also fabricated heat shields from stainless. The manifolds each had three mounting bosses cast into them, so I figured I might as well take advantage of it and make some heat shields. They turned out quite nicely I think.
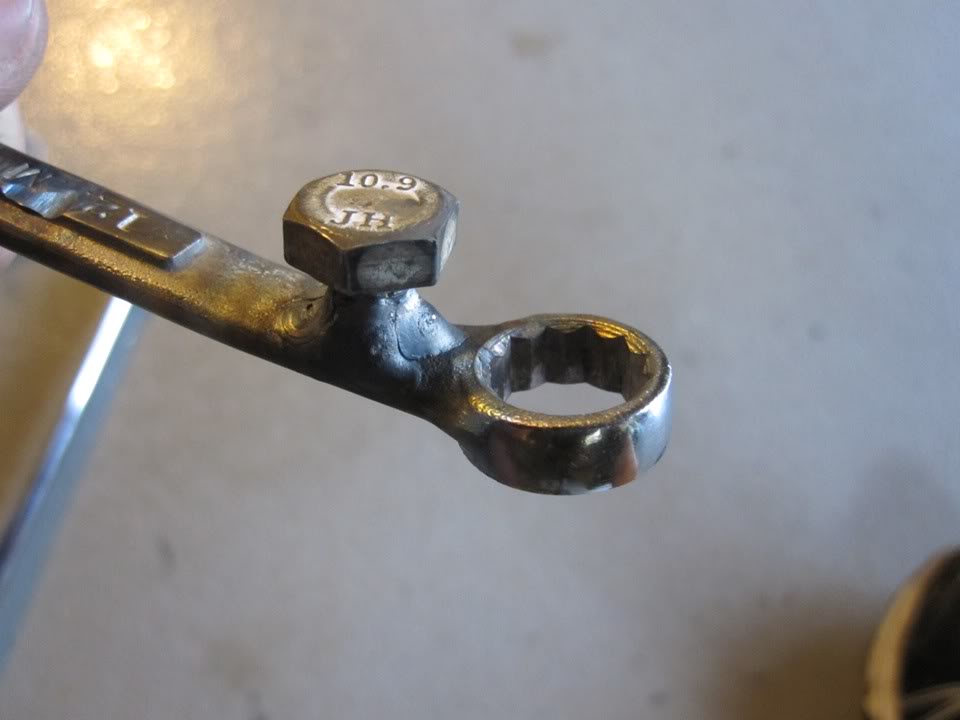
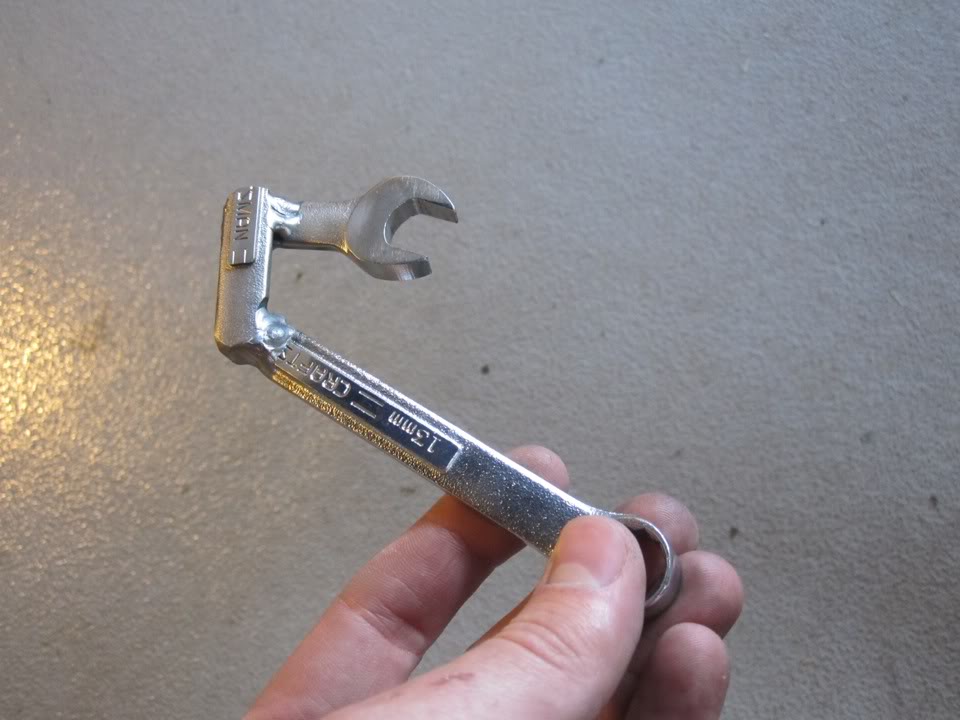
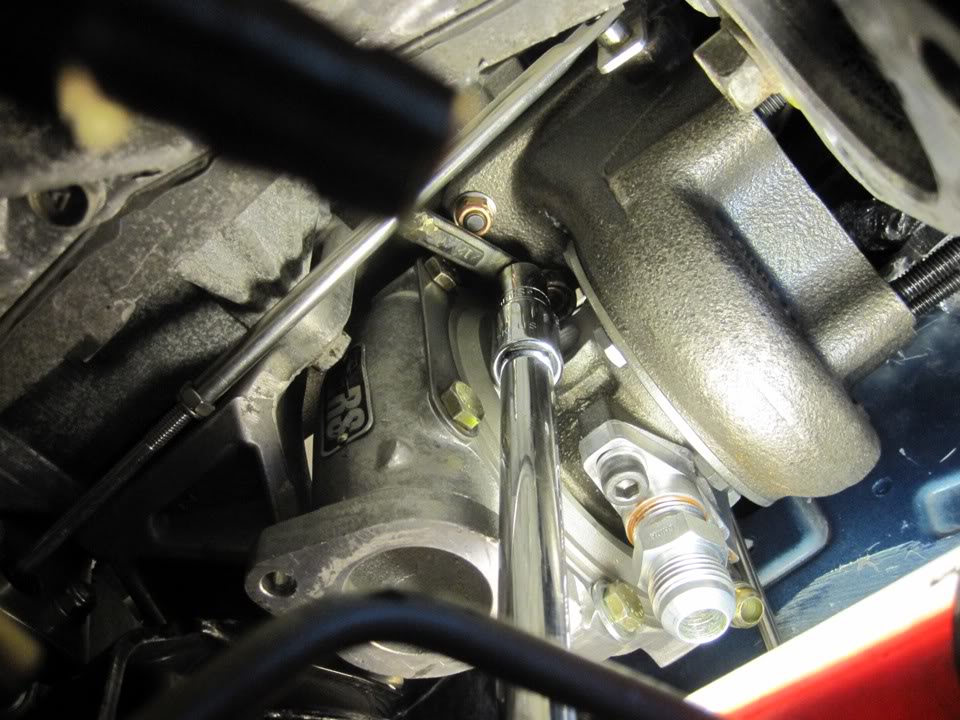
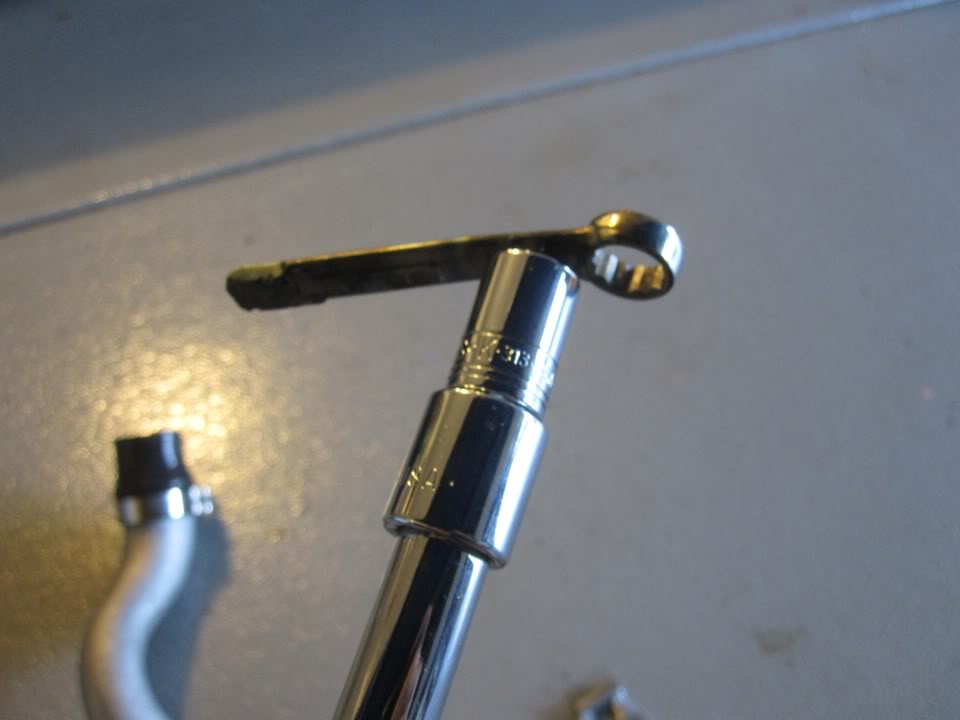
When I went to do the final installation I ran into a few glitches. The problem is that there is just not enough room to get wrenches onto various nuts and bolts when trying to do the install with the engine still in the car. Specifically the turbine inlet flange nuts and the compressor outlet tube nuts. So I made my own wrenches. Very weird looking, but very effective.
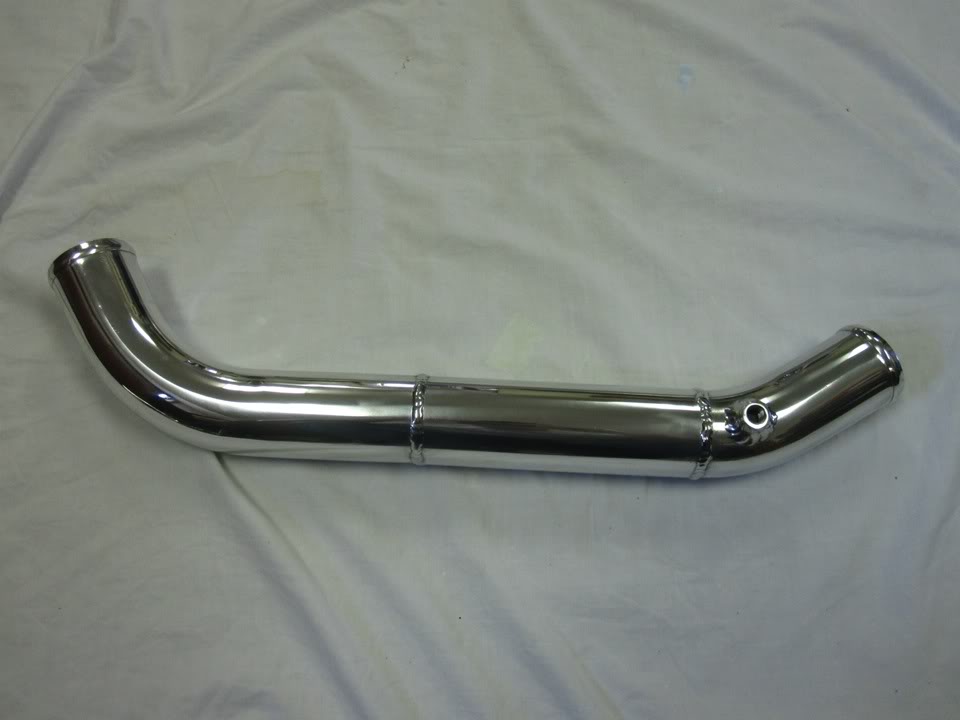
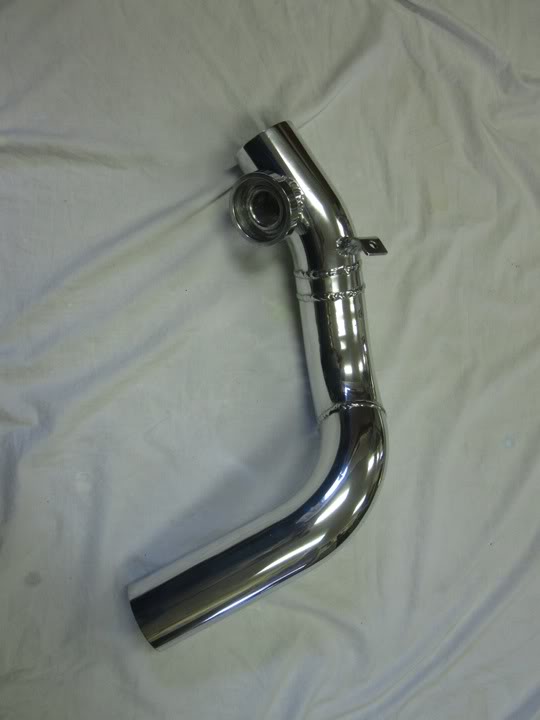
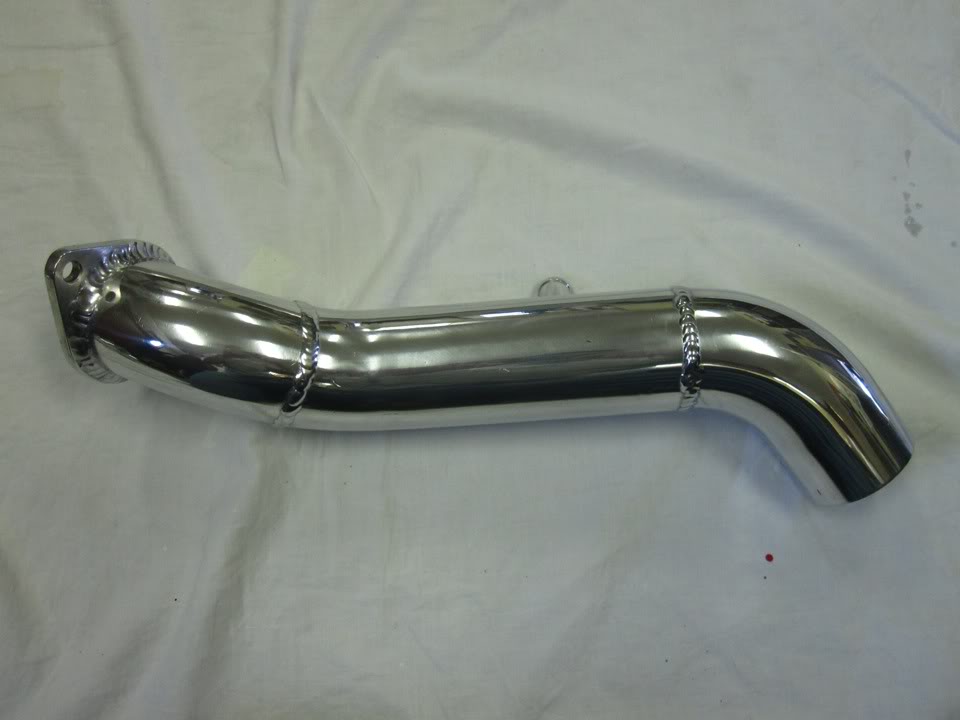
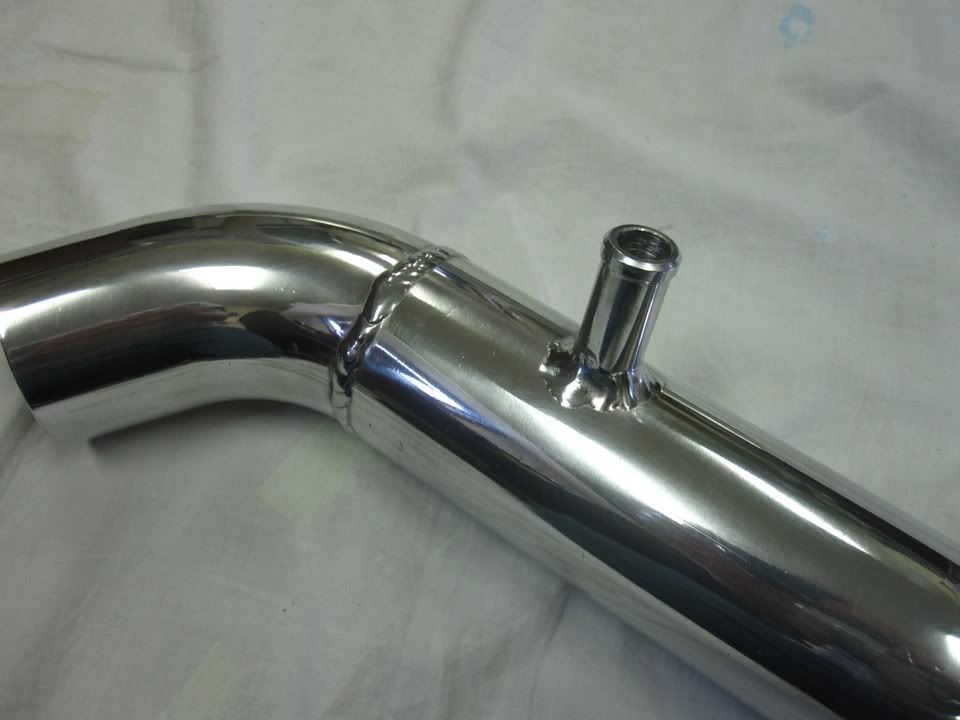
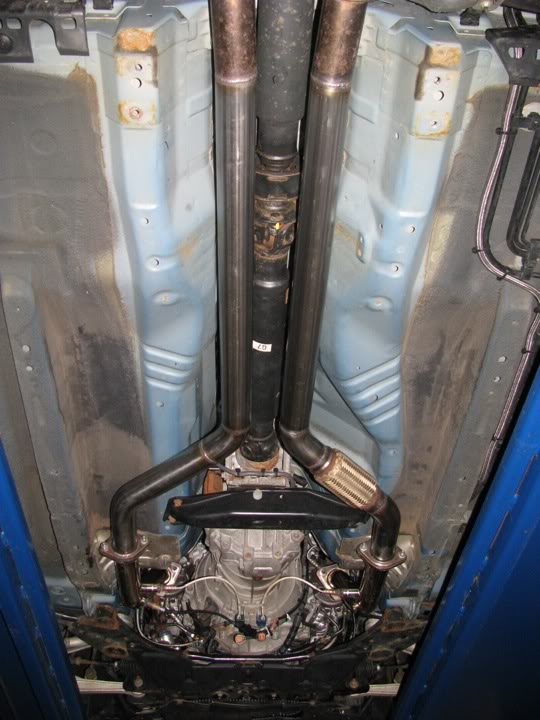
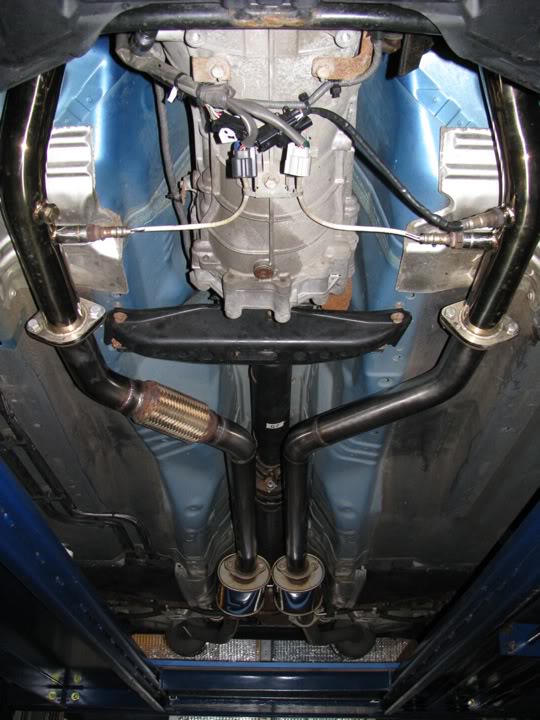
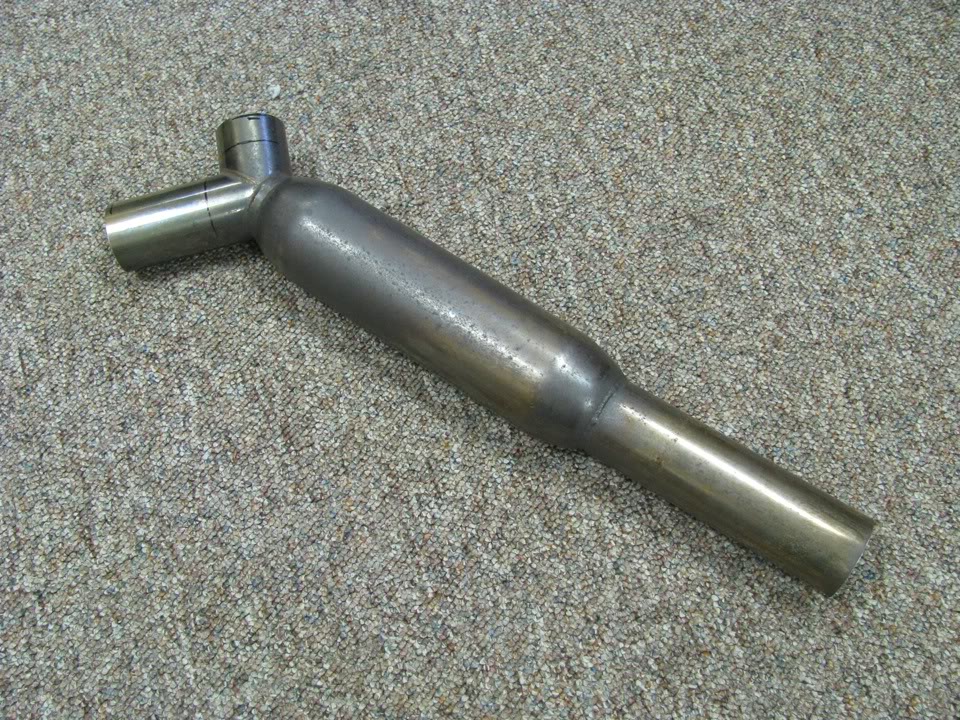
I already had a GReddy EVO2 exhaust on the car, but I knew it was seriously restricting flow because there is a good portion of it that was single 60 mm (2-3/8�)! After I finished the turbo install I drove it with the stock EVO2 for a while and it was super quiet. I also had trouble getting the same boost in different gears, even with a Profec B boost controller. So I decided to save some money and instead of buying a new exhaust I found a source for 2-3/8� diameter stainless tubing (Synapse Engineering - one of the only places I have ever found 2-3/8� straight and mandrel bent ss tubing for a reasonable price!) and converted the exhaust to a true dual. I was able to re-use the bends and flex joint that were already part of the EVO2 so all I needed was about 5 feet of straight tubing. I would like to add a second flex joint but I haven�t had any luck finding a 60 mm one yet. When I welded up the new exhaust I was able to tack it right on the car so the fitment is absolutely perfect. Then I back-purged the pipe with argon while welding to prevent contamination of the weld (if you don�t do this when welding thin stainless pipes you get what is sometimes referred to as �sugar� - which is a nasty buildup of crap on the inside of the pipe and a crappy looking weld). I had to buy a second regulator for my argon tank but it was well worth it. After the exhaust modification my boost was very consistent and stable in all gears, the sound was WAY louder, and best of all I gained significant spoolup and a good bit of horsepower!
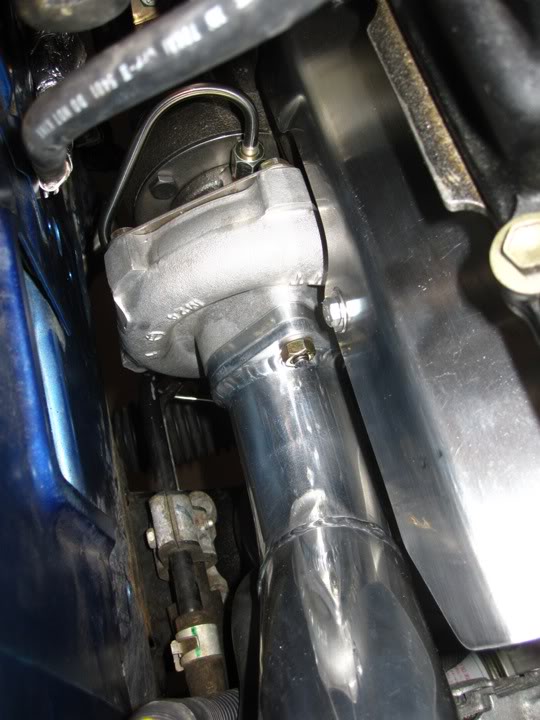
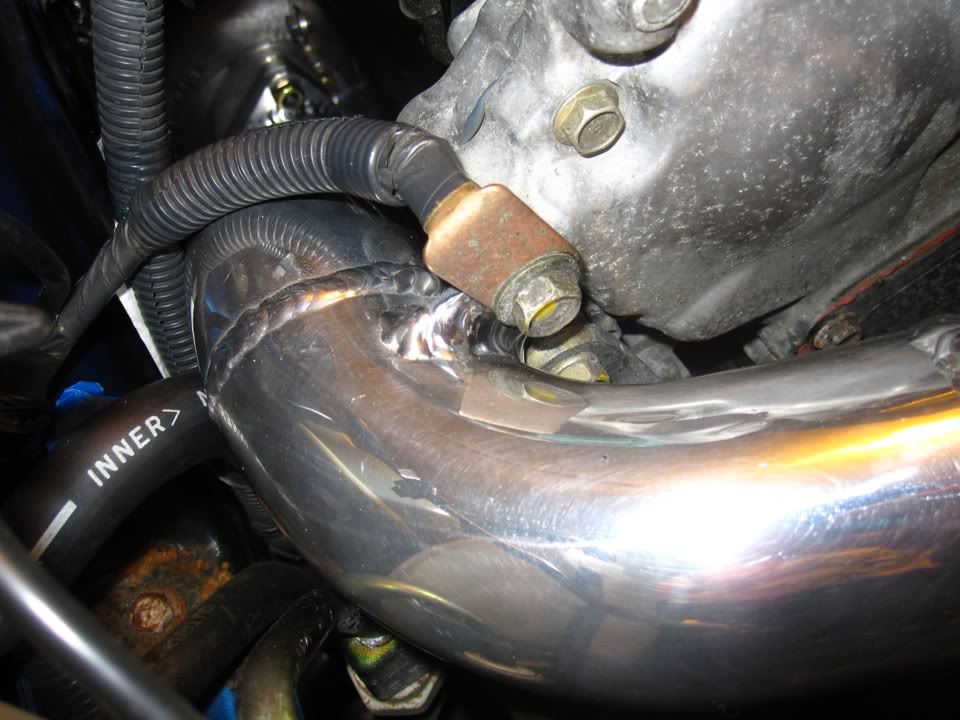
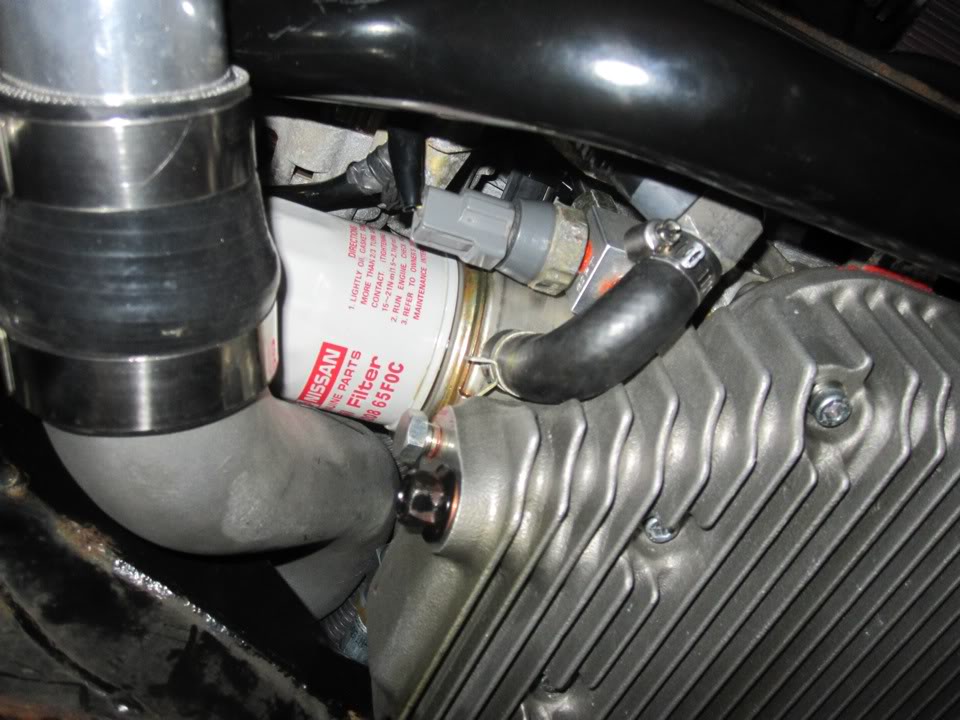
I must say that I am pretty impressed with the fitment of the HKS kit parts. The passenger side turbo outlet snakes downward in front of the starter, around the engine mount and down around the oil filter. It�s an incredibly tight fit, and an incredible PITA to install with the engine still in the car!
Here�s a list of parts:
HKS GTRS Turbo Setup Kit
JWT Intercoolers
HKS SSQ blowoff valve
Skunk 2 plenum spacer
Clutchmasters FX300 clutch
ACT Streetlite flywheel
UTEC
Deatschwerks 600cc Injectors
CJM Stage 0 fuel return system
Walbro 255 fuel pump
Defi boost gauge
AEM UEGO gauge type wideband
Berk test pipes
Custom true dual GReddy EVOII exhaust
GReddy Profec B boost controller
And of course pictures...
About four months ago I began the task of building my own turbo system for my 03 G35 coupe. I decided that I was going to build the system using various components from different kits along with many custom pipes, brackets, heat shields, etc. I have fabricated two turbo systems previously (both for Miatas) so I felt pretty confident about tackling this project. I also have access to a lift, TIG welder, band saw, mill, lathe, and a buffer in my fathers garage so I can fabricate almost anything I want.
The heart of the system is an HKS GTRS "turbo setup kit" that I purchased used from a my350z forum member. Apparently this kit was installed on a SEMA show car and saw approximately 200 miles of use, at which point GTM removed the main pieces and sold it. It changed hands twice more before I got it but it was never installed. It was missing a few pieces, such as wastegate brackets and rods, all hardware, gaskets, and oil drain fittings. For those of you who are unfamiliar with the HKS kit, it's basically just two turbos, two manifolds, two compressor outlet pipes, two 02 housings, and an oil pan. The rest is left up to the fabricator. Couple that with the fact that it retails for $6300 and you can see why it's not very popular.
For an intercooler I decided to look for a used JWT twin intercooler setup. I wanted to keep my stock bumper and I always thought the twin intercooler design was a very elegant solution. I ended up getting a really sweet deal on one from a forum member who had upgraded to a GReddy intercooler. He also included a few pipes from the JWT kit so that helped me out tremendously. In fact, the drivers side turbo outlet mated up to the JWT piping with no modification needed, so all I had to do was fabricate one pipe to connect the passenger side turbo outlet to the intercooler.
For the turbo intakes I used 2.25� mandrel bent aluminum u-bends, and routed them to two separate K&N filters right where the stock airbox used to be. This is similar to the JWT setup, but since I am using a blow-thru MAF setup I was able to run two filters instead of one. I also fabricated flanges and welded them to the pipes so that the intake pipes actually bolt to the compressor housings...one less silicone coupler to worry about!
For oil and water lines I used stainless steel tubing which I bent and flared for use with 37 degree JIC flare fittings. I always had problems on my Miata with the water lines cooking and eventually failing at the turbo, even with high temperature silicone tubing. I converted the Miata to stainless hard lines this past summer and it worked great, so I decided to do it the first time around on the G. The hard lines are just long enough to get away from the hot turbine housing at which point they go to hose barbs and regular rubber coolant hose. The oil feed line for the drivers side turbo was a bit of a pain in the *** because there was not much room between the turbo and the manifold above it to route the lines. Plus I was trying to use an oil inlet restrictor which normally would go right into the turbo but there was no room. I ended up using an inverted flare fitting with a short stainless line directly into the turbo and then bent the line 180 degrees so it ran down alongside the turbo. Then I attached the oil restrictor to that line and adapted it back to 37 degree JIC flare to attach to the longer line which runs over to the T fitting by the steering rack. The oil feed comes from a custom adapter block that I fabricated which screws in between the oil pressure sender and the block. It�s basically a 1� cube of aluminum that has four ports, two of which are tapped 1/8� NPT and two of which are 1/8� BSPT (I had to buy a tap from McMaster Carr because BSPT is kinda rare in the states). Then I got a 1/8� BSPT nipple to screw into the engine block, and then screwed the adapter onto that. This was the best (and most cost effective way) I found to do it, while still having the proper BSPT thread. I plugged the extra NPT port in case I ever need it for an aftermarket oil pressure gage sender.
As I said earlier the wastegate actuator brackets and rods were missing from the kit so I decided to fabricate my own from stainless. HKS wanted something like $80 each for these brackets and I thought to myself �I can make those�. If I had to do it all over again I would have just bought the damn brackets. These brackets were probably the hardest part of the entire project. I was able to make them by looking at the pictures in the instructions, measuring the pictures and measuring the car but the drivers side bracket took me more than one try. Let�s just say that there is very little space where these actuators go and very little room for error with the brackets. Especially with the engine still in the car! I also fabricated the missing actuator rods from stainless tubing.
I also fabricated heat shields from stainless. The manifolds each had three mounting bosses cast into them, so I figured I might as well take advantage of it and make some heat shields. They turned out quite nicely I think.
When I went to do the final installation I ran into a few glitches. The problem is that there is just not enough room to get wrenches onto various nuts and bolts when trying to do the install with the engine still in the car. Specifically the turbine inlet flange nuts and the compressor outlet tube nuts. So I made my own wrenches. Very weird looking, but very effective.
I already had a GReddy EVO2 exhaust on the car, but I knew it was seriously restricting flow because there is a good portion of it that was single 60 mm (2-3/8�)! After I finished the turbo install I drove it with the stock EVO2 for a while and it was super quiet. I also had trouble getting the same boost in different gears, even with a Profec B boost controller. So I decided to save some money and instead of buying a new exhaust I found a source for 2-3/8� diameter stainless tubing (Synapse Engineering - one of the only places I have ever found 2-3/8� straight and mandrel bent ss tubing for a reasonable price!) and converted the exhaust to a true dual. I was able to re-use the bends and flex joint that were already part of the EVO2 so all I needed was about 5 feet of straight tubing. I would like to add a second flex joint but I haven�t had any luck finding a 60 mm one yet. When I welded up the new exhaust I was able to tack it right on the car so the fitment is absolutely perfect. Then I back-purged the pipe with argon while welding to prevent contamination of the weld (if you don�t do this when welding thin stainless pipes you get what is sometimes referred to as �sugar� - which is a nasty buildup of crap on the inside of the pipe and a crappy looking weld). I had to buy a second regulator for my argon tank but it was well worth it. After the exhaust modification my boost was very consistent and stable in all gears, the sound was WAY louder, and best of all I gained significant spoolup and a good bit of horsepower!
I must say that I am pretty impressed with the fitment of the HKS kit parts. The passenger side turbo outlet snakes downward in front of the starter, around the engine mount and down around the oil filter. It�s an incredibly tight fit, and an incredible PITA to install with the engine still in the car!
Here�s a list of parts:
HKS GTRS Turbo Setup Kit
JWT Intercoolers
HKS SSQ blowoff valve
Skunk 2 plenum spacer
Clutchmasters FX300 clutch
ACT Streetlite flywheel
UTEC
Deatschwerks 600cc Injectors
CJM Stage 0 fuel return system
Walbro 255 fuel pump
Defi boost gauge
AEM UEGO gauge type wideband
Berk test pipes
Custom true dual GReddy EVOII exhaust
GReddy Profec B boost controller
And of course pictures...
Last edited by mx594; Dec 6, 2009 at 06:32 PM.


Trending Topics


was liking it till I saw the SSQV 
in all seriousness, I know the pains of a TT install. Looks like the piping around the oil filter will be a lingering pain in the @ss. Your home made tools look much nicer than the ones I fab'd for my install.
Enjoy!
in all seriousness, I know the pains of a TT install. Looks like the piping around the oil filter will be a lingering pain in the @ss. Your home made tools look much nicer than the ones I fab'd for my install.
Enjoy!


very nice fabrication! Aluminum T-joint (fillets) kick my ***......so big ups to you on your welding skills. I also appreciate the custom wrenches you made. As someone who has installed a Greddy TT kit with the motor in the car, I discovered the need to make custom tools for the job. I like you wrench with the bolt head welded to the shaft of the wrench. That's a great idea......I will definately need to copy that one!

Yes oil changes are going to suck. I will definitely have to take off the undertray every time. I can still get the wrench on the filter though so that's good.
I think the lift was in the neighborhood of $3000 shipped. I don't know for sure because like I said it's my dad's house and he bought it. The ceiling isn't particularly high, probably 9 ft? I can find out for sure if you really want. Before I started working on the G I used to work on my Miata a lot, which is a whole lot lower than the G. In fact we use the lift to park an extra car in the garage, because you can stack a Miata and the G or any similar size car. One thing we had to do was get a garage door opener that fits directly onto the shaft, so the ceiling can be clear (it's a Wayne Dalton). We also re-routed the garage door track to go up tighter to the ceiling so it clears the back of the car when the car is on the lift. If you like to work on your own car, the lift is awesome! However I must say that a 2 post lift would probably be better, but the concrete slab in our garage wasn't thick enough to meet the requirement for a 2-post lift.
I think the lift was in the neighborhood of $3000 shipped. I don't know for sure because like I said it's my dad's house and he bought it. The ceiling isn't particularly high, probably 9 ft? I can find out for sure if you really want. Before I started working on the G I used to work on my Miata a lot, which is a whole lot lower than the G. In fact we use the lift to park an extra car in the garage, because you can stack a Miata and the G or any similar size car. One thing we had to do was get a garage door opener that fits directly onto the shaft, so the ceiling can be clear (it's a Wayne Dalton). We also re-routed the garage door track to go up tighter to the ceiling so it clears the back of the car when the car is on the lift. If you like to work on your own car, the lift is awesome! However I must say that a 2 post lift would probably be better, but the concrete slab in our garage wasn't thick enough to meet the requirement for a 2-post lift.


