
Test Pipe Installation DIY


Thread Starter
Registered User
Joined: Jun 2011
Posts: 108
Likes: 3
From: North Carolina
This was done on a 2007 350z with a VQ35HR engine. A lift would have made this install a little easier but it is not nesessary, and this write-up is for those normal dudes with a floor jack. I would recommend you read through this entire write up before you get started.
Minimum tool requirements:
One floor jack (two is better but you only need one)
Two height adjustable Jack Stands. (four is better but you only need two minimum.) be sure to put the jack up as a third point in case the jack stands fail.
one 5''x5'' x1'' thick square piece of wood or plastic or cardboard that you don't care about ruining. place this on the jacks contact surface to cushion your underbody with the wood. this will prevent scratches and bent metal under your z.
two 3''x5'' small pieces of cardboard to put on top of jackstand surface to protect and cushion jacktand from your underbody.
One 3/8 Socket Wrench
Four normal length 3/8 extensions.
One half length "wobble" extension OR 3/8 universal joint (swivel)
One Breaker bar (mine was a 1/2 breaker bar and I used an 1/2 to 3/8 adapter to fit it to the extensions)
One 1/2 to 3/8 adapter so you can use your breaker bar with all of your 3/8 extensions and sockets.
One can of PB blaster or Liquid Wrench
a set of deep and shallow sockets 10mm, 12mm, 14mm, 17mm, 19mm.
One 22mm wrench OR a 22mm O2 sensor socket.
One tube of High Temp RTV silicone OR use included gaskets OR buy new gaskets from one of the vendors on this forum. (on the ART pipe directions for those with HR motors only, it says to use RTV silicone. In my experience, RTV between the exhaust manifold and a downpipe or cat sucks. It will eventually blow out and you'll have an exhaust leak and your car will sound like a lawnmower. So anybody who buys the ART pipes that doesn't want to use RTV will have to get a set of gaskets for the exhaust manifold to cat. converter. end.) My pipes came with new gaskets only for the cat. converter to y-pipe end. I bought my gaskets from Z1 motorsports. They are very nice and thick and can be reused over and over again.
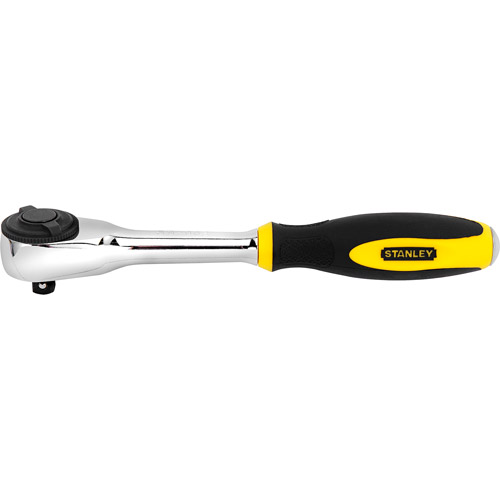
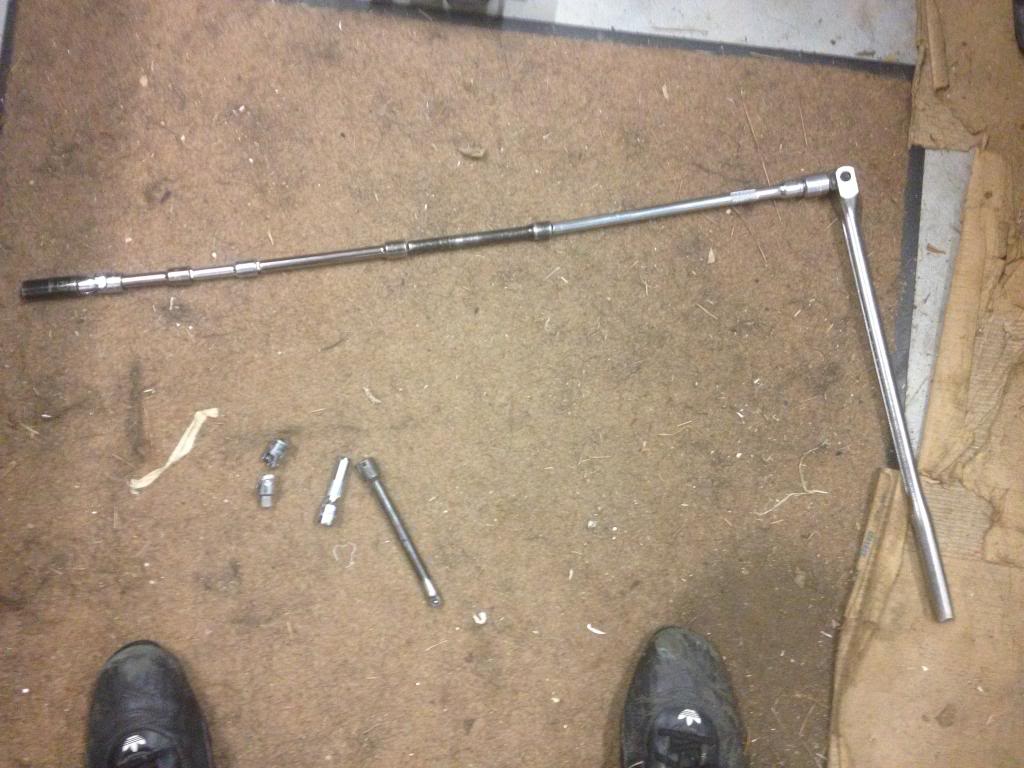
A rotator tool is not required but it will save you lots of time, mine looks like this:
IMPORTANT NOTE: This will become apparent as you read through this write-up but the number one rule you need to keep in mind is this: ON ANYTHING RELATED TO EXHAUST - LOOSEN EVERY BOLT BEFORE YOU REMOVE ANY BOLT. This will save you time and headaches.
Also, keep in mind that 80% of your time will be taken up by removing the stock system and 20% will be installing the new parts and putting the parts back in place.
Step 1.
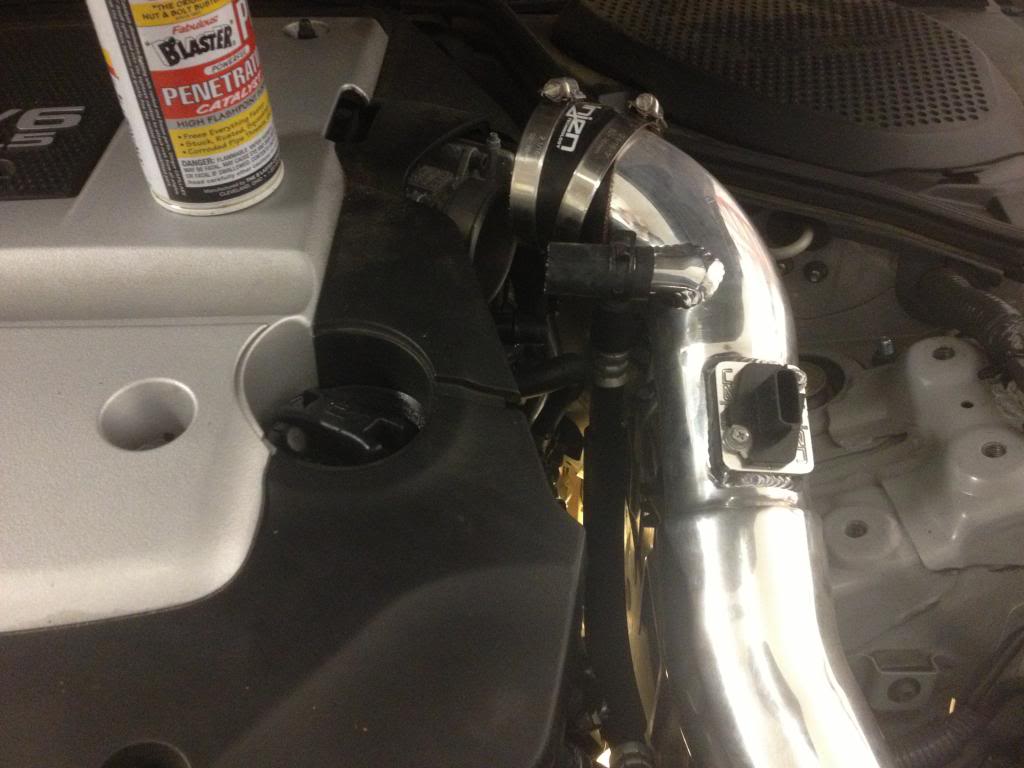
Open the hood and Remove the strut tower bar and loosen the intake piping on the drivers side where it attaches to the throttle body. You can disconnect the battery too.
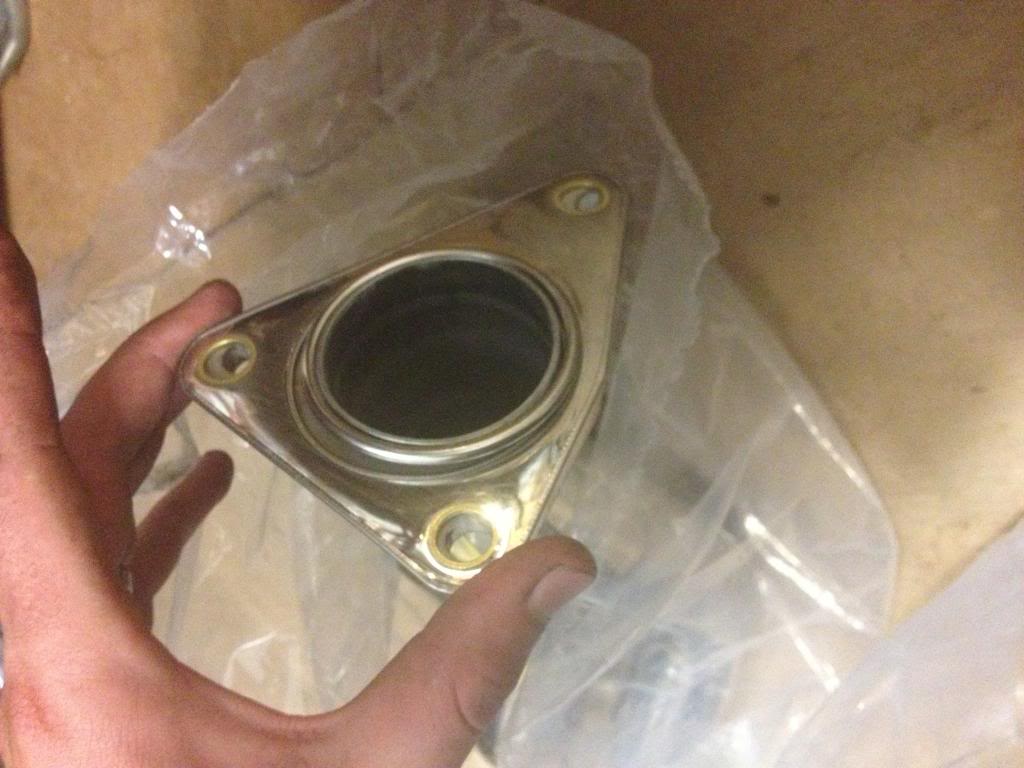
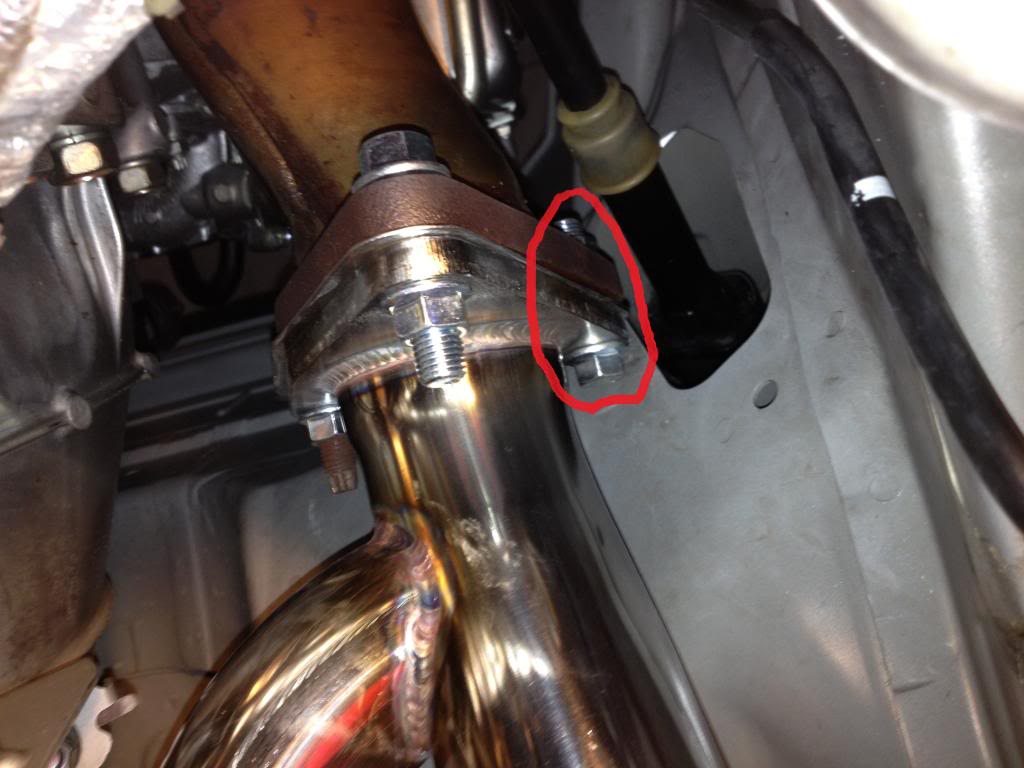
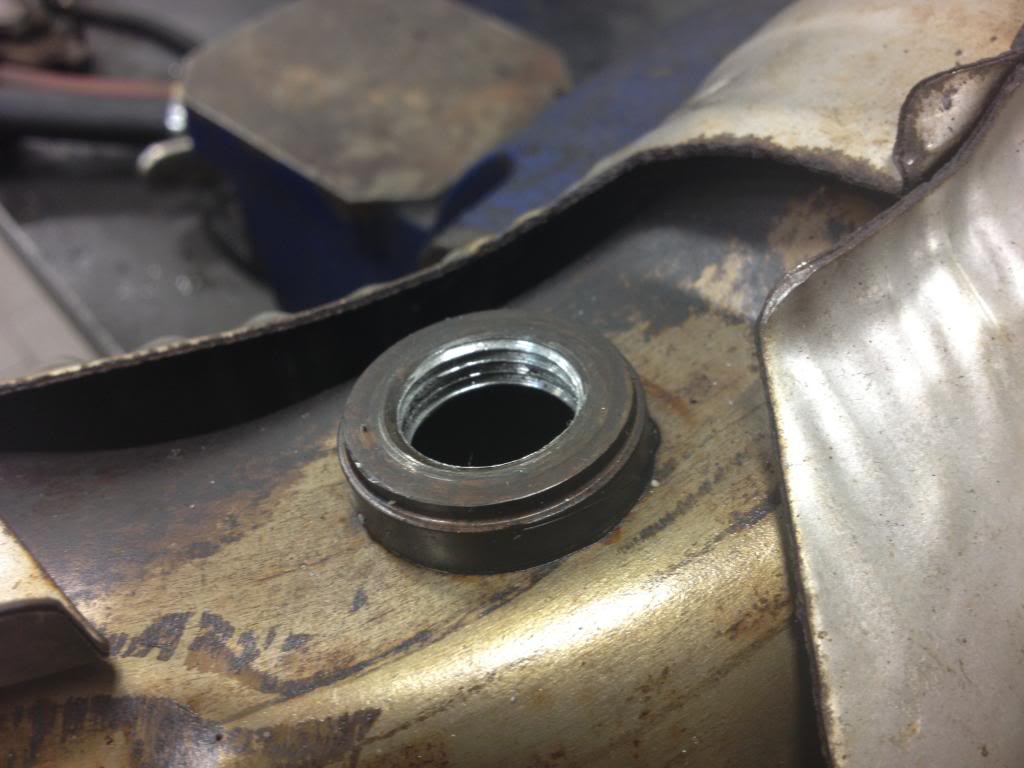
Step 2. Get a flashlight and from the top of the engine on the drivers side, locate the bolt on the flange of the catalytic converter near the steering shaft as it protrudes through the firewall very close to this one bolt in particular. Get PB Blaster can and aim carefully, and spray down from the top of the engine to hit this bolt. This bolt is the hardest bolt to remove, and I will refer to it as the top bolt drivers side. You may want to try to get this bolt off first (I didn't but I'm 6'4" and could easily get leverage on it after the car was jacked up). This picture was taken after the cat was removed so that you could more easily see what bolt I am talking about.
Step 3. Jack the front of the car up and put jackstands on the big suspension joints - do not put them on any of the brace bolt areas because you will have to remove the brace. If you can, use cardboard to cushion the joints from the metal jackstands, and a small piece of wood on your jack to cushion your car from your jack.
Step 4. Spray PB Blaster or Liquid Wrench (I used both actually) on all exhaust bolts, nuts and O2 sensors (try not to get any on the wires).
Step 4. Loosen the obvious nuts on the cats on the y-pipe end. There are two for each side of the car. do not fully remove the nuts yet..
Step 5. Loosen and remove the aluminum U brace between the cats, this brace must be removed in order to give you room to remove the O2 sensors.
Step 6. Carefully break loose the O2 sensors...I did this by using a 22 mm wrench and loosening a little at a time, retightening, then loosening a little more, then retightening, then loosening a little more. Go back and forth like this to gently remove the O2 sensor without breaking it. You will find that as you go back and forth, the O2 sensors will get much looser and easier to remove. The threads on both the cat and the O2 sensors will likely be messed up upon further inspection once you get them out. The solution will be covered later.
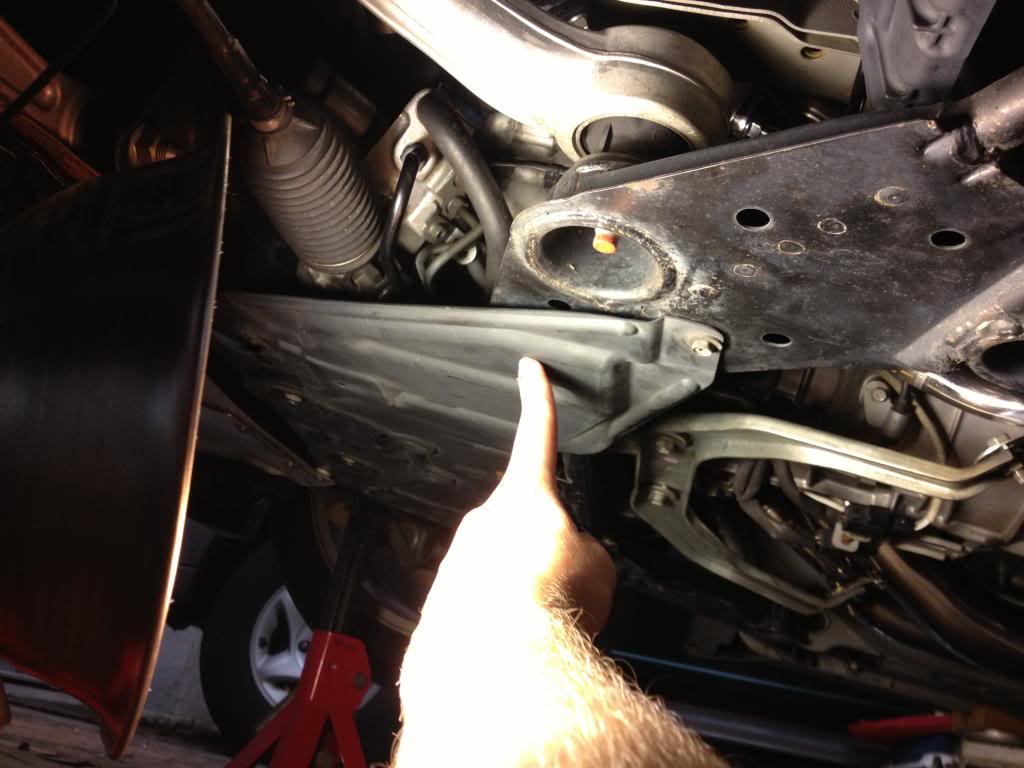
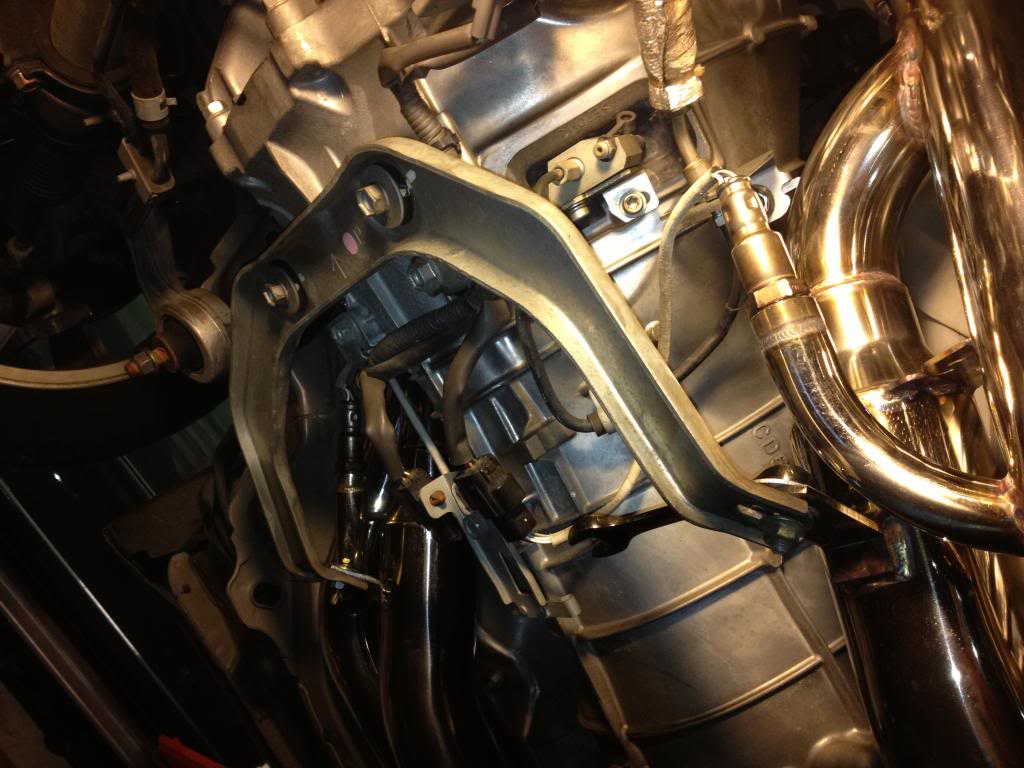
Step 7. Remove the large underbody batman batwing brace and the small plastic shroud bolted to the bat brace under the engine. you will not need PB blaster for this. You are removing this to get enough elbow room to gain access to the upper bolts holding your cats to your exhaust manifolds. there are three bolts on each side that connect your exhaust manifolds to your cats.
batwing brace

plastic shroud
Step 8. Using extensions, your socket wrench, your breaker bar and your body power, loosen all three upper bolts/nuts on the passenger side where your cat connects to the exhaust manifold. You can get all three bolts from underneath the car. Spray PB Blaster as necessary. It will look like this once you get it off in step 11:

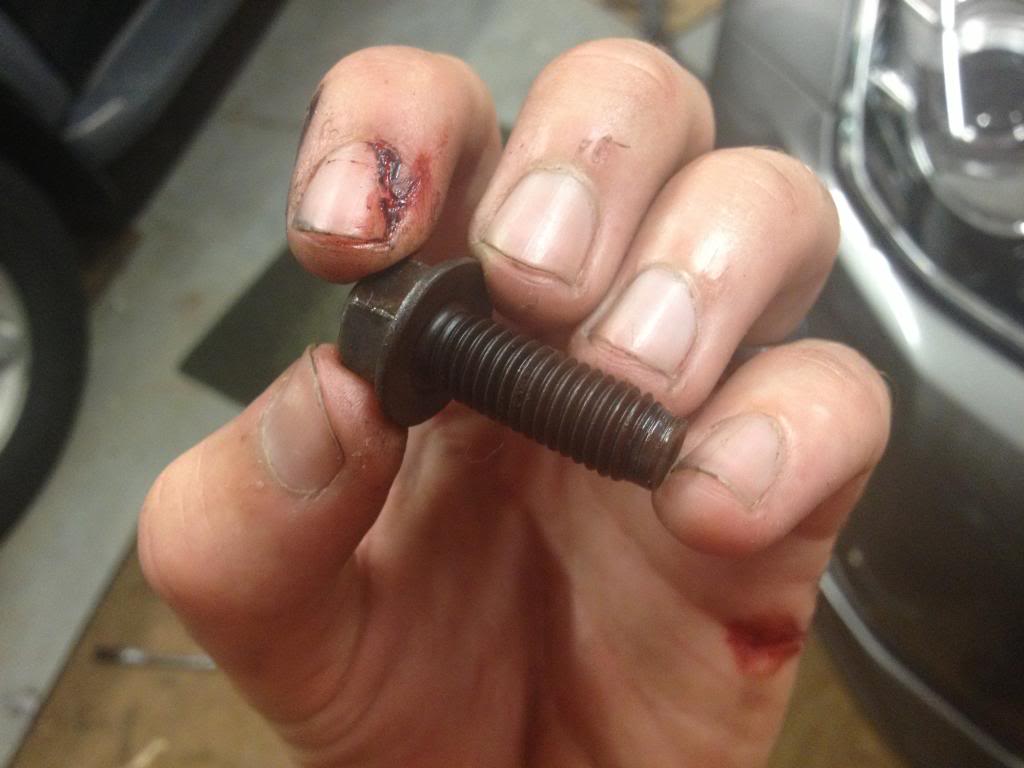
Step 9. Now for the drivers side, you will be able to get under the car and remove the two lower bolts on the cat where it attaches to the exhaust manifold. For the top bolt next to the steering shaft, you will have to go in from the top of the engine at an angle. Use some extensions with a wobble extension on the end, or use a universal joint. I tried a universal joint first and it snapped in half. Then I tried a wobble extension and it snapped off too. Then I bought a new universal joint and it worked. I had to take off all bolts on the drivers side cat and kick the cat a few times and repeatedly spray the top bolt with PB blaster and Liquid wrench and wiggle it some more with my hands before the bolt finally came off without breaking anything. This step took me the longest.
winning combo
going in from the top")
Casualties

GOTCHA! You EVIL Bolt!
Step 10. Take off both of the O2 sensors from the cats, unplug them and put them somewhere safe, we will get to those later. You may want to keep track of which one is which, it probably doesn't matter but it doesn't hurt to be safe.
Step 11. After all bolts are loose, remove all the bolts and take the old cats out!
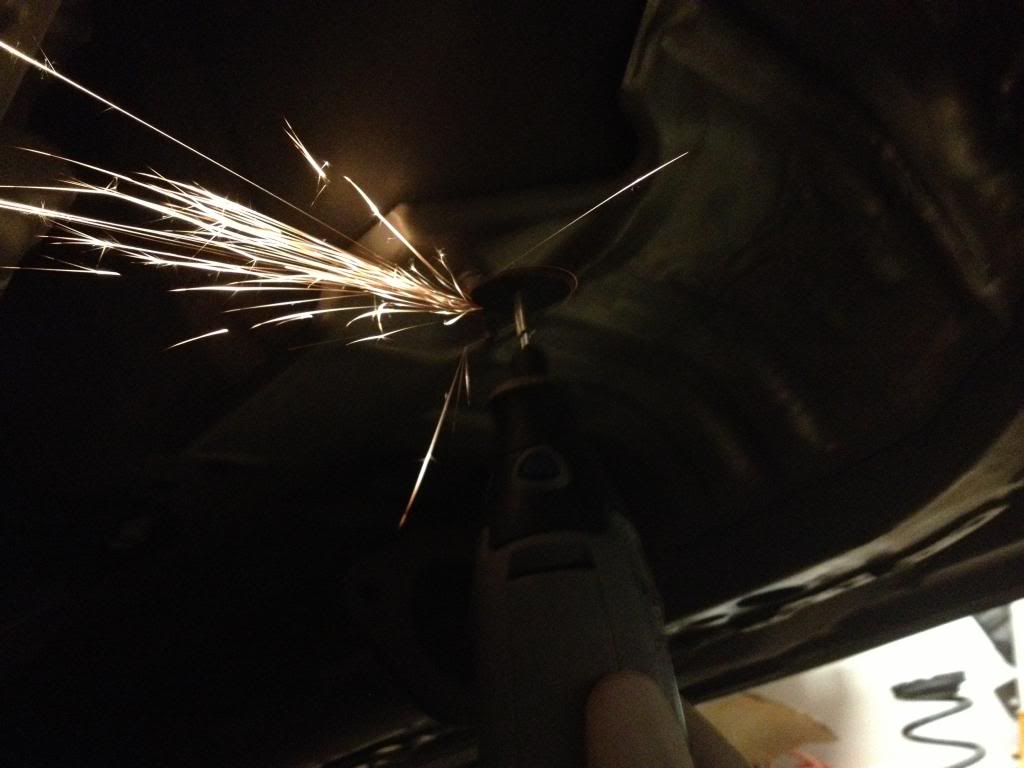
Step 12. Locate the long protruding bolt on the drivers side heat shield. This must be trimmed in order for the new ART pipes to bolt up properly. Trim it using a dremel with a cutting wheel or a similar tool.

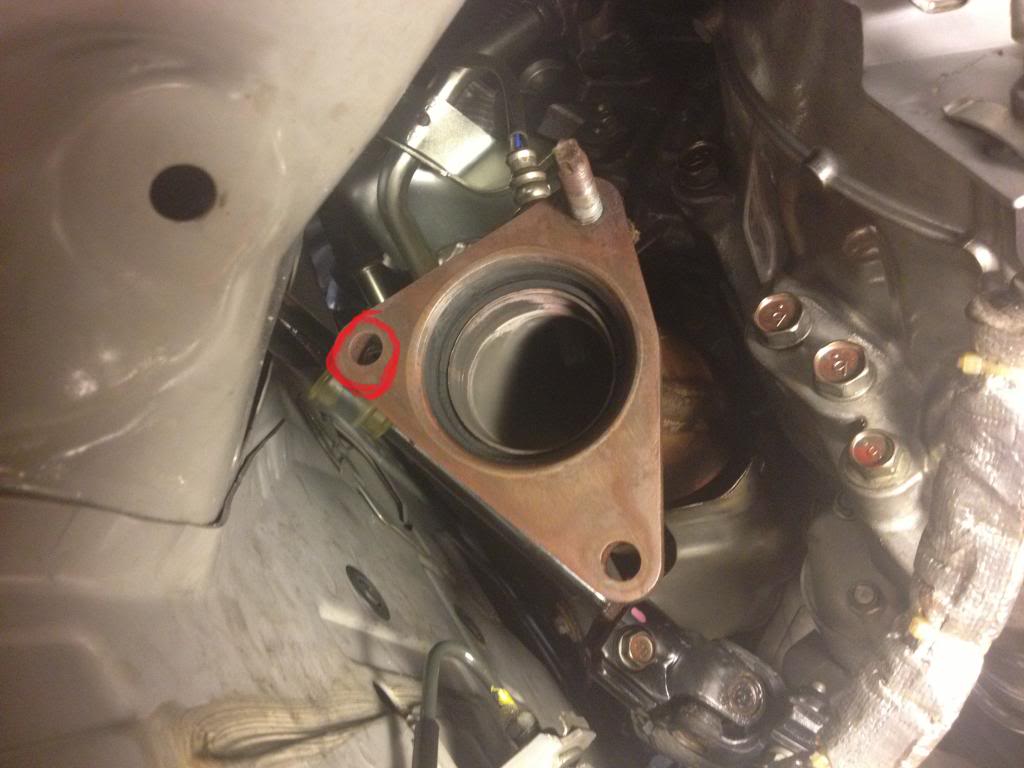
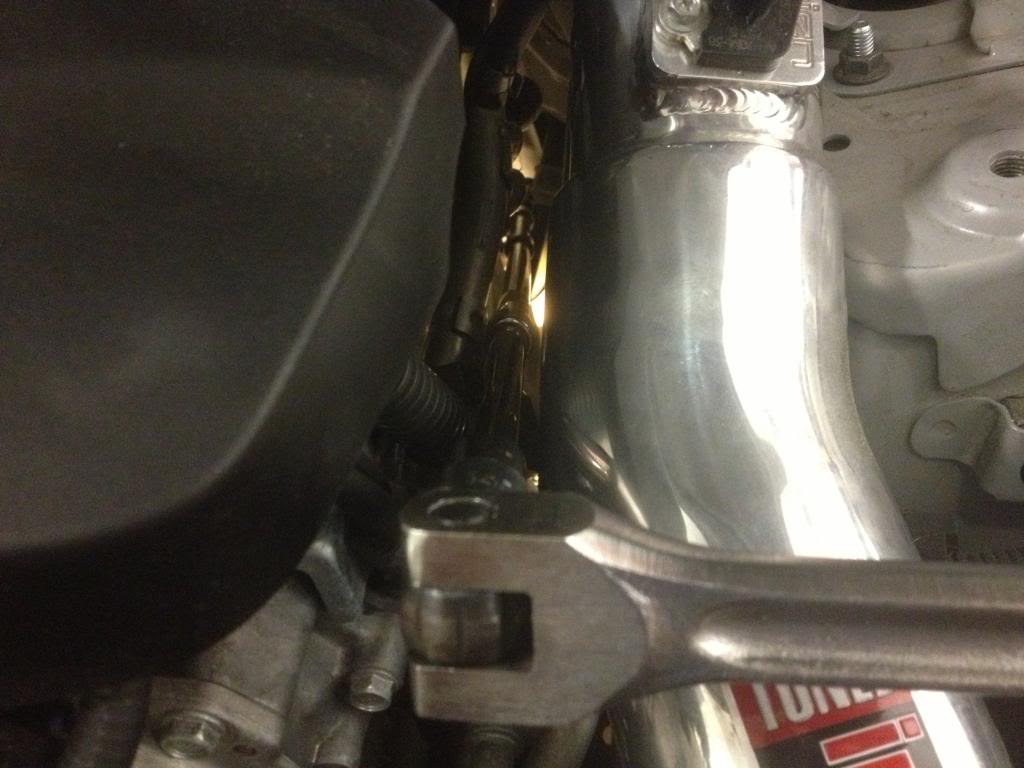
Step 13. Install your new ART pipes/test pipes/HFC's by tightening up the three cat-to-manifold bolts first then tightening the two bolts that are on the cat to Y pipe end. When tightening all these bolts, alternate between the bolts as you tighten so that the pipe is tightened evenly, as you do not want to warp anything. Treat installation as you would treat tightening the lug-nuts on your precious wheels. On the drivers side, to help with the ridiculous top bolt, I oriented the bolt like this in case I had to remove it in the future to make it easier on myself:
Step 14. Install the Batwing brace and the plastic shroud.
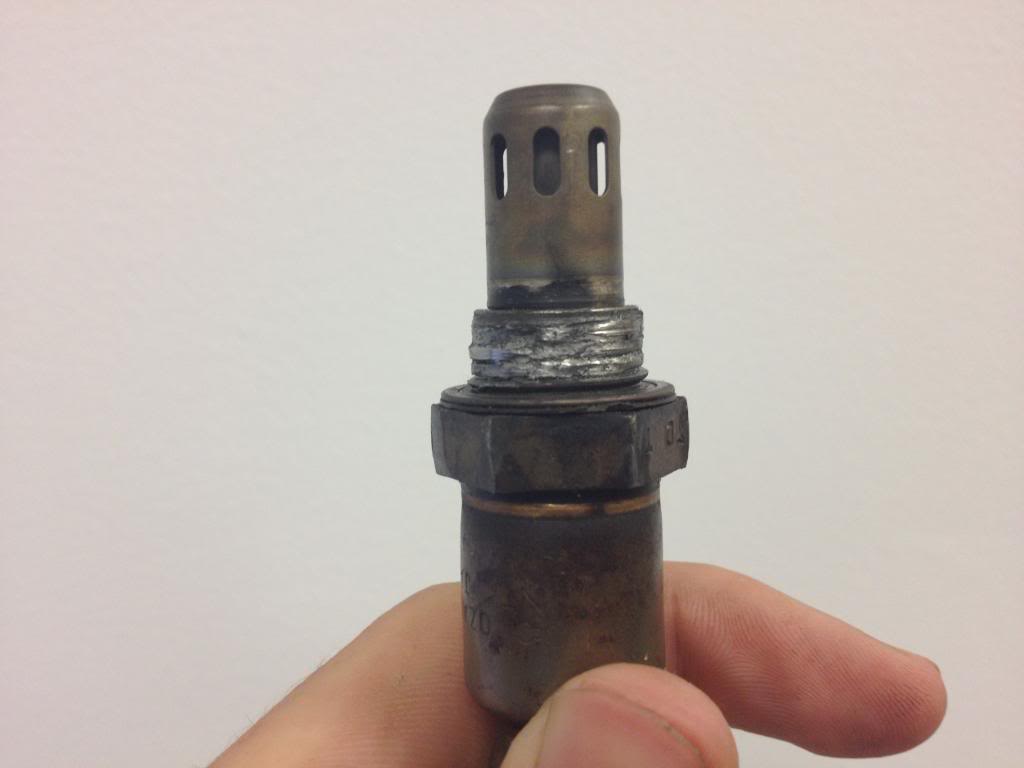
Step 15. Back to the O2 sensors: If your O2 Sensors look like this, then you will need to use a M18x1.5mm die to recut the threads.
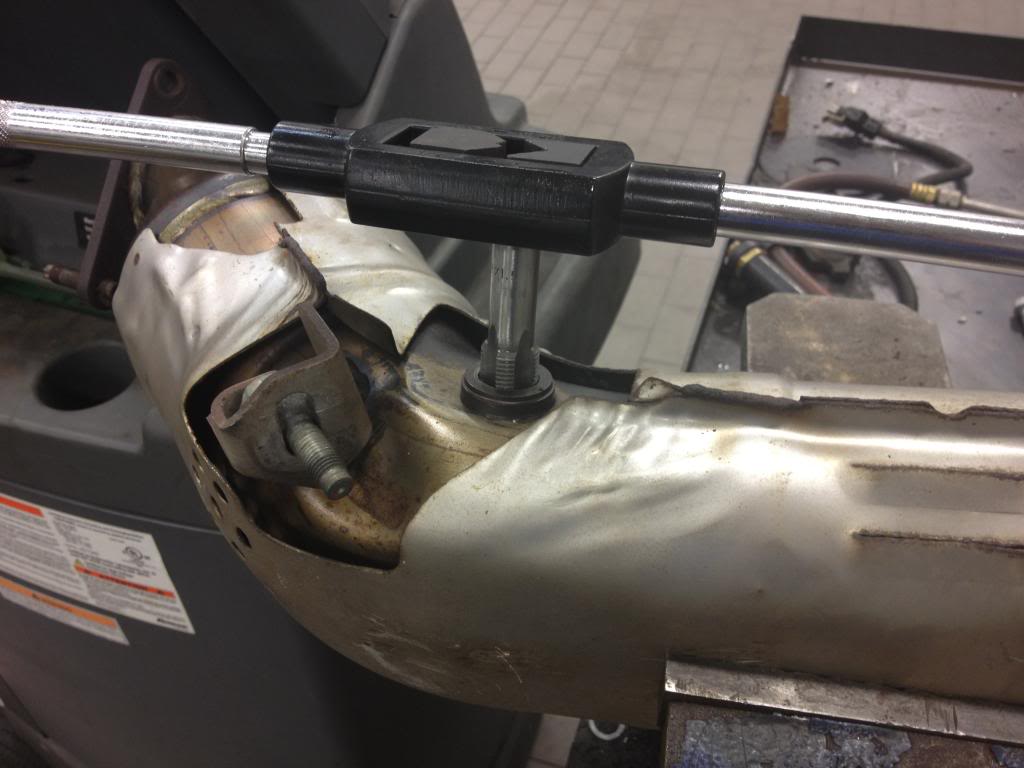
Use a M18x1.5mm tap to recut the threads in the cat on the factory O2 bungs so that you can re-use the cats if you want to keep them or sell them.
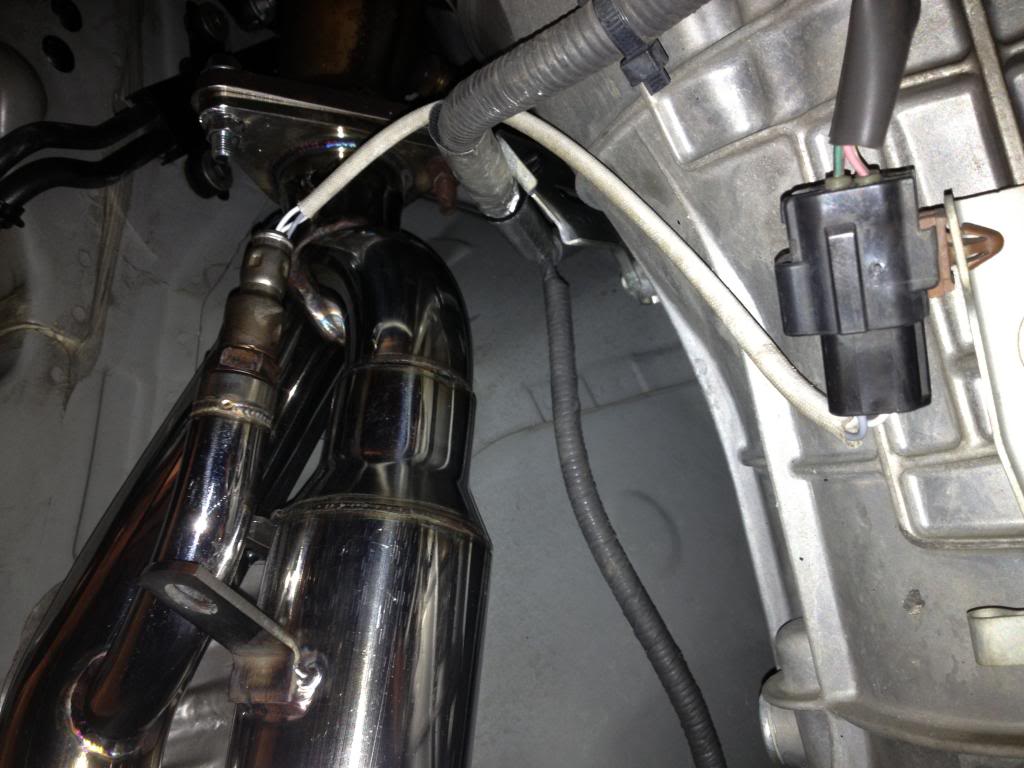
Step 16. Get back under the car and install your O2 sensors. Screw them in, then plug them in. Arrange the wires as best you can so that they will not come in contact with any part of the exhaust system. I looped my O2 wires through the transmission harness because it kept the O2 wires from touching the exhaust.
Step 17. Re-install the Aluminum factory U brace. Mine didn't fit perfectly so I had to use some skinnier bolts and washers to get the job done. This brace must be installed with the ART pipes to keep them from rattling and eventually cracking.
Step 18. Re-attach your intake tubing and MAF sensor and put your strut tower back on, unless you are short, because you can also lower the car first if it will help you.
Step 19. Start it up and hope you don't get a CEL (Check Engine Light). If your 350z runs good, put all your tools away, clean up, get a newspaper in your seat, wash your hands and go for a ride. You're done! The z will run loud the first time you start it up and it will get quieter as it gets warmer. Exhaust Rasp noises will also be less pronounced as the car warms up.
Step 20. After 100 miles of driving, re-tighten everything.
I got a CEL after 40 miles of driving. Tony at Motordyne tells me this happens 5% of the time, and if it does happen to you, Tony says that it can be fixed with a Tune. If you can't immediately pay $ to tune your Z, There is another solution... Provided your O2 sensors still work, you need to have your codes cleared with an OBDII reader and after 33 miles of driving, your CEL shouldn't be back on yet and all of your codes will be ready except for one - the code P0430 that says you have a bad catalytic converter. After 40 miles of driving the CEL will come back on and all codes will be ready including the bad one P0430. So if it matters where you live... you want to get it inspected between 33 and 39 miles of driving after you clear your codes. Where I live, you can have one "not ready" code and still pass inspection as long as your CEL isn't on.
I hope this helps! If you have any ideas or pictures to add, please PM me.
Cold Start:
Warm Start
Minimum tool requirements:
One floor jack (two is better but you only need one)
Two height adjustable Jack Stands. (four is better but you only need two minimum.) be sure to put the jack up as a third point in case the jack stands fail.
one 5''x5'' x1'' thick square piece of wood or plastic or cardboard that you don't care about ruining. place this on the jacks contact surface to cushion your underbody with the wood. this will prevent scratches and bent metal under your z.
two 3''x5'' small pieces of cardboard to put on top of jackstand surface to protect and cushion jacktand from your underbody.
One 3/8 Socket Wrench
Four normal length 3/8 extensions.
One half length "wobble" extension OR 3/8 universal joint (swivel)
One Breaker bar (mine was a 1/2 breaker bar and I used an 1/2 to 3/8 adapter to fit it to the extensions)
One 1/2 to 3/8 adapter so you can use your breaker bar with all of your 3/8 extensions and sockets.
One can of PB blaster or Liquid Wrench
a set of deep and shallow sockets 10mm, 12mm, 14mm, 17mm, 19mm.
One 22mm wrench OR a 22mm O2 sensor socket.
One tube of High Temp RTV silicone OR use included gaskets OR buy new gaskets from one of the vendors on this forum. (on the ART pipe directions for those with HR motors only, it says to use RTV silicone. In my experience, RTV between the exhaust manifold and a downpipe or cat sucks. It will eventually blow out and you'll have an exhaust leak and your car will sound like a lawnmower. So anybody who buys the ART pipes that doesn't want to use RTV will have to get a set of gaskets for the exhaust manifold to cat. converter. end.) My pipes came with new gaskets only for the cat. converter to y-pipe end. I bought my gaskets from Z1 motorsports. They are very nice and thick and can be reused over and over again.
A rotator tool is not required but it will save you lots of time, mine looks like this:
IMPORTANT NOTE: This will become apparent as you read through this write-up but the number one rule you need to keep in mind is this: ON ANYTHING RELATED TO EXHAUST - LOOSEN EVERY BOLT BEFORE YOU REMOVE ANY BOLT. This will save you time and headaches.
Also, keep in mind that 80% of your time will be taken up by removing the stock system and 20% will be installing the new parts and putting the parts back in place.
Step 1.
Open the hood and Remove the strut tower bar and loosen the intake piping on the drivers side where it attaches to the throttle body. You can disconnect the battery too.
Step 2. Get a flashlight and from the top of the engine on the drivers side, locate the bolt on the flange of the catalytic converter near the steering shaft as it protrudes through the firewall very close to this one bolt in particular. Get PB Blaster can and aim carefully, and spray down from the top of the engine to hit this bolt. This bolt is the hardest bolt to remove, and I will refer to it as the top bolt drivers side. You may want to try to get this bolt off first (I didn't but I'm 6'4" and could easily get leverage on it after the car was jacked up). This picture was taken after the cat was removed so that you could more easily see what bolt I am talking about.
Step 3. Jack the front of the car up and put jackstands on the big suspension joints - do not put them on any of the brace bolt areas because you will have to remove the brace. If you can, use cardboard to cushion the joints from the metal jackstands, and a small piece of wood on your jack to cushion your car from your jack.
Step 4. Spray PB Blaster or Liquid Wrench (I used both actually) on all exhaust bolts, nuts and O2 sensors (try not to get any on the wires).
Step 4. Loosen the obvious nuts on the cats on the y-pipe end. There are two for each side of the car. do not fully remove the nuts yet..
Step 5. Loosen and remove the aluminum U brace between the cats, this brace must be removed in order to give you room to remove the O2 sensors.
Step 6. Carefully break loose the O2 sensors...I did this by using a 22 mm wrench and loosening a little at a time, retightening, then loosening a little more, then retightening, then loosening a little more. Go back and forth like this to gently remove the O2 sensor without breaking it. You will find that as you go back and forth, the O2 sensors will get much looser and easier to remove. The threads on both the cat and the O2 sensors will likely be messed up upon further inspection once you get them out. The solution will be covered later.
Step 7. Remove the large underbody batman batwing brace and the small plastic shroud bolted to the bat brace under the engine. you will not need PB blaster for this. You are removing this to get enough elbow room to gain access to the upper bolts holding your cats to your exhaust manifolds. there are three bolts on each side that connect your exhaust manifolds to your cats.
batwing brace
plastic shroud
Step 8. Using extensions, your socket wrench, your breaker bar and your body power, loosen all three upper bolts/nuts on the passenger side where your cat connects to the exhaust manifold. You can get all three bolts from underneath the car. Spray PB Blaster as necessary. It will look like this once you get it off in step 11:
Step 9. Now for the drivers side, you will be able to get under the car and remove the two lower bolts on the cat where it attaches to the exhaust manifold. For the top bolt next to the steering shaft, you will have to go in from the top of the engine at an angle. Use some extensions with a wobble extension on the end, or use a universal joint. I tried a universal joint first and it snapped in half. Then I tried a wobble extension and it snapped off too. Then I bought a new universal joint and it worked. I had to take off all bolts on the drivers side cat and kick the cat a few times and repeatedly spray the top bolt with PB blaster and Liquid wrench and wiggle it some more with my hands before the bolt finally came off without breaking anything. This step took me the longest.
winning combo
going in from the top
Casualties
GOTCHA! You EVIL Bolt!
Step 10. Take off both of the O2 sensors from the cats, unplug them and put them somewhere safe, we will get to those later. You may want to keep track of which one is which, it probably doesn't matter but it doesn't hurt to be safe.
Step 11. After all bolts are loose, remove all the bolts and take the old cats out!
Step 12. Locate the long protruding bolt on the drivers side heat shield. This must be trimmed in order for the new ART pipes to bolt up properly. Trim it using a dremel with a cutting wheel or a similar tool.
Step 13. Install your new ART pipes/test pipes/HFC's by tightening up the three cat-to-manifold bolts first then tightening the two bolts that are on the cat to Y pipe end. When tightening all these bolts, alternate between the bolts as you tighten so that the pipe is tightened evenly, as you do not want to warp anything. Treat installation as you would treat tightening the lug-nuts on your precious wheels. On the drivers side, to help with the ridiculous top bolt, I oriented the bolt like this in case I had to remove it in the future to make it easier on myself:
Step 14. Install the Batwing brace and the plastic shroud.
Step 15. Back to the O2 sensors: If your O2 Sensors look like this, then you will need to use a M18x1.5mm die to recut the threads.
Use a M18x1.5mm tap to recut the threads in the cat on the factory O2 bungs so that you can re-use the cats if you want to keep them or sell them.
Step 16. Get back under the car and install your O2 sensors. Screw them in, then plug them in. Arrange the wires as best you can so that they will not come in contact with any part of the exhaust system. I looped my O2 wires through the transmission harness because it kept the O2 wires from touching the exhaust.
Step 17. Re-install the Aluminum factory U brace. Mine didn't fit perfectly so I had to use some skinnier bolts and washers to get the job done. This brace must be installed with the ART pipes to keep them from rattling and eventually cracking.
Step 18. Re-attach your intake tubing and MAF sensor and put your strut tower back on, unless you are short, because you can also lower the car first if it will help you.
Step 19. Start it up and hope you don't get a CEL (Check Engine Light). If your 350z runs good, put all your tools away, clean up, get a newspaper in your seat, wash your hands and go for a ride. You're done! The z will run loud the first time you start it up and it will get quieter as it gets warmer. Exhaust Rasp noises will also be less pronounced as the car warms up.
Step 20. After 100 miles of driving, re-tighten everything.
I got a CEL after 40 miles of driving. Tony at Motordyne tells me this happens 5% of the time, and if it does happen to you, Tony says that it can be fixed with a Tune. If you can't immediately pay $ to tune your Z, There is another solution... Provided your O2 sensors still work, you need to have your codes cleared with an OBDII reader and after 33 miles of driving, your CEL shouldn't be back on yet and all of your codes will be ready except for one - the code P0430 that says you have a bad catalytic converter. After 40 miles of driving the CEL will come back on and all codes will be ready including the bad one P0430. So if it matters where you live... you want to get it inspected between 33 and 39 miles of driving after you clear your codes. Where I live, you can have one "not ready" code and still pass inspection as long as your CEL isn't on.
I hope this helps! If you have any ideas or pictures to add, please PM me.
Cold Start:
Last edited by ShineMaster; Oct 17, 2014 at 02:33 PM. Reason: made a better title


great write up - I'm assuming you already had antiseize in the garage and I did not see 'beer' on your materials list…
when I did my headers/exhaust I antiseized my gaskets to (hopefully) prevent them from sticking to the flanges if/when I need to remove them. I antiseize everything though
when I did my headers/exhaust I antiseized my gaskets to (hopefully) prevent them from sticking to the flanges if/when I need to remove them. I antiseize everything though
Thread Starter
Registered User
Joined: Jun 2011
Posts: 108
Likes: 3
From: North Carolina
great write up - I'm assuming you already had antiseize in the garage and I did not see 'beer' on your materials list�
when I did my headers/exhaust I antiseized my gaskets to (hopefully) prevent them from sticking to the flanges if/when I need to remove them. I antiseize everything though
when I did my headers/exhaust I antiseized my gaskets to (hopefully) prevent them from sticking to the flanges if/when I need to remove them. I antiseize everything though

Registered User
Joined: May 2011
Posts: 774
Likes: 2
From: schertz, tx
a couple suggestions. first, you dont need to remove the brace at all. second, use LONG 1/2 drive breaker bar(mines 30") long half 1/2 drive extensions and wobblers. third, 1/2 drive impact deep sockets. with that combo, the bolts come off no problem.
for the bottom one, drivers side. use and 3/8 ratchet with a flex head. mines a craftsman. with a deep socket 14mm. place it around the brace (no need to remove brace). using a small cheater pipe, those bolts come out quick.
knock it out in 2 hours.
for the bottom one, drivers side. use and 3/8 ratchet with a flex head. mines a craftsman. with a deep socket 14mm. place it around the brace (no need to remove brace). using a small cheater pipe, those bolts come out quick.
knock it out in 2 hours.

Haha ahh god those top bolts were seriously the biggest pain in the A$$! i wanted to die. Use tons of PB plaster thats all i can say! OP great write up and awesome sound clips!
Thread Starter
Registered User
Joined: Jun 2011
Posts: 108
Likes: 3
From: North Carolina
a couple suggestions.
for the bottom one, drivers side. use and 3/8 ratchet with a flex head. mines a craftsman. with a deep socket 14mm. place it around the brace (no need to remove brace). using a small cheater pipe, those bolts come out quick.
knock it out in 2 hours.
for the bottom one, drivers side. use and 3/8 ratchet with a flex head. mines a craftsman. with a deep socket 14mm. place it around the brace (no need to remove brace). using a small cheater pipe, those bolts come out quick.
knock it out in 2 hours.
2. I'd like to see pics of this craftsman 3/8 ratchet with a flex head, although I think I know what you are talking about.
3. Whats a cheater pipe? (is it just a piece of pipe that you slide over the handle of the ratchet)
4. for the bottom one, drivers side, what do you mean by bottom one? bottom bolt? also, if the top bolt comes out from the top and the bottom bolt comes out from the bottom, how do you get the side bolt drivers side?

Thread
Thread Starter
Forum
Replies
Last Post