My NWP 75mm throttle body upgrade review
 07-21-2013, 09:10 AM
#1

I got one of NWP's 75mm throttle body kits. He had some great claims and good research to back up what he was doing with the project. So of corse is the conquests of continuing development of the vq platform I was hooked. I knew this would be a tough crowd, and this is why I am writing the review. Most people with this platform discredit things for no other reason than it doesn't follow the normal cookie cutter build.
http://www.nwpengineering.com/Phenolic_Spacers.html
Dyno Sheet from NWP
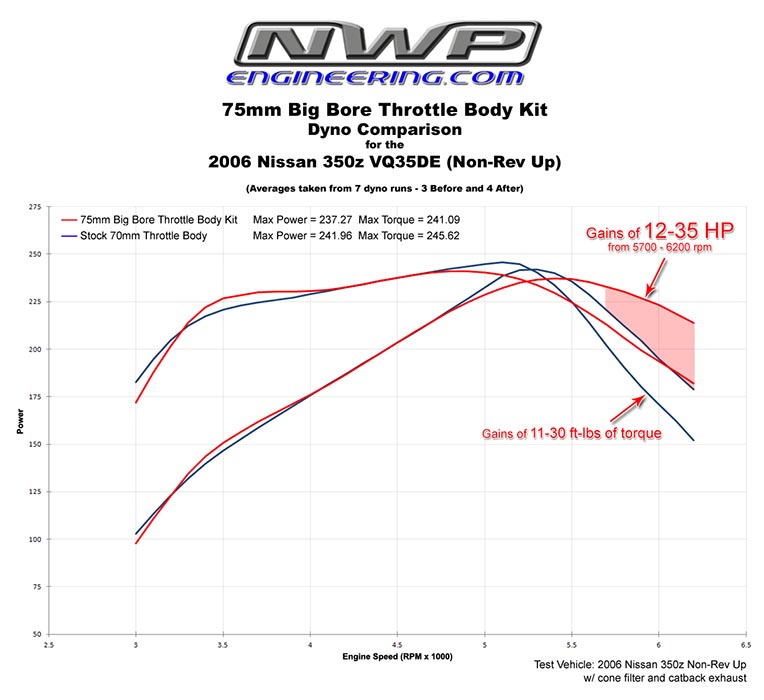
For those that haven't seen it here it is. 100% Plug and Play. No tuning or portwork required. Perfectly port matched. Features a tapered bore for increased airflow!
When I received the package from NWP I was thoroughly impressed with the quality of the adapter piece. Was machined beautifully, came with new hardware and additional gasket.
Install was as simple as unbolting the intake pipe removing the old tb, installing the adapter plate, new 75mm throttle body, plug in Voltage drop adapter harness, then re install intake. Defiantly a diy job with basic hand tools.
Initial Impressions: Car fired right up first try with no need to idle relearn, and a very steady idle, it didn't idle hunt like my previous tb. It was very steady.
First drive and rev ranges. The throttle response is fast and crisp. The butt dyno says that it is making power in the upper rpms, and did not feel any noticeable lost down low. It seems to be really pulling in the 5k plus rpm which is consistent with the dyno charts that I have seen from NWP. I will be doing additional testing in the next couple weeks and will eventual be doing some dyno testing with before / after and retune.
In closing, I am impressed with the upgrade and think is a very good bang for you buck that will compliment most other bolt on mods on the market. Especially those that are trying to squeeze every last drop out of there motor.
Note: If you are using t-bolt clamps and very stiff couplers you might need a larger size to accommodate the additional size of the new tb. I was able to stretch my silicon coupler over but needed a larger t-bolt clamp.
Side by side comparison of the stock vs the new 75mm Tb
Front

Rear

Installed

http://www.nwpengineering.com/Phenolic_Spacers.html
For those that haven't seen it here it is. 100% Plug and Play. No tuning or portwork required. Perfectly port matched. Features a tapered bore for increased airflow!
When I received the package from NWP I was thoroughly impressed with the quality of the adapter piece. Was machined beautifully, came with new hardware and additional gasket.
Install was as simple as unbolting the intake pipe removing the old tb, installing the adapter plate, new 75mm throttle body, plug in Voltage drop adapter harness, then re install intake. Defiantly a diy job with basic hand tools.
Initial Impressions: Car fired right up first try with no need to idle relearn, and a very steady idle, it didn't idle hunt like my previous tb. It was very steady.
First drive and rev ranges. The throttle response is fast and crisp. The butt dyno says that it is making power in the upper rpms, and did not feel any noticeable lost down low. It seems to be really pulling in the 5k plus rpm which is consistent with the dyno charts that I have seen from NWP. I will be doing additional testing in the next couple weeks and will eventual be doing some dyno testing with before / after and retune.
In closing, I am impressed with the upgrade and think is a very good bang for you buck that will compliment most other bolt on mods on the market. Especially those that are trying to squeeze every last drop out of there motor.
Note: If you are using t-bolt clamps and very stiff couplers you might need a larger size to accommodate the additional size of the new tb. I was able to stretch my silicon coupler over but needed a larger t-bolt clamp.
Side by side comparison of the stock vs the new 75mm Tb
Front
Rear
Installed
Last edited by GreenGoblin; 07-21-2013 at 01:10 PM.


 07-21-2013, 05:11 PM
#10
Registered User

Op, how long did install take?
07-21-2013, 06:22 PM
#11
Registered User

Join Date: Jun 2012
Location: San Antonio, TX
Posts: 477
Likes: 0
Received 0 Likes
on
0 Posts
I can answer the install question...it's the same as installing an OEM throttle body except for the adapter harness, which adds on 5.8 sec. It's seriously a 20 min job.
 07-21-2013, 08:10 PM
#13
Thanks! That's what I was thinking. I talk to the guys at nwp via Instagram. They tested it on a 06 non revup? I think. I want to see how it affects fuel economy and if the horsepower in the high Rpm's is worth it. But for the price, it's probably the cheapest horsepower you can get.
Op, how long did install take?
Op, how long did install take?
As said it takes no longer than 20 min with some basic tools.
 07-22-2013, 06:06 AM
#15
Registered User
iTrader: (4)

Join Date: Jun 2012
Location: Moncton, Newbrunswick
Posts: 364
Likes: 0
Received 0 Likes
on
0 Posts
How is everyone getting theres before me ! I paid for express shipping and its not getting here very express 
I will also be posting before and after dynos when I get mine in but I will be retuning for the tb
I will also be posting before and after dynos when I get mine in but I will be retuning for the tb

 07-22-2013, 10:21 AM
#18
Registered User
iTrader: (9)

Join Date: Sep 2006
Location: KC
Posts: 412
Likes: 0
Received 0 Likes
on
0 Posts
I have/had a 2006 Rev-up, which I realize is going to have a little more top end than a regular DE but that dyno chart looks phishy at best. My peak power on a stock baseline was at 6k and held flat to 6.5k rpms and my torque curve was pretty damn flat through the low to mid range. Granted it's been a while since I've looked at stock DE dynos but, eh. I want a 3rd party dyno chart.
07-22-2013, 11:40 AM
#19
Registered User
iTrader: (13)

Join Date: May 2005
Location: NJ/FL
Posts: 926
Likes: 0
Received 0 Likes
on
0 Posts
Just ordered mine! Hopefully it'll be here by the end of the week.
I'll let you guys know how it feels on my Revup.
Here are my engine mods currently:
Furookie Intake
Non-Resonated 2.5" Test Pipes
Invidia Gemini Exhaust
Motordyne 5/16 Iso Thermal Plenum Spacer
Motordyne MREV+ Intake Manifold
Motordyne Copper Iso Thermal Upgrade
Cobb AccessPort
I'll let you guys know how it feels on my Revup.
Here are my engine mods currently:
Furookie Intake
Non-Resonated 2.5" Test Pipes
Invidia Gemini Exhaust
Motordyne 5/16 Iso Thermal Plenum Spacer
Motordyne MREV+ Intake Manifold
Motordyne Copper Iso Thermal Upgrade
Cobb AccessPort
07-22-2013, 07:42 PM
#20
