
Window Motor Repair (replace motor brushes?)


Originally Posted by Jcolman
I'll save you the trouble. It will work fine for a while then quit. I'm on my third Autozone motor. Hopefully this one will last a bit longer than 9 months like the other two.
I'll just be happy to be able to get out of my car and roll up the window, instead of pulling it up with my hands lol

Registered User
Joined: Aug 2005
Posts: 422
Likes: 0
From: NC
Originally Posted by MrKaira
but you have been able to get a new motor, every time, right? With the factory one there is no warranty. And it may last a little bit longer, but then you just have to buy another one. I don't mind doing the labor, I have taken the door apart so many times now I can get it apart in about 10 minutes.
I'll just be happy to be able to get out of my car and roll up the window, instead of pulling it up with my hands lol
I'll just be happy to be able to get out of my car and roll up the window, instead of pulling it up with my hands lol


Well, if you buy a window motor from the Nissan dealership parts counter like I had to because when I needed one AutoZone, Advanced Auto Parts all seemed to be out and had none in stock; you get a 12 month 12K mile warranty from Nissan.


After reading all 17 pages of this thread I copied and pasted all the necessary info you guys will need, for those that wish to clean your window motors instead of replacing them. Yes, this is for all you lazy fuggers that do not like to search nor read...
VO
Nissan Manual Reset Procedure
https://my350z.com/forum/showpost.ph...&postcount=131
VO
Originally Posted by Integrity
I can get you started, but hopefully someone else will be able to pick up where I left off. I started doing this repair today on my driver's side door. Wasn't too hard. I was pausing to take pictures alot to document this for everyone else, but it started to rain. I had to hurry up and finish so I could not do a proper step by step pictorial.
Step one. Locate the plastic cover piece in the middle of the door handle and remove it with a small flat head screwdriver or scribe.

Step two. Remove the screw underneath using a philips head screwdriver.

Step three. Gently pull up on the left side of the switch panel. Disconnect the window switches and side mirror controls at the harnesses, then remove the two phillips head screws that are revealed by removing the switch panel. There is also a third screw behind the door handle. Simply pry up on the left side of the plastic piece that sits directly behind the door handle, and this will reveal the screw.

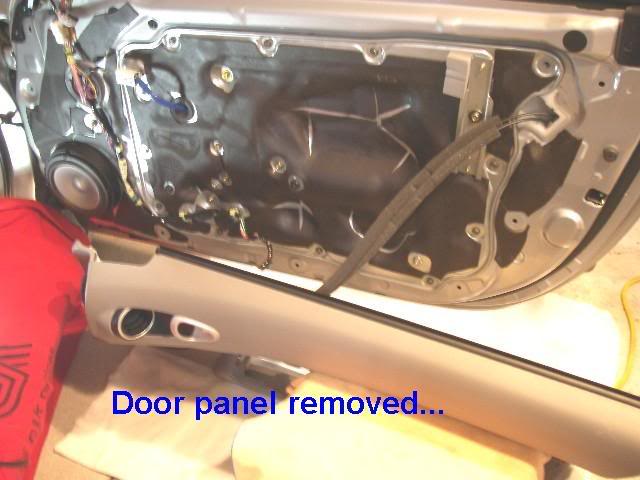
Step four. Now simply pull gently on the left side, right side, and bottom of the door panel. The fasteners should give way and you should be able to lift up on the door panel and lay it off to the side. (I did not disconnect the cables for the door handles.)
This will reveal the inner door panel which will have to be removed next.

There are (12) 10mm bolts holding the inner door panel on - Red circles.
There are (2) 10mm bolts and (2) 12mm nuts holding the window tracks to the door panel - Yellow circles.
And there are (3) 10mm bolts/philips head screws holding the window motor to the door panel - Green circles.
Step Five. The window motor can be seperated from the cable spindel by removing the three philips head screws. (No picture)
Step Six. Remove the brush assembly out of the motor by removing three small philips head screws.

Step Seven. Clean the black carbon crap out of the motor and reassemble. Here's a pic after I cleaned it using rubbing alcohol and q-tips.

Step one. Locate the plastic cover piece in the middle of the door handle and remove it with a small flat head screwdriver or scribe.
Step two. Remove the screw underneath using a philips head screwdriver.
Step three. Gently pull up on the left side of the switch panel. Disconnect the window switches and side mirror controls at the harnesses, then remove the two phillips head screws that are revealed by removing the switch panel. There is also a third screw behind the door handle. Simply pry up on the left side of the plastic piece that sits directly behind the door handle, and this will reveal the screw.
Step four. Now simply pull gently on the left side, right side, and bottom of the door panel. The fasteners should give way and you should be able to lift up on the door panel and lay it off to the side. (I did not disconnect the cables for the door handles.)
This will reveal the inner door panel which will have to be removed next.
There are (12) 10mm bolts holding the inner door panel on - Red circles.
There are (2) 10mm bolts and (2) 12mm nuts holding the window tracks to the door panel - Yellow circles.
And there are (3) 10mm bolts/philips head screws holding the window motor to the door panel - Green circles.
Step Five. The window motor can be seperated from the cable spindel by removing the three philips head screws. (No picture)
Step Six. Remove the brush assembly out of the motor by removing three small philips head screws.
Step Seven. Clean the black carbon crap out of the motor and reassemble. Here's a pic after I cleaned it using rubbing alcohol and q-tips.
Originally Posted by Jcolman
Like many of you, my window motor failed.
A couple of tips that should make the job go smoother. If you can get your window in the "up" position prior to starting the job it will be a bit easier.
Follow all the procedures in the above mentioned thread except the job will be easier if you simply unhook the door latch cables and unplug all the electrical connectors.
Before removing the old motor from the inner panel/window track, duct tape your window to the door so that it won't drop down. Then simply unbolt the old motor and install the new one in it's place. When you re-attach the inner door panel to the window tracks it helps to have someone hold the window to align the bolt holes.
You may have to perform the reset procedure described in the above thread however I did not and my window works perfectly.
Originally Posted by bender
So I decided to tackle my window motor today.
Symptoms:
So the project took me 2 hours (only because I screwed up). When I cracked open the window motor, there were clunks of black carbon. I used about 20 q-tips and some throttle body cleaner.
NOTE:
Here's where I screwed up the first time. If you look down from the top of the door near the tweeter, there's a track for the glass to sandwich in between. It's 2 metal rods going down covered in rubber. When I took took off the metal panel exposing the window motor, the glass had dropped down and moved outside the track. So when I put everything back together, the window would move up, but rub against the door panel and stop half way. I had to take it all apart again and slide it in between the track.
So anyways, the window has been working at 100% so far.
Originally Posted by 3hree5ive0ero
OK, it seems like I did everything that was written in the how-to.
After I put all the bolts back on, I tried the window switch. My window (which was rolled down all the way before starting) did not come up. I took off the bolts again and saw that I can hear clicks everytime I push down or up on the driver's window switch and the motor gets warm. However, the window does not move at all. What could be the cause of this?
Edit -
I found the solution. You cannot screw in the coil/magnet piece (the one you need to clean) all the way. If you do that, then the motor will not function. You need to just make sure it's in place (in the hole just enough) so the gold cover can be screwed on.
Originally Posted by LBkr
Wohoo!! Success!
Did the whole thing today in around an hour on my passenger door. A few tips:
� I found illustrated pics (on another site's speaker repair tutorial) regarding how to remove the passenger door panel and handle without damage. (Very helpful.)
� I duct taped the window in the up position before starting. This helped ALOT.
� Once you have the door panel loose, it helps to have someone hold it while you unscrew the 4 black phillips screws holding the door handle in place and jiggle it loose through the opening.
� Once I unscrewed and removed the bad motor, I couldn't easily get the new motor to fit in place. So with everything still disassembled, I plugged in the new motor and my door switches, turned on the car, and used the window switch to spin the motor until it stopped in the EXACT same position as the old one I just removed. This allowed me to put the new motor in place with no problems.
� During reassembly it helps to do stuff in this order: First, reattach the motor to the aluminum panel, then coax the bottom rail bolts through the panel while putting it back in place, thread the 2 bottom nuts loosely on the bolts first, then do the top 2 rail bolts, then snug everything up. Finally reassemble the rest of the screws to remount the aluminum inner panel (but leave off the door panel until you test the window operation) in case you need to do the motor reset procedure. (I had to reset mine.)
Originally Posted by LBkr
As for taking the door apart to do the reset, yes you have to remove the door panel but fortunately you don't have to remove the inner aluminum panel. There's a black round sticker covering the reset button so you need to take that off to easily access the reset button. - It's a little bit of a pain in the butt, however, it's still cheaper than taking it to the dealership to have it reset. Reset is the magic repair for lots of these electric window misbehaviors.
Originally Posted by Sk8fe
Killermove, can you explain what you are having difficulties with in performing the window motor reset procedure as documented by Nissan? Everything has to be assembled, the aluminum panel must be secured to the door. The door must be closed and you must perform the reset procedure from inside the car with the door closed (at least according to Nissan's instructions which only took me a minute or less literally and I had no problems). Care must be taken when closing the door so that the dangling window control button is not caught on anything. It is easier to do if you also disconnect the door latch from the plastic interior panel. This will allow you to completely close the door. In fact, I do not know how you could do it without completely removing the plastic door panel. The electronics in the window motor must be able to detect when the windows is all the way up (when door is closed) so it knows how far to take it and the same when powering down the window. The Nissan procedure made it clear to do this manually and not push the window button all the way to use the one-up or one-down (auto) feature. I think you have to completely remove the plastic interior door panel, I do not think that you can properly reset the window motor without doing this.
Originally Posted by jeffw
One bit of advice I can offer is that I think it's important to use a toothpick to clean the contact points on the commutator. The commutator is the bit that spins inside the motor housing. Unfortunately, I don't have a picture of it, but I have borrowed one of Integrity's pics to show where it came from. I also made a rough diagram of the commutator to show how it should look after you clean it.
Mine was so dirty I could see no signs of the grooves between the brush contacts. It was almost luck that I discovered how packed with carbon dust that thing was. I had to use several tooth picks with a good bit of force to dig the carbon out.
--
Jeff
Mine was so dirty I could see no signs of the grooves between the brush contacts. It was almost luck that I discovered how packed with carbon dust that thing was. I had to use several tooth picks with a good bit of force to dig the carbon out.
--
Jeff
https://my350z.com/forum/showpost.ph...&postcount=131
I decided to take on the motor cleaning task last night. My passenger side window is the culprit. Luckily I was able to get it to raise, and plan on leaving it like that until I fixed the window motor.
I'm going to take my time doing this job. First day I decided to remove the door panel. Tonight I will remove the actual metal door panel and motor. Thursday I'll reattach everything.
I've taken many pictures along the way and have illustrated all off them. I plan on creating a detailed write-up and have it stickied. For the meantime, here's a teaser pic.
BTW, what's the best way to remove the door handle cables?
Last edited by VO...; May 21, 2008 at 08:58 AM.

Originally Posted by Integrity
They actually slide right out if you twist it. No tools needed.

I'm talking about the little lead piece that's attached to the end of the wire cable(behind the lever). The 1st one looked similar to bicycle brakes, and could be pulled then manipulated out. The 2nd one had the same set-up, but the lead portion didn't look like it could be manipulated out of there....

Originally Posted by vo7848
I noticed that on one cable, but the 2nd cable seems to be embedded in there somehow.
I'm talking about the little lead piece that's attached to the end of the wire cable(behind the lever). The 1st one looked similar to bicycle brakes, and could be pulled then manipulated out. The 2nd one had the same set-up, but the lead portion didn't look like it could be manipulated out of there....
I'm talking about the little lead piece that's attached to the end of the wire cable(behind the lever). The 1st one looked similar to bicycle brakes, and could be pulled then manipulated out. The 2nd one had the same set-up, but the lead portion didn't look like it could be manipulated out of there....
You were right. Both cables just came off. I finished the process tonight and had to perform the "reset" also. Everything works just fine now. I will get the write-up in the morning. You guys are gonna love it. I took a gazillion pictures!
Originally Posted by Integrity
I'm going from memory here, and the last time I pulled the door frame off was last year. I was doing the audio install and I was fiddling with the cables and they just came right out. If I remember right, the second cable comes out with the plastic head still attached.
Originally Posted by vo7848
You were right. Both cables just came off. I finished the process tonight and had to perform the "reset" also. Everything works just fine now. I will get the write-up in the morning. You guys are gonna love it. I took a gazillion pictures!
Originally Posted by Integrity
Awesome! Glad I could help.
https://my350z.com/forum/maintenance-and-repair/361241-how-to-repair-stuck-broken-window-motor.html
Originally Posted by vo7848
Very well written. It'll be alot easier for people to reference that then this thread.

Originally Posted by nasty350
how do you reset the window, because before this problem my window would go up on automatic mode and come back down half way.. let me know guys thanks
Post #17 explains the reset procedure.