
FIX for gas gauge fluctuations, hard to fill


Ok folks, after putting up with this problem for over 2 years I finally discovered a fix. The issue, the fuel level only reads 1/2 or less. It also fluctuates to 3/4 to 1/2 to 1/4 in one trip. So after some research, I finally was able to find this thread several months ago. Since I am preparing my car for a road trip I though I should do this fix:
I followed "moses" diy on g35driver's. Its found on page 6 so you kinda had to search to find the fix. This is why I decided to post a new thread to make it easier to fix.
http://g35driver.com/forums/g-spot/2...irdness-6.html
The repair itself is pretty simple as you can see in the thread.
Some recommendations, the factory service manual recommends that you de-pressurize the fuel system. Fortunately, my car has been sitting in the garage for more than 24 hrs so when I detached the fuel line from the fuel sending unit sensor on the passenger's side, and only a little gas spilled out (I remember doing my eclipse fuel lines and gas was squirting everywhere!!!). Make sure to cover the fuel line from the top with a plastic material to protect it from dirt and debris in the outside area of the gas tank!
The driver's side fuel sending unit sensor was much easier to get out compared to the passenger's side. The passenger's side was a PAIN. Its a huge unit so slowly back out the fuel sending unit out, and make sure that the wiring on the bottom is not caught in the port as you are lifting it out. Also, the floater arm juts out of the both sensors so carefully lift up the unit and be aware of where the arm is. If you have the factory service manual pdf, check out the "fl" section and go to the fuel level sensor area for directions for getting out the sensor unit out of the fuel tank (I attached screen shots to help illustrate what the procedure is).
When cleaning the sensor port on each fuel sending unit, just swab the ports with a q-tip as directed in the DIY, up and down, and move the floater arm up and down to clean the areas on the bottom of the sensor. Even though when I was cleaning it with the q-tip and the sensor board did not look dirty, the q-tip darkened. The picture attached is from the thread in the link above taken by the user named "moses". I attached it to illustrate what I am talking about.
****Finally when putting the fuel sending unit back in the fuel tank, again the passenger's side unit is much harder... Take your time and make sure the line clear the port hole. Now, the sending unit collapses against the bottom of the fuel sending unit so you push it down a bit. I was wondering why the sending unit was not flushed in the port hole but it collapses into itself.
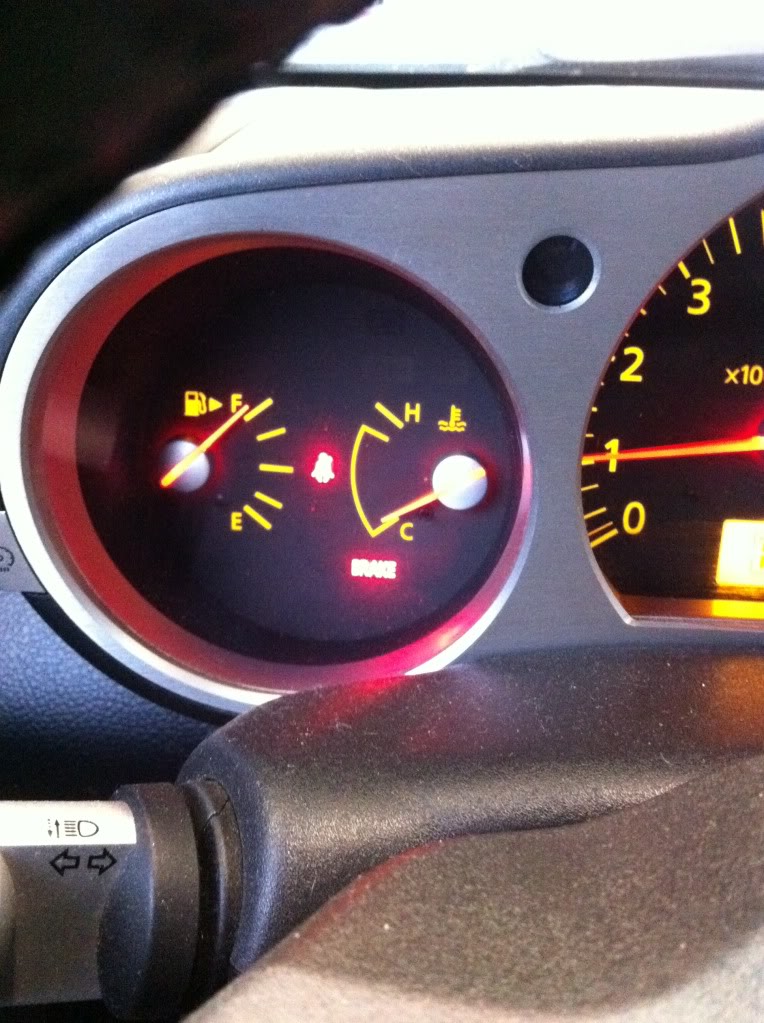
When I was cleaning the sensor, I had my doubts this would solve the fuel issue since it is such an easy fix but it work!!! I went to the dealer a day before I did this repair and they were asking 120 and 118 for each sensor respectively. CourtesyNissan had it for 80 something each sensor. So I thought why not try the fix using the link I found and see if it works. I'll buy the sensors from Courtesy if it doesn't. So after putting everything back together, I went to the gas station, and walla!!! I pump fuel and for the first time in nearly 2.5 years, it read I had a full gas tank. The needle was 1/8 over the full bar!!!!!!! Its been years since I've seen that LOL. So hopefully this helps people out and definitely try this fix before buying sensors. It was super easy and took me an hour (I could have done it faster).
Now I may have to go back and install new o-rings on the sensor ports since I reused my old ones and the factory service manual recommends buying a new o-ring if you take out the fuel sending unit out.
I followed "moses" diy on g35driver's. Its found on page 6 so you kinda had to search to find the fix. This is why I decided to post a new thread to make it easier to fix.
http://g35driver.com/forums/g-spot/2...irdness-6.html
The repair itself is pretty simple as you can see in the thread.
Some recommendations, the factory service manual recommends that you de-pressurize the fuel system. Fortunately, my car has been sitting in the garage for more than 24 hrs so when I detached the fuel line from the fuel sending unit sensor on the passenger's side, and only a little gas spilled out (I remember doing my eclipse fuel lines and gas was squirting everywhere!!!). Make sure to cover the fuel line from the top with a plastic material to protect it from dirt and debris in the outside area of the gas tank!
The driver's side fuel sending unit sensor was much easier to get out compared to the passenger's side. The passenger's side was a PAIN. Its a huge unit so slowly back out the fuel sending unit out, and make sure that the wiring on the bottom is not caught in the port as you are lifting it out. Also, the floater arm juts out of the both sensors so carefully lift up the unit and be aware of where the arm is. If you have the factory service manual pdf, check out the "fl" section and go to the fuel level sensor area for directions for getting out the sensor unit out of the fuel tank (I attached screen shots to help illustrate what the procedure is).
When cleaning the sensor port on each fuel sending unit, just swab the ports with a q-tip as directed in the DIY, up and down, and move the floater arm up and down to clean the areas on the bottom of the sensor. Even though when I was cleaning it with the q-tip and the sensor board did not look dirty, the q-tip darkened. The picture attached is from the thread in the link above taken by the user named "moses". I attached it to illustrate what I am talking about.
****Finally when putting the fuel sending unit back in the fuel tank, again the passenger's side unit is much harder... Take your time and make sure the line clear the port hole. Now, the sending unit collapses against the bottom of the fuel sending unit so you push it down a bit. I was wondering why the sending unit was not flushed in the port hole but it collapses into itself.
When I was cleaning the sensor, I had my doubts this would solve the fuel issue since it is such an easy fix but it work!!! I went to the dealer a day before I did this repair and they were asking 120 and 118 for each sensor respectively. CourtesyNissan had it for 80 something each sensor. So I thought why not try the fix using the link I found and see if it works. I'll buy the sensors from Courtesy if it doesn't. So after putting everything back together, I went to the gas station, and walla!!! I pump fuel and for the first time in nearly 2.5 years, it read I had a full gas tank. The needle was 1/8 over the full bar!!!!!!! Its been years since I've seen that LOL. So hopefully this helps people out and definitely try this fix before buying sensors. It was super easy and took me an hour (I could have done it faster).
Now I may have to go back and install new o-rings on the sensor ports since I reused my old ones and the factory service manual recommends buying a new o-ring if you take out the fuel sending unit out.

I saw this a few months ago on the driver forum too but was too chicken to try it myself. Seems real messy and........gassy. I guess I need to buck up and do this. How many miles did you get out of a full tank now than what you had before you fixed it?
It really isn't THAT messy. My brake change is more messing than anything. Just remember to keep your car overnight and don't drive it so the fuel pressure gets lower. You can also pull the fuel pump fuse and prime it to release fuel pressure. The only messy thing is taking off the fuel line form the passenger side fuel level sensor, a bit of gas dribbled out and that's it! This can be a quick 30 min project if you don't mess around. My dte is showing 400 something after fixing this issue. Before my dte gauge would read only anywhere between 180 to 270.
I'm doing a trip to Yellow stone so its going to be 2200 total miles of driving next week. I'll update the results of this diy fix.
I'm doing a trip to Yellow stone so its going to be 2200 total miles of driving next week. I'll update the results of this diy fix.
Last edited by SoldzMyZ; Sep 26, 2010 at 05:04 PM.


Trending Topics


I've got a question for anybody who has done this fix. To get the passenger console box out, besides removing the side panel, I assume you have to remove the center console and items 22-28 in the diagram below, correct?

Dealer. Special material and large size, probably not going to find them at Home Depot.
If you still have your interior dismantled, do me a favor and take a picture of the area of the passenger side. I'm trying to get an idea of how much of the interior I have to remove to get to it.
If you still have your interior dismantled, do me a favor and take a picture of the area of the passenger side. I'm trying to get an idea of how much of the interior I have to remove to get to it.
Last edited by DavesZ#3; Sep 16, 2011 at 03:56 PM.
 It will shrink and fit again.

My initial results from the fix looks promising. My needle was on E before the fix and after it reads a little more than a quarter tank. The big test will happen next week when I fill it up and see how far I can go on a tank full and how many gallons it takes to fill it. Lately, even when the light came on, filling it would only take 12 or so gallons.
This fix definitely solved my gas gauge problems. I ran the car till the gauge was below E and with the light glowing brightly, DTE read "----". Filled up and it took 17� gallons, something it hasn't done in a long time. Now, the needle goes above F when the tank is full.

It's the inside of item #1 in this image from above...
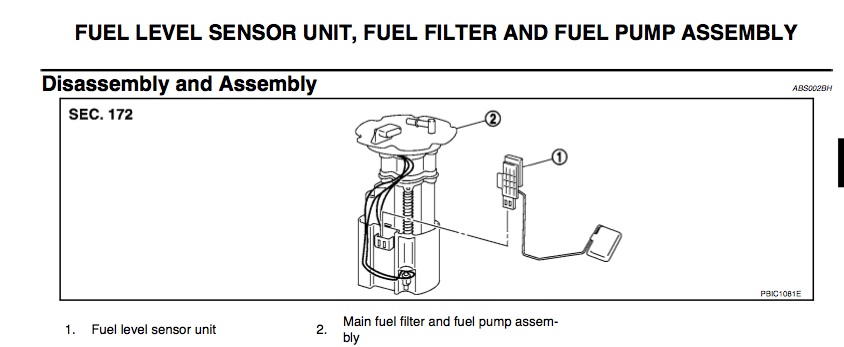
In this picture...
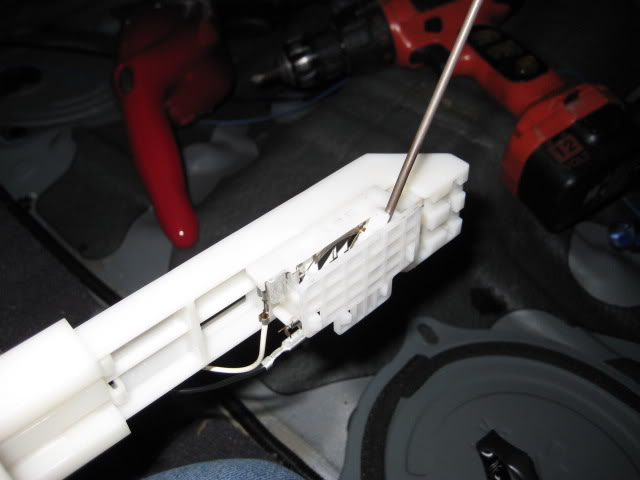
do you see where the wire from the float goes into the housing. There's a metal contact on the plastic pivot that holds the float arm. That metal rubs against some contacts on the surface inside the slot the wire in going into. You'll see that it's black/gray on the surface but once you wipe it a few times with a Q-tip the black residue will go away.
In this picture...
do you see where the wire from the float goes into the housing. There's a metal contact on the plastic pivot that holds the float arm. That metal rubs against some contacts on the surface inside the slot the wire in going into. You'll see that it's black/gray on the surface but once you wipe it a few times with a Q-tip the black residue will go away.
Last edited by DavesZ#3; Oct 16, 2011 at 06:50 AM.


Registered User
Joined: Apr 2009
Posts: 42
Likes: 0
From: San Diego
This fix worked for me. I've constantly used my odometer because my gauge was never accurate. Recently though my gauge was constantly showing empty and had that annoying orange light on. So I checked out the forums, found this one and I tried it out. It took me some time to set it up because I have both of my amps in the part where one of the fuel sensor access points is. Anyways picture speaks for itself. This is after fill up.
Nice.
That's exactly what you want. I need to do this on mine sooner than later, whilst it's no where near as bad as yours, it's getting quite annoying.
I found this link in England, slightly clearer instructions and gives details to test it before putting it back in so you know it will work correctly (if you cleaned it enough)
http://www.350z-uk.com/forum/viewtopic.php?f=35&t=56966