
How To: Frugal Artificial Light Product Photography


Thread Starter
Registered User
iTrader: (9)
Joined: Dec 2003
Posts: 2,069
Likes: 1
From: Waipahu HI; Phoenix AZ
What separates the pros from joes is the knowledge and ability to shoot with artificial light. If you don't know, studio lighting or even portable strobes is very expensive. I'm no pro, but I though I'd share how I dabble with aritifical light for not much $$$. The inspiration came from a photo I saw in Flickr, with the basic knowledge coming from the book: Light, Science & Magic.
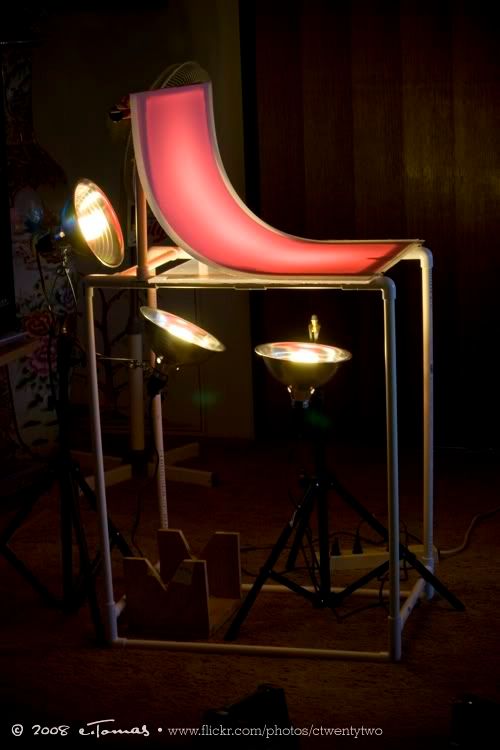
First, find a table without a top so you can put a clear acrylic (available at Lowes) or glass as replacement for the top. Or you can buy plastic pipes like I did and build a custom table. Another way is to find a coffee table that has a glass top.
For the lights, I just bought a couple of $7 dish light holders which has a clamp built in (though it's flimsy), and 100 watt equivalent compact fluorescent bulbs from Lowe's. I even employ some desk lamps I found around the house that can hold bulbs.
At Lowe's or Home Depot, get some rectagular ceiling light covers. You can find different styles, either opaque or clear, and "ice" or some other textures. The opaque ones diffuse more light, obviously, and can flex more. The clear ones are prone to cracking if you bend it too much. The ones I used are the clear and opaque "ice" type. The ice type has that broken glass look. These light covers are going to be used for the background.
Also, if you want to add color to the background, get some cello transparent gift wrap. You can add this to the back of the ceiling light covers. Use clothespins to hold them to the background.
Shot at f/4.5 for a softer background. This one had the fourth light as sidelighting, hence the shadow. The background is the opaque ice light cover with red cello.

This one is shot at f/11 so DOF is greater, with no sidelighting, just the 3 lights from under the background.

The following were shot with the clear ice light cover with purple cello. I used the rough side with the texture, unlike the upper two "red" shots which used the smooth side of the light cover. You can clearly see the "ice" texture.

With this setup, you can shoot all kinds of small items. Again, only a fourth sidelight was used. You can certainly add more lights as you see fit.


I used the efs 60mm macro on these last two shots. All the previous ones were shot with the efs 55-250mm IS. These last two used backlighting as shown in the last "purple setup shot" in the beginning of this post... you can see how I positioned the lamp. I used 4 cards as reflectors- one on either side, above and in front of the subject.
Shot at f/2.8 for a shallow DOF, making a creamy background:

f/8 for greater DOF.

Now you don't even need to buy the light covers and cello wrap, or even have/make a glass table. You can just use a white, black, or colored poster board and position the board like I did on a regular table. Then use the lights for 3-point lighting- front quarter front and quarter rear... or even overhead lighting. It's fun to photograph small items. Give it a try. Experiment!
First, find a table without a top so you can put a clear acrylic (available at Lowes) or glass as replacement for the top. Or you can buy plastic pipes like I did and build a custom table. Another way is to find a coffee table that has a glass top.
For the lights, I just bought a couple of $7 dish light holders which has a clamp built in (though it's flimsy), and 100 watt equivalent compact fluorescent bulbs from Lowe's. I even employ some desk lamps I found around the house that can hold bulbs.
At Lowe's or Home Depot, get some rectagular ceiling light covers. You can find different styles, either opaque or clear, and "ice" or some other textures. The opaque ones diffuse more light, obviously, and can flex more. The clear ones are prone to cracking if you bend it too much. The ones I used are the clear and opaque "ice" type. The ice type has that broken glass look. These light covers are going to be used for the background.
Also, if you want to add color to the background, get some cello transparent gift wrap. You can add this to the back of the ceiling light covers. Use clothespins to hold them to the background.
Here's how I used them.
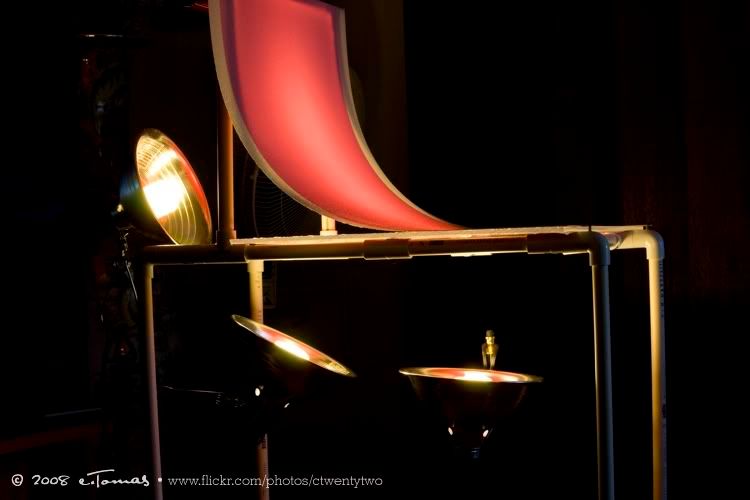
These pics show a red cello gift wrap used with the opaque ice light cover used as the background. The opaque covers allow for more light diffusion and less harsh lighting.
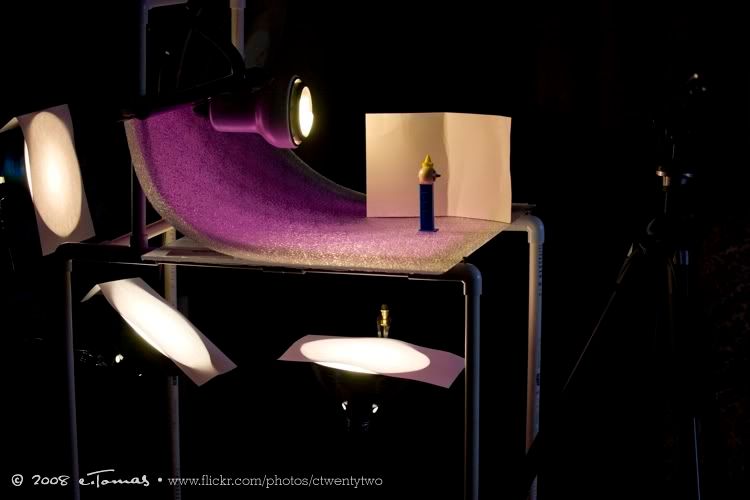
In this setup, I used purple cello gift wrap with clear ice light cover. A fourth light source was used for the backlighting, while simple white cards (used for comic backs) were used for reflectors. Also, you can see I used plain typing paper to cover the "shoot through" lights to weaken/diffuse the light.
The following results could have been better with conventional 3-point lighting, along with the 3 "shoot through" lights, no doubt...These pics show a red cello gift wrap used with the opaque ice light cover used as the background. The opaque covers allow for more light diffusion and less harsh lighting.
In this setup, I used purple cello gift wrap with clear ice light cover. A fourth light source was used for the backlighting, while simple white cards (used for comic backs) were used for reflectors. Also, you can see I used plain typing paper to cover the "shoot through" lights to weaken/diffuse the light.
Shot at f/4.5 for a softer background. This one had the fourth light as sidelighting, hence the shadow. The background is the opaque ice light cover with red cello.
This one is shot at f/11 so DOF is greater, with no sidelighting, just the 3 lights from under the background.
The following were shot with the clear ice light cover with purple cello. I used the rough side with the texture, unlike the upper two "red" shots which used the smooth side of the light cover. You can clearly see the "ice" texture.
With this setup, you can shoot all kinds of small items. Again, only a fourth sidelight was used. You can certainly add more lights as you see fit.
I used the efs 60mm macro on these last two shots. All the previous ones were shot with the efs 55-250mm IS. These last two used backlighting as shown in the last "purple setup shot" in the beginning of this post... you can see how I positioned the lamp. I used 4 cards as reflectors- one on either side, above and in front of the subject.
Shot at f/2.8 for a shallow DOF, making a creamy background:
f/8 for greater DOF.
Now you don't even need to buy the light covers and cello wrap, or even have/make a glass table. You can just use a white, black, or colored poster board and position the board like I did on a regular table. Then use the lights for 3-point lighting- front quarter front and quarter rear... or even overhead lighting. It's fun to photograph small items. Give it a try. Experiment!
Last edited by ctwentytwo; Jun 19, 2008 at 07:57 PM.

wow great post!..always loved the pics u do..
i was also curious as to where exactly were u when u were in AZ?..and did u have quite a bit of mods on the z when u were out here?
i was also curious as to where exactly were u when u were in AZ?..and did u have quite a bit of mods on the z when u were out here?
Thread Starter
Registered User
iTrader: (9)
Joined: Dec 2003
Posts: 2,069
Likes: 1
From: Waipahu HI; Phoenix AZ
Originally Posted by Zgrabin
wow great post!..always loved the pics u do..
i was also curious as to where exactly were u when u were in AZ?..and did u have quite a bit of mods on the z when u were out here?
i was also curious as to where exactly were u when u were in AZ?..and did u have quite a bit of mods on the z when u were out here?
My brother's still in AZ, working at Intel.
Shoot, the only mods my Z had while there was the Fairlady Z badge and smoked reflectors.
BTW, never go to Bell Nissan.
BTW, glad you like the pics.


Thread
Thread Starter
Forum
Replies
Last Post