
**** Official Photoshop 101 Thread ****


Okay guys, I've changed the title to this thread from a "Color Change" thread to a "Photoshop 101" thread so that anyone can share ANY PS techniques/tricks. So if you have anything to share, post'em! 
I must be slow or something because I get stuck after I select the area I want to color. How do I open a new layer, copy and paste? I tried it but it just didnt work.  Im using CS2
Im using CS2
New Member
Joined: Feb 2005
Posts: 2,149
Likes: 0
From: East Texas (Tyler Area)
Originally Posted by solidsnake
I must be slow or something because I get stuck after I select the area I want to color. How do I open a new layer, copy and paste? I tried it but it just didnt work. Im using CS2
Im using CS2Also, you may want to save the selection first just in case you mess up later on down the line. To do that go to Select, then click on Save Selection which should be towards the bottom of the list. At that point just name it whatever you are modifying (like: Front Bumber). Doing this will alow you to pull up just the selection that you made, and not the layer that you are trying to make, just in case you mess something up later on so you do not have to go through the process of selecting the area again.
Hope this helps,
RxZ

Thread Starter
Registered User
Joined: Mar 2005
Posts: 1,176
Likes: 0
From:
Just in case anyone cared, I edited the first post to include a how to for doing wheel swaps that I had done a while back.
Here is the link as well... https://my350z.com/forum/photoshop/164457-how-to-wheel-swap-56k-no-no.html
Here is the link as well... https://my350z.com/forum/photoshop/164457-how-to-wheel-swap-56k-no-no.html

Thread Starter
Registered User
Joined: Mar 2005
Posts: 1,176
Likes: 0
From:
You can download a free "trial" version from Adobe's webpage. I think it's good for 30 days... then you'll need a product registration code for it, or you can download it again (w/ a different email address).
New Member
Joined: Feb 2005
Posts: 2,149
Likes: 0
From: East Texas (Tyler Area)
Make it as good as the first 
In all seriousness, alot of people ask about swapping parts; things like new bumbers and side skirts, spoilers, etc... I know that is a more complicated task, but it may help some people.
In all seriousness, alot of people ask about swapping parts; things like new bumbers and side skirts, spoilers, etc... I know that is a more complicated task, but it may help some people.

Registered User
Joined: Apr 2007
Posts: 221
Likes: 0
From: Ontario, Canada
I did this tutorial to help out a few people on a contest I entered. enjoy...
Photoshop Carbon Fibre Tutorial
Select the hood on the car, or what ever area you would like to make CF on.
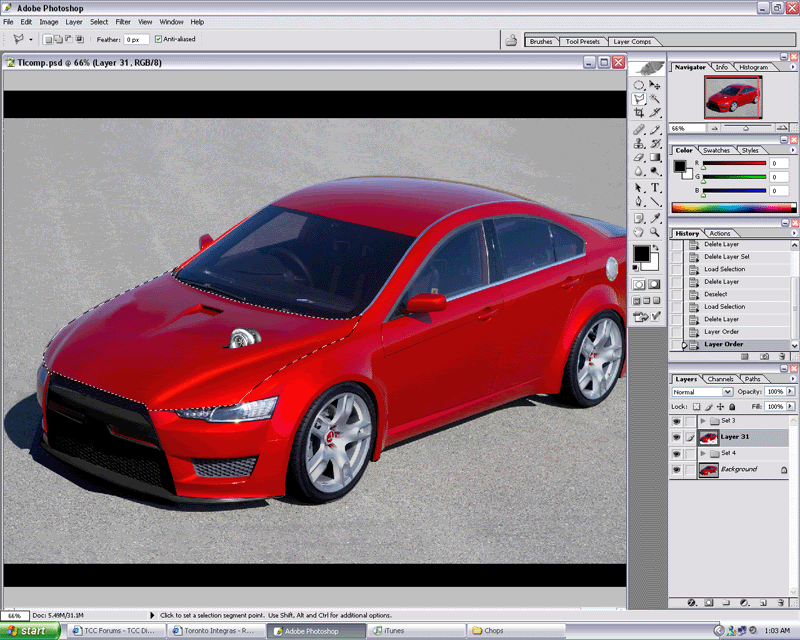
Next, Copy and Paste it (you can either hold CTRL and press C, or hold CTRL and press J).
Now hold CTRL and click on the layer that you just made (the hood), and hold CTRL, hold Shift and Press U. This will Desaturate the layer.
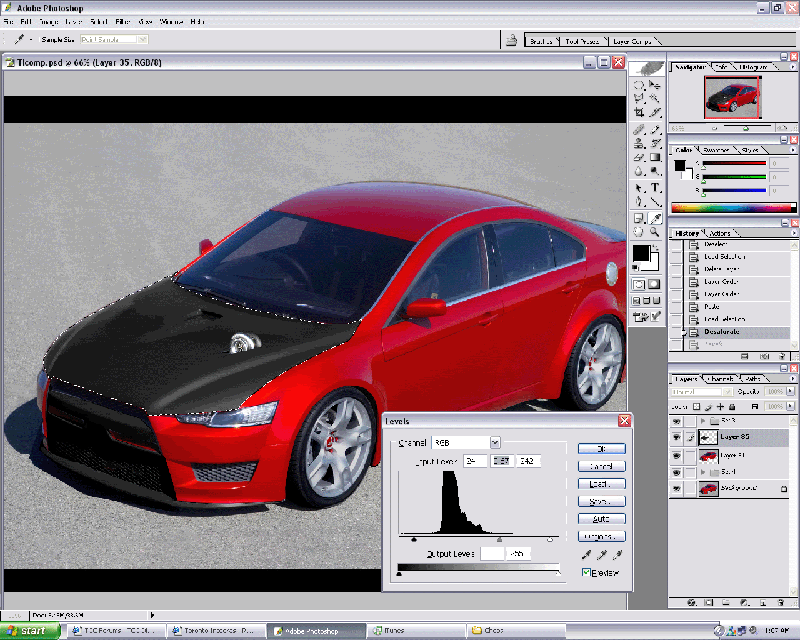
With the hood layer still selected, hold CTRL and press L to open the Level's menu, or you can go to Image > adjustments > Levels
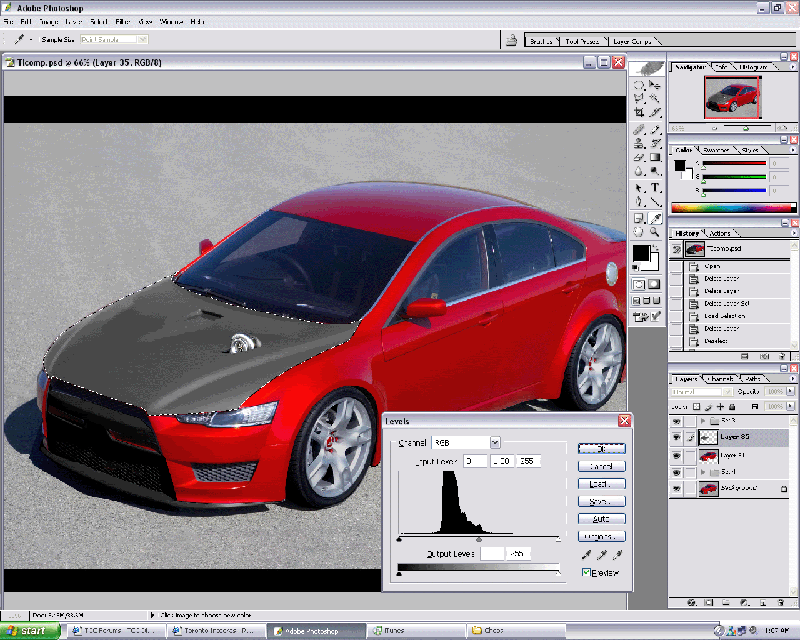
Move around the level sliders to get a nice dark base colour.
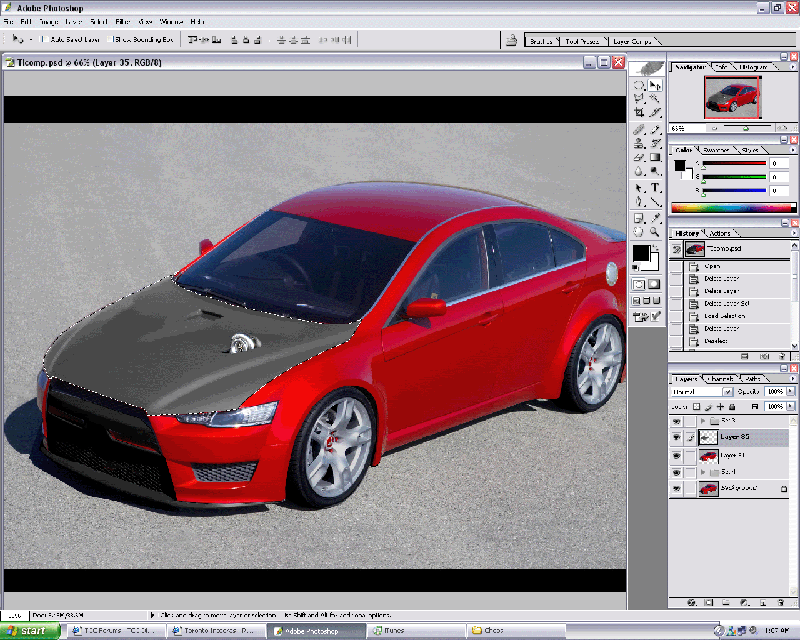
Copy and Paste this layer into the image as it's own layer.
This is not mine so feel free to use it as it does an amazing job.

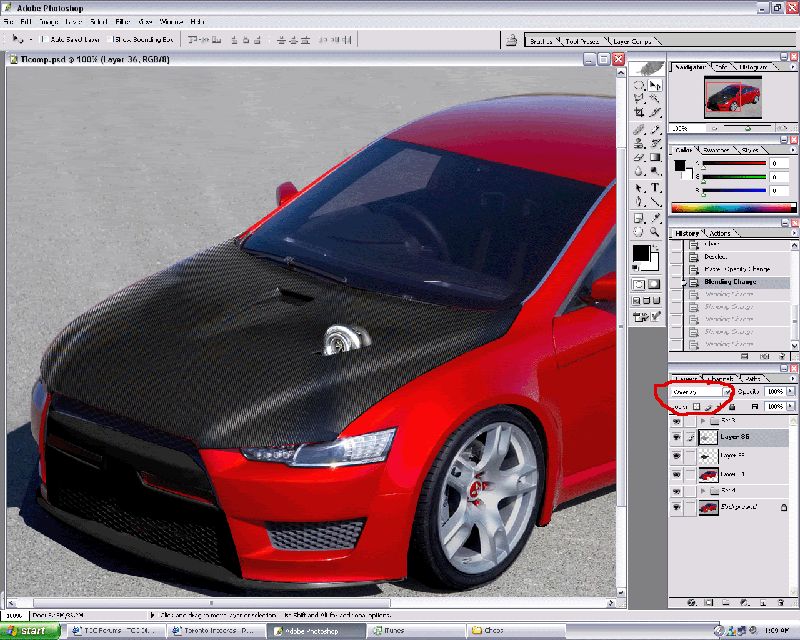
Lower the opacity of the CF layer so you can see the hood underneath it. Now select the CF layer and hold CTRL and press T, or you can go to Edit and select free transform. move the layer so it covers the hood nicely. if the hood is smaller than the CF layer, then do not make it smaller.

Press enter once you have it covering the hood. With the CF layer still selected, hold CTRL and click on the hood layer so the hood selection is picked. Go to Select > Inverse (or hold CTRL+SHIFT+I) and press Delete to delete all parts not under the selection. Raise the opacity of the CF back to 100%. Once you have the CF layer in the shape of the hood, where it stands normal next to the opacity, change it from Normal to Overlay or Soft Light.
Now what you want to do is make the CF look realistic. So select the CF layer and then select the burn tool. To object is to burn the parts furthest away as you wouldn't see the CF pattern at a certain angle.
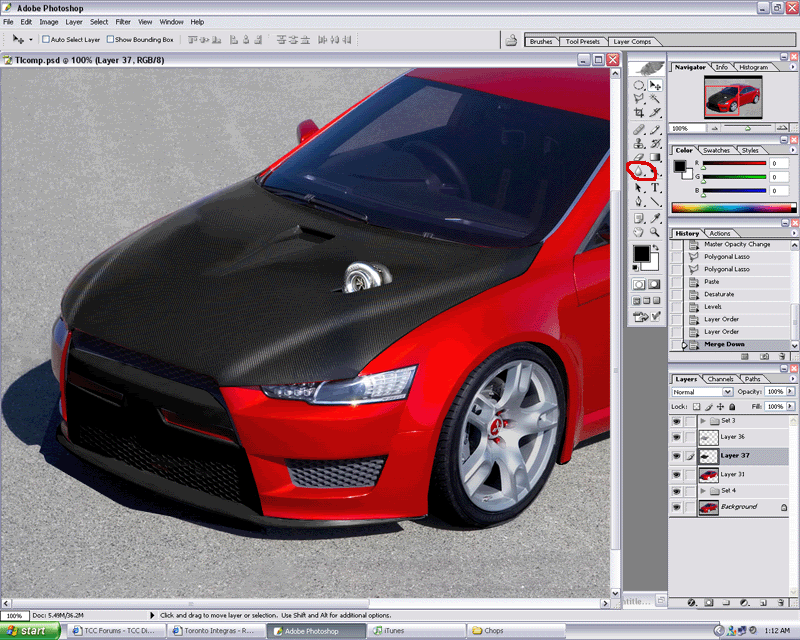
Now change the obacity to how you would like and you are done! You can also select the CF layer and hold CTRL and click on the layer, go to Filter > Distort > twirl and choose between 15-30 %. it will give a realistic weave pattern, you just need to experiment.
Photoshop Carbon Fibre Tutorial
Select the hood on the car, or what ever area you would like to make CF on.
Next, Copy and Paste it (you can either hold CTRL and press C, or hold CTRL and press J).
Now hold CTRL and click on the layer that you just made (the hood), and hold CTRL, hold Shift and Press U. This will Desaturate the layer.
With the hood layer still selected, hold CTRL and press L to open the Level's menu, or you can go to Image > adjustments > Levels
Move around the level sliders to get a nice dark base colour.
Copy and Paste this layer into the image as it's own layer.
This is not mine so feel free to use it as it does an amazing job.
Lower the opacity of the CF layer so you can see the hood underneath it. Now select the CF layer and hold CTRL and press T, or you can go to Edit and select free transform. move the layer so it covers the hood nicely. if the hood is smaller than the CF layer, then do not make it smaller.
Press enter once you have it covering the hood. With the CF layer still selected, hold CTRL and click on the hood layer so the hood selection is picked. Go to Select > Inverse (or hold CTRL+SHIFT+I) and press Delete to delete all parts not under the selection. Raise the opacity of the CF back to 100%. Once you have the CF layer in the shape of the hood, where it stands normal next to the opacity, change it from Normal to Overlay or Soft Light.
Now what you want to do is make the CF look realistic. So select the CF layer and then select the burn tool. To object is to burn the parts furthest away as you wouldn't see the CF pattern at a certain angle.
Now change the obacity to how you would like and you are done! You can also select the CF layer and hold CTRL and click on the layer, go to Filter > Distort > twirl and choose between 15-30 %. it will give a realistic weave pattern, you just need to experiment.

New Member
Joined: May 2007
Posts: 286
Likes: 0
From: Burlington, Colorado
elements sucks....unless you want to just make a photo album for your grandmother
other than that photoshop CS3 is one heck of a buy for what it can do
i am a graphic designer and if you have any questions i can lead u in the right direction...hopefully
Thanks
Remington
other than that photoshop CS3 is one heck of a buy for what it can do
i am a graphic designer and if you have any questions i can lead u in the right direction...hopefully
Thanks
Remington

Thread Starter
Registered User
Joined: Mar 2005
Posts: 1,176
Likes: 0
From:
How-to: Lower
************************************************************
************************************************************
Original
LOWERED
************************************************************
************************************************************
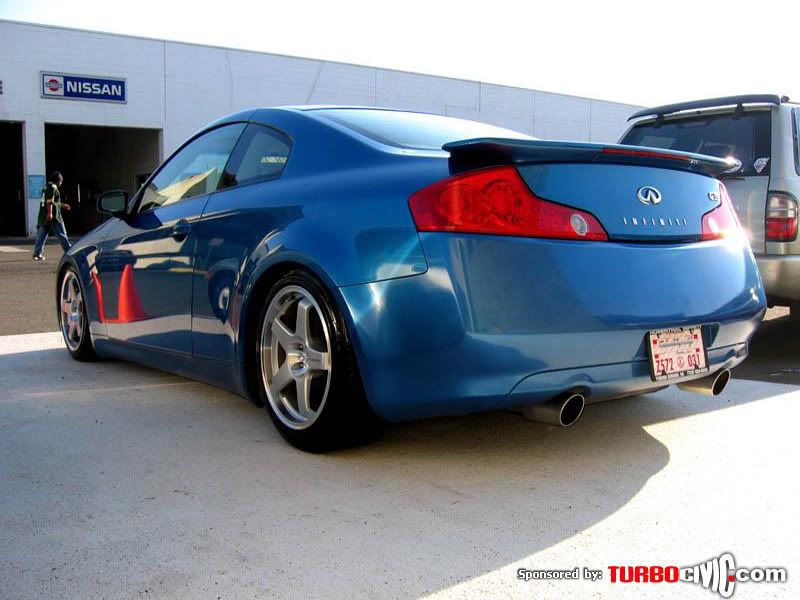
PREFACE: Essentially what you will be doing is stretching the car portion of the picture so that it appears lower on the car then it actually is.
I'll be working with this picture that I took from the gallery portion of the site
First, you want to open Photoshop and open the picture that you want to adjust.
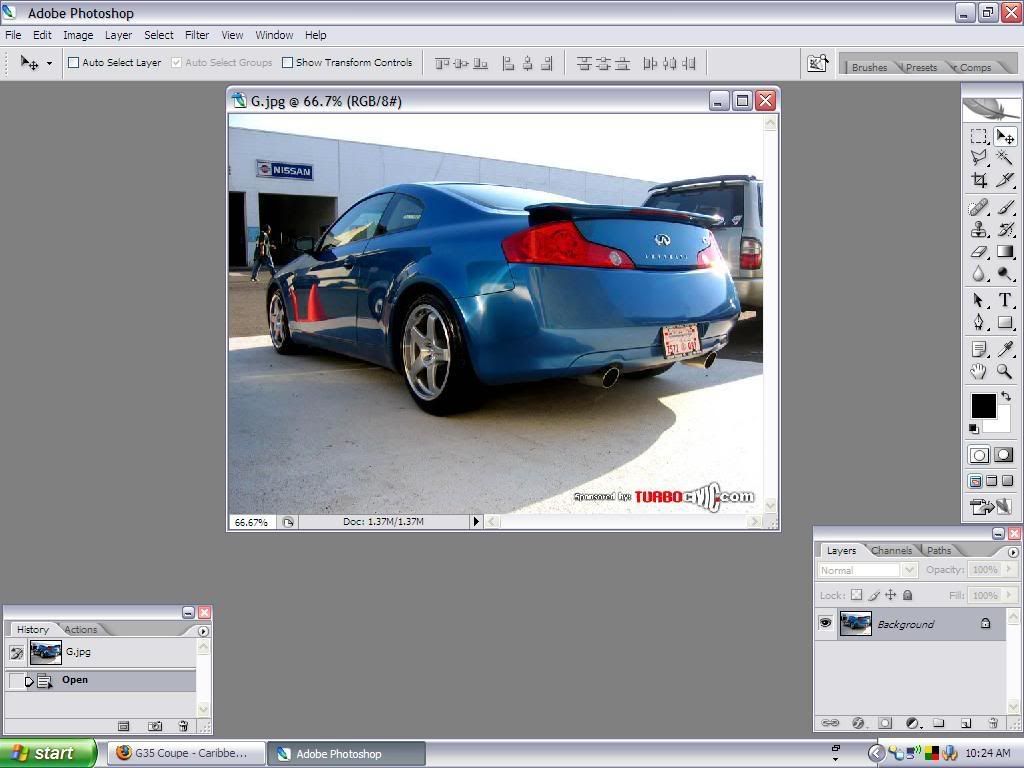
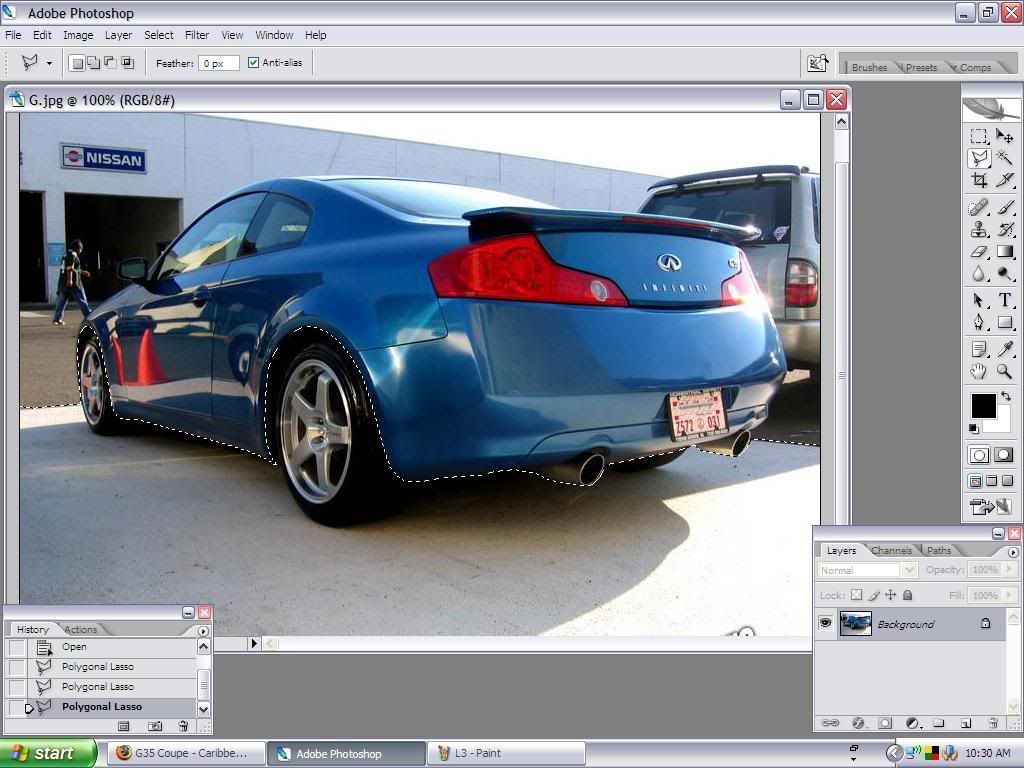
Next, select your tool of choice. As you can see by the toolbar on the right hand side, I prefer the "polygonal lasso." At this point zoom in on the picture at least to 200 or 300%. You can zoom in by pressing "Ctrl" and "+".
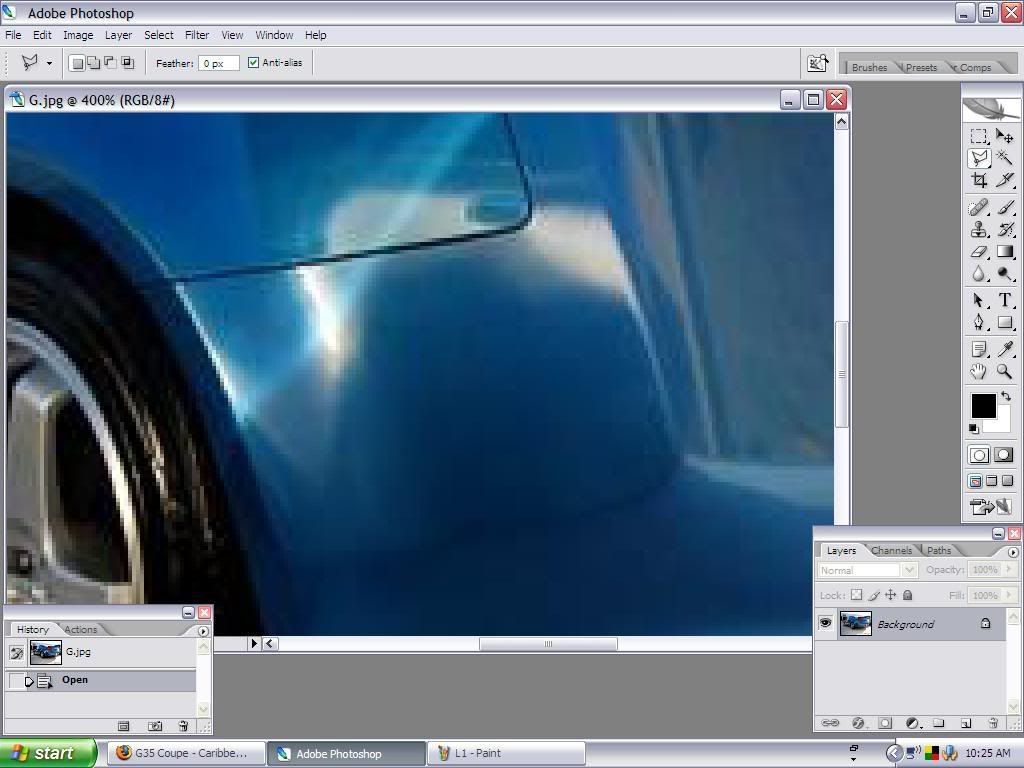
Using the tool that you selected in the last step, work on "cutting" around the bottom edge of the car.
Please note, I also went ahead and "cut" from the edge of the picture to the bottom of the front bumper. I did this for 2 reasons. The first is explained in the preface. The second is so you can see some of the things that may need fixed after the car is lowered.
Continue by "cutting" or selecting around the bottom edge of the car. Be sure NOT to include the wheels. However, make sure that you select the exhaust or any other feature on the car that would normally be affected if you had chosen to lower your car.
When you get to the far side of the picture, zoom out by pressing "ctrl" and "-", then finish by selecting along the outsides of the entire picture. It will leave you with something that looks like this.
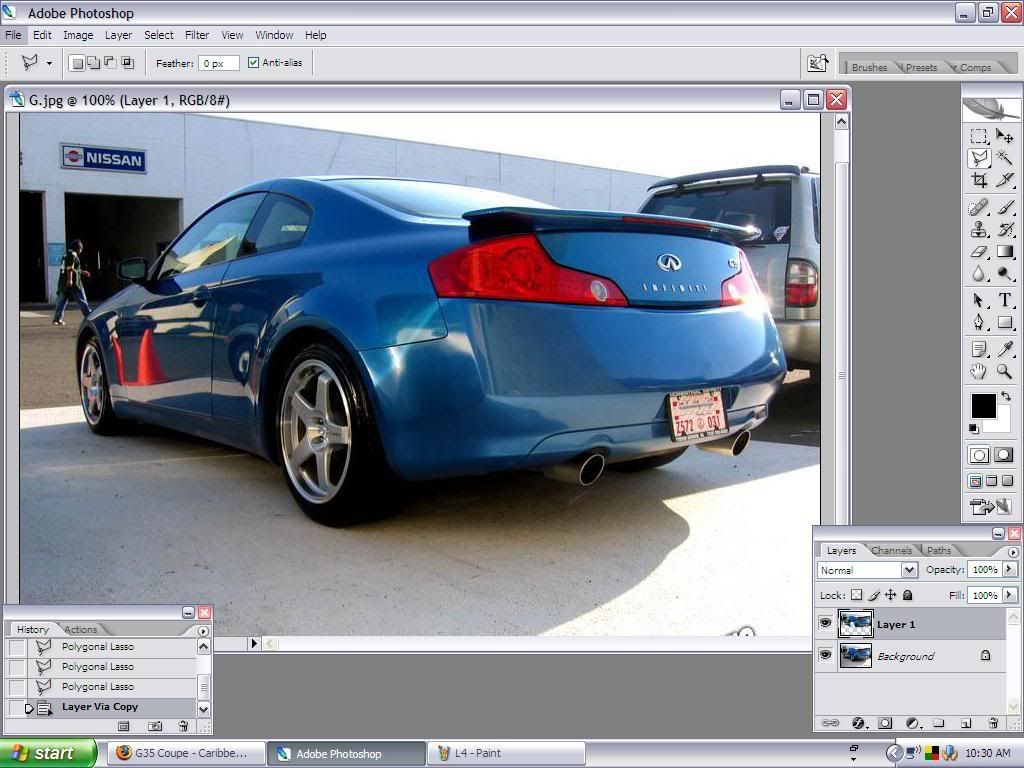
Copy the selected area to a new layer (like a transparency) by pressing "ctrl" and "j". If you look in the bottom right hand corner you can see that there is now a "layer 1" that only has the top half of the picture.
Next, click on "Edit -> Transform -> Scale"
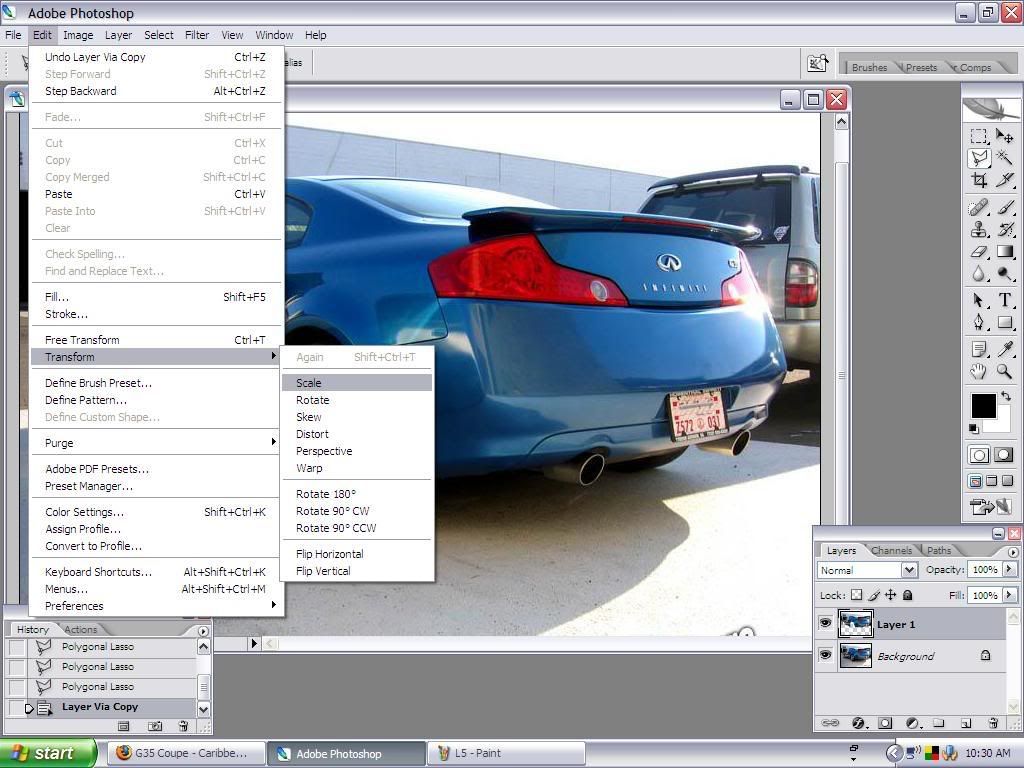
Click and hold on the little box that is horizontally centered and drag it down until the car is however low you wanted it to be.
NOTE If you look in this picture you can see that there are some big problems. First (let's call this "Problem area 1") being to the left of the front bumper, you can see how the ground doesn't look right against the car (compare to the first picture if needed). Also, ("Problem area 2")on the inside of the rear wheel well you can still see the previous portion of the car.

To fix "Problem area 1," I erased the ground on "layer 1" so that it matched the ground from the original picture.
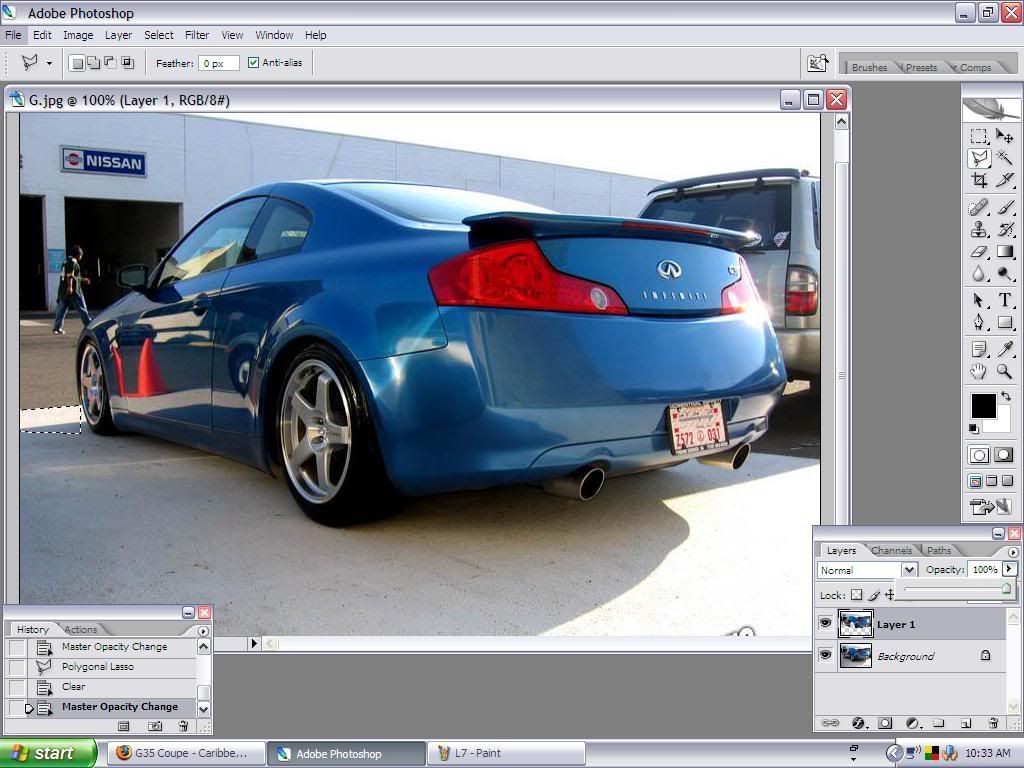
To fix "Problem area 2," I filled in that portion of the wheel well with black paint (I used the paintbrush tool).

This leaves you with your finished product!
************************************************************
************************************************************
Original
LOWERED
************************************************************
************************************************************
PREFACE: Essentially what you will be doing is stretching the car portion of the picture so that it appears lower on the car then it actually is.
I'll be working with this picture that I took from the gallery portion of the site
First, you want to open Photoshop and open the picture that you want to adjust.
Next, select your tool of choice. As you can see by the toolbar on the right hand side, I prefer the "polygonal lasso." At this point zoom in on the picture at least to 200 or 300%. You can zoom in by pressing "Ctrl" and "+".
Using the tool that you selected in the last step, work on "cutting" around the bottom edge of the car.
Please note, I also went ahead and "cut" from the edge of the picture to the bottom of the front bumper. I did this for 2 reasons. The first is explained in the preface. The second is so you can see some of the things that may need fixed after the car is lowered.
Continue by "cutting" or selecting around the bottom edge of the car. Be sure NOT to include the wheels. However, make sure that you select the exhaust or any other feature on the car that would normally be affected if you had chosen to lower your car.
When you get to the far side of the picture, zoom out by pressing "ctrl" and "-", then finish by selecting along the outsides of the entire picture. It will leave you with something that looks like this.
Copy the selected area to a new layer (like a transparency) by pressing "ctrl" and "j". If you look in the bottom right hand corner you can see that there is now a "layer 1" that only has the top half of the picture.
Next, click on "Edit -> Transform -> Scale"
Click and hold on the little box that is horizontally centered and drag it down until the car is however low you wanted it to be.
NOTE If you look in this picture you can see that there are some big problems. First (let's call this "Problem area 1") being to the left of the front bumper, you can see how the ground doesn't look right against the car (compare to the first picture if needed). Also, ("Problem area 2")on the inside of the rear wheel well you can still see the previous portion of the car.
To fix "Problem area 1," I erased the ground on "layer 1" so that it matched the ground from the original picture.
To fix "Problem area 2," I filled in that portion of the wheel well with black paint (I used the paintbrush tool).
This leaves you with your finished product!

 It has been for two years.