
DIY - CLUTCH INSTALL part II - JWT clutch

Thread Starter


Joined: Jan 2006
Posts: 11,204
Likes: 32
From: San Antonio/I miss DFW, TX
First off much thanks to JG 350Z for his how to. it helped alot but i did find some things to add...I had the pleasure of replacing my clutch this weekend with the JWT and like any member I found this awesome write up. Like JG 350Z says “if there is anything not so clear let him know” so I thought I would add my experiences to the equation.
HIS LINK: https://my350z.com/forum/engine-drivetrain-and-forced-induction-diy/237697-diy-clutch-install.html
ALSO, This was a really easy clutch install! The Z is fairly new and there is a bunch of room. I come from helping my cousin on 240’s and this clutch job was much easier and straight forward. So I do recommend doing it yourself if you consider yourself at least a bit above mechanically inclined.
DIY - clutch install:
________________________________________
Changing out a clutch in the 350z is not a small task although it is similar to most RWD cars. You’ll need your usual hand tools, preferably air tools, torque wrench, transmission jack, jack stands, a few special tools, etc… How quick and easy depends how mechanically inclined you are and how much effort your willing to invest.
If you mangle or botch the install it’s no one else’s fault but your own, having a shop do it will at least give you the option or path to a warranty claim. The going rate is about 600 – 1200 dollars and the decision is up to you. I take no responsibility for any injuries or damages if you decide to do this yourself… with that being said here what needs to be done.
1A: Before you begin, I found that loosening the top 4 tranny bolts makes things really easy. (J***** talks about this on step 12). There is a small bracket on top that he talks about that’s kinda in the way! I recommend removing it too. It attaches to the rear coolant log. Use 10mm wrench or socket. Then zip tie up out of the way. Then with a long 17mm wrench you can get to the 4 upper most bolts. Loosen them all and remove the upper most two. The upper most two bolts are at 11 and 1 -o-clock positions. Looking fwd.
1. Secure vehicle with jack stands, I went as high as my jack could go. This is very important and probably the most crucial, people have been crushed, so be careful. Don’t do this on inclined driveway! I will say its bee-yotch lying on your back, wish I had a lift.
2. Disconnect the battery.
3. I’m running the borla exhaust and I had to loosen it all up to let the driveshaft drop. I removed the first pieces/h pipe after the cats. Mine had seized and had to use some big pipe wrench vise grips to twist it loose. I imagine the stock exhaust removal should be much easier. Yes Stock exhaust requires you disconnect the Y pipe only. Very straight forward. 14mm wrenches, ratcheting wrenches work great here!
4. Remove the brace connecting the two cats. – uses 14mm socket.
I also removed the passenger side o2 sensor to give me more room as I’m using those non-fouler extensions.
5. Remove driveshaft bolts just before the diff. (17mm wrenches – open ended. My others wouldn’t fit. Once disconnected pull back and input shaft will come out of the back of the tranny, and slide it out (to the back), set it aside.
6. Remove all electronic connectors, use a small flat head screwdriver like the ones used to tighten reading glasses. You don’t want to break any of the clips. Make sure you get all of cable management clips and brackets that are clipped on. Using curved needle nose pliers helps. You don’t want anything attached to the transmission. I also found it helpful to have a small 10mm wrench. Some of the electrical connectors are mounted on small brackets. Its nice this way because you can easily remember how they go back on. Be sure that once you remove the bracket put the small 10 mm screw back in the tranny so u don’t loose them.
6A: ALSO, I FOUND ONE SMALL ELECTRICAL CONNECTOR IN THE VERY BACK. IT’S THE FURTHEST ONE AND ITS ON TOP! ITS TOUGH TO GET TO, BUT IF YOU HAVE ALL THE OTHER ELECTRICAL DISCONNECTED IT GIVES YOU ENOUGH ROOM TO LOWER THE TRANNY WITH YOUR JACK AND THEN EASILY REMOVE IT.
6B: I removed a sensor at about 7-o-clock position. That sensor lines up with a magnet thingy on the flywheel. I also removed it so that when I go to stab the tranny back in when reinstalling I wouldn’t hit and break this sensor since its completely exposed. Remove using 10mm socket. See step 17 also.
7. Remove the rear splash guard. (ITS THIS PLASTIC JUNK MOUNTED WITH 10 MM SCREWS with Phillips heads too. No biggy here. It helps to see more and remove the tranny.
8. Remove starter bolts and move it out of the way leaving the cabling intact. (make sure the battery is disconnected, you don’t want a short here)! no biggy!
9. Remove the clutch SLAVE *(edit) cylinder and move it to the side. Make a habit of putting the bolts back in place to help you remember where they all go. ya good habit! U don’t wanna lose bolts.
10. Remove the shifter from inside the car, twist off the **** and after removing the plastic boot area cover remove all the bolts underneath. There will be four 10 mm bolts and then under that boot, there will be an additional three 10mm bolts.(pay attention here, because the shifter goes in a certain way! There is a physical bump stop that hits the STAR TREK shaped bracket you are about to remove with the last 3 bolts. Go back under the car and remove the 12 mm bolt holding the shifter in place. It will pop out. Its got a spring so its nice to have someone on top in the car.
11. Remove the small sheet metal brace under the transmission. Requires two 12mm sockets and then two 10 mm sockets. No biggy at all.
12. Start loosening all the bolts to the engine. Make sure you can get to all of them, they will be tight. There was one bolt on top that required me to remove a small bracket that was in the way. See STEP 1A.
13. Once they are loose you can begin positioning the tranny jack, it was it a little tricky to actually tighten the band, its optional and it helps, just try your best. The center of gravity is towards the back of the transmission. yup! no biggy here!
14. Begin removing the crossmember bolts; don’t let the transmission just hang by the input shaft. (14mm sockets - impact comes in handy here!)
15. Remove all the bolts and start pulling the transmission out. Again make sure nothing is attached. Be careful as you start lowering it as it could tilt back and begin dripping oil out the output shaft like it did onto me. Lower the trans all the way and it roll it back.
16. I used an impact wrench to remove the pressure plate bolts. Be careful and ready to catch it here as you don’t want it to fall on your face. (12 mm bolts) no biggy!
17. Using a T-55 torx bit remove the flywheel. I used the impact wrench again. This one is heavy too so be ready. *** mark the location or take the flywheel off slowly then mark it once its off! They fly wheel needs to go back on in the same spot. Nissan puts a green mark on the flywheel to mark orientation. Also on the opposite side of this green mark is the only circular thingy that lines up with the indicator on the crank/engine side. I positioned the crank indicator to 12-o-clock. If you really look at it there is a copper colored weight that also lines up with a sensor at about 7-o-clock position (see step 6B).
18. Now there is one small little piece left, the pilot bushing. Most clutch sets include this so you might as well change it. - get a flashlight, inspect it and decide....
The service manual says to use a special tool, use it if you have it. "its called a slide hammer" puller - I used an old trick to get this guy out, fill in the hole with some thick grease and with the clutch alignment tool begin tapping it into the hole, (I removed the plastic ring on mine). Eventually the pressure from the grease will pop it out. I didn’t replace the pilot bushing as it looked great! This is rare to wear out!
see post 50 for how u can do this with a slide hammer puller - and given that i have changed about 12 clutches on 350z or more, i have been useing the slide hammer with my modified end with ease. see post 50:
https://my350z.com/forum/engine-driv...ml#post8735291
19. Now go back to the transmission remove the retaining clip and remove the throwout bearing from the input shaft.
20. Use a gear puller to remove the bearing from the sleeve. Now here is the tricky part, I couldn’t figure out how to hold the center section of the puller in place. I just happen to find a thick washer that fit perfectly into the center of the sleeve. See picture.
20A: I didn’t use a puller at all. It all can be done on a vise.
Remove Bearing:
I positioned the Throw-out on the vise and I used a big socket to hammer the sleeve down! I then used a perfectly sized socket to push it completely through! This is not hard guys!
Install new bearing:
Just use the vise clamp and center it on there and tighten slowly. I used wood shims so that I wouldn’t damage the bearing. No biggy! See step 22.
21. Wipe off all the grease from the crankshaft to begin installing the pilot bushing. The pilot bushing is soft brass so care must be taken when taping it in. I used a socket and a rubber mallet. Make sure it feels smooth on the inside and that its pushed in straight all the way in.
22. Press the new throwout bearing on to the sleeve. The manual says to use a press, I used a vise, I flipped the serrated jaws to have a smooth surface to squeeze with. This is crucial, don’t mark up the bearing’s surface and make sure it goes on straight.
23. Install throwout bearing assembly on to the input shaft; use the clip to secure the clutch fork. I put a little grease on the bearing’s face, the clutch fork and just a tiny wipe on the splines and input shaft.
24. The JWT flywheel has two timing holes and was clearly marked which one to use on 350z. Make sure you use the right one, although its lighter than stock you don’t want to drop it on your face. Hand tighten all the bolts.
Last edited by JasonZ-YA; May 4, 2015 at 05:00 PM.
Thread Starter
Joined: Jan 2006
Posts: 11,204
Likes: 32
From: San Antonio/I miss DFW, TX
Look at these pics....
The back of the flywheel has an "indicator hole/mark" that is supposed to line up with the DOT that is shown in "this" pic at the 12-O-clock position - its in-between the Torx T-55 hole locations.
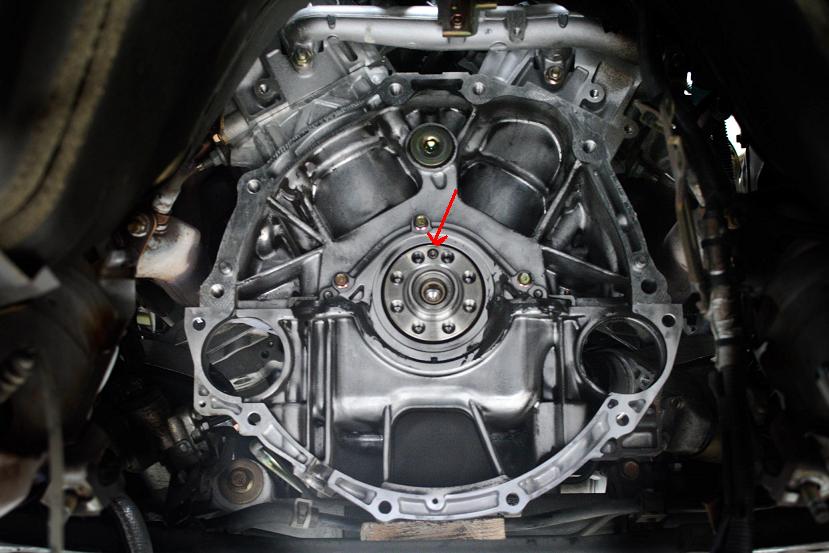
-J
25. I don’t have the tool to prevent the flywheel from turning and resorted to using a � ratchet on the crank pulley with a long pipe/breaker bar holding it in place. If I had more time I’d invest or fab up something better. The pipe was touching the ground as I tightened the bolts. You can also wrap some safety wire around the flywheel and a nearby hole to hold the flywheel in place. I had the flywheel tool and it makes that job easy! Any auto parts store will have it.
EDIT: my instructions said 90/93 - review post 19 and others where its confirmed the instructions say 90/93 - for those of you that broke your bolts - did you read your instructions? were you under the car, yanking on it with out a steady hand, pulling at an odd angle? yes, this step is delicate - that being said - pay attention, review your instructions, and make a decision.
So to continue:
""""Factory service manual says 62-68 ft lb, but some clutch install kits say 70-75ft lbs, my clutch kit instructions that came with mine said 90 then 93 - Review both the FSM and the instructions of the clutch/flywheel kit you bought and decide for your damn self""""
26. I cleaned the flywheel and pressure plate with some carburetor cleaner and some clean shop rags. You don’t want any and I repeat any type of grease or oil on the flywheel or pressure plate.
Once again: Flywheel installation:
*** mark the location or take the flywheel off slowly then mark it once its off! They fly wheel needs to go back on in the same spot. Nissan puts a green mark on the flywheel to mark orientation. Also on the opposite side of this green mark is the only circular thingy that lines up with the indicator on the crank/engine side. I positioned the crank indicator to 12-o-clock. If you really look at it there is a copper colored weight that also lines up with a sensor at about 7-o-clock position (see step 6B).
*** If the flywheel is installed in the wrong location the car will throw a check engine light with the code/s P0011 or P0021 for Cam sensor.
Make sure it’s clean, put the clutch disk and hold it in place with the alignment tool.
27. Bolt on the pressure plate, it took a few attempts for me to guess where the alignment dowels go. There are other holes on the flywheel that will not work. Tighten down to 25 foot lbs, remove alignment tool.
28. Now the fun part, putting the transmission back in. It has to go straight in and you must be careful no to damage the pilot bushing. Twist it and push it in as much as possible, don’t bang it in, be patient. If the transmission is gear try turning the output shaft or turn the engine over with a ratchet to try and get the splines to line up. I couldn’t push mine all the way in but I made sure the splines were in before I began to bolt it up. I used the bolts to bring in the last 1/2 inch.
29. Bolt the crossmember in place and begin tightening all the bolts. Torque down to about 55 lbs for the big 17mm bolts and about 37 lbs for the smaller 14mm bolts.
The only bolt I suggest you do before any others is the one at about 2 or 3-o-clock just ABOVE the starter bolts. It’s a 17mm that you loosed from the top. It’s a lot easier to get that one in with the starter out still.
30. Install starter and tighten down bolts also to about 37lbs.
31. Reinstall clutch master cylinder, tighten bolts. Whenever your working with aluminum don’t ever go over board, you don’t want to strip the threads.
32. Now it’s just a matter of putting everything back together the way you found it.
33. I had to top off the transmission oil since I spilled some. You’ll need a 10mm allen bit to take out the plug.
34. Make sure the shifter goes into all the gears before putting the ****/boot. You might need to re-align it. (See Step 10)
35. Connect battery.
36. That’s pretty much it, now go take a test drive and enjoy!
ATTACHED IS A WORD DOCUMENT FORM WITH MY ADDITIONS IN BOLD. THAT MIGHT HELP.
- JASON
The back of the flywheel has an "indicator hole/mark" that is supposed to line up with the DOT that is shown in "this" pic at the 12-O-clock position - its in-between the Torx T-55 hole locations.
-J
25. I don’t have the tool to prevent the flywheel from turning and resorted to using a � ratchet on the crank pulley with a long pipe/breaker bar holding it in place. If I had more time I’d invest or fab up something better. The pipe was touching the ground as I tightened the bolts. You can also wrap some safety wire around the flywheel and a nearby hole to hold the flywheel in place. I had the flywheel tool and it makes that job easy! Any auto parts store will have it.
EDIT: my instructions said 90/93 - review post 19 and others where its confirmed the instructions say 90/93 - for those of you that broke your bolts - did you read your instructions? were you under the car, yanking on it with out a steady hand, pulling at an odd angle? yes, this step is delicate - that being said - pay attention, review your instructions, and make a decision.
So to continue:
""""Factory service manual says 62-68 ft lb, but some clutch install kits say 70-75ft lbs, my clutch kit instructions that came with mine said 90 then 93 - Review both the FSM and the instructions of the clutch/flywheel kit you bought and decide for your damn self""""
26. I cleaned the flywheel and pressure plate with some carburetor cleaner and some clean shop rags. You don’t want any and I repeat any type of grease or oil on the flywheel or pressure plate.
Once again: Flywheel installation:
*** mark the location or take the flywheel off slowly then mark it once its off! They fly wheel needs to go back on in the same spot. Nissan puts a green mark on the flywheel to mark orientation. Also on the opposite side of this green mark is the only circular thingy that lines up with the indicator on the crank/engine side. I positioned the crank indicator to 12-o-clock. If you really look at it there is a copper colored weight that also lines up with a sensor at about 7-o-clock position (see step 6B).
*** If the flywheel is installed in the wrong location the car will throw a check engine light with the code/s P0011 or P0021 for Cam sensor.
Make sure it’s clean, put the clutch disk and hold it in place with the alignment tool.
27. Bolt on the pressure plate, it took a few attempts for me to guess where the alignment dowels go. There are other holes on the flywheel that will not work. Tighten down to 25 foot lbs, remove alignment tool.
28. Now the fun part, putting the transmission back in. It has to go straight in and you must be careful no to damage the pilot bushing. Twist it and push it in as much as possible, don’t bang it in, be patient. If the transmission is gear try turning the output shaft or turn the engine over with a ratchet to try and get the splines to line up. I couldn’t push mine all the way in but I made sure the splines were in before I began to bolt it up. I used the bolts to bring in the last 1/2 inch.
29. Bolt the crossmember in place and begin tightening all the bolts. Torque down to about 55 lbs for the big 17mm bolts and about 37 lbs for the smaller 14mm bolts.
The only bolt I suggest you do before any others is the one at about 2 or 3-o-clock just ABOVE the starter bolts. It’s a 17mm that you loosed from the top. It’s a lot easier to get that one in with the starter out still.
30. Install starter and tighten down bolts also to about 37lbs.
31. Reinstall clutch master cylinder, tighten bolts. Whenever your working with aluminum don’t ever go over board, you don’t want to strip the threads.
32. Now it’s just a matter of putting everything back together the way you found it.
33. I had to top off the transmission oil since I spilled some. You’ll need a 10mm allen bit to take out the plug.
34. Make sure the shifter goes into all the gears before putting the ****/boot. You might need to re-align it. (See Step 10)
35. Connect battery.
36. That’s pretty much it, now go take a test drive and enjoy!
ATTACHED IS A WORD DOCUMENT FORM WITH MY ADDITIONS IN BOLD. THAT MIGHT HELP.
- JASON
Last edited by JasonZ-YA; May 4, 2015 at 04:51 PM.

Registered User
Joined: Aug 2006
Posts: 13
Likes: 0
From: Massachusetts
Hey guys, his tutorial says the flywheel is supposed to be torqued to 90 ft lbs. Is this correct? I believe the service manual says ~54 ft lbs.
Nice writeup, too, btw. Like a fool, I removed the clutch master cylinder when I didn't have to :P
Nice writeup, too, btw. Like a fool, I removed the clutch master cylinder when I didn't have to :P
Originally Posted by jetboy
Hey guys, his tutorial says the flywheel is supposed to be torqued to 90 ft lbs. Is this correct? I believe the service manual says ~54 ft lbs.
Nice writeup, too, btw. Like a fool, I removed the clutch master cylinder when I didn't have to :P
Nice writeup, too, btw. Like a fool, I removed the clutch master cylinder when I didn't have to :P
Trending Topics
Torque Specs are super important with heads,Brg caps,....Things where tolerences and expansion/contraction is a priority.
Sequence and balance in torque is important to a lesser degree in flywheels,torque converters,dampers,differential rings, where it simply has to be sufficiently tight and balanced.
Keep in mind that torque specs are determained by bolt size/thread pitch/hardness and bolts are choosen to handle the requirements of a specific demand.
Always best to play by the rules, but as I said, in this case, not the end of the world.....Clean threads,clean mating surfaces, sequence, consistant torque and Loc-Tite
Did you change out to new flywheel bolts are did you reuse stock ones with flywheel spec loctite?
I'm reading the nissan manual on what to grease but there is a lot of stuff you are suppose to grease up with litium grease.
I'm reading the nissan manual on what to grease but there is a lot of stuff you are suppose to grease up with litium grease.
Originally Posted by SuperBlack350
Did you change out to new flywheel bolts are did you reuse stock ones with flywheel spec loctite?
I'm reading the nissan manual on what to grease but there is a lot of stuff you are suppose to grease up with litium grease.
I'm reading the nissan manual on what to grease but there is a lot of stuff you are suppose to grease up with litium grease.
I have installed a lot of clutchs, and have my own ways. I always polish the splines and nose and throw out Brg slide tube, Pre fit my disc so I niw I have a smooth slide and no burrs and as I said, I lube all of the above sparingly with synthetic grease

Originally Posted by failsafe306
If one was going to remove bolts that have already been Red Loc-Tite'ed in, (say...replacing a JWT flywheel) how do you get them up to temp to break loose? Heat gun?
Originally Posted by Eazzzzzzy
Air Impact---Use your wire wheel to clean threads and reinstall with fresh Loc-Tite
Originally Posted by failsafe306
Oh okay, I didn't know if I'd end up breaking the head of the bolt off or anything. I don't have an air impact, but I have an electric one that's supposed to have up to 300+ lb-ft of torque so I guess we'll see. It will be a while before I get around to changing the clutch/fly anyway. Thanks!
I don't think that's going to work. You want somethign to break the bolts fast and hard. I had to use my 500ft lb one to break open. My 250ft lb didn't work.
Originally Posted by SuperBlack350
I don't think that's going to work. You want somethign to break the bolts fast and hard. I had to use my 500ft lb one to break open. My 250ft lb didn't work.

Originally Posted by Eazzzzzzy
If its a good Milwaukee it mite do it ----They arent a whole bunch tighter than a properly installed Lug Nut (Having broken loose no less than a 1000 FW Bolts) I used one years ago on my Harleys---There were some crucial Mega Nuts on them.....Much like me
I'm in the process of doing mine as we speak. When i took them off, i used the 500 ft lbs and it came off. Didn't think of using the 250ft lbs. I put the new ones on with red loctite and torqued to 93 ft lbs like JWT says. Then later i find out that i forgot to take out the pilot bearing so i used the 250ft lbs gun (Snap On gun), then thing didn't budge. Put the Snap on 500lb, came out easy.
So yeah, i guess it depends. Stock flywheel is torqued down to 50-60 lbs i believe.


Registered User
Joined: Sep 2007
Posts: 58
Likes: 0
From: Einsiedlerhof, DE
not to be an jerk because i hate when they get on but next time use blue Lok-Tite.
the red is not what you should use on a flywheel being that the more you mod your ride the more likely you are to warp this or want to change it out. that is just a suggestion though bro.........
the red is not what you should use on a flywheel being that the more you mod your ride the more likely you are to warp this or want to change it out. that is just a suggestion though bro.........

Having said that, I was having the same problem so I just ended up driving them in with the impact wrench. That was about 2000 miles ago and I've had no problems

25. I don’t have the tool to prevent the flywheel from turning and resorted to using a � ratchet on the crank pulley with a long pipe/breaker bar holding it in place. If I had more time I’d invest or fab up something better. The pipe was touching the ground as I tightened the bolts to 90 foot lbs. I then followed the instructions to loosen, add red loctite and torque back down to 93 lbs. You can also wrap some safety wire around the studs and a nearby hole to hold the flywheel in place. I had the flywheel too and it makes that job easy! Any auto parts store will have it.
someone needs to change this part of the post...90 to 93lbs on the flywheel DOES snap them....im stuck on a sunday with no way of being able to get new bolts...and i have to work at 6:45am....gay
someone needs to change this part of the post...90 to 93lbs on the flywheel DOES snap them....im stuck on a sunday with no way of being able to get new bolts...and i have to work at 6:45am....gay