
GPS Navigation Install-Garmin GVN-52

Thread Starter
New Member
Joined: Sep 2002
Posts: 375
Likes: 0
From: Colorado Springs, CO
This may have been posted before . . . not sure. Anyway, for those who are looking for an aftermarket GPS Navigation unit for the Z, I highly recommend the Garmin GVN-52 combined with whatever LCD screen you want (I'm using an Alpine TME-M760).
The Garmin GVN-52 is small enough to install in a single din slot beneath your aftermarket head unit, and the antenna can easily be installed just in front of the triple-gauge cluster.
Here are some pics, and install instructions. First disassemble the center instrument cluster as detailed here: http://liljerk.morpheus.net/350Z/dash_removal/
Remove the two brackets (4 screws) that hold the double-din radio slot on to the center console, as shown here:
Last edited by MSGarrett1; May 9, 2007 at 05:50 PM.
Thread Starter
New Member
Joined: Sep 2002
Posts: 375
Likes: 0
From: Colorado Springs, CO
You'll need to fabricate a bracket to hold the navigation unit. I made mine from 3/8 inch plywood. It is 7" wide and 2.5" tall. How deep you make it, is up to you. The deeper, the less room for all the wires from the headunit, but if it's too shallow, the Garmin unit will hang off--about 4.5" - 5" should do it. See here:
Last edited by MSGarrett1; May 9, 2007 at 05:53 PM.
Thread Starter
New Member
Joined: Sep 2002
Posts: 375
Likes: 0
From: Colorado Springs, CO
With those dimensions, the custom wooden bracket will be flush with the bottom of the double-din radio steel bracket and still have about 1/2" between the top of the wooden bracket and the headunit. See the bottom view here:
Thread Starter
New Member
Joined: Sep 2002
Posts: 375
Likes: 0
From: Colorado Springs, CO
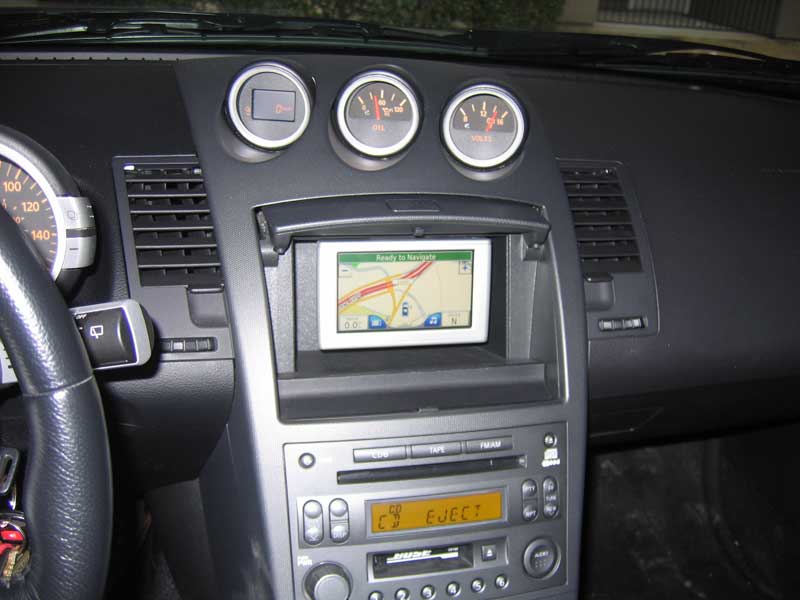
With the wooden box sanded and painted black, you can see how the Garmin unit fits nicely into this spot.
The Garmin has a slot for updating maps via downloaded files on the Garmin website. These files fit onto an SD card, which then slides into a slot on the Garmin unit. I have this side of the Garmin facing toward the rear, so future updates will not require completely removing the unit from it's bracket. Also, the unit is off-center to one side, leaving room for the wire connections (power/signal, and GPS antenna).
Also, you'll need to drill holes in the sides of the wooden bracket to fit bolts through to hold it to the two steel brackets that comprise the double-din slot. The holes in the steel brackets are already there from the factory radio. See here:
Last edited by MSGarrett1; May 9, 2007 at 05:57 PM.
Thread Starter
New Member
Joined: Sep 2002
Posts: 375
Likes: 0
From: Colorado Springs, CO
Now, the tricky part of the install. To run the GPS antenna wire cleanly, you have to pass it through an air vent at the top of the dash. But DO NOT let it get into the air ducting . . . it's a ***** to get back out. Trust me. Use a screwdriver to pry open some room to fish the wire through the yellow path shown here:
Thread Starter
New Member
Joined: Sep 2002
Posts: 375
Likes: 0
From: Colorado Springs, CO
That's the toughest part of the install--running that GPS antenna wire. Now just make the connections, reinstall everything. Here are a couple of finished shots of the GPS antenna installed in the dash:
Trending Topics
Thread Starter
New Member
Joined: Sep 2002
Posts: 375
Likes: 0
From: Colorado Springs, CO
This whole install took me one day. I started about 11 AM and finished around 7 PM. This includes the time to fabricate the wooden box, sand it, paint it, etc. I also soldered all my electrical connections between the Garmin (12V continuous, 12V switched, ground, and audio interrupt) and my headunit and used heat-shrink tubing and zip ties. I also had to run the signal wires (video, L/R audio) to a box beneath the passenger kickpanel.
A final shot of the finished product:
A final shot of the finished product:
Last edited by MSGarrett1; May 9, 2007 at 06:02 PM.


New Member


Joined: Dec 2006
Posts: 7,337
Likes: 204
From: Edina, Minnesota
Nice install. Looks good.
I did my install a little differently from yours. I put the Garmin GVN52 "black box" in the small rear cubby behind the driver's seat, and ran the GPS antenna to the rear strut bar.
I bench-tested several 7" LCD screens, and decided on the Power Acoustik PT-700MHR (for its great and very sharp image). Note: The Kenwood LZ-702W Monitor (and, for the matter any and all Kenwood LCD's) displayed images just as good or better than the Power Acoustik PT-700MHR.
The Garmin GVN52, Kenwood KNA-G510 Navigation Box "black box," and the Kenwood DNX-7100 (all-in-one double-din device) are OEM's driven by Garmin. These devices use the NAVTEQ map-database and Garmin's superior application software.
And, Kenwood products support touch-screen function while the Garmin GVN-52 does not. That is simply a marketing position that Garmin chooses as the company prepares to penetrate the OEM market.
--Spike
Thread Starter
New Member
Joined: Sep 2002
Posts: 375
Likes: 0
From: Colorado Springs, CO
Tubbs . . . . the screen is awesome in the sun . . . partially because it's a good screen, and partially because the lid to that compartment in the Z partially shades the screen, even when it is fully open.
izmir . . . the interface is via a small radiofrequency remote. The remote has a center button that you can push right, left, down, up, or in to move the highlighted area around on the screen and hit enter . . . very intuitive, as easy or easier than the touchscreen Garmins I've used. Basically, this model of Garmin is designed for someone who already has a screen. It still does the voice guidance stuff, and the way I have it connected, the Nav voice will interrupt any music playing to give the Nav voice instructions.
Spike . . . where did you put the GPS antenna on the rear strut . . . over the "Z" or off to one side? Plus, I don't think that rear strut silverish cover with the "Z" is metal, but the antenna is held in place magnetically. Did you put the round metal piece supplied with the Garmin GVN-52 on top of the rear strut?
New Member
Joined: Dec 2006
Posts: 7,337
Likes: 204
From: Edina, Minnesota
Originally Posted by MSGarrett1
Spike . . . where did you put the GPS antenna on the rear strut . . . over the "Z" or off to one side? Plus, I don't think that rear strut silverish cover with the "Z" is metal, but the antenna is held in place magnetically. Did you put the round metal piece supplied with the Garmin GVN-52 on top of the rear strut?
You are correct: "Plus, I don't think that rear strut silverish cover with the "Z" is metal, but the antenna is held in place magnetically."
--Spike

Or if you want a GPS that you can remove from your car and take with you, the Garmin Nuvi 360 or 660/670/680 fit pretty nicely:
Here's a more detailed how-to - http://tinyurl.com/2k5wgt - you have to buy a slightly smaller ball-mount if you want to be able to close your cubbyhole door to cover up the Garmin. Here's a video of mine, with the door closing over it:
http://video.google.com/videoplay?do...29539572365048
Oh and also, my reception is great, I always have 5 bars.
New Member
Joined: Dec 2006
Posts: 7,337
Likes: 204
From: Edina, Minnesota
^^ Nice...
I ran this setup for awhile, but decided against it because I felt a 4.3" screen is too small when viewing from the driver's seat. I replaced this with a 7" screen, which was perfect (and much better for viewing while driving). I still have the Nuvi (great unit), but it's in the glove box and I take it when leaving the car and going on foot.
--Spike
Originally Posted by Spike100
^^ Nice...
I ran this setup for awhile, but decided against it because I felt a 4.3" screen is too small when viewing from the driver's seat. I replaced this with a 7" screen, which was perfect (and much better for viewing while driving). I still have the Nuvi (great unit), but it's in the glove box and I take it when leaving the car and going on foot.
--Spike
I ran this setup for awhile, but decided against it because I felt a 4.3" screen is too small when viewing from the driver's seat. I replaced this with a 7" screen, which was perfect (and much better for viewing while driving). I still have the Nuvi (great unit), but it's in the glove box and I take it when leaving the car and going on foot.
--Spike
OP - nice write-up.

Registered User
Joined: Sep 2004
Posts: 471
Likes: 0
From: SoCal
Originally Posted by Spike100
Nice install. Looks good.
I did my install a little differently from yours. I put the Garmin GVN52 "black box" in the small rear cubby behind the driver's seat, and ran the GPS antenna to the rear strut bar.
I bench-tested several 7" LCD screens, and decided on the Power Acoustik PT-700MHR (for its great and very sharp image). Note: The Kenwood LZ-702W Monitor (and, for the matter any and all Kenwood LCD's) displayed images just as good or better than the Power Acoustik PT-700MHR.
The Garmin GVN52, Kenwood KNA-G510 Navigation Box "black box," and the Kenwood DNX-7100 (all-in-one double-din device) are OEM's driven by Garmin. These devices use the NAVTEQ map-database and Garmin's superior application software.
And, Kenwood products support touch-screen function while the Garmin GVN-52 does not. That is simply a marketing position that Garmin chooses as the company prepares to penetrate the OEM market.
--Spike
I did my install a little differently from yours. I put the Garmin GVN52 "black box" in the small rear cubby behind the driver's seat, and ran the GPS antenna to the rear strut bar.
I bench-tested several 7" LCD screens, and decided on the Power Acoustik PT-700MHR (for its great and very sharp image). Note: The Kenwood LZ-702W Monitor (and, for the matter any and all Kenwood LCD's) displayed images just as good or better than the Power Acoustik PT-700MHR.
The Garmin GVN52, Kenwood KNA-G510 Navigation Box "black box," and the Kenwood DNX-7100 (all-in-one double-din device) are OEM's driven by Garmin. These devices use the NAVTEQ map-database and Garmin's superior application software.
And, Kenwood products support touch-screen function while the Garmin GVN-52 does not. That is simply a marketing position that Garmin chooses as the company prepares to penetrate the OEM market.
--Spike

Registered User
Joined: Jun 2006
Posts: 375
Likes: 0
From: Bay Area, CA
Originally Posted by mthreat
Or if you want a GPS that you can remove from your car and take with you, the Garmin Nuvi 360 or 660/670/680 fit pretty nicely ...
Oh and also, my reception is great, I always have 5 bars.
Oh and also, my reception is great, I always have 5 bars.
Originally Posted by mg350ZR
Do you need an external antena for this setup, or does Nuvi 660 work well without it from inside the cubby?
New Member
Joined: Dec 2006
Posts: 7,337
Likes: 204
From: Edina, Minnesota
Originally Posted by izmir41500
Will the Kenwood KNA-G510 work with the xenarc 700TSV screen seen here: http://store.mp3car.com/category_s/53.htm ? Or does it just work with Kenwood touchscreens? I've been looking for a nav unit like this for my G35.
The Kenwood KNA-G510 Navigation Box uses a proprietary connector that does not support VGA monitors. You must use a Kenwood brand display with the KNA-G510 Navigation Box. Kenwood's website lists the displays that you can use with the KNA-G510.
--Spike

