Homemade Splitter Design and Mounting
 11-24-2012, 03:16 AM
#41

I forgot to add some of those posts were super helpful.
I am still hoping someone can post pics of the posterior support. But the welding on of tabs sounds like a great idea I never thought of.
Can you post more pics of this?
And the sway bar. How much would you recommend I clear it by in it's static position to be safe?
Are ou guys able to load up onto a trailer with the splitter on? Or do you attach it at the track everytime? I'm betting on the second option.
Road Atlanta bound next weekend.

 11-24-2012, 04:46 AM
#42

https://my350z.com/forum/east-canada...blog-roll.html
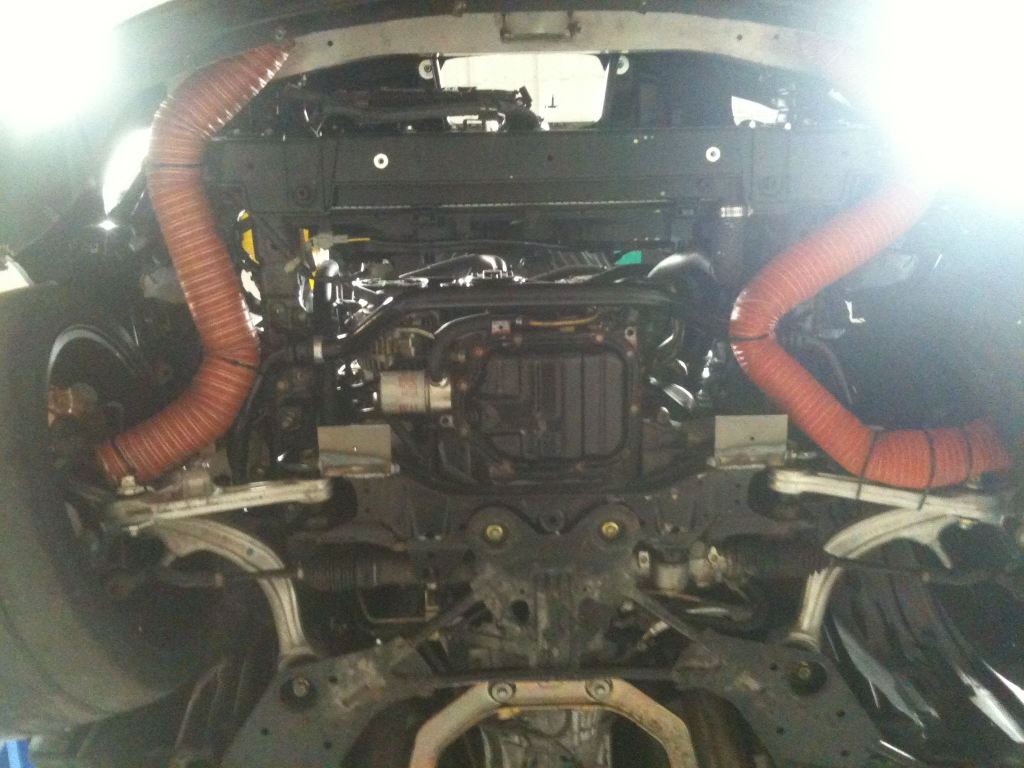
You've probably already seen this. I don't have any pics of the tabs or supports but they are similiar to what Sasha did. I welded the tabs on the bottom edge of subframe on the "flange". It sits about 1" below the sway bar and no clearance issues.
The height is such that I can get it on the trailer without removing the splitter. However, I'll work on a detachable version over the winter to allow it to sit lower.
11-24-2012, 07:13 AM
#43
https://my350z.com/forum/east-canada...blog-roll.html
You've probably already seen this. I don't have any pics of the tabs or supports but they are similiar to what Sasha did. I welded the tabs on the bottom edge of subframe on the "flange". It sits about 1" below the sway bar and no clearance issues.
The height is such that I can get it on the trailer without removing the splitter. However, I'll work on a detachable version over the winter to allow it to sit lower.
I need to learn how to weld, so I can fab up something like that. I like how many attachment points there are.
11-24-2012, 08:19 AM
#45
Registered User
 11-24-2012, 09:30 AM
#46
Registered User
iTrader: (5)

Join Date: Feb 2010
Location: Guelph
Posts: 721
Likes: 0
Received 0 Likes
on
0 Posts
Yeah that was the first time out with just support at the front and back. I ended up putting alum bars from the bottom headlight bolts to the corners and it helped alot, enough I could stand on it at any point. I also put in a couple of alum bars running the length of the piece to add a bit of stiffness (I dont think the carbon did much). Mine was mounted to the under shroud bolts in your first pic, to the bottom of the rad bolts, the crash bar (could be avoided easily) and the headlight bolts (or maybe it was the crashbar bolts).
A front 'diffuser' is ideal yes, but its a pretty technical piece to make and if the rest of the car is not flat its not going to be very effective.

The 'splitter' that you are trying to make, with or without a diffuser, will see high pressure on top and will be subjected to forces, however its not that 200lbs of -lift is all on the edge, thats generally measured at the front wheels, so its a combination of low pressure you are creating below and high above. Air hitting the front of the bumper will be forced UP over the car instead of DOWN under it. I've said this before but openings in the bumper above the splitter will reduce this effectiveness.
Anyway, the topic isn't why you are building one. BTW buy that book I recommended a while back :P
You probably dont NEED the mounts right at the front edge like I had and can probably get by like Matt does as long as there are enough solid mount points as close to the edges as possible. The rods were cheap but its difficult to do as you only have certain angles that work through the opening.
Check out this thread for some inspiration for the DIY.
http://www.timeattackforums.com/foru...my-garage.html
http://www.timeattackforums.com/foru...-diffuser.html
A front 'diffuser' is ideal yes, but its a pretty technical piece to make and if the rest of the car is not flat its not going to be very effective.
The 'splitter' that you are trying to make, with or without a diffuser, will see high pressure on top and will be subjected to forces, however its not that 200lbs of -lift is all on the edge, thats generally measured at the front wheels, so its a combination of low pressure you are creating below and high above. Air hitting the front of the bumper will be forced UP over the car instead of DOWN under it. I've said this before but openings in the bumper above the splitter will reduce this effectiveness.
Anyway, the topic isn't why you are building one. BTW buy that book I recommended a while back :P
You probably dont NEED the mounts right at the front edge like I had and can probably get by like Matt does as long as there are enough solid mount points as close to the edges as possible. The rods were cheap but its difficult to do as you only have certain angles that work through the opening.
Check out this thread for some inspiration for the DIY.
http://www.timeattackforums.com/foru...my-garage.html
http://www.timeattackforums.com/foru...-diffuser.html
11-24-2012, 11:54 AM
#47
Here are the pics of the brackets that bolt to the backside of the crash bar and go down to the splitter and attch with "L" brackets. You can see the all thread behind it too that comes down from the core support. You can also see the little brackets that are attached to the bottom of the crash bar. That is where the rod supports attach to and go down to the front of the splitter.
There are some good links in this thread posted by the other guys too. You should have a pretty good amount of info. Let us know how to decide to build it.
There are some good links in this thread posted by the other guys too. You should have a pretty good amount of info. Let us know how to decide to build it.
Last edited by Fixxxercask; 11-24-2012 at 11:55 AM.
11-24-2012, 02:04 PM
#48
Oh, by the way. I know you are trying to reduce weight and I think Rob already pulled the speaker boxes. Did that a few weeks ago and pulled about 25lbs of metal.
The hatch though is crazy heavy. 67lbs on my bathroom scale. Was going to go custom carbon but I figured I'd save the money for hp. Anyway, took out the angle grinder and cut away 30lbs from the hatch and window. With lexan window the hatch is now 32lbs. Flimsy as hell but lighter (I already have a subframe in the hatch to support the wing-another reason to get a mig ).
).
Pulled that ridiculous tail wiring harness as well. Man there's a lot of wire. May need to retain the wheel speed sensor for abs, evap stuff and the brake lights but everything else on the harness got deleted
Anybody pulled the evap system yet?
The hatch though is crazy heavy. 67lbs on my bathroom scale. Was going to go custom carbon but I figured I'd save the money for hp. Anyway, took out the angle grinder and cut away 30lbs from the hatch and window. With lexan window the hatch is now 32lbs. Flimsy as hell but lighter (I already have a subframe in the hatch to support the wing-another reason to get a mig
).Pulled that ridiculous tail wiring harness as well. Man there's a lot of wire. May need to retain the wheel speed sensor for abs, evap stuff and the brake lights but everything else on the harness got deleted
Anybody pulled the evap system yet?
11-24-2012, 02:22 PM
#49
Registered User
iTrader: (5)
Join Date: Feb 2010
Location: Guelph
Posts: 721
Likes: 0
Received 0 Likes
on
0 Posts
Do you still have the oem latch system too? Or pins of some kind? I hate that you can't open the oem latch without power. Plus some weight to lose with it out, I just didn't see an easy way to put pins in without a bracket fabricated somehow. Would have liked to make a carbon skin, small lexan window (or not) and 4 aerocatch pins, probably get it down to 10lbs or so. Plus I think the 70in carbon fabric would let me do it in 1 piece (x 3 or 4 layers). Was going to be expensive though, close to 500 in materials I think.
Mike you hear that, 35lbs waiting to be removed in the rear Get to it!
Mike you hear that, 35lbs waiting to be removed in the rear
Get to it!
 11-25-2012, 05:35 AM
#52
75lbs so far - unfortunately mostly in the back of the car. Had the car at 51/49 but weight distribution is moving toward 52/48
I wouldn't run OEM glass if you gut the hatch.
My car is a dedicated track car that is trailered and garaged. I pulled the OEM latch so use hood pins. Also pulled the fuel lid latch.
Now that the hatch is gutted I'll need to beef up the wing supports slightly. By the way if you are welding in the trunk remember the diff and evap are vented to the cross member below the rear deck.
11-25-2012, 06:07 AM
#53
I have done the same thing to my hatch. I went to it with an angle grinder to cut out a ton of the excess metal out as well. I hear you on the wire harness. I ripped all that out of the back. The only wires I have left back there are the brake lights and the wire that powers the trunk latch. I even removed the 3rd brake light.
I think my splitter weighs about 15lbs or so all together.
As for the EVAP, I have it disconnected at the engine and when I got it tuned at Dynosty, I had them remove the codes that it threw by having it disconnected. I have not actually gotten around to removing all of the hose from the rear of the car to the front and the canister. I will be doing that this winter. I also plan to do some type of CF rear hatch and rear lexan window. Car should be around 3000lbs with me in it. I think it can be less if I run the fuel down to 1/4 tank.
I have not cut the speaker box material out from the inside. I have a hangup about it. I really want to to save more weight, but I think it has to add some rigidity to the car.
Good luck. This is turning into splitter/weight savings thread.
11-25-2012, 09:32 AM
#54
Took a few photos.
The splitter is attached at the subframe with 1/8 plate tabs I welded on.
You get an idea of how flimsy the hatch becomes.
I'm not worried about the stiffness the speaker box might add. The full cage adds a lot of rigidity in my opinion. I am worried about a fire break and will be adding an 30thou aluminum bulkhead between me and the tank (with lexan at the top for a rear view - much the sg motorsport z).
11-25-2012, 04:06 PM
#55
Must be cold outside, I'm posting videos instead of working on the car.
Aero is awesome, I can't stand understeer and between the splitter and wing the balance can be set pretty well, I also run a square setup:
https://vimeo.com/49057106
That was my first time at the glen. I was treating the esses with respect, shouldn't be a problem going through there flat, but I think it would be a little scary driving through there without a wing, even at the speed of the z, so kudos to those without a wing:
http://wn.com/350z_at_the_glen
I know the guy driving this T2/3 Z is really good, but man I don't know how people can deal with the understeer. Too bad spec z didn't allow aero.
Also if you go aero take the wing/splitter off occasionally so you don't get lazy.
11-26-2012, 06:49 AM
#56
Registered User

Join Date: Dec 2004
Location: NH
Posts: 70
Likes: 0
Received 0 Likes
on
0 Posts
My first splitter attempt broke in a way that I didn't expect. I had the splitter mounted to 2 tabs I welded on in the back, the front bumper cover basically to seal it, and had most of the weight designed to go through bolts mounted to the radiator core support. The bolts pulled through the core support, and I'm pretty well convinced that the best way to do it is to go directly to the crash bar. In this pic you can see where I had tabs welded to the subframe to support it in the back.
In this pic, you can see the 2 bolts sticking down that were mounted to the core support.
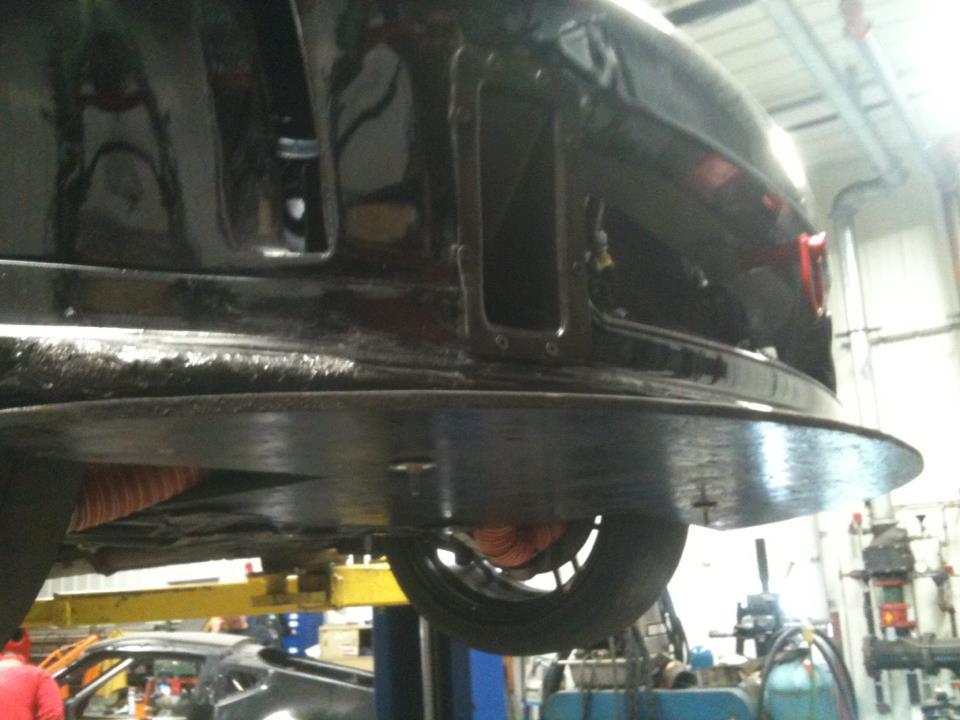
I realized what was happening right when they broke, so the splitter itself survived. I just need to make better mounts for it. I used 1/2" furniture grade plywood, and that seems to be good enough.
I actually bought the APR splitter, and it's more decorative than functional. It looks like it's based on the SCCA GT2 rules, which are more restrictive than what I'm building my car to.
As far as the SCCA T2/T3 350's, yes, they do understeer, and you have to accept that. There is a lot that you can do to reduce it some, but there comes a point where though the car may be easier to drive when it is more neutral handling, it is actually slower than when it is set up so that the car understeers. Having worked with a few of these guys, it has taken some convincing, but ultimately, if the car understeers like crazy but is 0.5 sec/lap faster than a neutral car, it's still 0.5 sec/lap faster, and that's the better way to go.
EDIT: I just watched the video of the 350Z at the Glen, that's bkleeman here, and I did a lot of the suspension setup work on that car. It's an 03 DE SCCA T2 car set up to the 2008 SCCA rules, and the ECU that was in that car is currently in mine. If you want to buy that car, I know it's for sale, and can easliy be converted to the current specs.
In this pic, you can see the 2 bolts sticking down that were mounted to the core support.
I realized what was happening right when they broke, so the splitter itself survived. I just need to make better mounts for it. I used 1/2" furniture grade plywood, and that seems to be good enough.
I actually bought the APR splitter, and it's more decorative than functional. It looks like it's based on the SCCA GT2 rules, which are more restrictive than what I'm building my car to.
As far as the SCCA T2/T3 350's, yes, they do understeer, and you have to accept that. There is a lot that you can do to reduce it some, but there comes a point where though the car may be easier to drive when it is more neutral handling, it is actually slower than when it is set up so that the car understeers. Having worked with a few of these guys, it has taken some convincing, but ultimately, if the car understeers like crazy but is 0.5 sec/lap faster than a neutral car, it's still 0.5 sec/lap faster, and that's the better way to go.
EDIT: I just watched the video of the 350Z at the Glen, that's bkleeman here, and I did a lot of the suspension setup work on that car. It's an 03 DE SCCA T2 car set up to the 2008 SCCA rules, and the ECU that was in that car is currently in mine.
If you want to buy that car, I know it's for sale, and can easliy be converted to the current specs.
Last edited by kfoote; 11-26-2012 at 11:37 AM.
11-26-2012, 10:37 AM
#57

I have done the same thing to my hatch. I went to it with an angle grinder to cut out a ton of the excess metal out as well. I hear you on the wire harness. I ripped all that out of the back. The only wires I have left back there are the brake lights and the wire that powers the trunk latch. I even removed the 3rd brake light.
I think my splitter weighs about 15lbs or so all together.
As for the EVAP, I have it disconnected at the engine and when I got it tuned at Dynosty, I had them remove the codes that it threw by having it disconnected. I have not actually gotten around to removing all of the hose from the rear of the car to the front and the canister. I will be doing that this winter. I also plan to do some type of CF rear hatch and rear lexan window. Car should be around 3000lbs with me in it. I think it can be less if I run the fuel down to 1/4 tank.
I have not cut the speaker box material out from the inside. I have a hangup about it. I really want to to save more weight, but I think it has to add some rigidity to the car.
Good luck. This is turning into splitter/weight savings thread.
I think my splitter weighs about 15lbs or so all together.
As for the EVAP, I have it disconnected at the engine and when I got it tuned at Dynosty, I had them remove the codes that it threw by having it disconnected. I have not actually gotten around to removing all of the hose from the rear of the car to the front and the canister. I will be doing that this winter. I also plan to do some type of CF rear hatch and rear lexan window. Car should be around 3000lbs with me in it. I think it can be less if I run the fuel down to 1/4 tank.
I have not cut the speaker box material out from the inside. I have a hangup about it. I really want to to save more weight, but I think it has to add some rigidity to the car.
Good luck. This is turning into splitter/weight savings thread.
11-26-2012, 04:10 PM
#60
late reply
http://grassrootsmotorsports.com/new...an-nismo-350z/
edit:
~33lbs is @ the rear. ~11 @ the front
http://grassrootsmotorsports.com/new...an-nismo-350z/
edit:
~33lbs is @ the rear. ~11 @ the front
Last edited by Voboy; 11-26-2012 at 09:16 PM.