
06 Headlight mods-the Thread of all Threads-many pix

Thread Starter


Joined: Aug 2006
Posts: 8,321
Likes: 467
From: Scottsdale/coyote drophouse
OK, so Im letting the cat out of the bag.
I went thru and did headlight mods galore on my light.
Buy all your parts from Andrew at theretrofitsource.com.. the guy is MONEY.
Heres links to what I used.
Sti R lens premium
http://www.theretrofitsource.com/pro...products_id=85
90mm Morimoto internal Iron man Halos
http://www.theretrofitsource.com/pro...roducts_id=103
Oxy Butyl rubber glue.. end of story, this is what you will use, period.
http://www.theretrofitsource.com/pro...roducts_id=792
Pack of red pre-wired LEDs for demon eye and testing.
http://www.ebay.com/itm/390364459250...84.m1439.l2649
V-LEDS.com 12" red strip led for demon halo
http://www.v-leds.com/Interior-LED-B...-p6374243.html
DEPO headlight assemblies, parted for new lenses
http://www.ebay.com/itm/310325891470...84.m1439.l2649
____________________________________________________________ ____________________________________________________________ ______
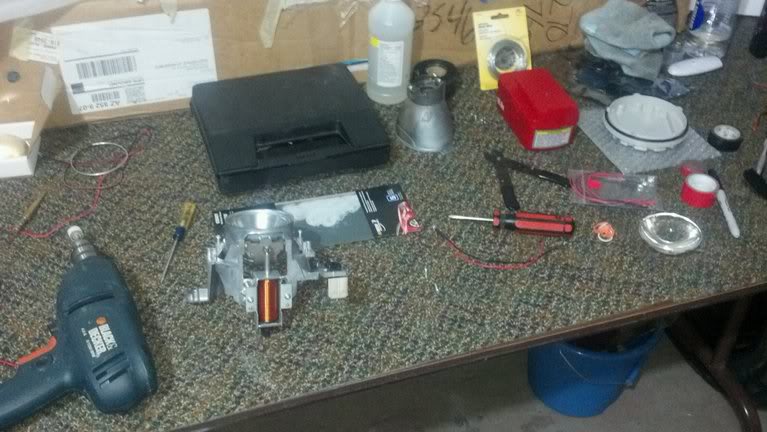
Theres alot of things you may run into when you do yours just like i had to deal with.. but I took lots of pics..surely overkill actually.. and have all sorts of answers to questions you may have.
What I DONT have is final shots of them all powered up, i just dont have a car here and test wiring them to a 9 volt battery just doesnt cut it.
I have a set of 06 lights in an 05 car, i had bad scratched lenses, and had a black out and halo mod previously done by Lightwerkz.. good work btw. They were sealed w silicone, and it was yellowing, and the lenses UV layer was toast..time to open em up and redo some stuff.. besides, I want BRIGHT daytime bright halos.
The mods are simple, yet require alot of time and patience, think of building a model airplane in your garage.. clean workspace, steady hands, lots of test fitting, and do IT RIGHT THE FIRST TIME!!!
the ol classic "tell em what youre going to tell em.. and then tell em" list of what Ill cover:
Have a semi soft sruface to work with btw>>
btw.....

____________________________________________________________ ____________________________________________________________ ______
OK so here goes..
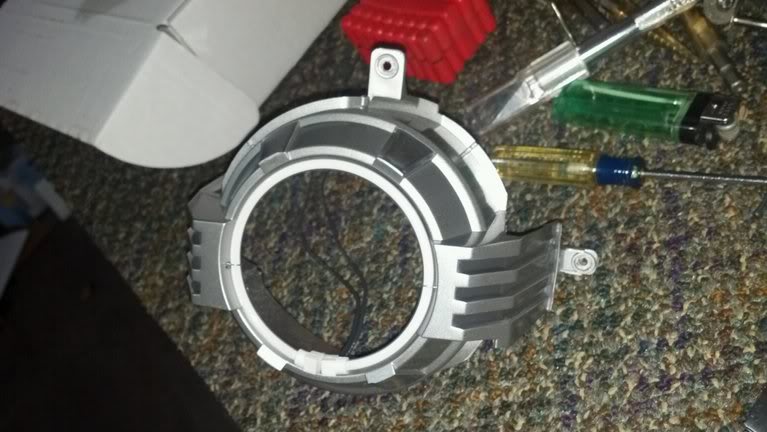
1- Opening headlights--
stop w the horror stories of melted lights.. do it right the first time.
This step is easy.. heat guns do not heat everything up evenly.. would you bake a cake w a heat gun? Mmmm. my guess is no. Opening lights w a heat gun.. can it be done? Im sure. Is it the right way? no its not. Use one to nip up the final sealing job only I say.
____________________________________________________________ ___
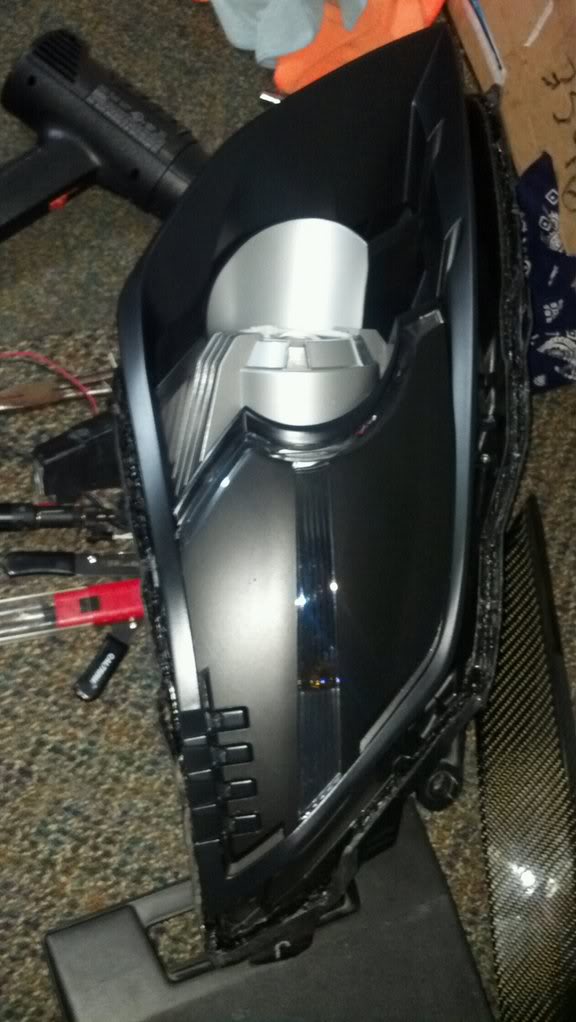
2- Sti-R lens install.
Really youll save this til the very end, but Ill show you the stuff now.
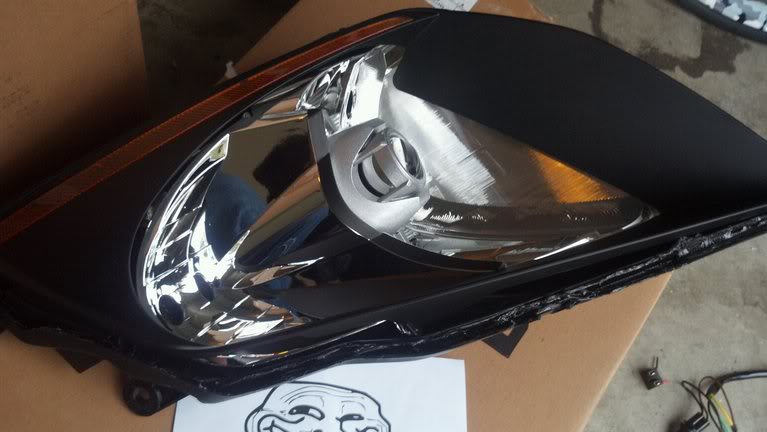
The sti R lens is clear and doesnt ahve the ridges of the OEM fresnel, it flickers, has a sharp cut off, and is thinner still than the STI standard lens which is what Lightwerkz put in for me.
Bare housing:
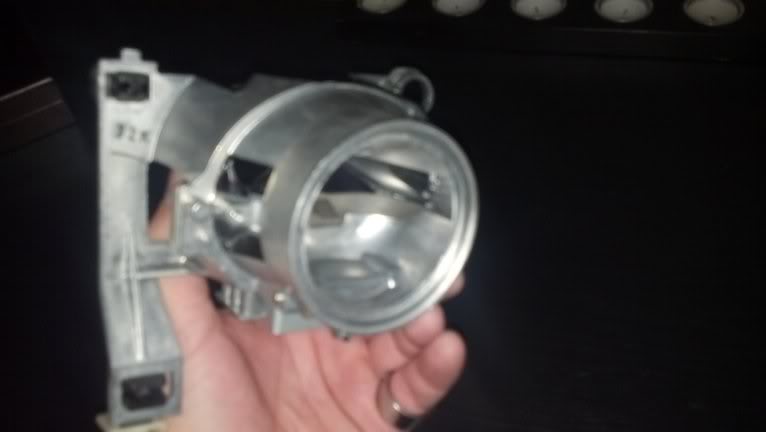
Pic w the STI in place
____________________________________________________________ ___
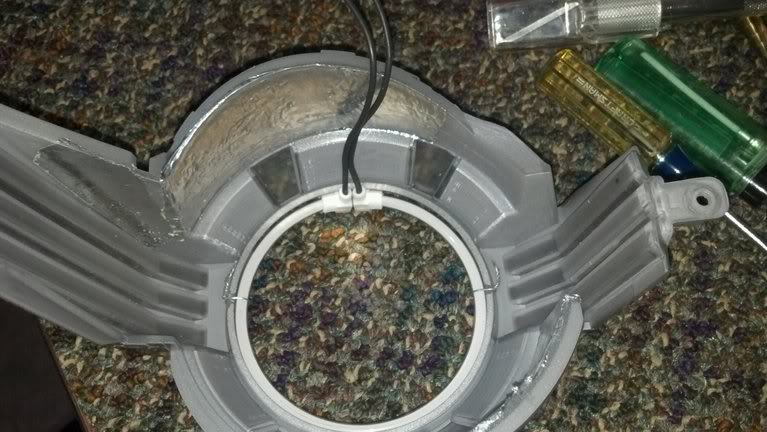
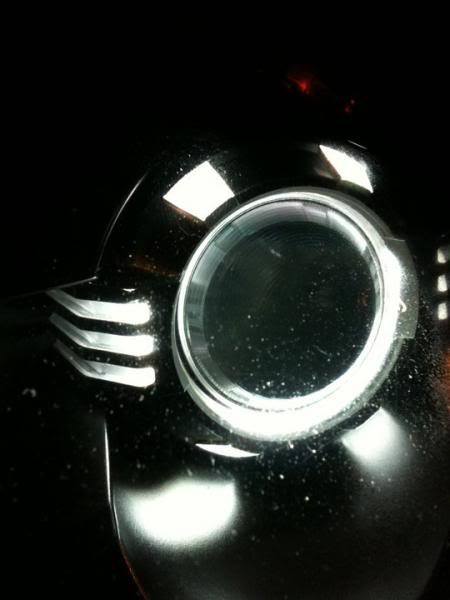
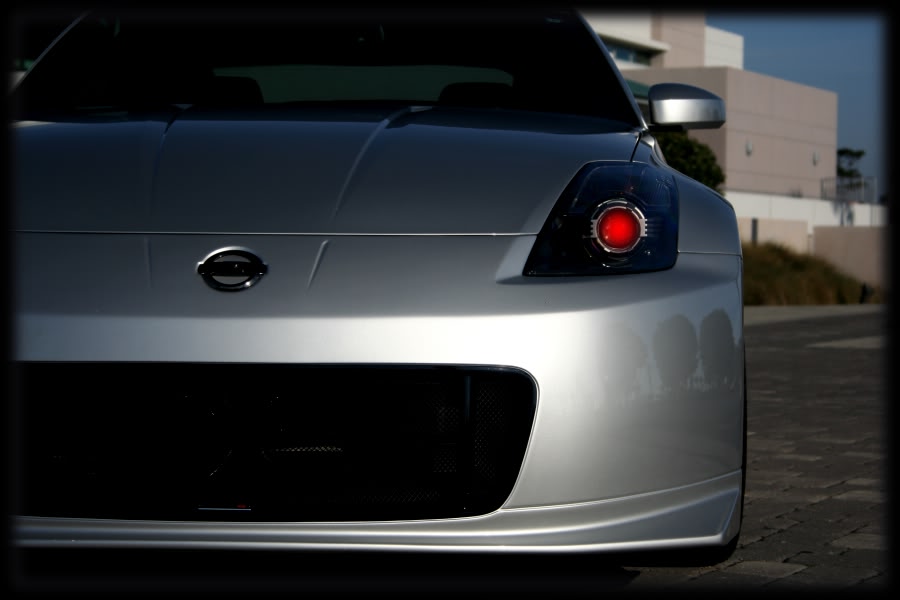
3- Adding simple red led "Demon eyes"
These are illegal to run during driving operation yal.. just do ya know..in all 50 states.. its Offroad only.
____________________________________________________________ ___
4- Oracle AAC Exterior projector DRL/Halo
OK, so as a company, these AAC guys suck my blz so Im not posting links.. they charge an arm and a leg and sell these w pictures of an Iron Man halo.. but these are actually the size of the projector housing nose only, i think like 75mm. They are thick and ARE very bright and very white ( i chose 6k white), but at 175 bucks shipped.. wtf. They wouldnt take them back, and shipped w crazy crooked wire caps.. and the replacements they sent back had a cold solder in the wire and and it simply fell off the halo.. sweet. I re soldered it myself and decided to keep them as they would not refund me. So... a friendly "F U" to AAC... see? Now im telling the world about it. Howd that work for ya?
____________________________________________________________ ___
I went thru and did headlight mods galore on my light.
Buy all your parts from Andrew at theretrofitsource.com.. the guy is MONEY.
Heres links to what I used.
Sti R lens premium
http://www.theretrofitsource.com/pro...products_id=85
90mm Morimoto internal Iron man Halos
http://www.theretrofitsource.com/pro...roducts_id=103
Oxy Butyl rubber glue.. end of story, this is what you will use, period.
http://www.theretrofitsource.com/pro...roducts_id=792
Pack of red pre-wired LEDs for demon eye and testing.
http://www.ebay.com/itm/390364459250...84.m1439.l2649
V-LEDS.com 12" red strip led for demon halo
http://www.v-leds.com/Interior-LED-B...-p6374243.html
DEPO headlight assemblies, parted for new lenses
http://www.ebay.com/itm/310325891470...84.m1439.l2649
____________________________________________________________ ____________________________________________________________ ______
Theres alot of things you may run into when you do yours just like i had to deal with.. but I took lots of pics..surely overkill actually.. and have all sorts of answers to questions you may have.
What I DONT have is final shots of them all powered up, i just dont have a car here and test wiring them to a 9 volt battery just doesnt cut it.
I have a set of 06 lights in an 05 car, i had bad scratched lenses, and had a black out and halo mod previously done by Lightwerkz.. good work btw. They were sealed w silicone, and it was yellowing, and the lenses UV layer was toast..time to open em up and redo some stuff.. besides, I want BRIGHT daytime bright halos.
The mods are simple, yet require alot of time and patience, think of building a model airplane in your garage.. clean workspace, steady hands, lots of test fitting, and do IT RIGHT THE FIRST TIME!!!
the ol classic "tell em what youre going to tell em.. and then tell em" list of what Ill cover:
Have a semi soft sruface to work with btw>>
btw.....
____________________________________________________________ ____________________________________________________________ ______
OK so here goes..
1- Opening headlights--
stop w the horror stories of melted lights.. do it right the first time.
This step is easy.. heat guns do not heat everything up evenly.. would you bake a cake w a heat gun? Mmmm. my guess is no. Opening lights w a heat gun.. can it be done? Im sure. Is it the right way? no its not. Use one to nip up the final sealing job only I say.
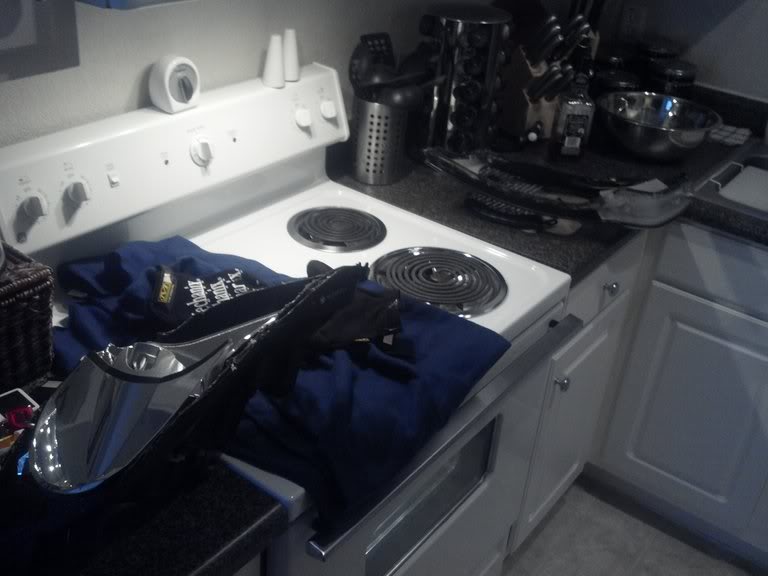
- Remove all the exterior parts and wiring possible.
- Remove your ballast, the back cap, the wire harness, etc.
- You need two small boxes btw.. put EVERYthing from each headlight in its own small box , screws wires, bulbs ( dont touch your HIDs) , and the samll screws that are located in each end of the headlights ( dont forget the one behind the driving light drl.. its sneaky hidden. SAVE THEM !!
- PREHEAT the oven to just under 250 degrees. I like to think this is about 230 degrees. DISCLAIMER: its up to you to know if you have the oven of doom or not.. I have a standard recent model apartment wonder oven.
- Set your microwaves timer to (10) TEN minutes.
- If you have a small kitchen like most of you surely do, put a towel you dont mind ruining a bit over your range stove top, have mechanix gloves ready ( they are not oven mits btw.. you still need those to touch stove parts.. i learned very quickly). Remove all racks out of the oven save for one, and mount it low enough that your headlioght clears the top element in the ove easily. if your oven is full of steak grease because your a slob, well.. clean it out for Gods sake now anyways.
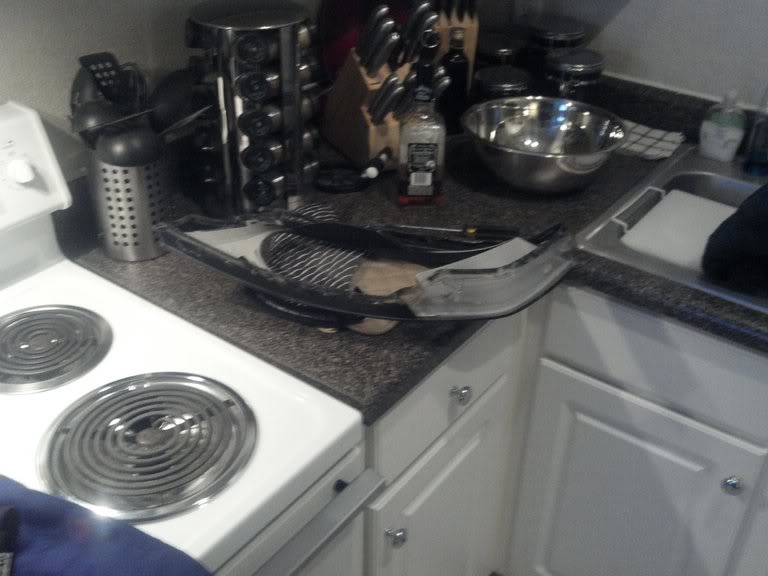
- When the timer goes off and the lights are nice n warm all over, use a flatbrade screw driver at the very front and bottom edge of the light and make a small pry to begin them opening up. The black oxy butyl glue is like cake frosting at this point. Once the entire seal is broken, they begin to slide out easily..
- Keep in mind the headlight lens likes to come of and to the front , just like if they were mounted and you were pulling them off towards the front of the car.
- Have something disposable like a spare chopstick around.. as you open the light, guide it thru the gap and use it to catch the stray stringy black glue that will spiderweb across this gap.. doing this keeps your parets clean of stray butyl glue, and your gloves, hence forth your jeans, your kitchen, doorknobs, etc.
- I recommend doing one headlight at a time until your familiar with the entire process.. theres too many parts floating around, youll feel like theres more work, no racing to beat the glue getting cooled off etc.
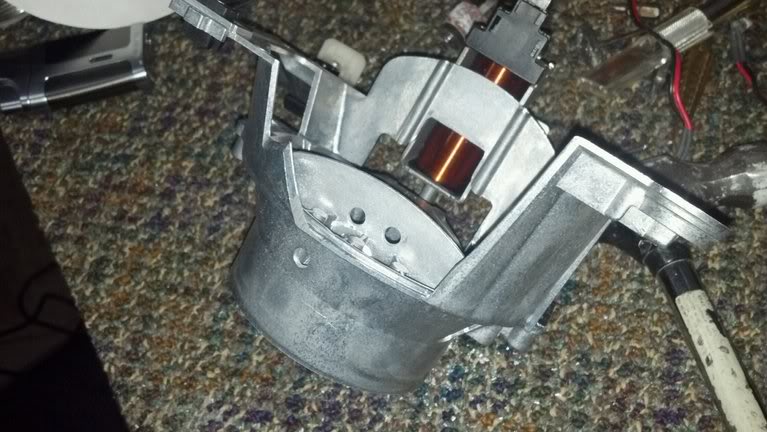
- Familiarize yourself with the guts...look at things inside the light, wiring , how the projector mounts etc.
(I took cell pics and measurements on projector mount screws so I could remove and reassemble them without being on the car and have them aimed right . )
____________________________________________________________ ___
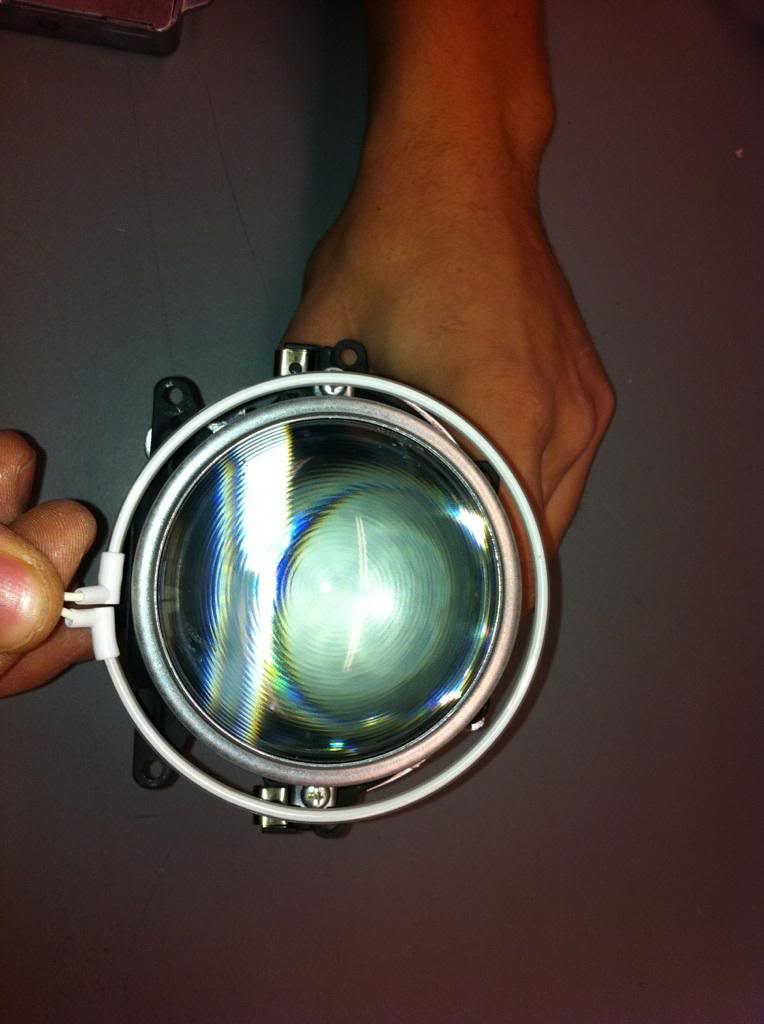
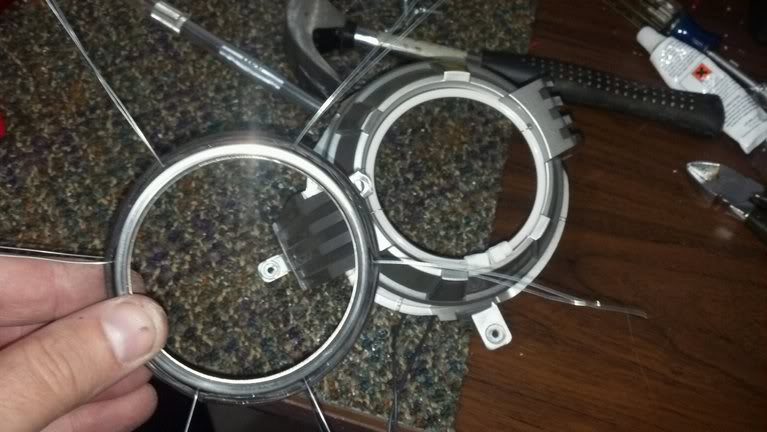
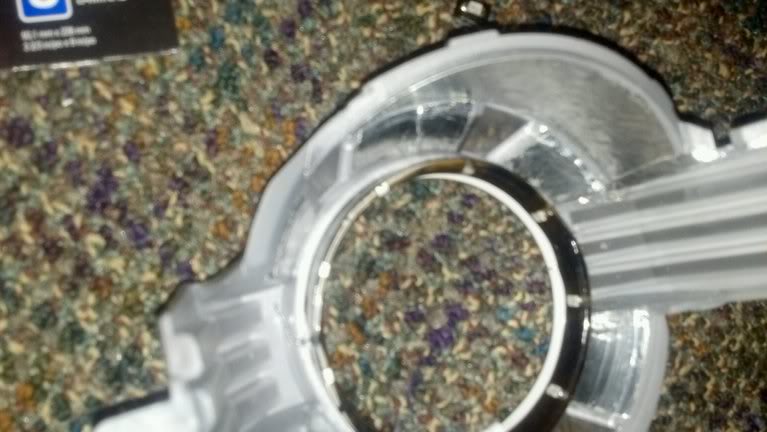
2- Sti-R lens install.
Really youll save this til the very end, but Ill show you the stuff now.
The sti R lens is clear and doesnt ahve the ridges of the OEM fresnel, it flickers, has a sharp cut off, and is thinner still than the STI standard lens which is what Lightwerkz put in for me.
- Remove the 2 screws on each side of the lens and carefully drop out the old..
- place the small metal spacer on to the projector side and seat it as best you can.
- clean the crap out of the inside of the sti _r lens. Verify no lint or fingerprints or cleaner streaks with a flashlight etc.
- Remount the lens, screw tight, and repeat cleaning process for the front side of lens.
- Triple quadruple check this before re-sealing the lights btw.. i had to reopen mine after my super thorough work becuase the only thin i forgot was the damn outside lens fingerprints.

- Done
Bare housing:
Pic w the STI in place
____________________________________________________________ ___
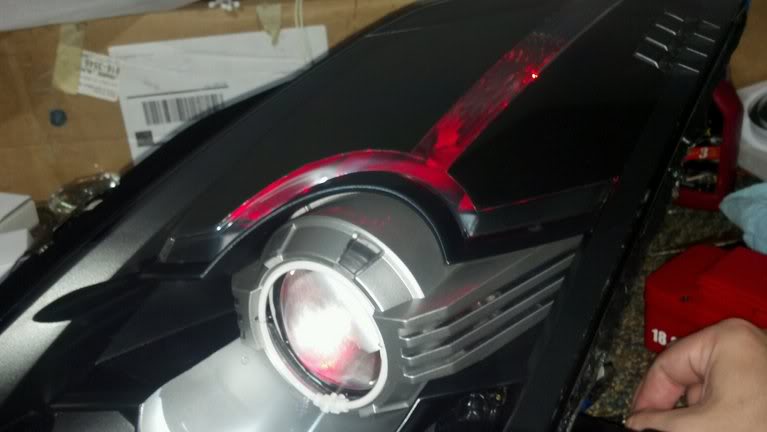
3- Adding simple red led "Demon eyes"
These are illegal to run during driving operation yal.. just do ya know..in all 50 states.. its Offroad only.
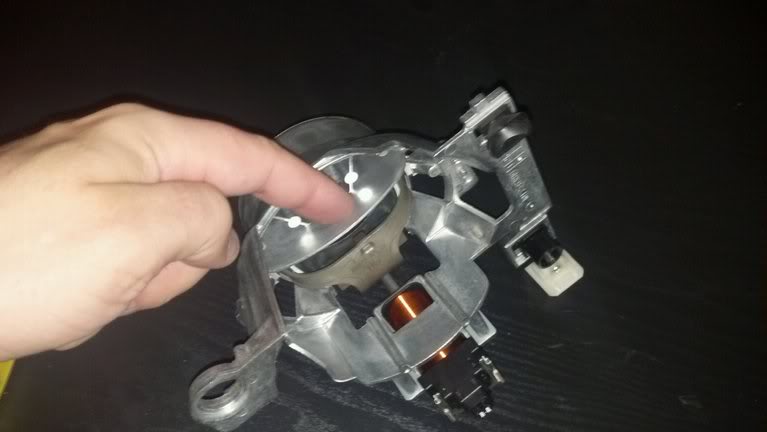
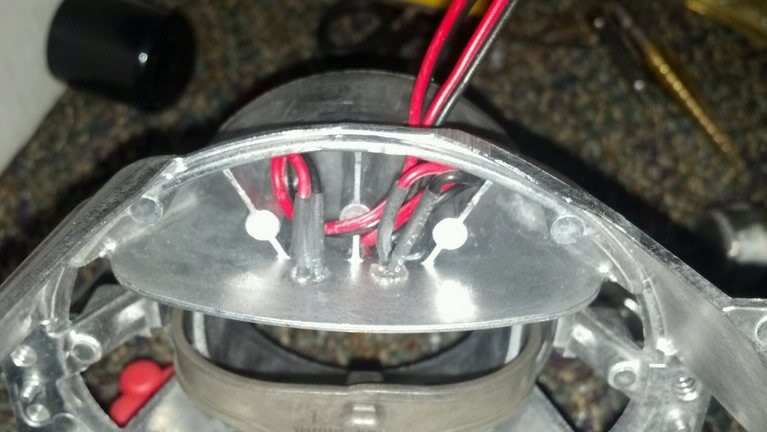
- Using the aforementioned pre wired LEDs, we will want to take the projector housing out to make working on it easier.
- Separate the reflector bowl from the lens cut off housing and store carefully. The demon eye led does not really use that reflector bowl to make its light... its the light placed into the front bowl that does it. I experimented w alot of angles and alot of LED grinds to see what worked for me.
- I decided Id use two leds for my general approcah of overkill.
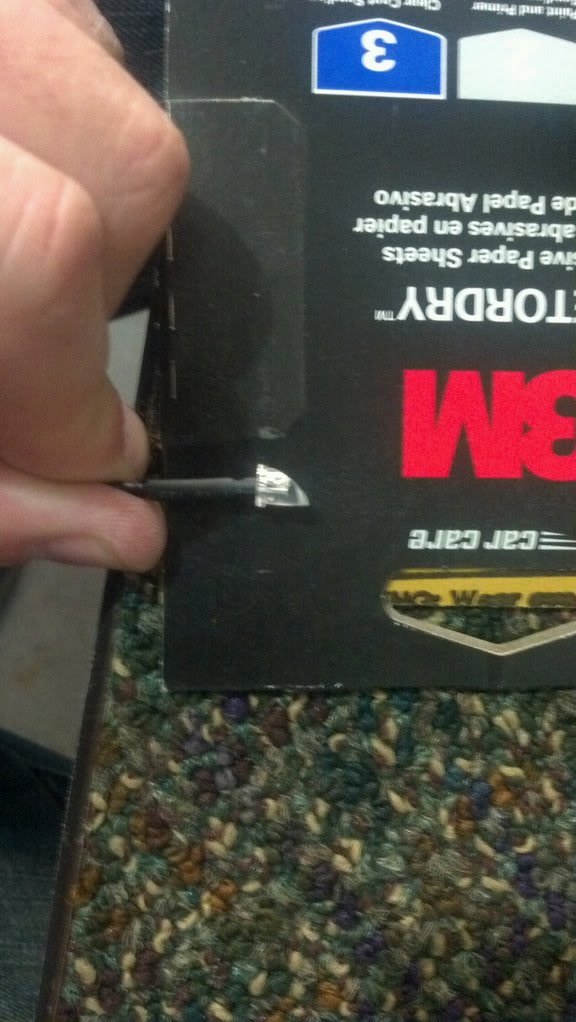
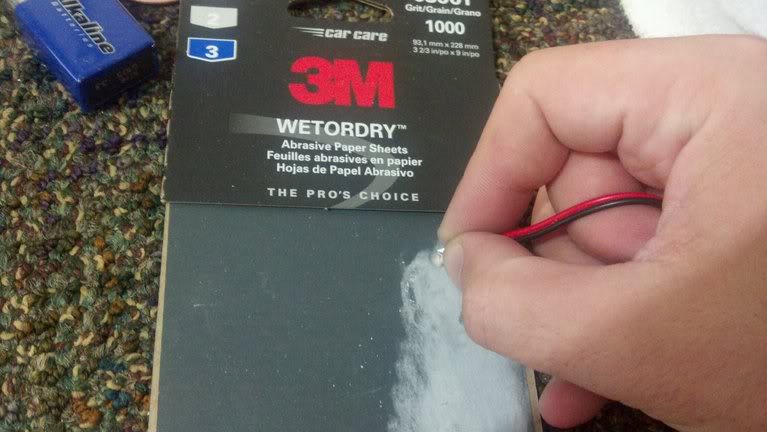
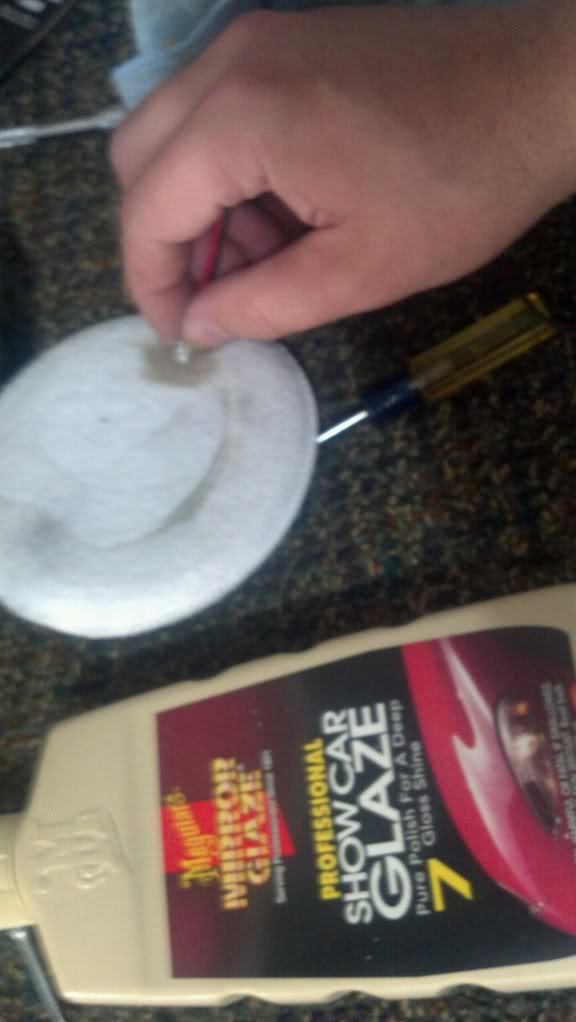
- I grinded down the top of my leds flat, then immediately ground them at an angle as shown.. this creates a laser pointer sharp blade of light that fires forward from the opposite sied of the led.. pretty cool.
- use 1000 grit sandpaper laying on the work desk after grinding w a dremel and clean up the scratches and grooves.. then apply scratch X or clear coat polish to the ends.. makes it nice n shiny.. test them w a 9 volt battery.. see? Very nice.
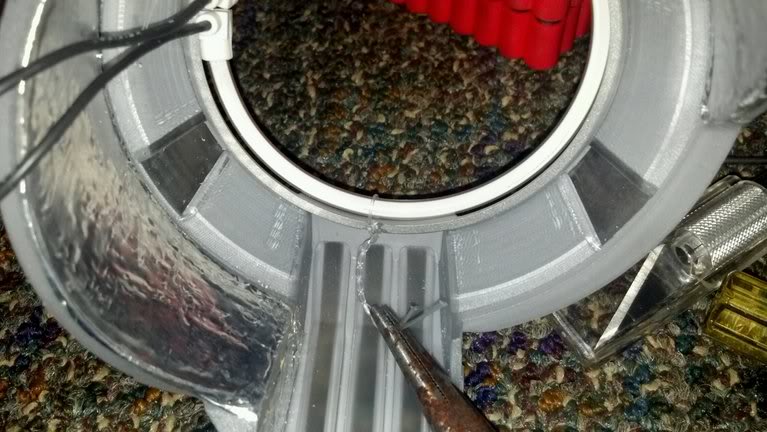
- Drill two clean holes (5mm in this case) into the top of the cutoff bowl side housing, and one slightly forward to allow the wires to come out the top and to the side of the internal ribbing.
- Place LEDs so that the angled side faces AWAY from the lens.. this is actually the side that makes that angle grind fire brightly into the lens itself, not the reflector.
- I used a dab of superglue to straightly position the leds, then used JB quick weld to permanantly affix them. Do a clean job. I use a touch of thin grey 3m tape to soften the edges of the wiring hole like a gasket, and then JB welded that sealed as well.
- Aside from chosing your wire up ( covered later) youre done. Thats it.
____________________________________________________________ ___
4- Oracle AAC Exterior projector DRL/Halo
OK, so as a company, these AAC guys suck my blz so Im not posting links.. they charge an arm and a leg and sell these w pictures of an Iron Man halo.. but these are actually the size of the projector housing nose only, i think like 75mm. They are thick and ARE very bright and very white ( i chose 6k white), but at 175 bucks shipped.. wtf. They wouldnt take them back, and shipped w crazy crooked wire caps.. and the replacements they sent back had a cold solder in the wire and and it simply fell off the halo.. sweet. I re soldered it myself and decided to keep them as they would not refund me. So... a friendly "F U" to AAC... see? Now im telling the world about it. Howd that work for ya?
- Anyways, you want to use steel wire available from Ace Hardware for this, and have some needle nose pliers handy to help twist em up.
- Also see this tutorial.. as Its what I did... and will save some of yal some reading here.
http://www.theretrofitsource.com/pdf...el_Eye_Kit.pdf - I made one hole ( in hindsight larger than necc) for my mount up.
Here's pics.. pretty explanatory. Dont tighten the too much, and take ur time planning the hole location. I only used 2 mouting spots.. all that was neccesary btw. - Mounting the ballasts will be covered later.. so for now youre done. Not so bad eh?
____________________________________________________________ ___
Last edited by bmccann101; Jan 16, 2012 at 12:44 PM.
Thread Starter
Joined: Aug 2006
Posts: 8,321
Likes: 467
From: Scottsdale/coyote drophouse
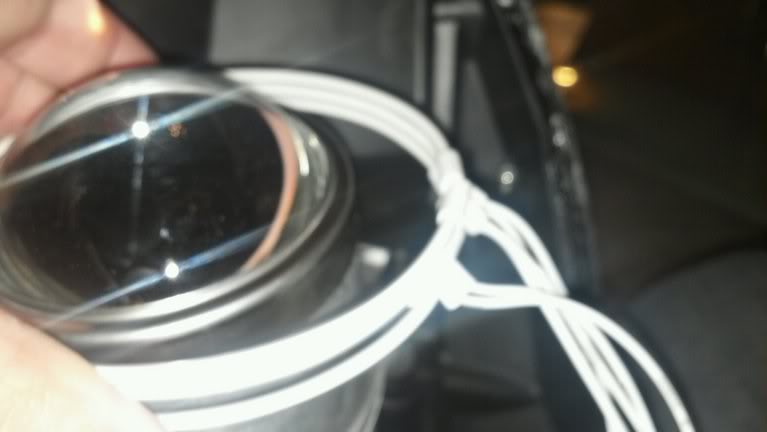
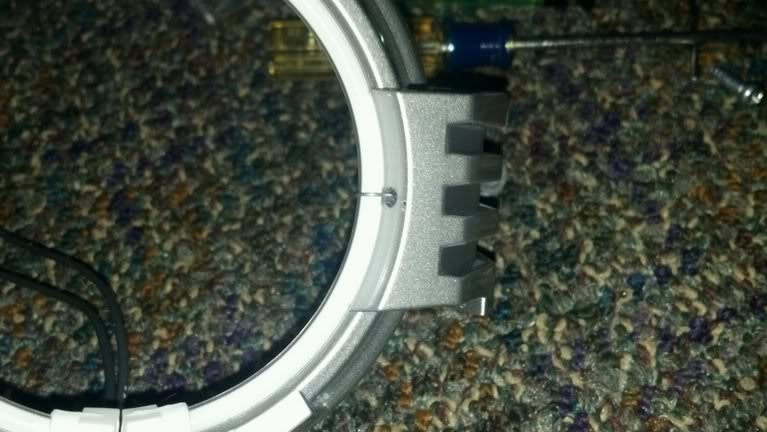
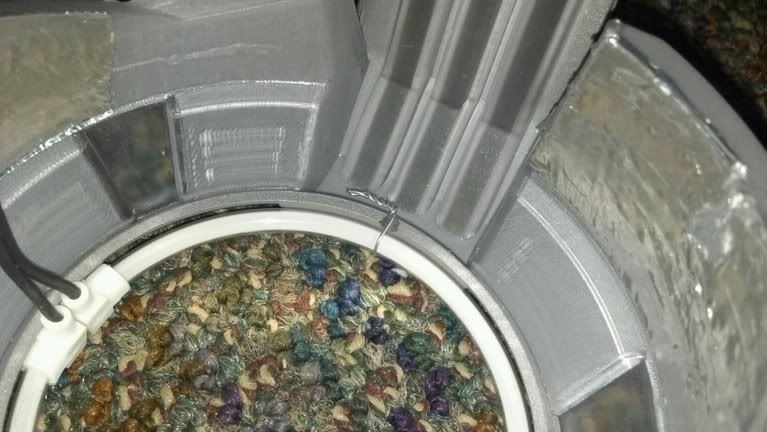
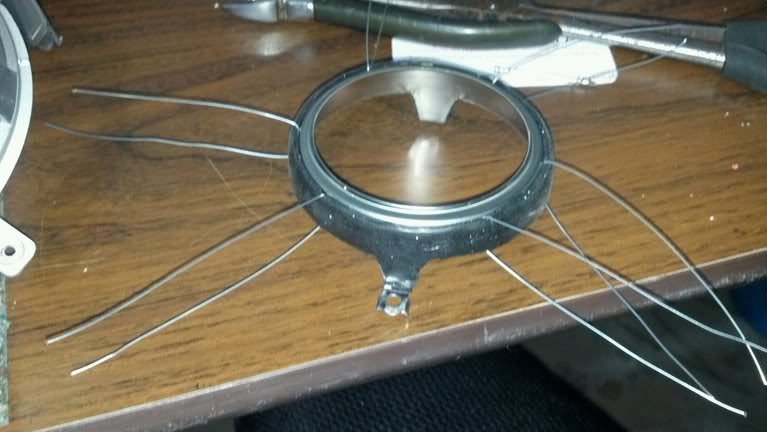
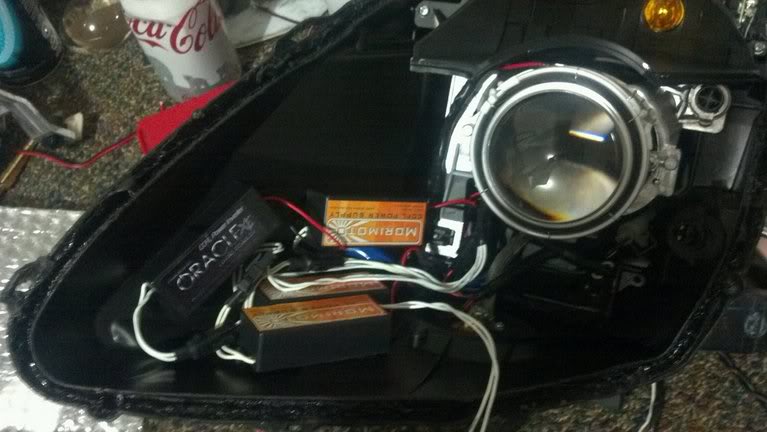
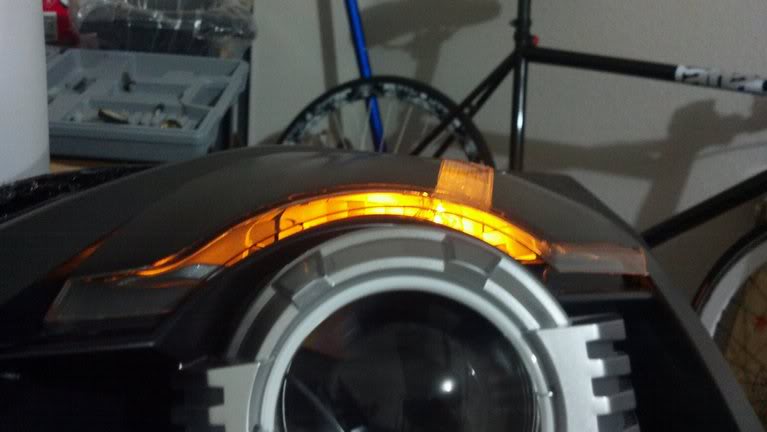
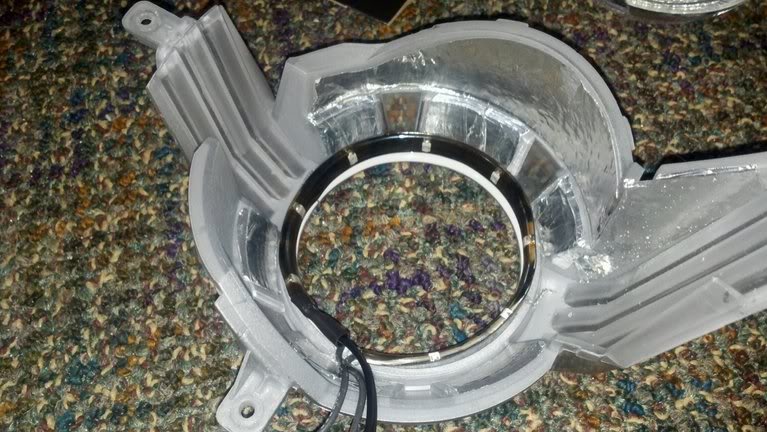
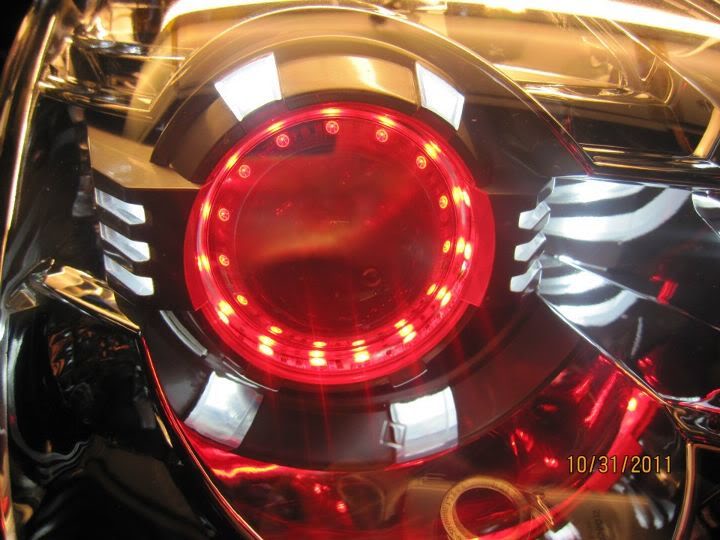
5- Moromoto Triple Iron Man HALO
This mod is easy, it took me a long time to develop a mount strategy tho. Ill save you that time. These things get hot, and glue doesnt work, and i couldnt find a good size bare ccfl that fit 100%, so i had to make up a few mms of space. I found a roll of black silicone self adhering silicone tape at a local Grainger.. 20 bucks, but is the EXACT thing to use.. cool stuff.. not sticky, but as soon as you lay it on itself, it all becomes on piece of silicone. And silicone withstands heat etc very veyr well and doesnt dry out like rubber.
____________________________________________________________ ___
6- What can you do if your exterior lenses are Hosed?
Things to know. I searched high and low.. i finally found my answers in this thread of mine:
https://my350z.com/forum/maintenance...-question.html
Buy a set of these DEPO headlights from an 03-05 Halogen car and pirate the lenses.. easy as that.. the plastic is cheaper than the OEM, but still works perfectly when the same oven process outlined above is used. It smelled more plastic-y when they came out of the oven, bt they are new and surely outgassed more.. no melting tho. Period.. was a 100% success and was easy.
Clearcoating your sanded down headlight aint the answer.. it will go bad quickly that way.. there's whats called a UV hardcoat actually imbedded in the OEM plastic. The fix I offer is a new lens all together, and has a version of this, but wont be AS resilient and good as OEM nissan.. but is cheap and is clean and is a correct way of fixing a crazed or oxidized or dea UV coat lens.
As you can see in the pictures, the DEPO brand headlight lenses have the EXACT same internal and expternal mounting points inclusing all screws, the shape etc. Its a 100% good to go fix.
Looks FAR worse in photo than in person, but the only visible difference.
____________________________________________________________ ___
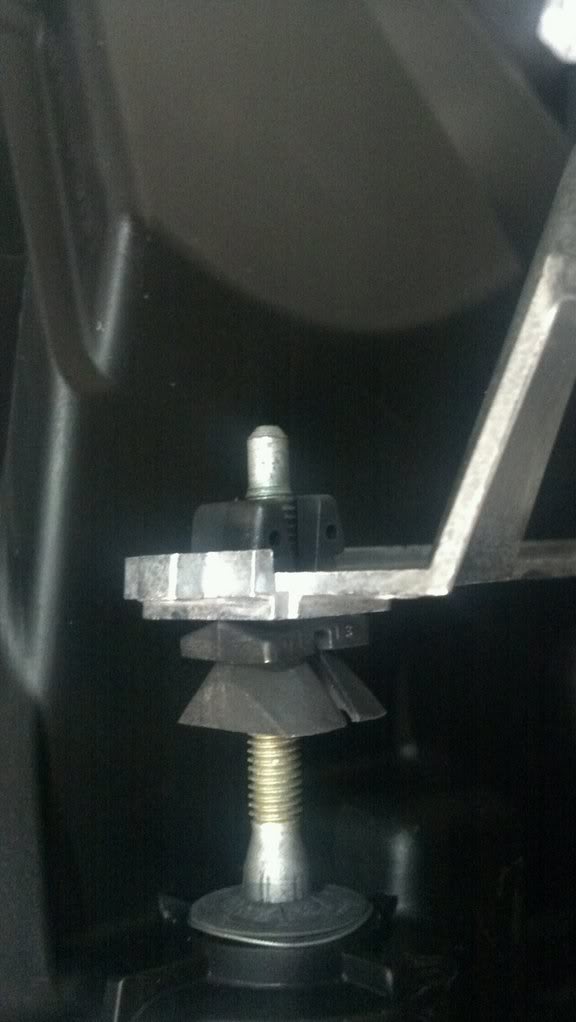
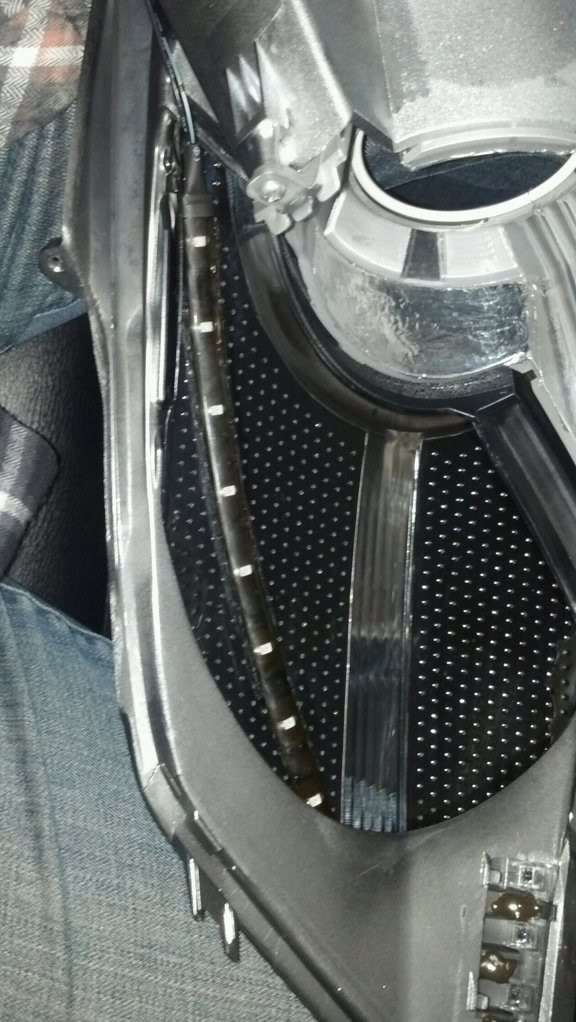
7- Ballast location suggestions
Many ppl have stated not to install the ballast inverters for the CCFL halos inside the lens.. well, they get really wet and burn out easily in outr cars in the fenderwewll, and we can remove the OEM HID ballaast as a hatch door anyways, so i said to hell w that and did it anyways. Theres a ton of room between the headlight innards you can see and the actual floor of the back of the light, but again, TEST FIT with your headlight reflector/painted parts to check for clearances.
____________________________________________________________ ___
This mod is easy, it took me a long time to develop a mount strategy tho. Ill save you that time. These things get hot, and glue doesnt work, and i couldnt find a good size bare ccfl that fit 100%, so i had to make up a few mms of space. I found a roll of black silicone self adhering silicone tape at a local Grainger.. 20 bucks, but is the EXACT thing to use.. cool stuff.. not sticky, but as soon as you lay it on itself, it all becomes on piece of silicone. And silicone withstands heat etc very veyr well and doesnt dry out like rubber.
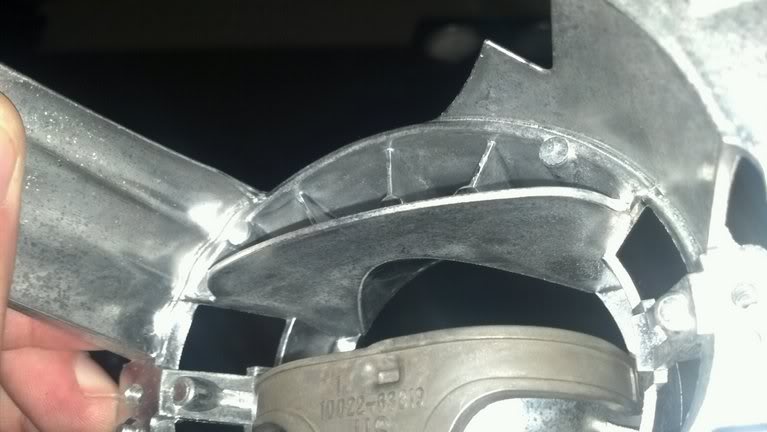
- I used 3, you really only need one. taking your lose and free projector lens mount ring, begin wrapping with the silicone tape until you reach a thinckness about 1/16 inch.. test fit your halo/halos. You do NOT want it tight, just a decent fit.
- Hold it up to your disassembled headlight projector cover.. the clear spots ( sanded out and polished by Lightwerkz ..or by yourself in this case).. and take note or mark it where the opaque sections are.. this is where youll use your wire so its not visible when the lights are on.
- My first side was OVERKILL.. you really only need 3 to four moutning points.. the more you use, the more chances to break Halos.. i re ordered 4 times ( fast shipping by Andrew btw.. props) as I installed, testedmad broke halo after halo.. I am sparing you that expense.
- I used a picture hanging nail to slip under the silicone gasket i made to allow the thin wire to pass under at the desired locations..
- Gently bend the wires up and around the halos towards the backside of the ring and gently twist w your pliers as you did before until they are well twisted but simply contacting the halo rings well.. and are NOT tight.
- Snip all but a 1/4 inch and you can use the pliers to gently bend that wire to make a nice j hook to hold down your halos wire after you mount it back.
- Re mount your lens ( see above.. CLEAN IT INSIDE!!) and CAREFULLY screw the ring back to the housing.
- Run your halo wires nealty across the housing, zip tie off where necessary.. ballasts and wiring covered later.. youre done.
____________________________________________________________ ___
6- What can you do if your exterior lenses are Hosed?
Things to know. I searched high and low.. i finally found my answers in this thread of mine:
https://my350z.com/forum/maintenance...-question.html
Buy a set of these DEPO headlights from an 03-05 Halogen car and pirate the lenses.. easy as that.. the plastic is cheaper than the OEM, but still works perfectly when the same oven process outlined above is used. It smelled more plastic-y when they came out of the oven, bt they are new and surely outgassed more.. no melting tho. Period.. was a 100% success and was easy.
Clearcoating your sanded down headlight aint the answer.. it will go bad quickly that way.. there's whats called a UV hardcoat actually imbedded in the OEM plastic. The fix I offer is a new lens all together, and has a version of this, but wont be AS resilient and good as OEM nissan.. but is cheap and is clean and is a correct way of fixing a crazed or oxidized or dea UV coat lens.
As you can see in the pictures, the DEPO brand headlight lenses have the EXACT same internal and expternal mounting points inclusing all screws, the shape etc. Its a 100% good to go fix.
Looks FAR worse in photo than in person, but the only visible difference.
____________________________________________________________ ___
7- Ballast location suggestions
Many ppl have stated not to install the ballast inverters for the CCFL halos inside the lens.. well, they get really wet and burn out easily in outr cars in the fenderwewll, and we can remove the OEM HID ballaast as a hatch door anyways, so i said to hell w that and did it anyways. Theres a ton of room between the headlight innards you can see and the actual floor of the back of the light, but again, TEST FIT with your headlight reflector/painted parts to check for clearances.
- Apply di-electric grease ( just a touch) to all connectors. Zip tie wires up where need be.
- Leave slack so they can be plugged in while in halves during the reassembly and re-sealing process. ( necc for the exterior AAC Oracle halo mod only)
- Solder all wires, do not crimp connect
- Seal all solders w a small piece of black electric tape, but cover all wiring when finished w the silicone tape, makes for a very clean install, which I am a fan of even if its pointless. (Just frikn do it. )
- I used 3m grey/red double sided tape to mount along with a heat gun, and placed in such a way that gravity wasnt going to pull on them much when it goets hot outside. Id hate to end up with a werid rattle or a short from an unplugged wire froma ballast that fell of its mount.
- See all this stuff i think of?
____________________________________________________________ ___
Last edited by bmccann101; Jan 16, 2012 at 10:54 AM.
Thread Starter
Joined: Aug 2006
Posts: 8,321
Likes: 467
From: Scottsdale/coyote drophouse
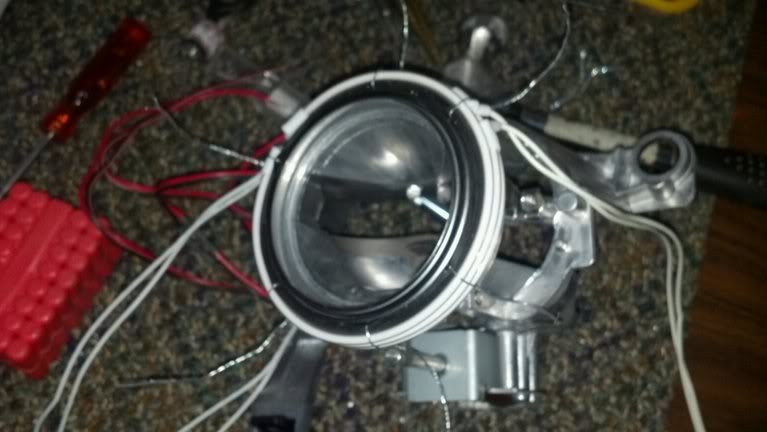
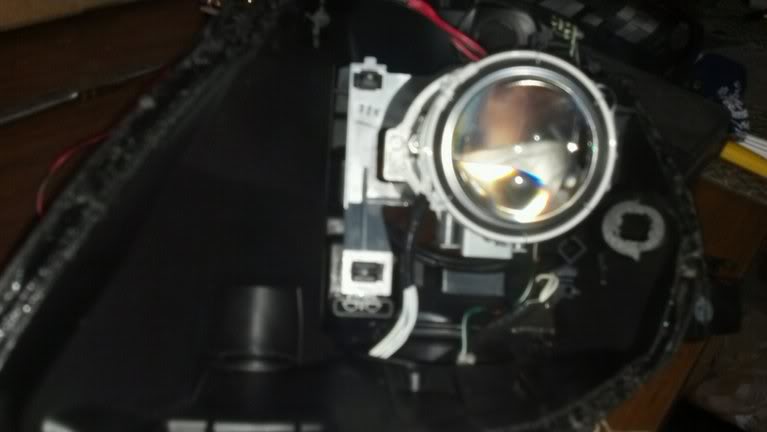
8- Wiring locations
Depending on how many of these mods you want to do, this can range from very basic to not so basic.
If you are modding anything that will only operate with the headlight switch, this can be done 100% internally. The dark green and black wires running to the OEM LED array at the top corner of your light can be tapped for halos very easily and is fully concealed inside the light, and if you leave enough slack, can even be serviced in emergency by removing the OEM HID ballast for access. Think ahead.
____________________________________________________________ ___
9- How to get addtnl wiring outside the headlight properly
____________________________________________________________ ___
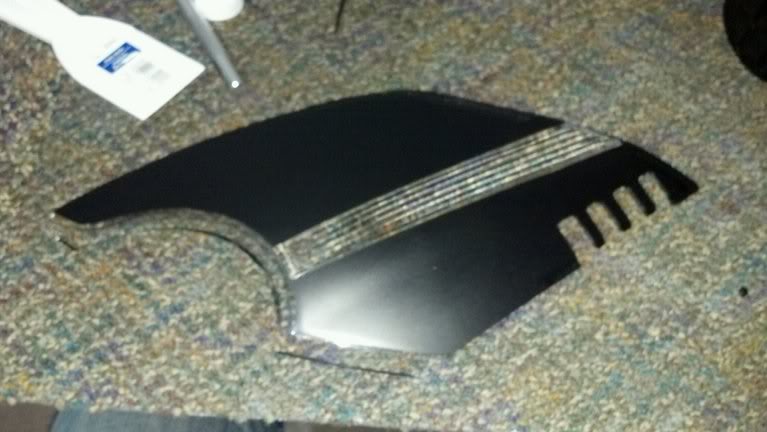
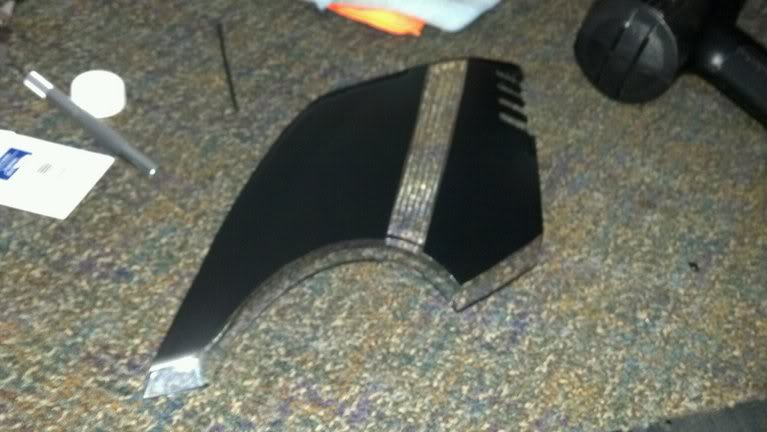
10- Turn Signal mods
Im showing you pictures, but Id ask that you do your own thing, dont bite my design damnnit.
I used the same black 3m vinyl as is on my entire car.. i think its a cool idea.
____________________________________________________________ ___
11- Demon eye strip Red Halo.
I ended up removing this as I ran out of room due to tthe whole 3 Halo thing, but here's how its done.
In case you get a wild hair, I did try thi.. but I felt it was too much.. had to step abck and tell myself to STOP it. But here, at least theres pics for ya. I tried the red LED strip isdie the turn reflector bowl to go along w the demon eye projector led:
Not my style, but hey, you saw it here first.
____________________________________________________________ ___
Depending on how many of these mods you want to do, this can range from very basic to not so basic.
If you are modding anything that will only operate with the headlight switch, this can be done 100% internally. The dark green and black wires running to the OEM LED array at the top corner of your light can be tapped for halos very easily and is fully concealed inside the light, and if you leave enough slack, can even be serviced in emergency by removing the OEM HID ballast for access. Think ahead.
____________________________________________________________ ___
9- How to get addtnl wiring outside the headlight properly
- FYI:If you are doing the Demon Eye mod, thats not legal, period, anywhere.
- I decided to add a relay to run this. All of it is external to the headlight btw.. but it allows it to operate flicker free when the dome light is on as i walk to my car at night after unlocking it.. no flicker.. when the relay looses enough voltage to trigger, it wil simply cut it off sharply.
- But.. i reccomend locating the rubber wiring grommet on the botom of the headlight.. it runs the high beam switch light and the LED DRL wires into the headlight.
- Most wiring you'll pass outside of the light is VERY small guage. Use a safety pin and put a microscopic hole in the grommet.
- Lube wires w di-electrioc grease, push wires thru. This will be a VERY snug hole and wont require any sealing. ( your lights are vented btw, THEY ARENT AIRTIGHT)
- There's enough room on that grommet to pass 2-3 small guage wire groups thru it easily.
____________________________________________________________ ___
10- Turn Signal mods
Im showing you pictures, but Id ask that you do your own thing, dont bite my design damnnit.
I used the same black 3m vinyl as is on my entire car.. i think its a cool idea.
____________________________________________________________ ___
11- Demon eye strip Red Halo.
I ended up removing this as I ran out of room due to tthe whole 3 Halo thing, but here's how its done.
- Feel free to buy color change or any color.. 5-6k whiote looks bad @ss too btw.
- The effect is far brighter and in your face than the simple Demon eye LED trick is.... but its a different look.
- Take your 12" strip, and note your cut lines, and remove a few linches.
- Test fit the strip in side the inner edge of the projector housing
- Test the LED strip before glueing so that you can see they all still light up after cutting..
- pay close attetntion to the relationship of the leds.. line them up so they lay straight and so that both sides will match..
- Unpeel the sticky side and place them correctly inthe housing. put a small dab of superglue on the side of one section to anchor part of it down, it will come unstuck alot until youre 100% done.
- Use a heat gun to warm all parts, and press the adhesive in place in a permanent fashion.
- Dab touches of superglue to the edge of adhsive strip inside the housing for a better seal.
- I used a spare sti lens as a weight and sta it faced down between to boxs as support while it all dried. Worked very well.
- When its all dried, you ahv a alrge section of the adhesive strip bared to the world, and maybe even visible thryu the iron man windows.. if it were I, id take some black electrical tape and cover the sticky side, trim the excess w a razor, and then Id know that it wont collect dust or drit ever and be seen.. again, think ahead.
- Wire to what every youd like ( DRL parking lights if its a halo, see above) or out thru the grommet (if it its separately switched red/demon eye/illlegal etc).
In case you get a wild hair, I did try thi.. but I felt it was too much.. had to step abck and tell myself to STOP it. But here, at least theres pics for ya. I tried the red LED strip isdie the turn reflector bowl to go along w the demon eye projector led:
Not my style, but hey, you saw it here first.
____________________________________________________________ ___
Last edited by bmccann101; Jan 16, 2012 at 10:55 AM.
Thread Starter
Joined: Aug 2006
Posts: 8,321
Likes: 467
From: Scottsdale/coyote drophouse
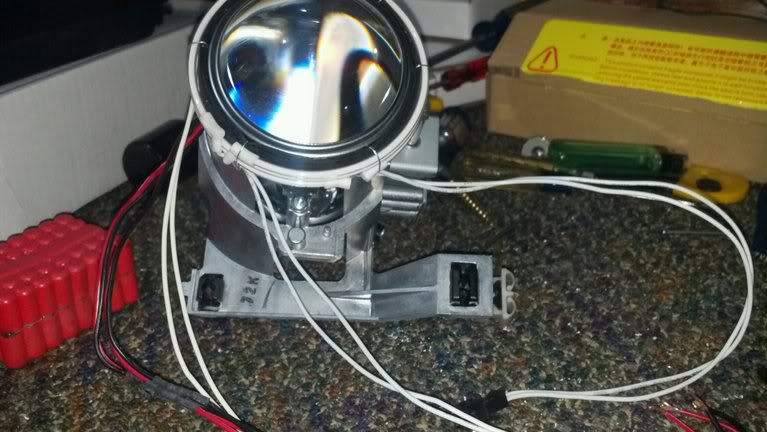
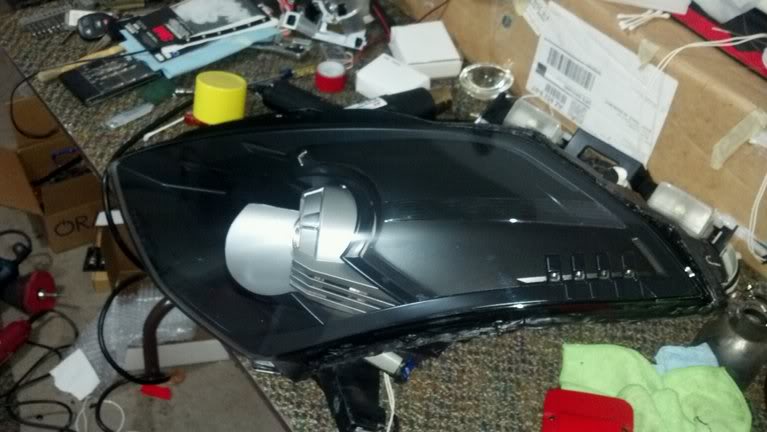
12- cleaning and reassembling the lights
Pretty basic, but your had your greasy paws on EVERYTHING at this point. Nothing will make your lights more lame than fingerprints and dirty parts ( no not those dirty parts) that you cant get to once its sealed back up. They will be lit up and highlighted.. it sucks. Again, ask me how I know.
Wax it up, let it dry. Buff it off.
Finished light w DEPO lens
____________________________________________________________ ___
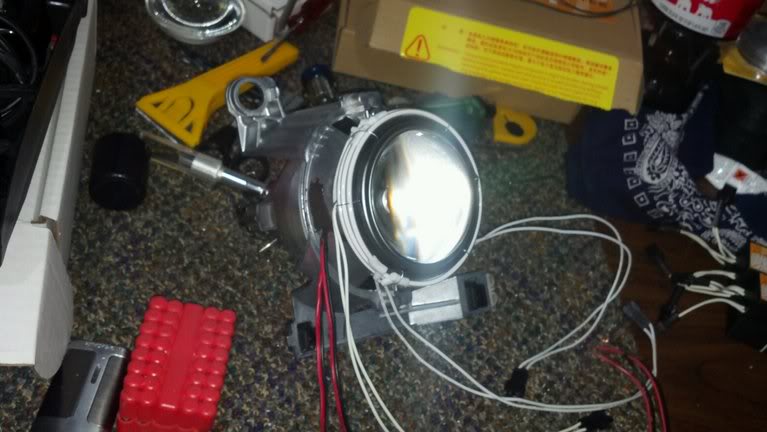
Dont thank me, thank Wells Fargo as Im getting paid 2.5x wage for being in on a Holiday (MLK) writing this for you guys.
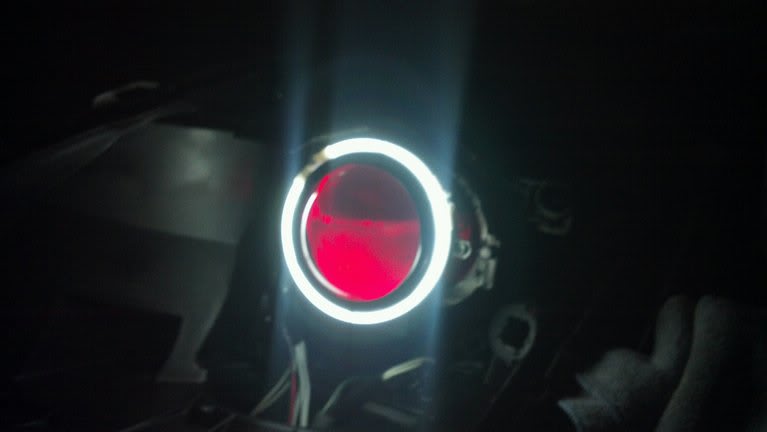
Here's a test shots of parts of it fired up becuase its all im really lacking here so far. I will of course update this once they are installed on the car in every fashion, but I cant say when that will be just yet.
LED demon eye w ONE internal HAlo fired up..
Upon request for ppl who may not know what these mods even are, here are some expamples.. these are not my car, i got them off google images, some are memebr cars here. This is not my work, again, just examples of the mods listed above executed for those who dont know.
exterior halos:
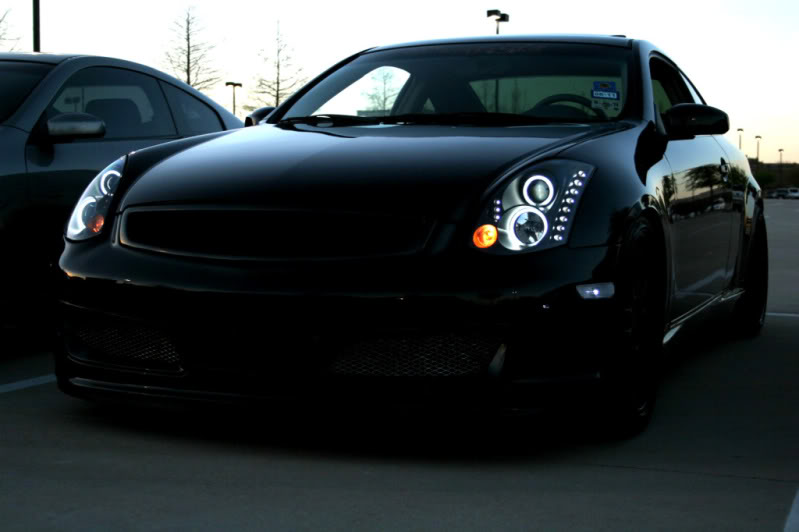
Iron man halos ( internal) :
Demon eye led inside housing:

demon eye led strip ( shown w iron man ccfls):
Pretty basic, but your had your greasy paws on EVERYTHING at this point. Nothing will make your lights more lame than fingerprints and dirty parts ( no not those dirty parts) that you cant get to once its sealed back up. They will be lit up and highlighted.. it sucks. Again, ask me how I know.
- Have truely lint free cloth available,and several of them at that.
- Use alcohol to lightly wipe over everything.
- Check the cleanlines of the projector lens.
- Check all your wiring termninations for slack, insulation tape etc.
- Test fit things together to see if wiring or mounting points interfere now
- Use a 9V battery to test all connections again.. you can check the parking lights circuit easily by pulling the plug for the OEM drl bulb and hitting it w electricity there.
- CCFL halos wont fire up fully w a 9V battery, but you can still check the connection that way, just dont freak out when they appear blown out and dim as all hell this way. They will perk right up w 12v... btw using 2 halos per ballast halves the brightness.. when at all possible, use a ballast per ring.. its far brighter.. I tried the double output ones.. meh.. no good, so I jsut tied one output off. I used a single one for each, with far better result.
- Lightly dust the inside of the full headlight lens, but leave it be.
- Apply a stretched out and THIN bead of the Oxy Butyl rubber glue to the entore assembly if your old OEM Nissan glue was toast.. hopefully you scooped out as much as you could before it cooled down in step one.
- If you add too much, it requires alot of force to squeeze thru it during re-assembly. Use whats necessary, overkill is a PITA here.
- Repeat the oven process in the first phase, oven at 250, prehated, 10 minutes.
- You will have ton of wiring on now that you didn't before, but the low heat is fine.. just make sure the wires arent hanging onto the heat element tho!!
- Have some longer versions of the outer mounting screws available to start the allignment process. I used a small allen wrench to find the hole and to line things up using leverage. Then a longer version of the extrenal screws was threaded and pulled on w pliers and I pushed the halves back to gether.
- with the headlight aligned and ready to be really pressed back into shape, place it all back in the over... again, 10 minutes at just under 250 degrees.
- remove the headlight and press it tightly back together.. a good guage of the completion of tis seal is the tun signal bowl to inner painted guts line.. youll see if there's a gap or not in that area.. if there is a gap.. push more and the rest will be done by the final screw tightening.
- Remove the line up screws and replace w your OEM screws.. I shose to add a thin washer to really add some good pressure back to the fixture. The housing is soft plastic, too tight and they can disappear right thru it. The washer really helped out alot.
- Tighten all screws until they are snug..if you still ahve that turn signal bowl gap, keep going, and reheat for 4 minutes now if it has cooled down... your first time you will surely not get it all fast enought. Its perfeectly fine.. tis not a race and its not rocket science.. just reheat it and keep going.. the goal is a correct seal and alignment, not a fast job.
- Beofre its 100% cooled and after its alligned and all tightened down, smooth out the rubber glue w the supplied rubber block.. if you use your fingers, you WILL lose the skin on your finger tips like a snake withinn the week.. its powerful stuff, and altough its not sticky like its stuck to your fingers like paint, it is strong enough to searate your outer layer from the skin layer beneath. If youve ever used a finger to push/ roll up 3m gray tape, it HURTS for days afterwards. This stuff is far worse oddly enuugh.... Eating Zipps Honey Gold extra crispy chicken wings the next day sucks.. if they are good n hot, its impossible haha. Ask me how I know.
- You will undoubtedly have some of that black rubber glue on your headlight lens
- at this point too... not to fear. Use a microfiber cloth and healthy amount of wd40 aerosol spray and it will come off very easily.
- Clean the WD40 from the lens w some good glass cleaner, I always use the Stoner brand.. very fitting in many ways..hmm.

- Use an acrylic UV sealnt product on the outside now if you have it, or at least use Meguiars polish, followed up by a good coat of Meguairs Carnuaba wax, the banana stuff.
- Go lightly and dont scratch things.
- Re install, wire up to your switches, and enjoy.
Wax it up, let it dry. Buff it off.
Finished light w DEPO lens
____________________________________________________________ ___
Dont thank me, thank Wells Fargo as Im getting paid 2.5x wage for being in on a Holiday (MLK) writing this for you guys.
Here's a test shots of parts of it fired up becuase its all im really lacking here so far. I will of course update this once they are installed on the car in every fashion, but I cant say when that will be just yet.
LED demon eye w ONE internal HAlo fired up..
Upon request for ppl who may not know what these mods even are, here are some expamples.. these are not my car, i got them off google images, some are memebr cars here. This is not my work, again, just examples of the mods listed above executed for those who dont know.
exterior halos:
Iron man halos ( internal) :
Demon eye led inside housing:
demon eye led strip ( shown w iron man ccfls):
Last edited by bmccann101; Jan 17, 2012 at 10:39 AM.
Trending Topics


Thread Starter
Joined: Aug 2006
Posts: 8,321
Likes: 467
From: Scottsdale/coyote drophouse
yeah sorry, Ill fire up a few w a test battery tonight and post more final pics into the above links under an edit. Thers just no pics of the guts of ths stuff online for reference, and everyones afraid to tackle it themselves, thus companies charge us 600-3000 bucks to do this for us.. not worth it.. DIY or die.


Awesome write-up man!! Your lights look great, and Im hoping to start this soon, as I will be following your process to the T. Not using your ideas, but using yours as a guide. I have different halos, and Im gonna use green leds for my demon eye as well.
Also I was wondering If you you read about the guy who painted this part blue? to make his lenses look blue at certain angles? Or am I thinking of a different part? I want to paint mine black, so I have an all black look in my headlights.
Also I was wondering If you you read about the guy who painted this part blue? to make his lenses look blue at certain angles? Or am I thinking of a different part? I want to paint mine black, so I have an all black look in my headlights.
Thread Starter
Joined: Aug 2006
Posts: 8,321
Likes: 467
From: Scottsdale/coyote drophouse
I did read that.. all i know is that it gets HOT up in there. big time.
I used a wire brush on my dremel and got the oxidiation out of that bowl, then wax sealed it back again.. dunno tho man.. not sure what it would do to the beam at all.. im sure its fine tho, id stay away from black tho if youre going to do the demon eye mod.. no reflectivity.
also for those who didnt know what these mods are, i edited the bottom of the post chain w pictures of examples.


Registered User
Joined: Jan 2011
Posts: 38
Likes: 0
From: jacksonville
Awesome write-up and pics. I pulled mine apart for Iron Man and Demon eye but dislodged all the solders on the halos while fitting em. Got pissed and closed em up with just Demon eyes. Now Ive got the itch to bust em open again and go for the gusto. Mad props on that vinyl overlay design for the turn signal! That never crossed my mind, maybe ill test it out and do a "Z".
that is the worst thing selling a car to a friend. i sold my old evo to my friend i saw all the time, was sad. like watching your woman getting ****ed by your best friend :/

Awesome write-up man!! Your lights look great, and Im hoping to start this soon, as I will be following your process to the T. Not using your ideas, but using yours as a guide. I have different halos, and Im gonna use green leds for my demon eye as well.
Also I was wondering If you you read about the guy who painted this part blue? to make his lenses look blue at certain angles? Or am I thinking of a different part? I want to paint mine black, so I have an all black look in my headlights.
Also I was wondering If you you read about the guy who painted this part blue? to make his lenses look blue at certain angles? Or am I thinking of a different part? I want to paint mine black, so I have an all black look in my headlights.
*Glass beaded then High Temp Black
*entire projector housing and cutoff shield, minus reflector bowl
*do not dismount cutoff shield, just paint it in place [found this out the hard way]
This makes the projector look completely blacked out during the day, and gets rid of most of whatever glare is left over after the sti clear lense mod [sharper cutoff]
This has been covered in HIDPLANET.com
Alot of guys paint High Temp blue or red
probably not a wise decision to use a gloss finish paint due to the fact that it may create glare and mess with cutoff [just a little]
If you are gonna do the demon eye mod, and want to paint the projector housings, you may want to use the same color as the led [no black]
If you do this, you should prob bake the projector housing [minus reflector bowl] at a low temp so that the High Temp paint can fully cure and release the VOC gasses. Dont want your headlights to yellow because of the VOC's