
SPL Pro solid rear diff bushings INSTALLED!!!


Thread Starter
Registered User
iTrader: (16)
Joined: May 2010
Posts: 1,611
Likes: 2
From: baton rouge
Bought the SPL Pro solid diff bushings from Z1, they came to me in black color. Im a Auto body tech and a friend of mine is a toyota tech so together we installed all 3 diff bushings.
To make a long story short the subframe OE bushing was a BIOTCH to get out!!! i will repeat... a BIOTCH!! lol but on a better note the other two bushings on the diff were super easy to get out. just put a 36mm socket on the back and beat them out.
Unless you have ALOT of tools on hand and have knowledge with cars and how the operate i do not suggest this mod.
Just the subframe bushing took us abt 3hrs to get out. the other two? 30min. We used the aluminum bushing beater to beat out the subframe bushing but got no where. end up having to do a LITTLE heating and cutting with a saw. then used a air hammer with a flat tip peice to beat the center out and then used the aluminum tool and air hammer together... that finally did the trick.
Real general instructions 1: cut the middle aluminum circle out and use air hammer to beat it out of the OE bushing. (now your just left with the OE bushing housing)
2:use the supplied aluminum bushing block and hit it with the air hammer working every angle. (with the center punched out and air hammer hitting the bushing puller it will eventually push out)
3:now that u have the OE bushing out take some 180 sand paper and sand the inside where the new bushing will seat. then after de burred hit it with some 320 or 400. Finally use some grease or vaseline(we used Vaseline) and put it where u sanded and on the ouside of the new bushing.
4: now just lightly tap the new one in. (make SURE you have it straight. the mor crooked it is the harder it will be the tap it in. once you have it started use the same supplied aluminum bushing puller and just finish tapping it in. (beat it in till the back side is flush with the subframe,backside being the side the driveshaft is on)
NOW for a few pics...
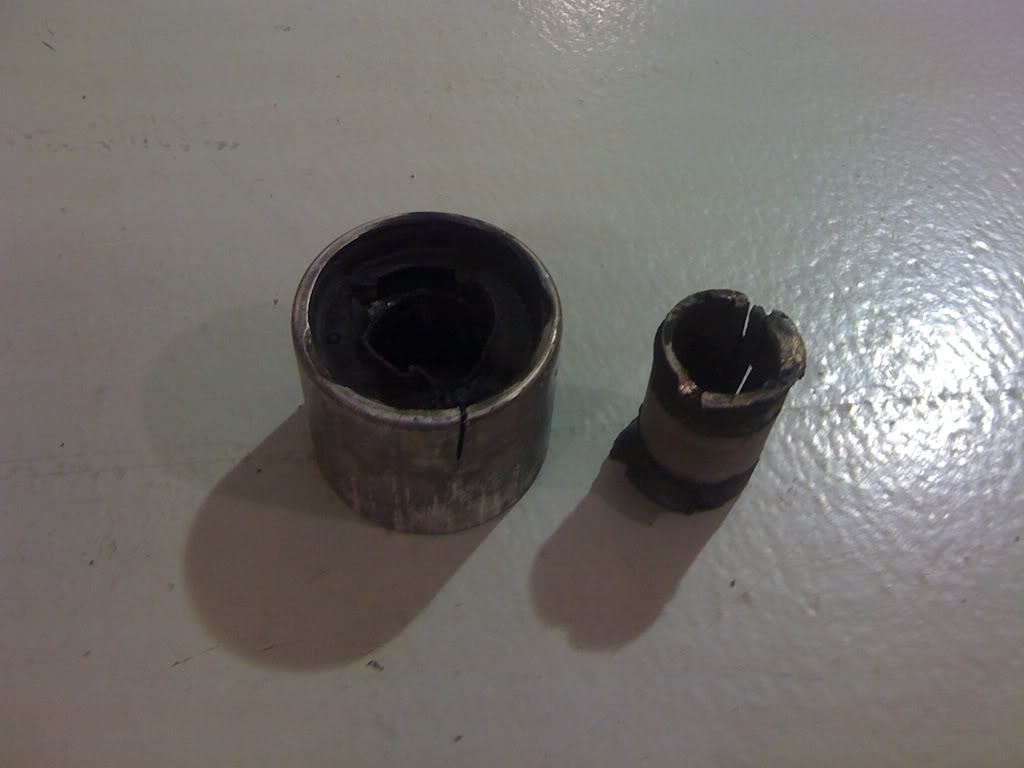
In the first pic you can see what has to be cut then driven out first then the housing
To make a long story short the subframe OE bushing was a BIOTCH to get out!!! i will repeat... a BIOTCH!! lol but on a better note the other two bushings on the diff were super easy to get out. just put a 36mm socket on the back and beat them out.
Unless you have ALOT of tools on hand and have knowledge with cars and how the operate i do not suggest this mod.
Just the subframe bushing took us abt 3hrs to get out. the other two? 30min. We used the aluminum bushing beater to beat out the subframe bushing but got no where. end up having to do a LITTLE heating and cutting with a saw. then used a air hammer with a flat tip peice to beat the center out and then used the aluminum tool and air hammer together... that finally did the trick.
Real general instructions 1: cut the middle aluminum circle out and use air hammer to beat it out of the OE bushing. (now your just left with the OE bushing housing)
2:use the supplied aluminum bushing block and hit it with the air hammer working every angle. (with the center punched out and air hammer hitting the bushing puller it will eventually push out)
3:now that u have the OE bushing out take some 180 sand paper and sand the inside where the new bushing will seat. then after de burred hit it with some 320 or 400. Finally use some grease or vaseline(we used Vaseline) and put it where u sanded and on the ouside of the new bushing.
4: now just lightly tap the new one in. (make SURE you have it straight. the mor crooked it is the harder it will be the tap it in. once you have it started use the same supplied aluminum bushing puller and just finish tapping it in. (beat it in till the back side is flush with the subframe,backside being the side the driveshaft is on)
NOW for a few pics...
In the first pic you can see what has to be cut then driven out first then the housing
Last edited by Z_enthusiast; Aug 28, 2010 at 03:27 PM.
Thread Starter
Registered User
iTrader: (16)
Joined: May 2010
Posts: 1,611
Likes: 2
From: baton rouge
We had to remove the following to drop the pumpkin.
The rear sway bar, the exhaust ( from y back),and of course undo the axles from the pumpkin along with the driveshaft. (no need to take out the shaft,just drop it) There is also a hose that runs to the top of pumpkin. dont forget to un do it before you drop it down.
If you have any questions PM me
The rear sway bar, the exhaust ( from y back),and of course undo the axles from the pumpkin along with the driveshaft. (no need to take out the shaft,just drop it) There is also a hose that runs to the top of pumpkin. dont forget to un do it before you drop it down.
If you have any questions PM me


Thread Starter
Registered User
iTrader: (16)
Joined: May 2010
Posts: 1,611
Likes: 2
From: baton rouge
Thread Starter
Registered User
iTrader: (16)
Joined: May 2010
Posts: 1,611
Likes: 2
From: baton rouge
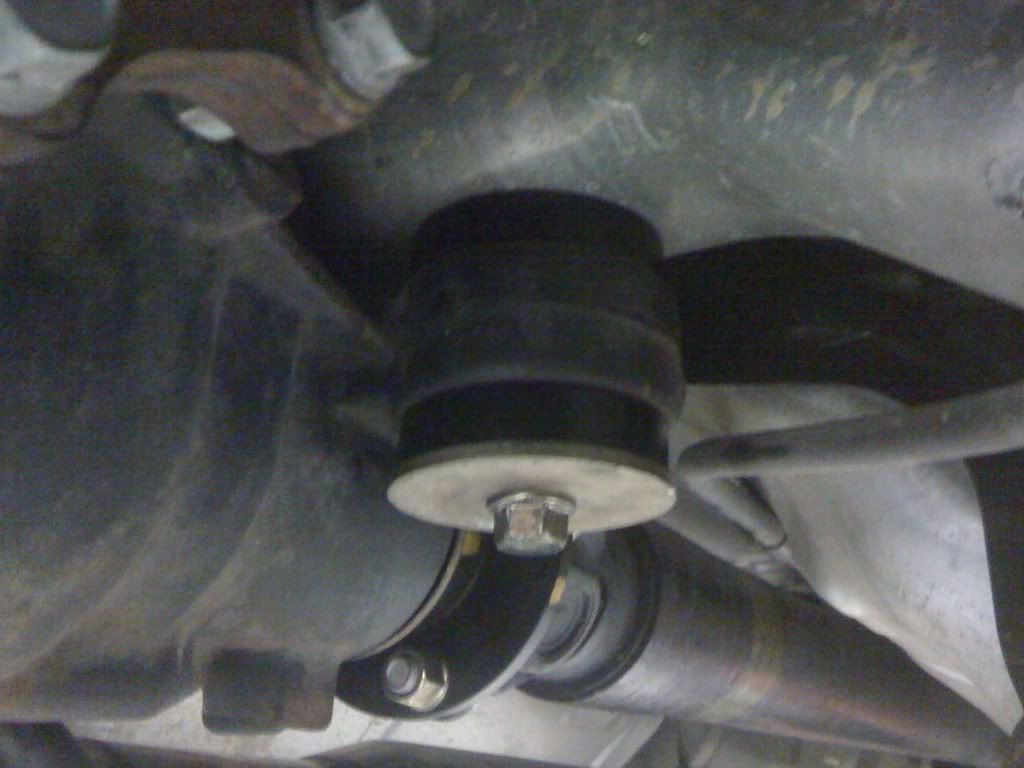
and i didnt use the plates... the black is the aluminum bushing. the gold is the bolt itself... no rubber or metal plate was used. just bolt and aluminum bushing
Last edited by JasonZ-YA; Aug 30, 2010 at 03:35 AM.
Trending Topics

Registered User
Joined: Sep 2009
Posts: 2,335
Likes: 5
From: Georgia
What a waste of time, work, and money. You could have left the original bushing in place, and installed "travel limiters" to keep the differential case from moving up excessively in the front.
The travel limiters would be made from aluminum pipe that has an inside diameter close to the outside diameter of the bushing. Cut the pipe a little shorter than the length of the bushing, then split it lengthwise into two pieces. Put the pieces around the bushing, and hold them in place with a muffler clamp.
The bushings would do their normal job for normal driving, and the limiter would do it's job when you're doing nutso stuff.

Z_enthusiast:
Dude, Im sorry it took you so long on the rear subframe mount! Did you read my DIY before doing this?? its a 5 min job max to remove the subframe mount with the way i outline in my revised update on post #12 here:
https://my350z.com/forum/engine-driv...mp-either.html
Z_enthusiast - you need to remove this gold metal plate (circled in red) - as per SPL's instructions as its not supposed to go back on when installing the solid bushings. I measured and you have lost thread engagement by leaving it on.
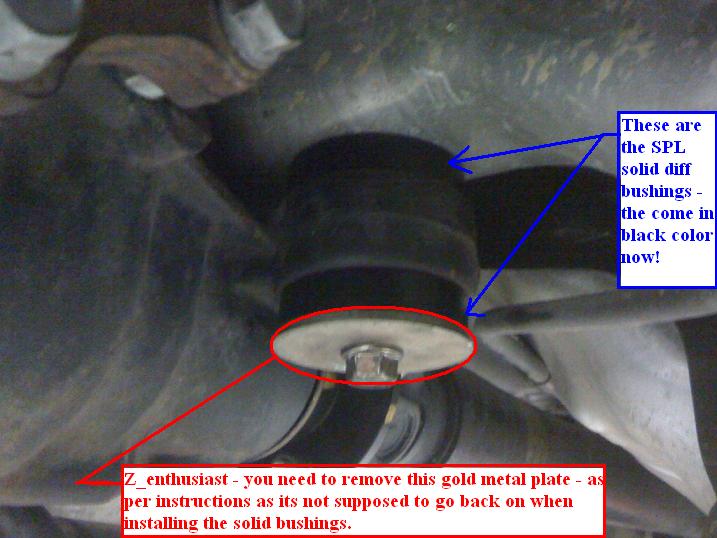
Also, if you look at the pic close - those are the "BLACK" spl solid diff bushings.....they are not blue anymore, even though SPL's website hasnt updated this in their pictures..........
-J
Dude, Im sorry it took you so long on the rear subframe mount! Did you read my DIY before doing this?? its a 5 min job max to remove the subframe mount with the way i outline in my revised update on post #12 here:
https://my350z.com/forum/engine-driv...mp-either.html
Z_enthusiast - you need to remove this gold metal plate (circled in red) - as per SPL's instructions as its not supposed to go back on when installing the solid bushings. I measured and you have lost thread engagement by leaving it on.
Also, if you look at the pic close - those are the "BLACK" spl solid diff bushings.....they are not blue anymore, even though SPL's website hasnt updated this in their pictures..........
-J
What a waste of time, work, and money. You could have left the original bushing in place, and installed "travel limiters" to keep the differential case from moving up excessively in the front.
The travel limiters would be made from aluminum pipe that has an inside diameter close to the outside diameter of the bushing. Cut the pipe a little shorter than the length of the bushing, then split it lengthwise into two pieces. Put the pieces around the bushing, and hold them in place with a muffler clamp.
The bushings would do their normal job for normal driving, and the limiter would do it's job when you're doing nutso stuff.
The travel limiters would be made from aluminum pipe that has an inside diameter close to the outside diameter of the bushing. Cut the pipe a little shorter than the length of the bushing, then split it lengthwise into two pieces. Put the pieces around the bushing, and hold them in place with a muffler clamp.
The bushings would do their normal job for normal driving, and the limiter would do it's job when you're doing nutso stuff.
you would need to put one on top and bottom, as the diff could dive downward.........and what about any wiggle movement, twist???
you would need to monitor it to ensure the thing never moved, etc plus you would have to remove them after X amount of driving just to ensure the bushings haven't torn - etc.....
for what? just to pay 50 bucks difference between getting the entire set versus buying just the rear..........???


-J
Last edited by JasonZ-YA; Aug 30, 2010 at 06:06 AM.
Registered User
Joined: Sep 2009
Posts: 2,335
Likes: 5
From: Georgia
Why would the front be moving down when you're applying lots of power? The torque reaction tends to lift the front of the differential. And, if it can only move up a little, there won't be enough rebound to do any damage to the lower part of the bushing.
I guess you could get some downward torque reaction from hard gearing down to slow the car, but who does that? The SPL write up only mentioned launches.
I generally dislike the idea of beating and framming on stuff. I'm sure I would have taken it apart without doing that, even if it involved making a puller or taking it completely out and using a shop press.
mishandling misshifts, etc along with the bolt still being the load transfer medium in a rubber bushing, plus the plates are thin weak hardware......great for the oem rubber bushing, but not so great if you decide to mount this "ring" around it...
what happens when ONE hose clamp snaps and only one side has the rings??? etc..etc.......
^ I agree with you on the beating on parts.......I list many options on how to do this solid diff bushings install at all 3 locations in my DIY i posted.
-J
what happens when ONE hose clamp snaps and only one side has the rings??? etc..etc.......
^ I agree with you on the beating on parts.......I list many options on how to do this solid diff bushings install at all 3 locations in my DIY i posted.
-J
Last edited by JasonZ-YA; Aug 30, 2010 at 09:12 AM.
Thread Starter
Registered User
iTrader: (16)
Joined: May 2010
Posts: 1,611
Likes: 2
From: baton rouge
jason... the gold is the washer for the bolt. and the bolt threaded way before it reached the bolt. i would think the washer does more help than harm right?
winchman... i do not regret doing the install, my wheel hop is almost totally gone. each day that goes by i like it more. when it comes to your car dont do shortcuts... do it right
winchman... i do not regret doing the install, my wheel hop is almost totally gone. each day that goes by i like it more.
when it comes to your car dont do shortcuts... do it right
-J
yeah, i measured and thread engagement isnt the same...with the gold washer you lose about 1.5 threads of engagement..
if you really wanna keep the gold washer, then go source two 10.9 strength M12x1.25 bolts that are 100mm long and replace the stock bolt.
careful threading them in, as the oem bolt is pointed to avoid cross threading.
-J
Last edited by JasonZ-YA; Aug 30, 2010 at 09:53 AM.


Thread Starter
Registered User
iTrader: (16)
Joined: May 2010
Posts: 1,611
Likes: 2
From: baton rouge
no prob bud. glad we could help.
One thing i do worry abt is the bolt hbolding up the runs through the subframe from the diff. since the bushing is solid you would think the bolt is taking a beating. can someone tell me that it wont break under a launch so i can launch in peace
One thing i do worry abt is the bolt hbolding up the runs through the subframe from the diff. since the bushing is solid you would think the bolt is taking a beating. can someone tell me that it wont break under a launch so i can launch in peace
go to an engineering web site or calculate/look up the shear force of a M12 bolt that is 10.9 grade.......
its highly unlikely.....but yes it has happened.....odds are those are rare cases or installation error (ie, front diff ear bolts not torqured correctly or bolt damaged duirng install/removal, etc)
-J
its highly unlikely.....but yes it has happened.....odds are those are rare cases or installation error (ie, front diff ear bolts not torqured correctly or bolt damaged duirng install/removal, etc)
-J