
Stillen Engine Dampener: Install and Review
 04-19-2005, 09:42 PM
#1
Registered User
Thread Starter
Join Date: Jan 2003
Location: new orleans
Posts: 1,426
Likes: 0
Received 0 Likes
on
0 Posts
My Stillen Engine Torque Dampener showed up in the mail today from Performance Nissan, and I absolutely could not wait until this weekend to put it on. So I walked out to the garage and got wrenchin' 
INSTALL
What followed was the most technically painful and backwards installation I have ever done on my car In terms of quality, I am very impressed with the piece. It is anodized a cool color (red) and the fit and finish is A+ -- everything was as good as I could have expected. I was slightly dissapointed to unscrew the cap and find that it is not a shock, as it appears to be, rather a straight rod with one or more hard bushings. This does not really bother me, but I was under the impression (maybe I am naive) that it was a shock and would reduce some of the latent vibration inherent in this kind of device with the shock absorber -- a shock absorber which does not exist, as it would happen.
Nevertheless, the install continued and after a trip to Home Depot for a tool which I needed and did not have, I finally completed the installation...hours after it had begun.
The big problem with this motor mount is that, while Stillen chose a very good place to put it, they also chose an extremely remote and hard to reach area which makes the removal and addition of various bolts and mounts a very frustrating experience. They recommed you dismount (but not remove) the power steering fluid reservoir so that you can work around it; I found it more useful to also dismount the coolant tank and slide it out of the way so the I could push the Power Steering Reservoir back into the place the coolant tank had once occupied.
The biggest and most frustrating problem for me was lining up the series of holes in various mounts which are required to attatch the dampener to "Bracket A", which is part of the timing chain cover. After 30 minutes of simply trying to thread a screw and being totally frustrated, I finally lined it up a different way and was rewarded with immediate gratification.
In addition to this, I had the heads of two factory bolts shear off while I was re-tightening, so I had to spend an additional 20 minutes with a set of needlenose pliers sweating it out as the threaded pieces came loose just a bit slower than molasses runs.
REVIEW
After all of this I tightened everything up and went for a brief drive. At first the differences seemed to be subtle, but I noticed more of them as I drove.
1.) There is more vibration in the car. This should be fairly obvious. It is not a direct or piercing vibration, but it is definitely there, mostly at idle and low RPMS. It is completely unnoticeable at speed.
2.) Idle is GREATLY improved. My car had a mildly rough idle beforehand, even with a grounding kit, and after installation of the dampener my idle is so smooth it's crazy -- judging by the needle it looks like the car isn't even running!
3.) The transmission makes more noise at idle. This one might not be so obvious. I have a lightweight flywheel and clutch (JWT), and they make a bit more noise at idle now than they did beforehand, vibrating to the pattern of the motor now.
4.) Engine response is better. Touching the gas yields a quicker response, and the air intake "sucking" noise comes much more quickly. I can tell that the motor is not moving as much.
5.) Under hard lateral acceleration I can notice a difference when powering out of turns. I am not sure exactly how to describe it, but the car is much more stable and smooth exiting corners. I tested this around several high speed (60-80MPH) loops. Previously the motor had a slight uneven-ness when I would exit high speed turns under hard acceleration, but that seems to have dissappeared. I need to test this more to be certain it is completely gone.
That's what I noticed on my brief drive. I will post more in a day or two, but for now that's it. Overall it seems to be worth the money spent (already!) and barring the insanely retarded install it is a great mod. I think my only words of wisdom to others thinking about this is that you should go into the install knowing that it'll be a b!tch. I walked into the garage thinking something along the lines of, "oh, look at this little thing! It'll take 15 minutes!" As you can probably tell, I walked out of the garage very dissapointed in that respect. Then again, you know what they say about "assuming" things...
INSTALL
What followed was the most technically painful and backwards installation I have ever done on my car
In terms of quality, I am very impressed with the piece. It is anodized a cool color (red) and the fit and finish is A+ -- everything was as good as I could have expected. I was slightly dissapointed to unscrew the cap and find that it is not a shock, as it appears to be, rather a straight rod with one or more hard bushings. This does not really bother me, but I was under the impression (maybe I am naive) that it was a shock and would reduce some of the latent vibration inherent in this kind of device with the shock absorber -- a shock absorber which does not exist, as it would happen.Nevertheless, the install continued and after a trip to Home Depot for a tool which I needed and did not have, I finally completed the installation...hours after it had begun.
The big problem with this motor mount is that, while Stillen chose a very good place to put it, they also chose an extremely remote and hard to reach area which makes the removal and addition of various bolts and mounts a very frustrating experience. They recommed you dismount (but not remove) the power steering fluid reservoir so that you can work around it; I found it more useful to also dismount the coolant tank and slide it out of the way so the I could push the Power Steering Reservoir back into the place the coolant tank had once occupied.
The biggest and most frustrating problem for me was lining up the series of holes in various mounts which are required to attatch the dampener to "Bracket A", which is part of the timing chain cover. After 30 minutes of simply trying to thread a screw and being totally frustrated, I finally lined it up a different way and was rewarded with immediate gratification.
In addition to this, I had the heads of two factory bolts shear off while I was re-tightening, so I had to spend an additional 20 minutes with a set of needlenose pliers sweating it out as the threaded pieces came loose just a bit slower than molasses runs.
REVIEW
After all of this I tightened everything up and went for a brief drive. At first the differences seemed to be subtle, but I noticed more of them as I drove.
1.) There is more vibration in the car. This should be fairly obvious. It is not a direct or piercing vibration, but it is definitely there, mostly at idle and low RPMS. It is completely unnoticeable at speed.
2.) Idle is GREATLY improved. My car had a mildly rough idle beforehand, even with a grounding kit, and after installation of the dampener my idle is so smooth it's crazy -- judging by the needle it looks like the car isn't even running!
3.) The transmission makes more noise at idle. This one might not be so obvious. I have a lightweight flywheel and clutch (JWT), and they make a bit more noise at idle now than they did beforehand, vibrating to the pattern of the motor now.
4.) Engine response is better. Touching the gas yields a quicker response, and the air intake "sucking" noise comes much more quickly. I can tell that the motor is not moving as much.
5.) Under hard lateral acceleration I can notice a difference when powering out of turns. I am not sure exactly how to describe it, but the car is much more stable and smooth exiting corners. I tested this around several high speed (60-80MPH) loops. Previously the motor had a slight uneven-ness when I would exit high speed turns under hard acceleration, but that seems to have dissappeared. I need to test this more to be certain it is completely gone.
That's what I noticed on my brief drive. I will post more in a day or two, but for now that's it. Overall it seems to be worth the money spent (already!) and barring the insanely retarded install it is a great mod. I think my only words of wisdom to others thinking about this is that you should go into the install knowing that it'll be a b!tch. I walked into the garage thinking something along the lines of, "oh, look at this little thing! It'll take 15 minutes!" As you can probably tell, I walked out of the garage very dissapointed in that respect. Then again, you know what they say about "assuming" things...
 04-19-2005, 10:24 PM
#2
Registered User
Thread Starter
Join Date: Jan 2003
Location: new orleans
Posts: 1,426
Likes: 0
Received 0 Likes
on
0 Posts
As a small update, I went and took some photos.
Here is the torque dampener right out of the box, before I installed it:

Here's one of those awesome titanium reinforced bolts from Nissan. They stand up to some pretty serious pressure...

This is "Bracket B" for the dampener. What is pictured is actually installed incorrectly -- the gold-colored bracked should actually go over top of the dampener, not underneath it. This was the part I mentioned above. With three people and 30 minutes none of us could get the frigging thing lined up right, even though the scre went right in any other way we tried it without the bracket on the outside. So I put it on the inside. If I run into trouble later (which I seriously doubt) then I'll dremel the bracket out and correct for it or buy one that fits better.

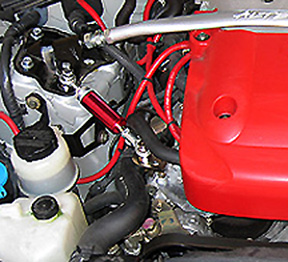
This is the body of the dampener. This picture was taken after the test drive. You can see slight pressure cracks in the anodization, indicating that a serious amount of pressure is being put on the piece. Hope it holds up to a track day!

Another view of the body to show the stress marks:

Here is the torque dampener right out of the box, before I installed it:
Here's one of those awesome titanium reinforced bolts from Nissan. They stand up to some pretty serious pressure...
This is "Bracket B" for the dampener. What is pictured is actually installed incorrectly -- the gold-colored bracked should actually go over top of the dampener, not underneath it. This was the part I mentioned above. With three people and 30 minutes none of us could get the frigging thing lined up right, even though the scre went right in any other way we tried it without the bracket on the outside. So I put it on the inside. If I run into trouble later (which I seriously doubt) then I'll dremel the bracket out and correct for it or buy one that fits better.
This is the body of the dampener. This picture was taken after the test drive. You can see slight pressure cracks in the anodization, indicating that a serious amount of pressure is being put on the piece. Hope it holds up to a track day!
Another view of the body to show the stress marks:
04-19-2005, 10:32 PM
#3

Should be called a Torque Brace or Torque Rod. Torque Damper is such a huge misconception going around the internet. Hey that Stillen piece actually looks just like the Pro-1 piece, which looks like the Signal Auto piece, which looks like the Project Nissan piece which looks like the eBay pieces. Get my babbling? Hehehe

 04-19-2005, 10:53 PM
#6
Registered User
Thread Starter
Join Date: Jan 2003
Location: new orleans
Posts: 1,426
Likes: 0
Received 0 Likes
on
0 Posts
Originally Posted by GTNPU Z
Excellent write-up! Everything you've described above is dead on! 
-did you have trouble with "Bracket B"? Did you mount it correctly or find a workaround?
-does yours have the stress marks in the anodization?
Originally Posted by Nano
Good writeup
just out of curiosity. at idle if you give it a good thump of gas, how much does the engine move?
just out of curiosity. at idle if you give it a good thump of gas, how much does the engine move?
04-19-2005, 11:14 PM
#7
Registered User

Join Date: Oct 2003
Location: Canada
Posts: 176
Likes: 0
Received 0 Likes
on
0 Posts
bracket B mounted just fine for me
and I have lots of stress marks
it's a bltch to install. And took me some time to adjust and understand the lenght properly.
From drivers seat with open hood. I still can see the engine flex.
and I have lots of stress marks
it's a bltch to install. And took me some time to adjust and understand the lenght properly.
From drivers seat with open hood. I still can see the engine flex.
Last edited by Tex Willer; 04-19-2005 at 11:21 PM.
Trending Topics
04-20-2005, 06:20 AM
#8
Registered User

Join Date: Feb 2003
Location: Dallas, TX
Posts: 43
Likes: 0
Received 0 Likes
on
0 Posts
I'd agree on the install difficulty. I think I had every tool out of my tool chest at one point trying to find something to work. Overall, it took me an hour and a half.
From a results perspective, to be honest, I can't tell any real difference. My hope was that this mod would reduce the low speed rocking of the engine and smooth the first to second shift under hard throttle. I couldn't tell any difference. On the plus side, I can't sense any add'l vibration.
This mod also failed the 'significant other' test - ie. my wife couldn't tell any difference at all (and she drives the car a few times each week).
04-20-2005, 11:59 AM
#9
Registered User
Thread Starter
Join Date: Jan 2003
Location: new orleans
Posts: 1,426
Likes: 0
Received 0 Likes
on
0 Posts
Originally Posted by vanwinkl
I'd agree on the install difficulty. I think I had every tool out of my tool chest at one point trying to find something to work. Overall, it took me an hour and a half.
From a results perspective, to be honest, I can't tell any real difference. My hope was that this mod would reduce the low speed rocking of the engine and smooth the first to second shift under hard throttle. I couldn't tell any difference. On the plus side, I can't sense any add'l vibration.
This mod also failed the 'significant other' test - ie. my wife couldn't tell any difference at all (and she drives the car a few times each week).
From a results perspective, to be honest, I can't tell any real difference. My hope was that this mod would reduce the low speed rocking of the engine and smooth the first to second shift under hard throttle. I couldn't tell any difference. On the plus side, I can't sense any add'l vibration.
This mod also failed the 'significant other' test - ie. my wife couldn't tell any difference at all (and she drives the car a few times each week).
04-20-2005, 05:08 PM
#10
Registered User
iTrader: (1)
Join Date: Sep 2003
Location: Montreal, Canada
Posts: 1,035
Likes: 0
Received 0 Likes
on
0 Posts
Originally Posted by vanwinkl
I'd agree on the install difficulty. I think I had every tool out of my tool chest at one point trying to find something to work. Overall, it took me an hour and a half.
From a results perspective, to be honest, I can't tell any real difference. My hope was that this mod would reduce the low speed rocking of the engine and smooth the first to second shift under hard throttle. I couldn't tell any difference. On the plus side, I can't sense any add'l vibration.
This mod also failed the 'significant other' test - ie. my wife couldn't tell any difference at all (and she drives the car a few times each week).
From a results perspective, to be honest, I can't tell any real difference. My hope was that this mod would reduce the low speed rocking of the engine and smooth the first to second shift under hard throttle. I couldn't tell any difference. On the plus side, I can't sense any add'l vibration.
This mod also failed the 'significant other' test - ie. my wife couldn't tell any difference at all (and she drives the car a few times each week).
I am still not sure if to get the stillen one or the ebay one...
 04-20-2005, 06:45 PM
#12
Registered User
Thread Starter
Join Date: Jan 2003
Location: new orleans
Posts: 1,426
Likes: 0
Received 0 Likes
on
0 Posts
Originally Posted by Nano
did you tighten it? I think it this thing needs to be tightened
I am still not sure if to get the stillen one or the ebay one...
I am still not sure if to get the stillen one or the ebay one...
Originally Posted by enhanced250
any of the torque dampers actually shocks or a mini hydrolic strut or are they all prretty much one solid peace?
Last edited by syf0n; 04-20-2005 at 06:47 PM.
 04-21-2005, 06:45 AM
#14
Registered User
Thread Starter
Join Date: Jan 2003
Location: new orleans
Posts: 1,426
Likes: 0
Received 0 Likes
on
0 Posts
Originally Posted by SJTrackZ
Did you adjust the dampener? It has the ability to move in or out. My bracket did not line up either, but after adjusting it, it fit perfect.
04-22-2005, 08:11 AM
#15

Originally Posted by Nano
did you tighten it? I think it this thing needs to be tightened
I am still not sure if to get the stillen one or the ebay one...
I am still not sure if to get the stillen one or the ebay one...
If you want a 100% trouble free install, go with the Stillen or other. If you don't mind drilling a hole in one of the steel plates provided in the Ebay kit and buying a slightly longer strut bar bolt, buy the EBAY one. I installed mine when I installed the AAM spacer and reinstalled the strut bar. Both Dampeners are most likely manufactured in CHINA, maybe at the same plant
...I've seen crazier stuff over there when visiting for work. Bottom line, the engine moves a LOT less when properly installed and shifting has become extremely precise. No extra vibrating in my particular case. Not bad for $49 to my door.
Zquicksilver
 04-22-2005, 08:44 AM
#16
Registered User
iTrader: (1)
Join Date: Sep 2003
Location: Montreal, Canada
Posts: 1,035
Likes: 0
Received 0 Likes
on
0 Posts
Originally Posted by Zquicksilver
If you want a 100% trouble free install, go with the Stillen or other. If you don't mind drilling a hole in one of the steel plates provided in the Ebay kit and buying a slightly longer strut bar bolt, buy the EBAY one. I installed mine when I installed the AAM spacer and reinstalled the strut bar. Both Dampeners are most likely manufactured in CHINA, maybe at the same plant ...I've seen crazier stuff over there when visiting for work.
Bottom line, the engine moves a LOT less when properly installed and shifting has become extremely precise. No extra vibrating in my particular case. Not bad for $49 to my door.
Zquicksilver
...I've seen crazier stuff over there when visiting for work. Bottom line, the engine moves a LOT less when properly installed and shifting has become extremely precise. No extra vibrating in my particular case. Not bad for $49 to my door.
Zquicksilver
I'd bet it's the same exact damper too.
04-22-2005, 10:23 AM
#19
Registered User

Join Date: Feb 2004
Location: Germany
Posts: 5
Likes: 0
Received 0 Likes
on
0 Posts
04-22-2005, 10:53 AM
#20
Registered User
iTrader: (1)
Join Date: Sep 2003
Location: Montreal, Canada
Posts: 1,035
Likes: 0
Received 0 Likes
on
0 Posts
Originally Posted by Mayday
http://search.ebay.ca/torque-damper_...QsaatcZ2QQscZ4
172-186 mm