
Anyone have upper oil pan leaks when building???


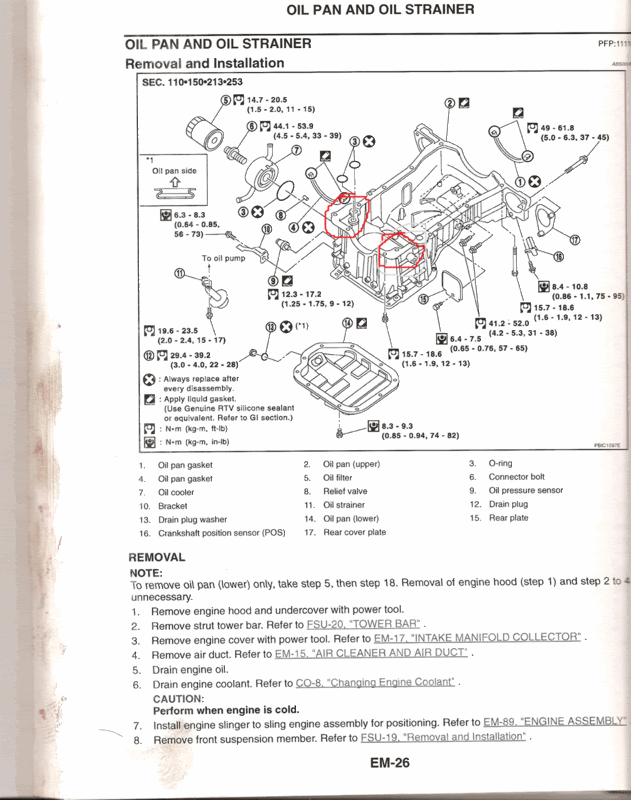
what about the front oil pan gasket (the saddle shaped gasket.) did you put a little bad of rtv on the ends of that gasket? maybe you are getting leaks at the upper corners of that gasket. it is part numner 4 in the service manual diagram you posted on the 1st page.
Just to clarify...The leaks are coming from 2 specific areas:
Its not coming from the front or rear of the engine. I have no problem with the 2 rubber gaskets curved in front and back...Yes, I waited about 10 minutes with the RTV after applying, then mounted, then did a light bolt up, and after another 10 minutes applied the recommended torque.
I have put in a new set of oil pan gaskets O-rings each time I opened her up.
I also let the RTV cure for 48hours before putting oil back in the car.
Yes, you can see a bead of RTV on both the inside edge and outer edge of the oil pan when looking up from underneath the car.
Yes, I cleaned the surfaces thoroughly before attempting to re-install.
It looks like the engine will have to come out again and I just ordered a new oil pan. I will also check that the engine base mounting surface is perfectly flat also.
I also plan to remove the timing cover (s) and remount them, just in case there is a leak coming from the lowest part of the covers.
More down time for me...Unfortunately. But it WILL be fixed!
I work for an Ambulance service as a Paramedic and we have excellent mechanics. One former race mechanic...asked me about the gasket situation and asked me why doesn't nissan use pre-formed silicone gaskets that are complete drop in??? My response, Nissan wants you to use RTV. He laughed and stated these ambulances are Turbo Diesels and get up to 60 psi of boost and they use pre-formed silicone gaskets which make our lives as mechanics so much easier.
Anyone here ever thought of making one?
Anyone here ever thought of making one?
Not for nothing randy but the gasket doesn't have a way to know how much boost the engine is running  It is meant to seal against a specific type of fluid over a certain temperature range.
A preformed gasket would be nice, but AFAIK there are none - even the OEMs don't really use them much anymore
It is meant to seal against a specific type of fluid over a certain temperature range. A preformed gasket would be nice, but AFAIK there are none - even the OEMs don't really use them much anymore

it would be great but if someone did them I guess, but I've never seen one for the VQ35, and I think something else is going on that you are still getting the leaks - the premade gaskets are no better, nor any more reliable than RTV, they are just more convenient
I've taken the precaution of ordering a new upper oil pan, though since it worked on my original motor, I can't quite figure out why it wouldn't work on my new motor. Either way, I am taking further precaution to ensure that it doesn't happen again and at the same time trying to get some new ideas sparked on this forum. I think that a pre-formed gasket would be a great idea to simplify things and prevent leaks like this from plaguing other members in this ever growing DIY community.
I am also going to re-do the rear main seal based on your experience Adam. I wouldn't want to go to all of the trouble of opening her up and then after all is said and done and I get her on a dyno to have the main seal let go.
Thanks for the heads up.
I am also going to re-do the rear main seal based on your experience Adam. I wouldn't want to go to all of the trouble of opening her up and then after all is said and done and I get her on a dyno to have the main seal let go.
Thanks for the heads up.


I applied the RTV to both sides of the bolt holes. I am assuming that there is a physical problem or flaw, perhaps with my oil pan, so I ordered a new replacement. In addition, I will be pulling the motor to ensure a clean and unobstructed install.
BTW, what do you mean #4. That bolt is 2/3's of the way back. No leaks from there.
The leaks I am experiencing seem more consistent with Bolt #5 & #10
BTW, what do you mean #4. That bolt is 2/3's of the way back. No leaks from there.
The leaks I am experiencing seem more consistent with Bolt #5 & #10
Randy, have you examined the oil pan CLOSELY around the bolt holes for cracks? They can be very very hard to spot, but take a close look. Maybe the upper oil pan has a crack in it. We had a car come in with a leaking pan, and the customer had overtightened one of the bolts, and lightly cracked the upper pan. Might be something to check.
In regards to o-rings, its easy to tell if they fit or dont...so I doubt you made that error. A snug fit is good.
Also a good idea to use a precision straight edge and check deflection if any. But it would take some massive warpage to leak through all the dried RTV.
In regards to o-rings, its easy to tell if they fit or dont...so I doubt you made that error. A snug fit is good.
Also a good idea to use a precision straight edge and check deflection if any. But it would take some massive warpage to leak through all the dried RTV.

Problem was a combination of 3 things:
1 - I had trouble getting a consistent bead of silicone all the way around the area needed.
2 - I was trying to work with the motor installed which created another problem of its own, that being the o-rings didn't want to stay in place. Used Indian Head Gasket Glue to keep them up while I re-installed the Upper Oil pan.
3 - It was the oil-warmer/cooler that was leaking. I didn't know the proper orientation of the red rubber gasket O-ring on the inside of it. I for some ungodly reason was trying to stretch the o-ring outside of the metal lip on the inside of the cooler/warmer. The proper placement is on the inside of the metal lip. I believe I even took some photos of it in a different thread. I'll see if I can find it.
Solution: Once I got the o-rings lightly 'glued' in place (upside down), and was able to get a consistent bead of silicone around the edges and correctly installed the o-ring gasket for the oil cooler/warmer, the problem was resolved.
WARNING: Do NOT overdo it with the silicone. Excess Silicone inside the motor will eventually break free and cause the same effect as a heart attack to your motor. It can clog a vital artery of oil passage and seize up your engine. Live and learn my friend.
Good Luck.
Edit. And after all of the removal and installation, the original upper oil pan piece developed a tiny crack on the driver side which is why it was leaking from that side. The replacement oil pan corrected this issue.
So to sum it up. Leak on Pass side was oil cooler/warmer leak and driver side was a crack in upper oil pan from abuse in removing with rubber malet.
Last edited by rrmedicx; Feb 25, 2010 at 05:02 AM.

Thread
Thread Starter
Forum
Replies
Last Post
350Z Project X
Suspension
9
Oct 10, 2015 09:23 AM