
06+ Headlight assembly help!
 08-17-2010, 07:46 PM
#1

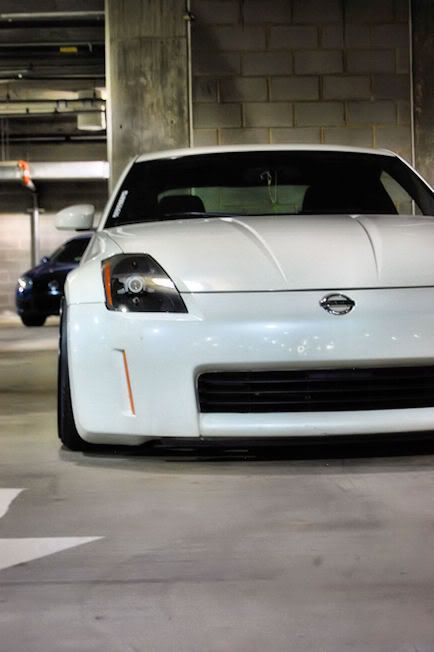
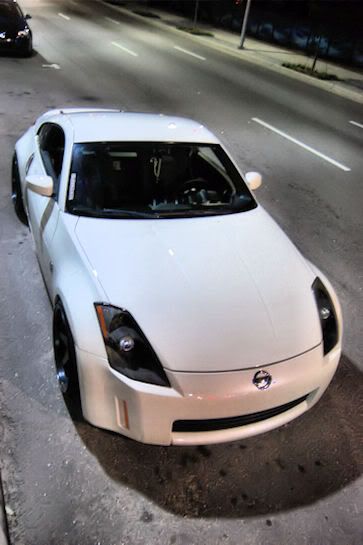
Hey guys, decided to black out my headlights and ran into a problem. Everything went smoothly untill it was time to put the headlights back together. I couldnt seem to align the housings right. Do i put the outer housing on the cover then assemble? Or do i line up the housing on the base then put the cover on? i tried both and the housing keeps shifting causing the gap and some scratches on black paint. Was i suppose to/can i remove the lense bcs that seems to get in the way forcing me to slide the housing in a weird angle. how can i prevent this? Should i be able to just put the cover on no problem? Thanks in advance!
As you can see theres a gap


yes thats copper gasket sealer you see (orange). There was a huge gap and i used all the sealants so i used that due to frustration. I used a heat gun btw
As you can see theres a gap
yes thats copper gasket sealer you see (orange). There was a huge gap and i used all the sealants so i used that due to frustration. I used a heat gun btw
Last edited by Toby-22; 08-17-2010 at 07:53 PM.


 08-17-2010, 10:55 PM
#9
Registered User
iTrader: (2)

Join Date: May 2007
Location: Vancouver, Canada
Posts: 542
Likes: 0
Received 0 Likes
on
0 Posts
heat gunning was your first problem...
i tried heat gunning before once and failed miserably, just when I got one side hot enough the other side would cool.
now I've got it all down, I've done over 20 sets of lights.
I've actually done 3 sets of these same 350z lights for my friends, and my guess would be one of your screws isn't aligned properly, because that whole bezel section there screws in with 2 or 3 screws into the other bezel piece.
I bet that's the case, so your only solution is to crack the lights back open using the oven method and just take your time with it.
don't get frustrated from personal experience it only makes things worse and you end up half assing the job like you did here with your lights because you're so eager to just finish the job and be done with it.
sorry man don't mean to offend you but I know exactly how you feel, when I get pissed I tend to half *** jobs as well, so yea just take your time with it.
oh and now another thing to consider is you might have fcked up even worse by putting that red silicone sealant around the headlight, because most of those gasket sealants are heat resistant, so now you won't be able to oven bake it open easily, you're gonna have to carefully slice the silicone with an exacto knife.
Last edited by Adon; 08-17-2010 at 10:57 PM.
08-18-2010, 05:08 AM
#10
^thanks a lot man
yea i did half *** it, and when i looked back i had so many extra little screw bolts so you must be right.
so your saying that the two pieces that arent aligned right should be screwed together? only other slots i noticed was the two that connects the lower housing to the cover/lense which i did not screw in.
08-18-2010, 05:18 AM
#11
Registered User
iTrader: (9)

Join Date: May 2009
Location: RALEIGH, NC
Posts: 519
Likes: 0
Received 0 Likes
on
0 Posts
^thanks a lot man
yea i did half *** it, and when i looked back i had so many extra little screw bolts so you must be right.
so your saying that the two pieces that arent aligned right should be screwed together? only other slots i noticed was the two that connects the lower housing to the cover/lense which i did not screw in.
yea i did half *** it, and when i looked back i had so many extra little screw bolts so you must be right.
so your saying that the two pieces that arent aligned right should be screwed together? only other slots i noticed was the two that connects the lower housing to the cover/lense which i did not screw in.
Yes, that is your problem. When I talked to you on FB chat last night I assumed that you had already put those little screws back in...But I see that you DIDN'T put those screws in, that is definitely your problem. I also told you before you started to LABEL/take picutres of all the screws and where they go...because after taking several hours to paint your headlights you will forget where some of the tiny screws go.
 08-18-2010, 05:38 AM
#13
Registered User
iTrader: (9)
Join Date: May 2009
Location: RALEIGH, NC
Posts: 519
Likes: 0
Received 0 Likes
on
0 Posts
 08-18-2010, 05:38 AM
#14
Juan...I told you to do it in the oven and not use a heat gun.
Yes, that is your problem. When I talked to you on FB chat last night I assumed that you had already put those little screws back in...But I see that you DIDN'T put those screws in, that is definitely your problem. I also told you before you started to LABEL/take picutres of all the screws and where they go...because after taking several hours to paint your headlights you will forget where some of the tiny screws go.
Yes, that is your problem. When I talked to you on FB chat last night I assumed that you had already put those little screws back in...But I see that you DIDN'T put those screws in, that is definitely your problem. I also told you before you started to LABEL/take picutres of all the screws and where they go...because after taking several hours to paint your headlights you will forget where some of the tiny screws go.
Pike i'll text/call u later you later
08-18-2010, 05:40 AM
#15
Registered User
iTrader: (9)
Join Date: May 2009
Location: RALEIGH, NC
Posts: 519
Likes: 0
Received 0 Likes
on
0 Posts
Headlights are OFF the car lol, thanks guys i willl be redoing them. I'll do it at my friends house later today, so hopefully this time with some help and an oven i can get it done. I will use all the screws this time, i dont remember taking out so many.
Pike i'll text/call u later you later
Pike i'll text/call u later you later

That's fine...like I said, if for some reason you aren't done by the time I get off work (4:30) then I'll stop by and help you out.
08-18-2010, 08:07 AM
#16
I used the oven on mine and they turned out great. I also did my buddies and his aligned just right also. When you put it in the oven where some kind of gloves so that you can use pressure on them to push back together and not burn your hands. When you pt them back together, take a little time aligning it and then really squeeze them together.
08-18-2010, 09:02 AM
#17
Registered User
iTrader: (2)
Join Date: May 2007
Location: Vancouver, Canada
Posts: 542
Likes: 0
Received 0 Likes
on
0 Posts
here I just took some pictures of the headlights I'm currently working on to show you a bit better.
here you can see exactly how many screws connect what


and dont forget about clipping this in properly as well, it pops out sometimes. Actually when I picked up the lights to take this picture I found out it popped out on it's own

and this is my method, I've never used wet cardboard or wet anything, I set my own to heat up ONLY FROM ABOVE this way I put a cookie sheet and also a piece of aluminum foil, and I make sure to put the shiny side down so the lens of the light makes contact only with the dull side of the foil which doesnt absorb or reflect heat.
I also put another sheet of aluminum foil on top of the lights with the shiny side facing upwards to reflect the heat off the top, this way the heat won't melt your electrical wires which in some cases has happened to me. This doesn't slow the process down at all, because all you really need is the silicone heated and nothing else.


and one last word of advice, when you clean the inside of the lens don't press too hard when scrubbing or use anything else than mild dish soap. I used Dove degreasing dish soap (which is actually one of the stronger ones, it easily strips car wax) and scrubbed a bit too hard and I took the interior coating of the lens right off.
In my defense, I've used this same method many times on G35 lights and never has this happened before, I suspect since this is a brand new set of lights that not everything was cured properly from the factory.


also one last piece of info, I had to use high temp paint for this particular piece since the light got so hot it melted the normal paint i used, and actually melted the plastic of the bezel a little bit, I had to fix it best I could but it's still noticeable if looked up close.
I know a lot of guys aren't using high temp paint, but I would suggest you do just for this piece thats directly underneath the projector, all the other pieces it's fine. You can see the damage up close


here you can see exactly how many screws connect what
and dont forget about clipping this in properly as well, it pops out sometimes. Actually when I picked up the lights to take this picture I found out it popped out on it's own
and this is my method, I've never used wet cardboard or wet anything, I set my own to heat up ONLY FROM ABOVE this way I put a cookie sheet and also a piece of aluminum foil, and I make sure to put the shiny side down so the lens of the light makes contact only with the dull side of the foil which doesnt absorb or reflect heat.
I also put another sheet of aluminum foil on top of the lights with the shiny side facing upwards to reflect the heat off the top, this way the heat won't melt your electrical wires which in some cases has happened to me. This doesn't slow the process down at all, because all you really need is the silicone heated and nothing else.
and one last word of advice, when you clean the inside of the lens don't press too hard when scrubbing or use anything else than mild dish soap. I used Dove degreasing dish soap (which is actually one of the stronger ones, it easily strips car wax) and scrubbed a bit too hard and I took the interior coating of the lens right off.
In my defense, I've used this same method many times on G35 lights and never has this happened before, I suspect since this is a brand new set of lights that not everything was cured properly from the factory.
also one last piece of info, I had to use high temp paint for this particular piece since the light got so hot it melted the normal paint i used, and actually melted the plastic of the bezel a little bit, I had to fix it best I could but it's still noticeable if looked up close.
I know a lot of guys aren't using high temp paint, but I would suggest you do just for this piece thats directly underneath the projector, all the other pieces it's fine. You can see the damage up close