
Al's 400rwhp, Stardast Flared, Shaved Bay, Bagged Z Build Thread


Thread Starter
Registered User
Joined: Sep 2008
Posts: 908
Likes: 28
From: Winnipeg, MB
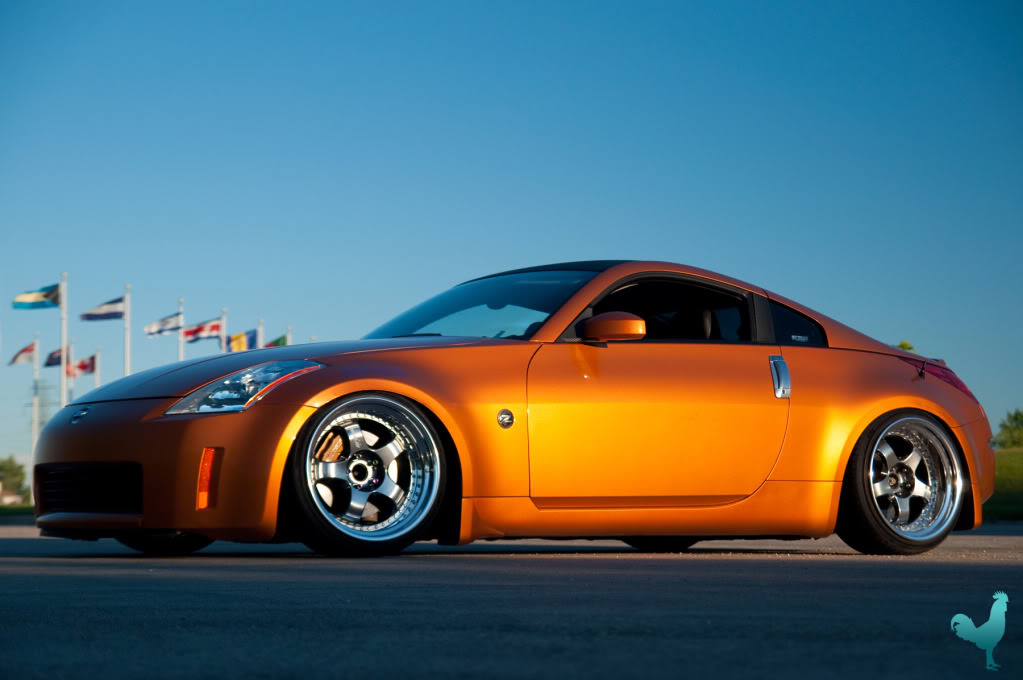
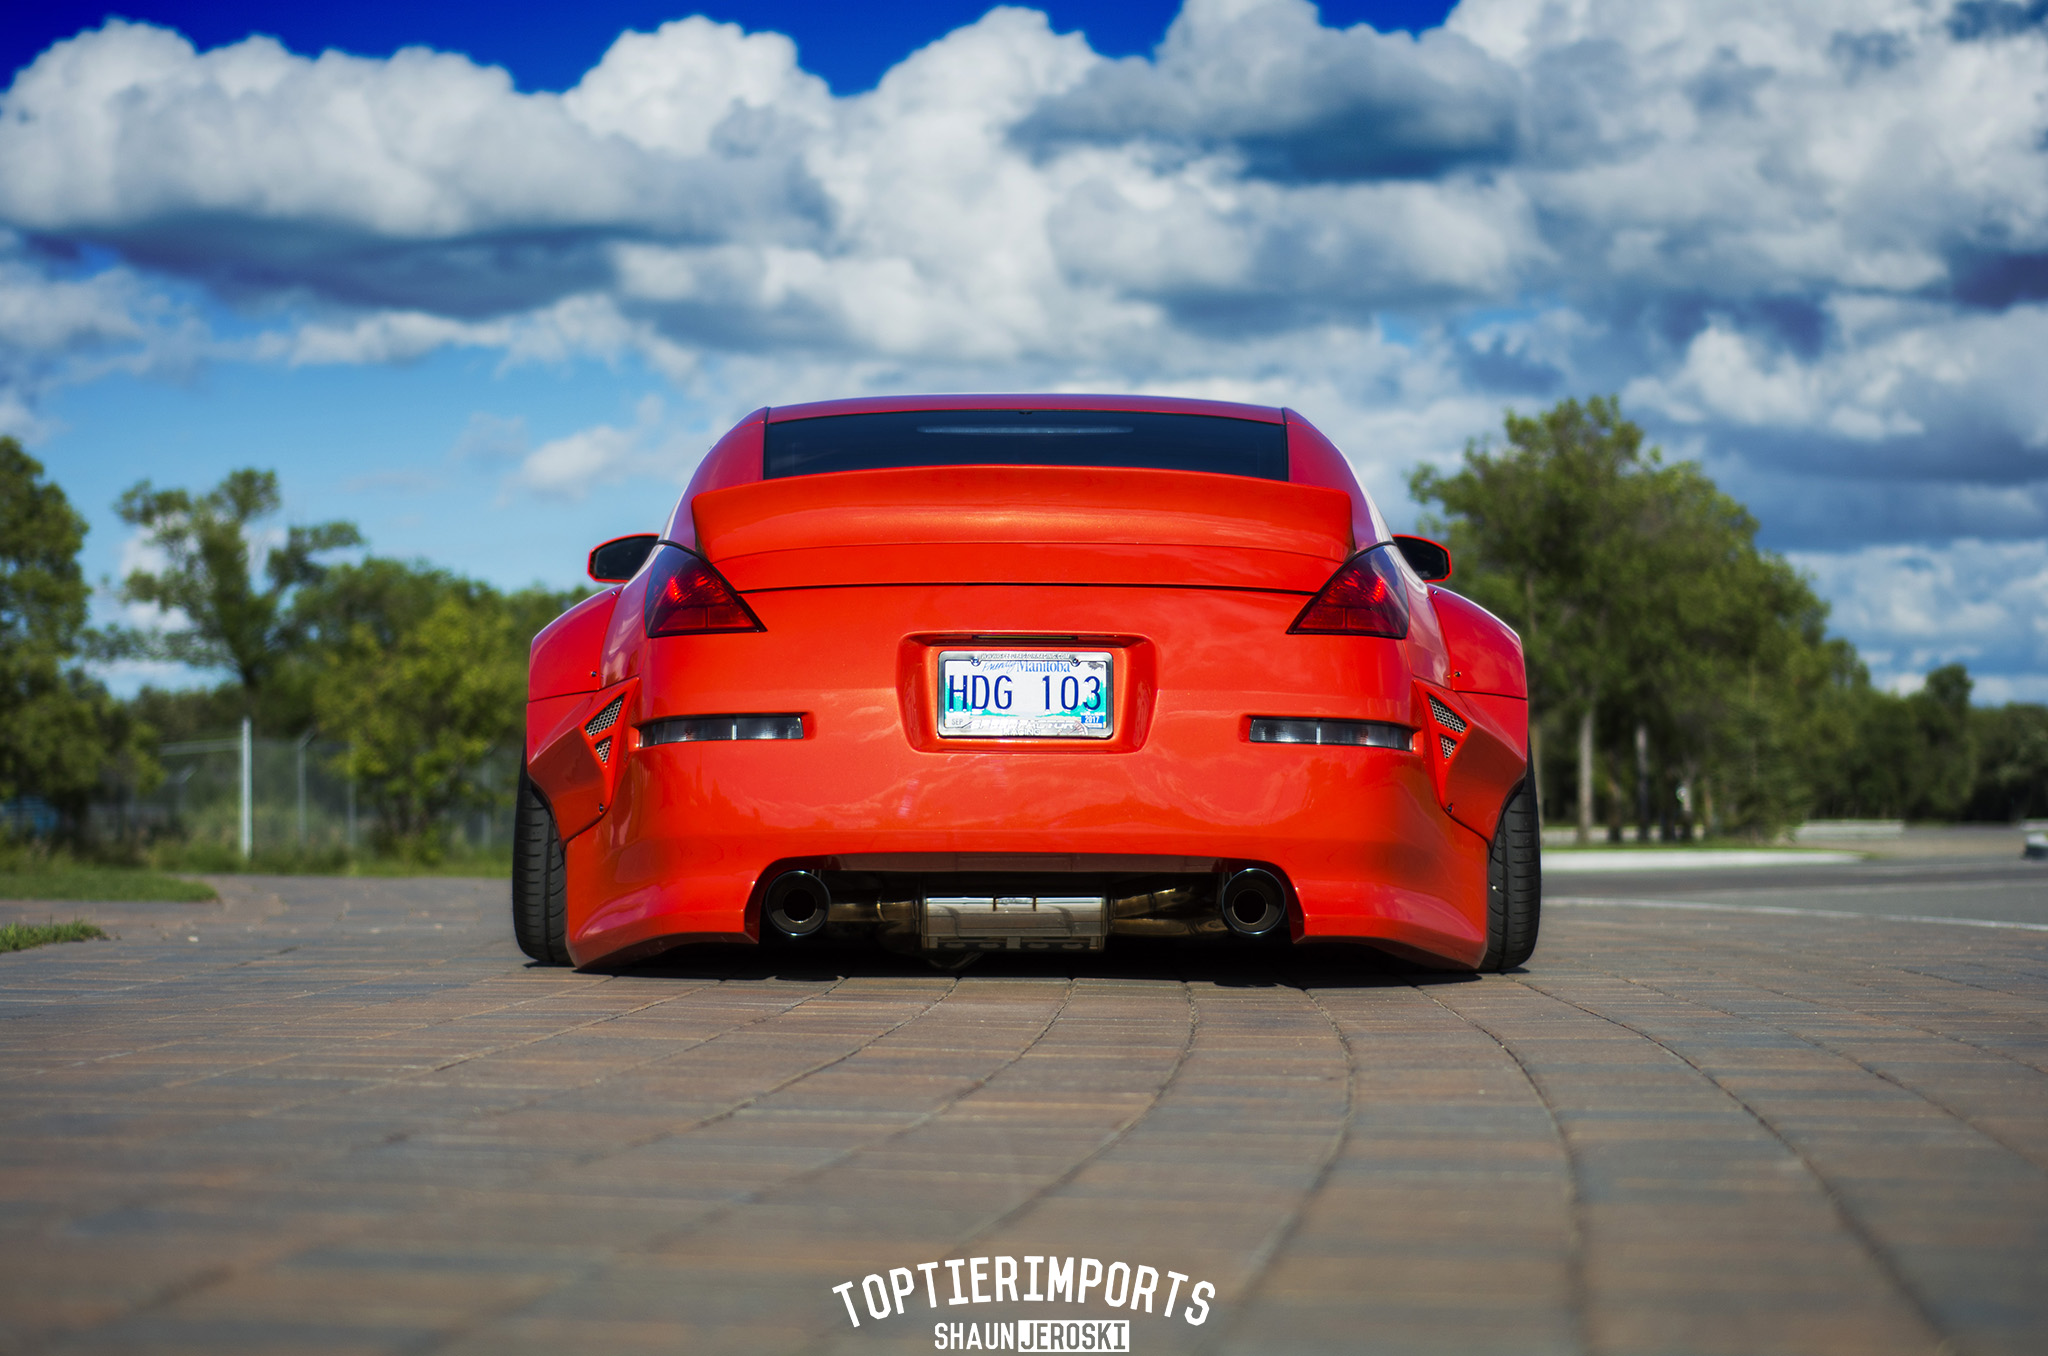
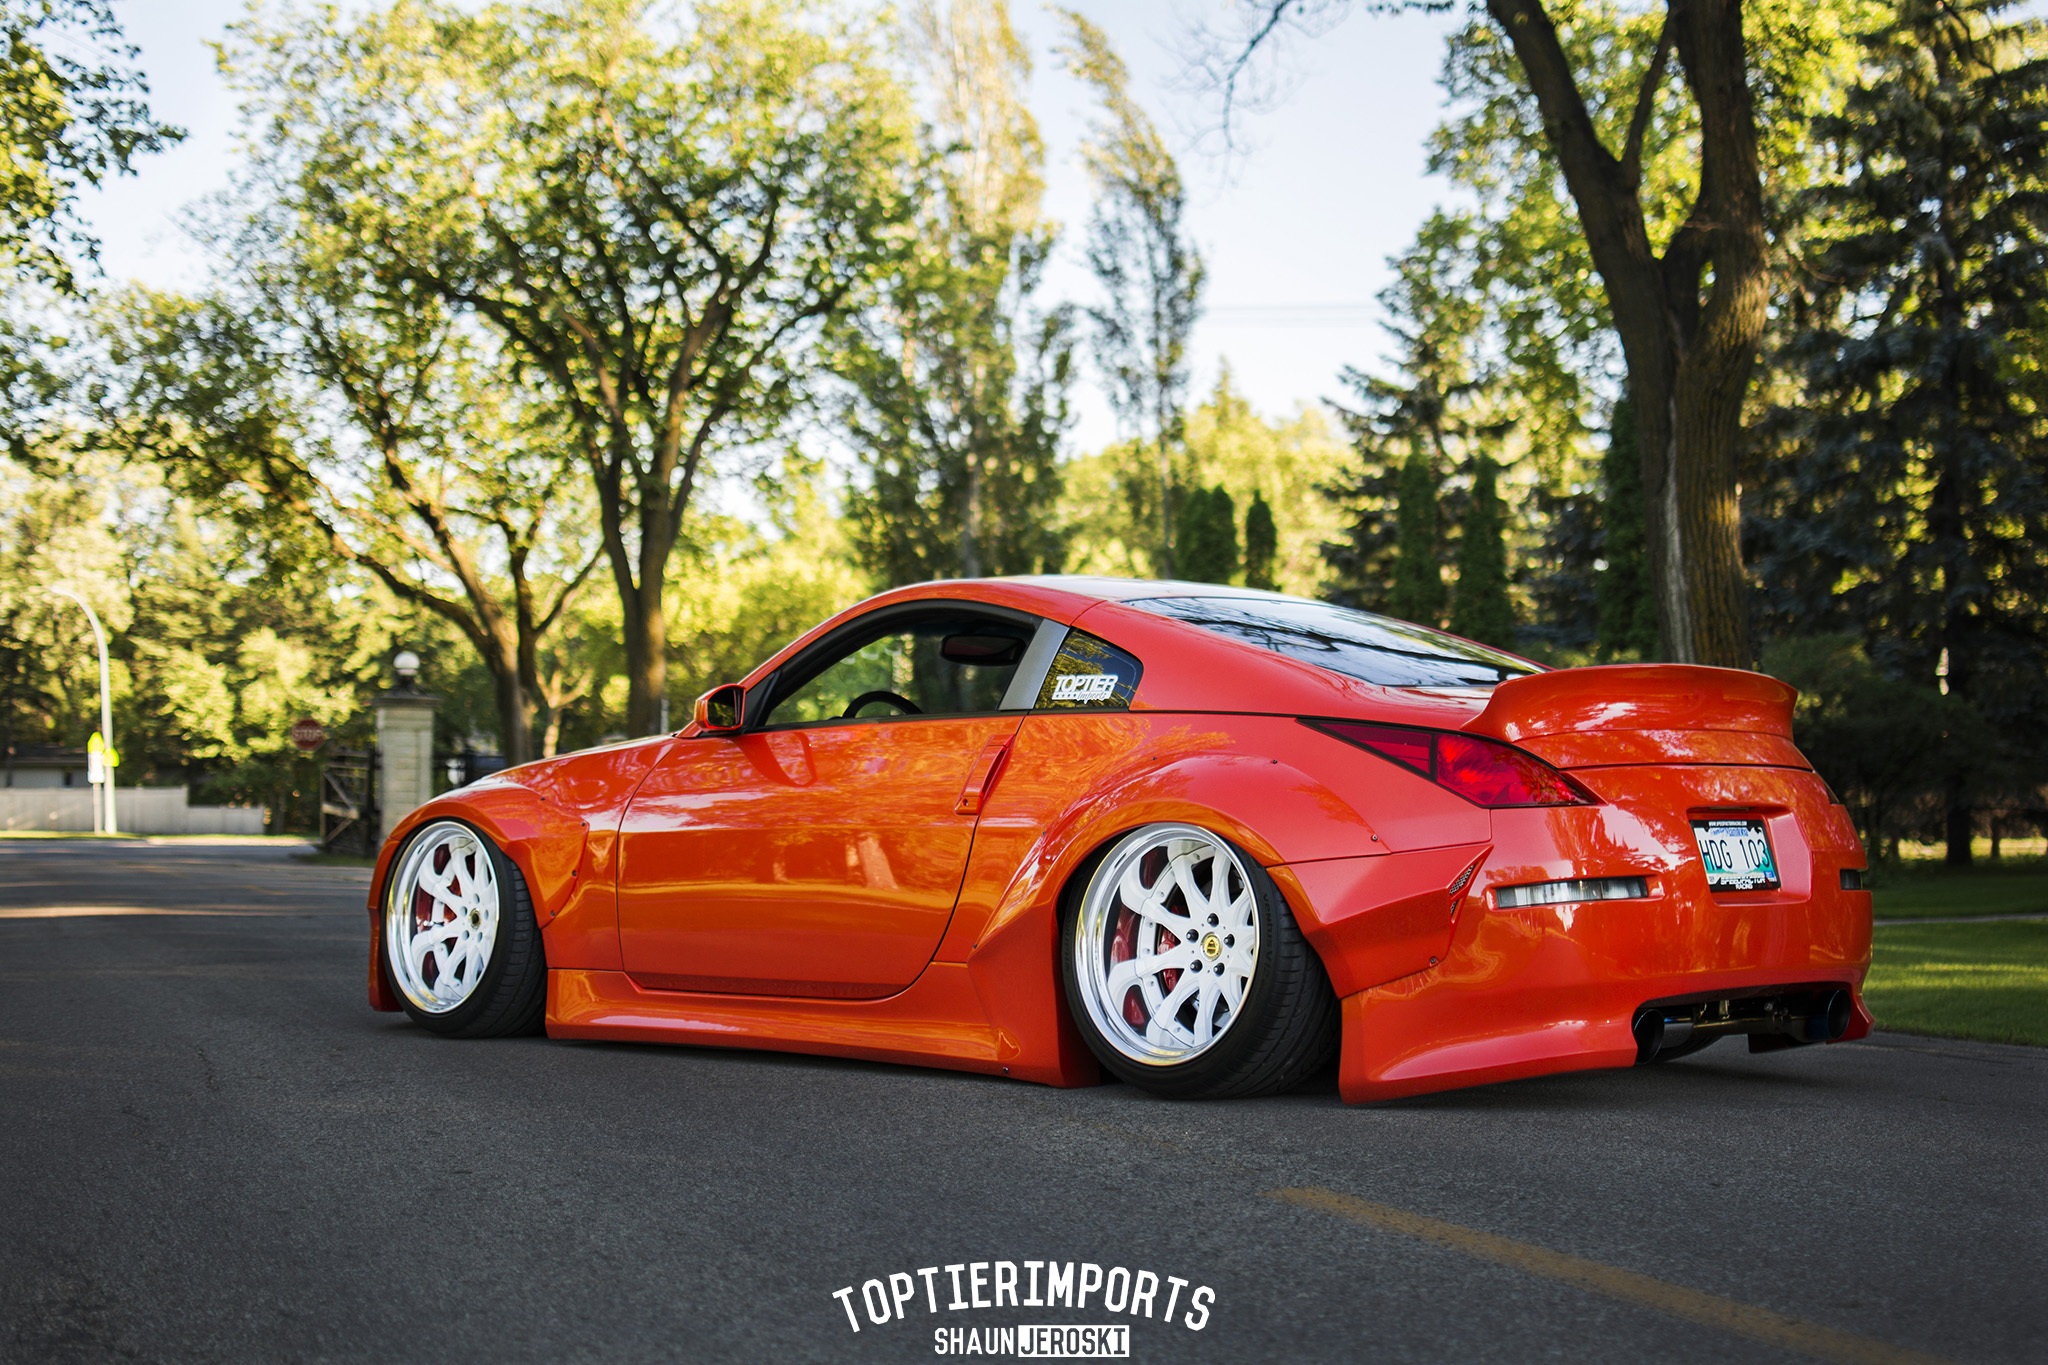
I'll start off with some finished pics, then get into all the details of the build.
It was a 2 year project to get the car from the first pic, to what you see below.
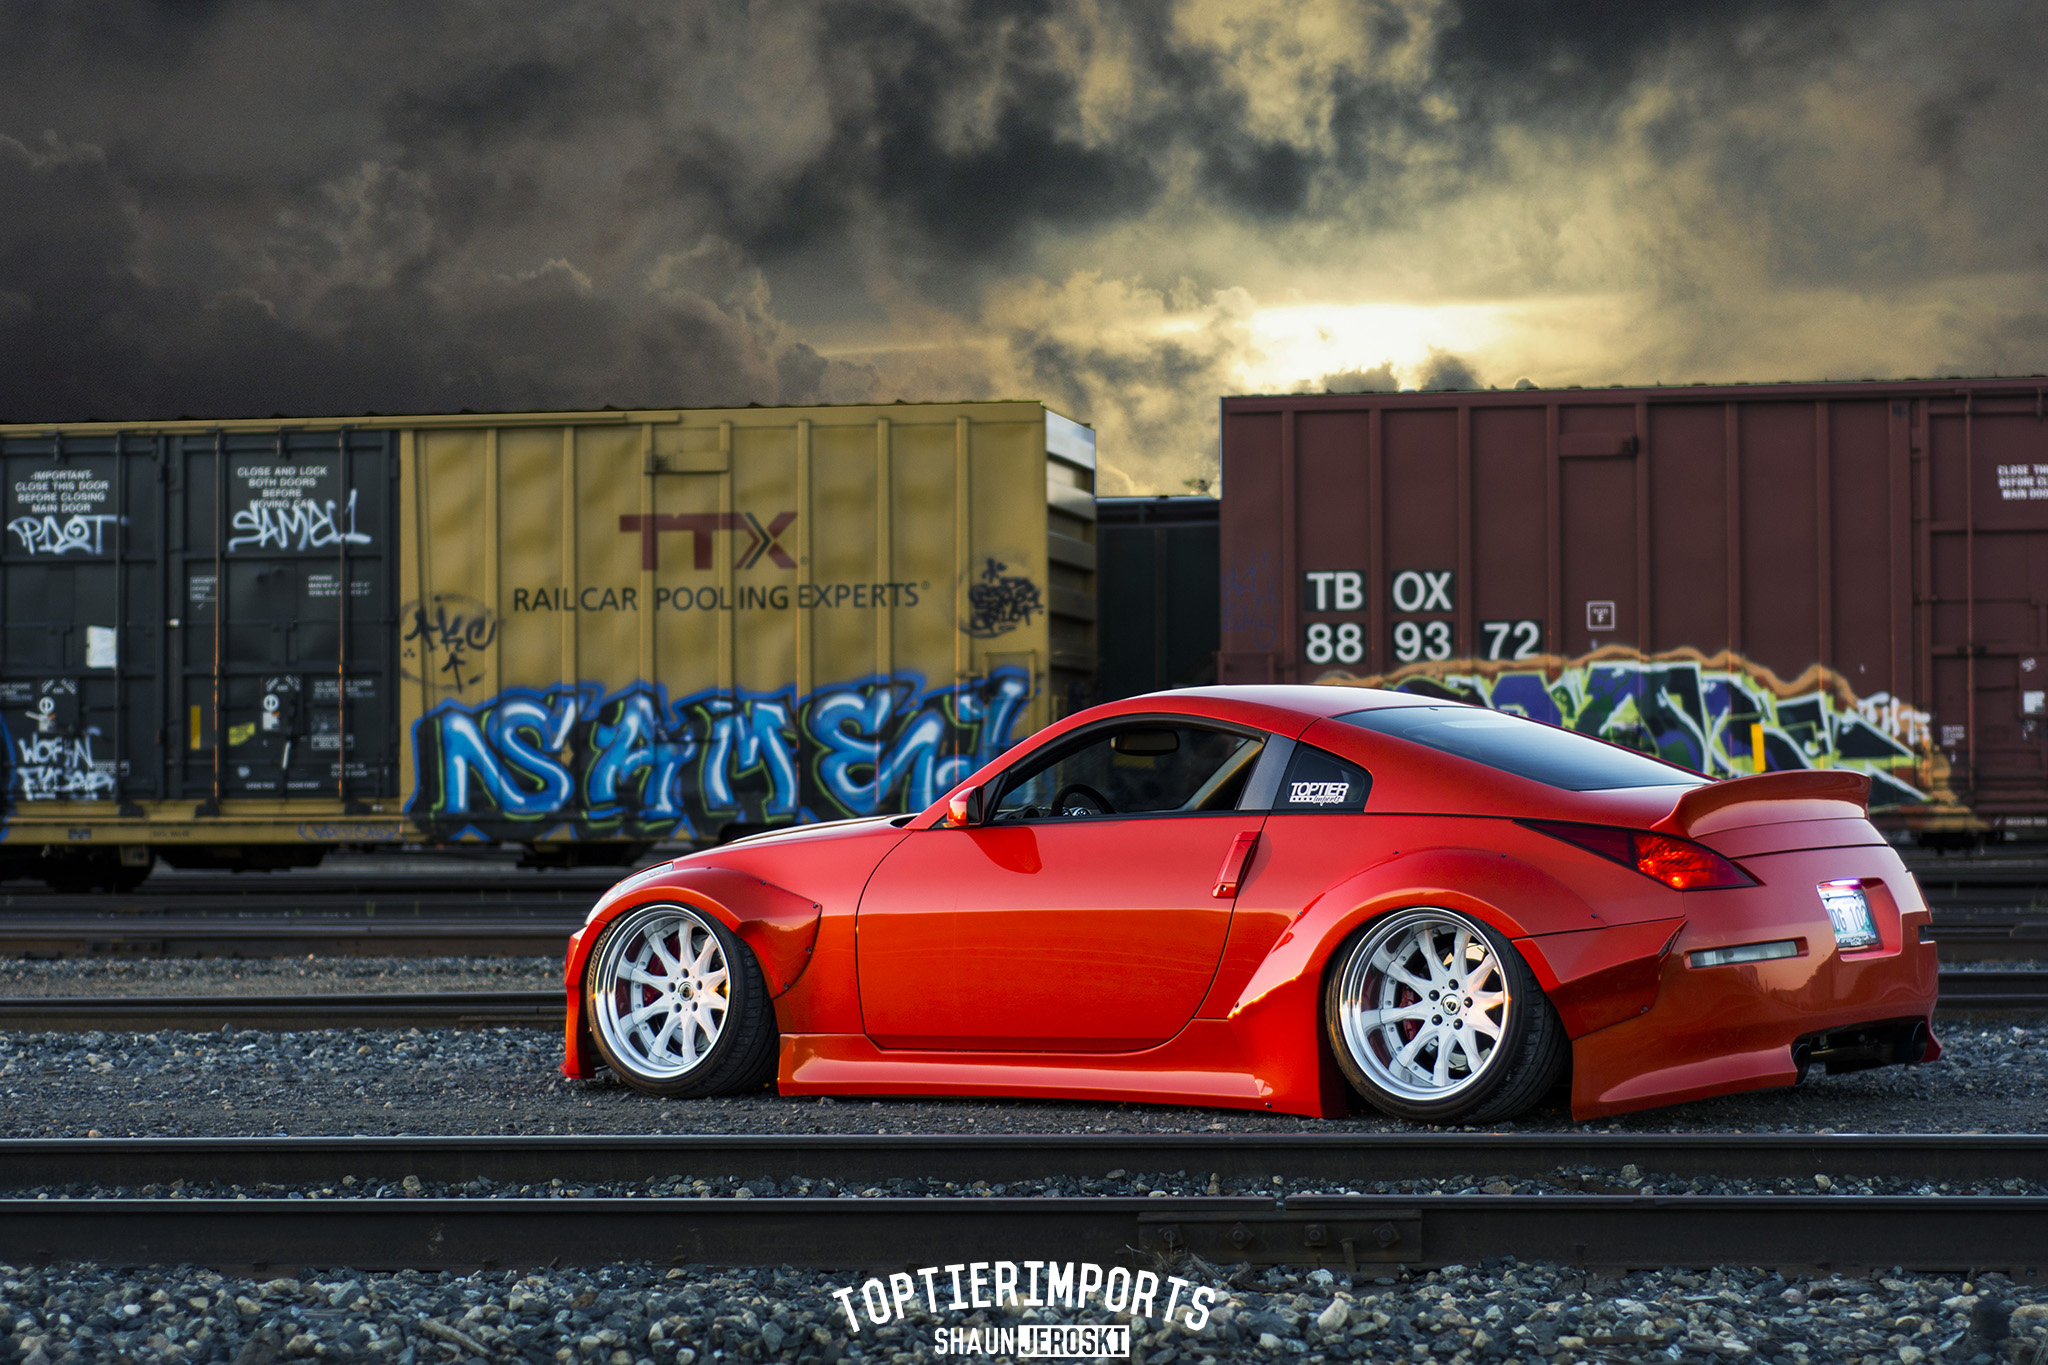
The main goal for the build was to make the car enjoyable to drive again. My last wheel/tire/suspension setup looked cool, but it was a pain in the *** to drive, scraping everywhere, having to watch the road like a hawk, not being able to go places because the car was too low.
I'm happy to say, the car is once again enjoyable to drive. With the air suspension the ride quality is better than it was stock and the handling is still excellent for what I use the car for. The Vortech supercharger has just the right amount of power to make the car an absolute blast to drive. I'm loving every aspect of the car again. So much so, that I've been daily driving the car since I finished it in July.
Some quick stats about the build:
- 1000+ hours of custom body work, fab, wiring, etc
- 295/30/19 front tires, 305/30 rears
- 500+ beers & about 30 26s of whiskey & vodka
- 7kg of base & mid coat paint
- many custom & one off parts
- 407 rwhp w/ maxed MAF. Retuning soon with new MAF.
- 5" of lift from laid out to fully aired up
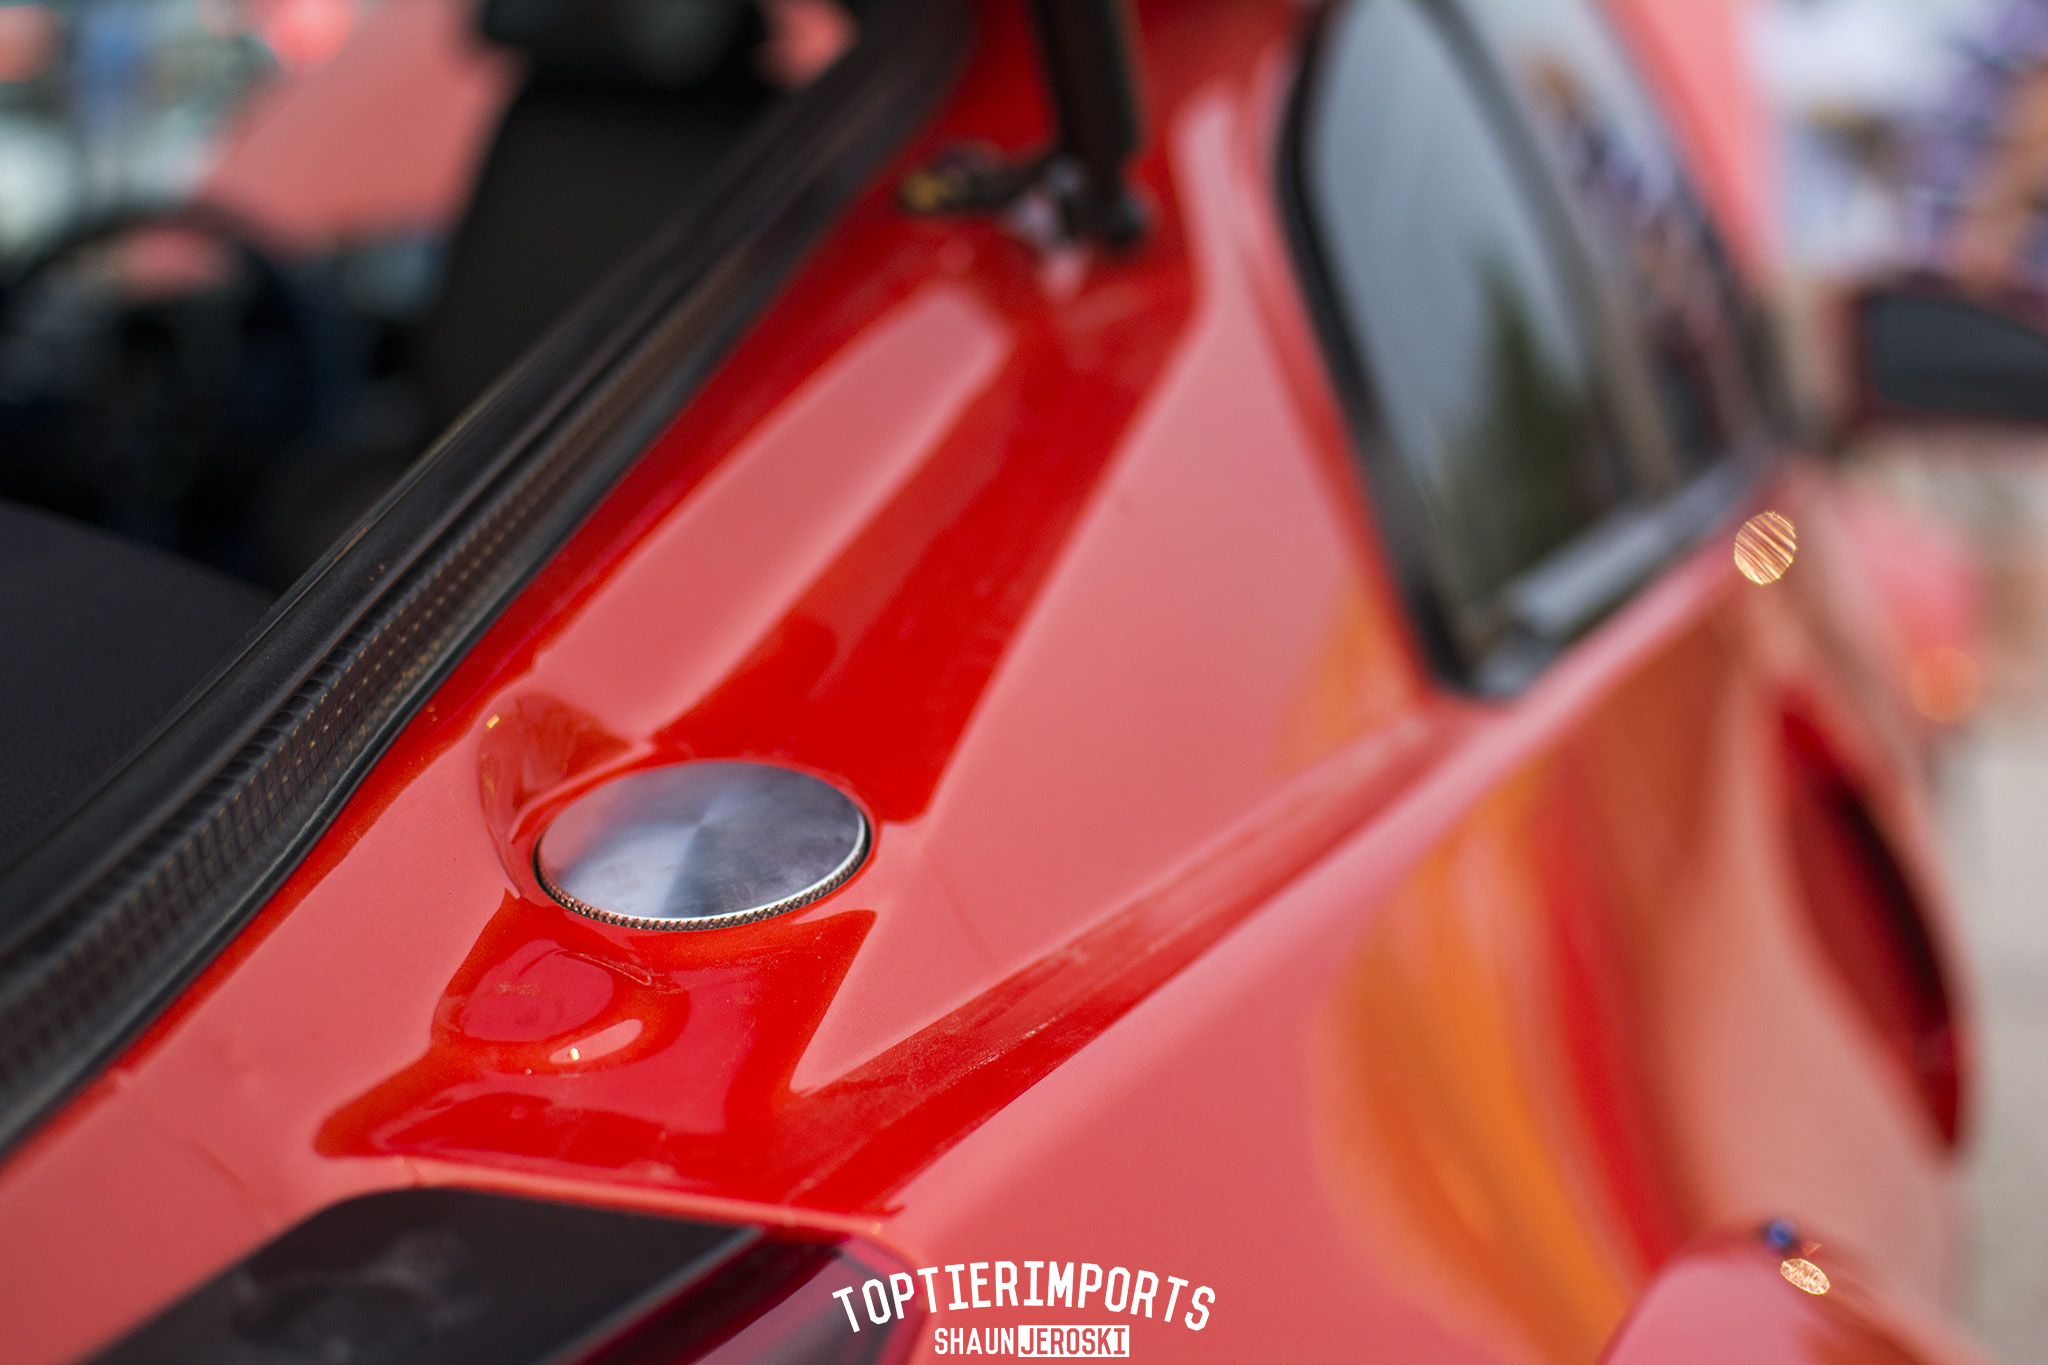
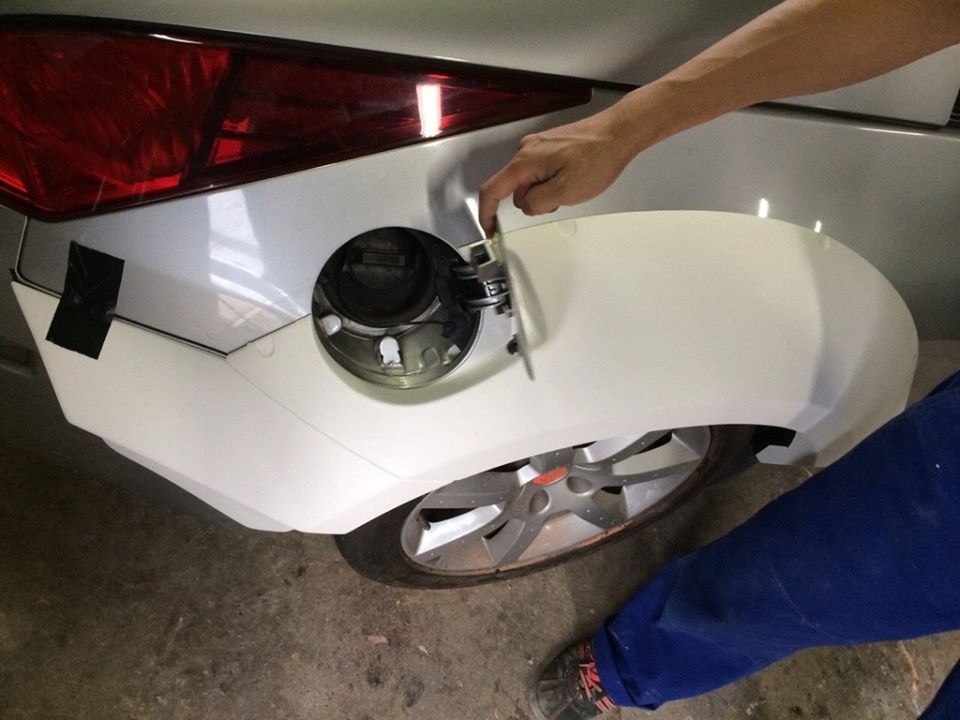
- Where did the gas cap go?
I'm also in a competition right now to go to SEMA, currently in the top 8. Voting starts again tomorrow and runs for two weeks. You can vote daily. Here is the voting link: www.bit.ly/350al
If you want to cheat and look ahead of what I post here, there are more pics & info here: https://www.facebook.com/Als350Z
It was a 2 year project to get the car from the first pic, to what you see below.
The main goal for the build was to make the car enjoyable to drive again. My last wheel/tire/suspension setup looked cool, but it was a pain in the *** to drive, scraping everywhere, having to watch the road like a hawk, not being able to go places because the car was too low.
I'm happy to say, the car is once again enjoyable to drive. With the air suspension the ride quality is better than it was stock and the handling is still excellent for what I use the car for. The Vortech supercharger has just the right amount of power to make the car an absolute blast to drive. I'm loving every aspect of the car again. So much so, that I've been daily driving the car since I finished it in July.
Some quick stats about the build:
- 1000+ hours of custom body work, fab, wiring, etc
- 295/30/19 front tires, 305/30 rears
- 500+ beers & about 30 26s of whiskey & vodka
- 7kg of base & mid coat paint
- many custom & one off parts
- 407 rwhp w/ maxed MAF. Retuning soon with new MAF.
- 5" of lift from laid out to fully aired up
- Where did the gas cap go?
I'm also in a competition right now to go to SEMA, currently in the top 8. Voting starts again tomorrow and runs for two weeks. You can vote daily. Here is the voting link: www.bit.ly/350al


If you want to cheat and look ahead of what I post here, there are more pics & info here: https://www.facebook.com/Als350Z
Last edited by 350Z_Al; Oct 26, 2015 at 12:06 PM.


Trending Topics


Thread Starter
Registered User
Joined: Sep 2008
Posts: 908
Likes: 28
From: Winnipeg, MB
What about polished?... Like everything under the hood. hmm.. But black would look good too lol

Registered User
Joined: May 2014
Posts: 2,892
Likes: 277
From: arizona
Not my taste. Looks too busy and takes alot away from the body line. And i would find it EXTREMELY annoying having to pop my trunk everytime i gas up. And the hood just doesnt look like it belong to a 350z. Just my opinion though.
Polished would look awesome as well but would be PITA to keep clean. I'm thinking any black whether gloss or matte would set it off. Maybe Black with stardast in white to match the wheels..
Thread Starter
Registered User
Joined: Sep 2008
Posts: 908
Likes: 28
From: Winnipeg, MB
Here is the mod list:
Exterior
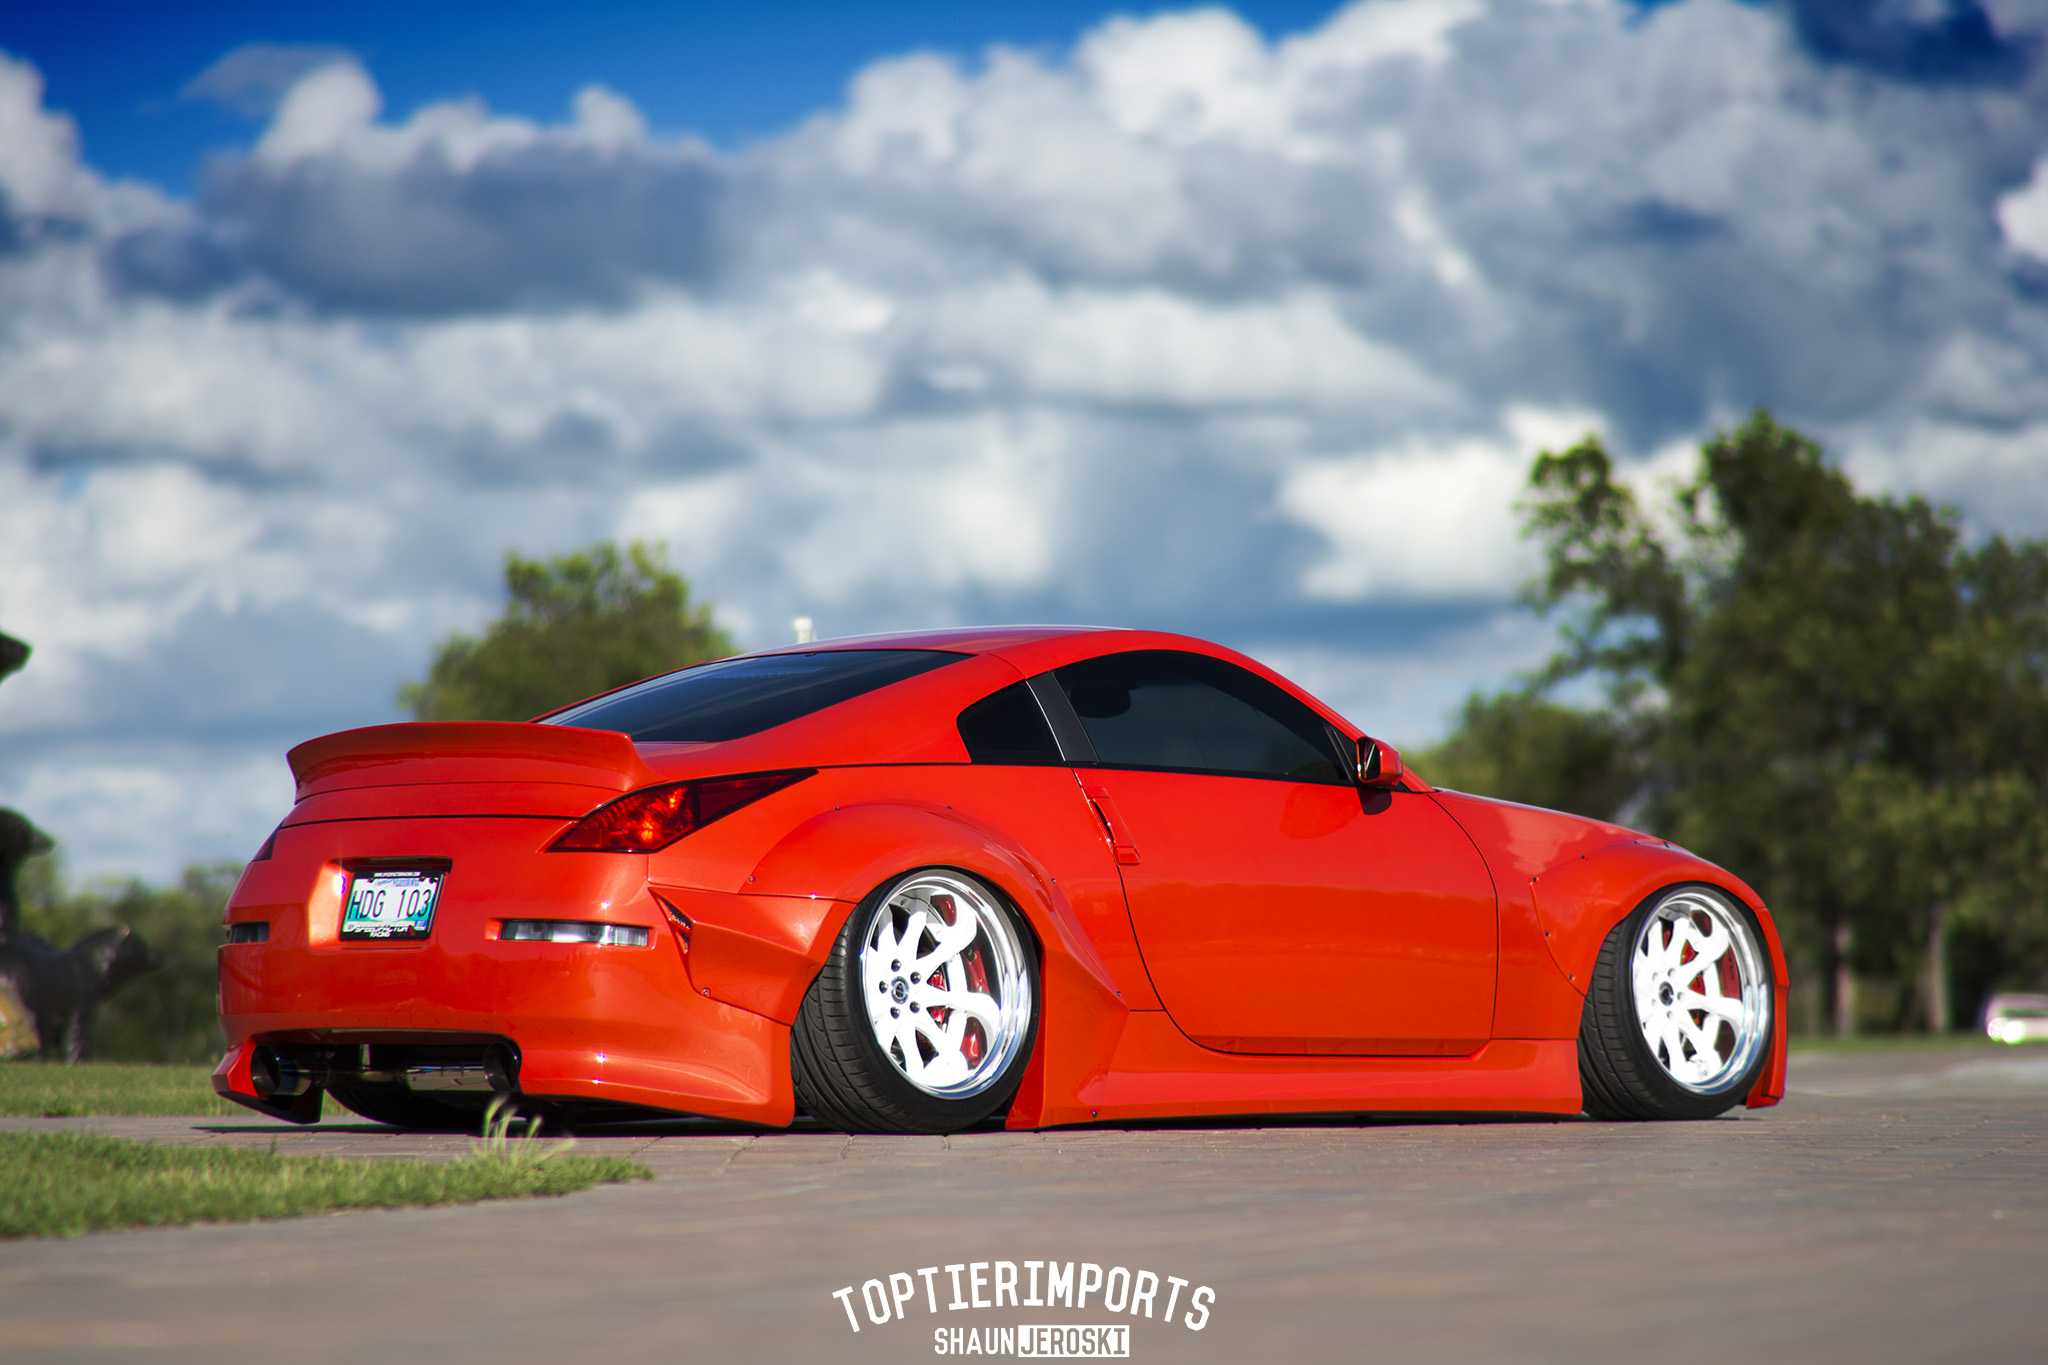
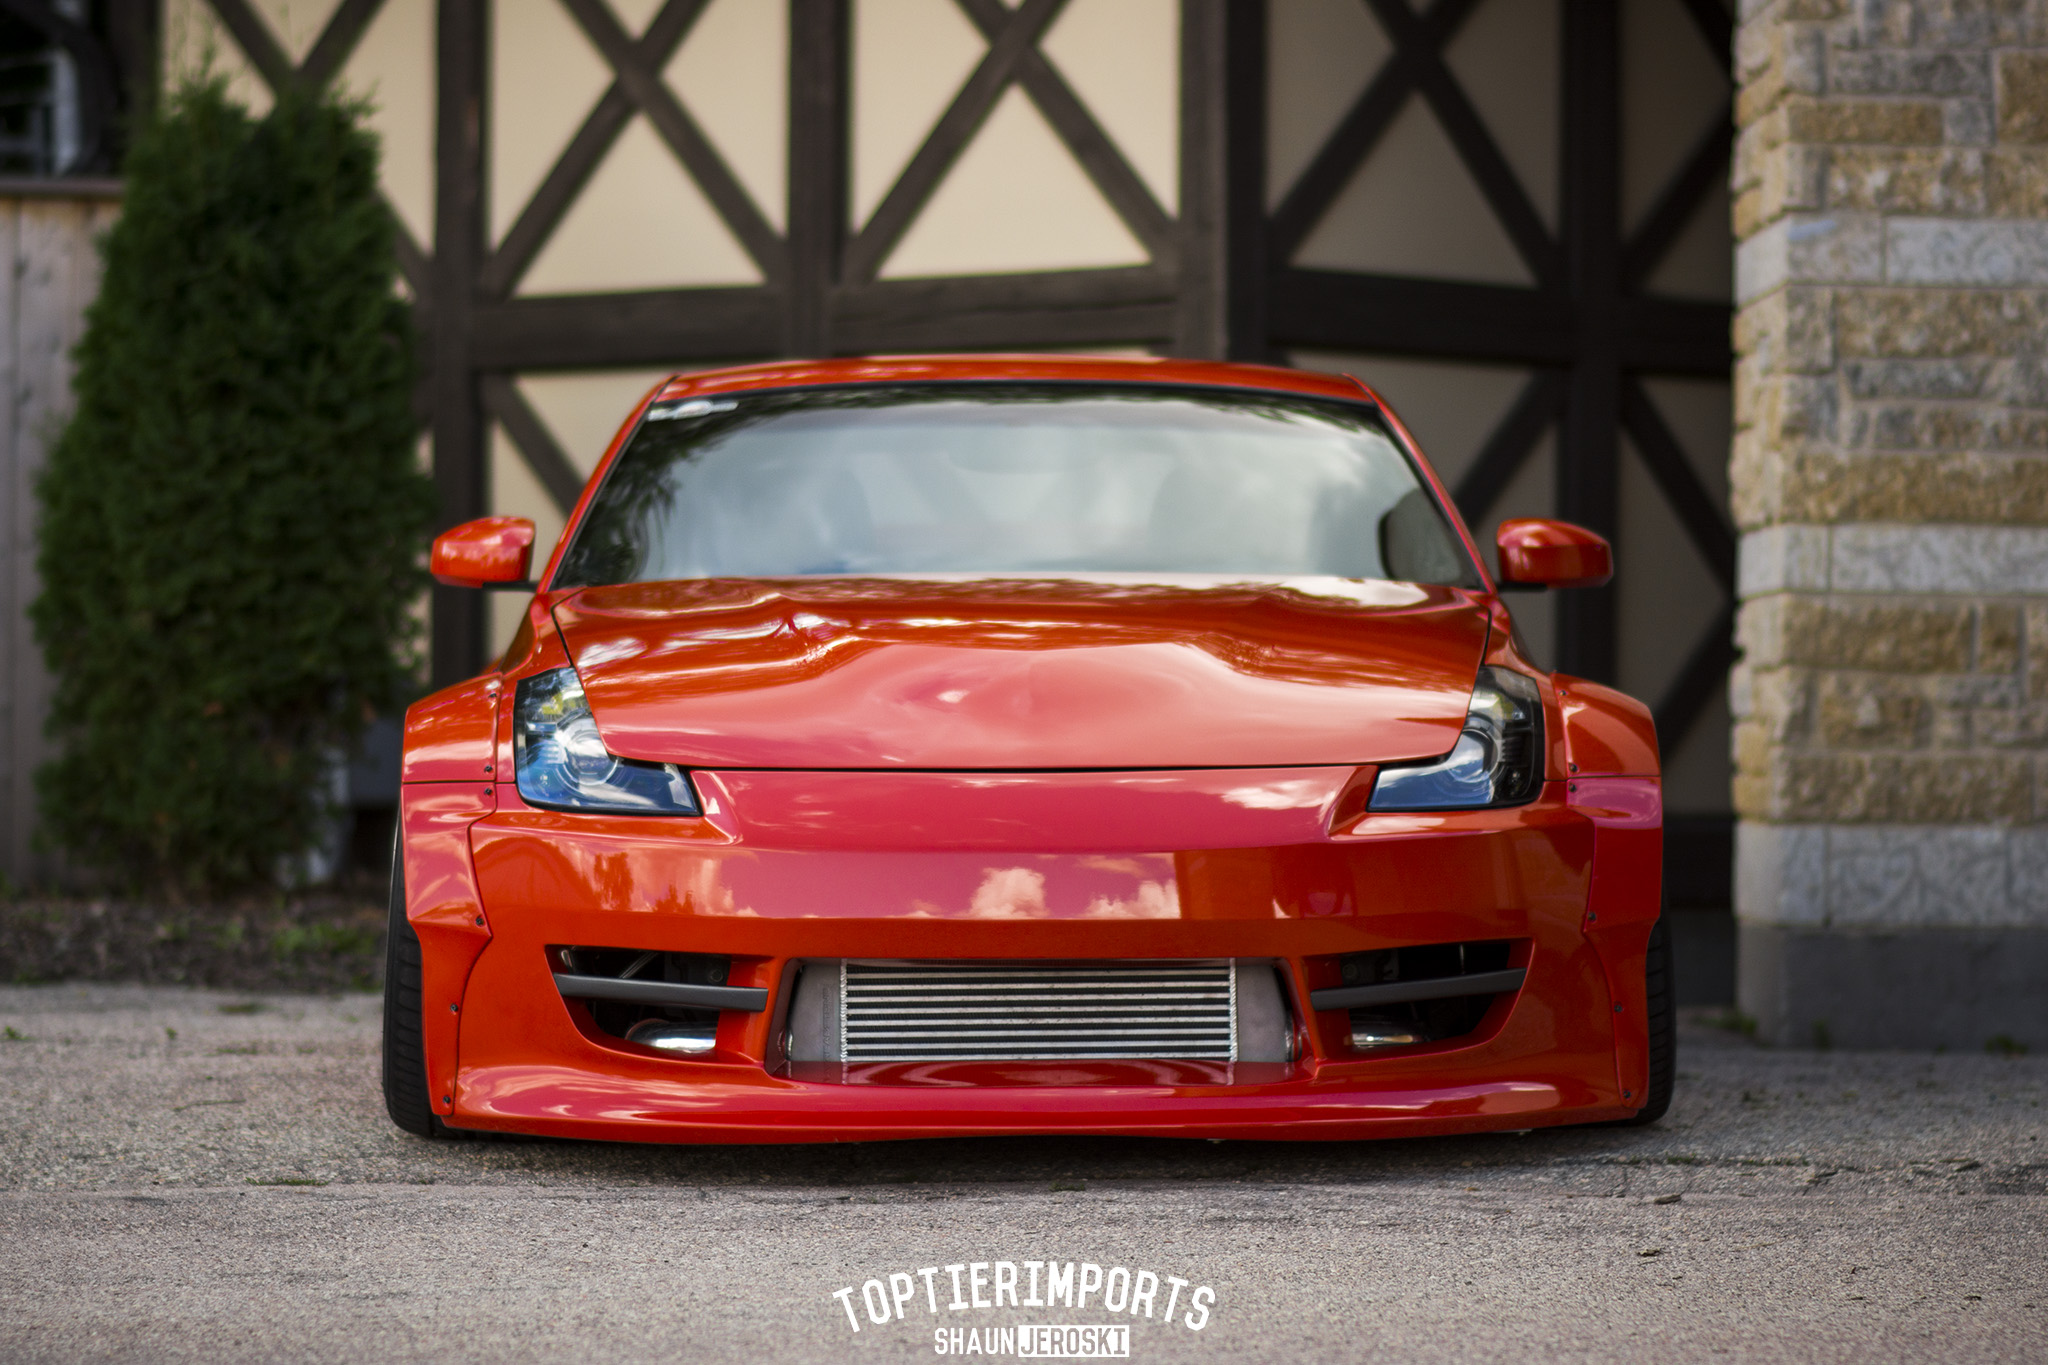
- Custom Blended Three Stage Paint Color
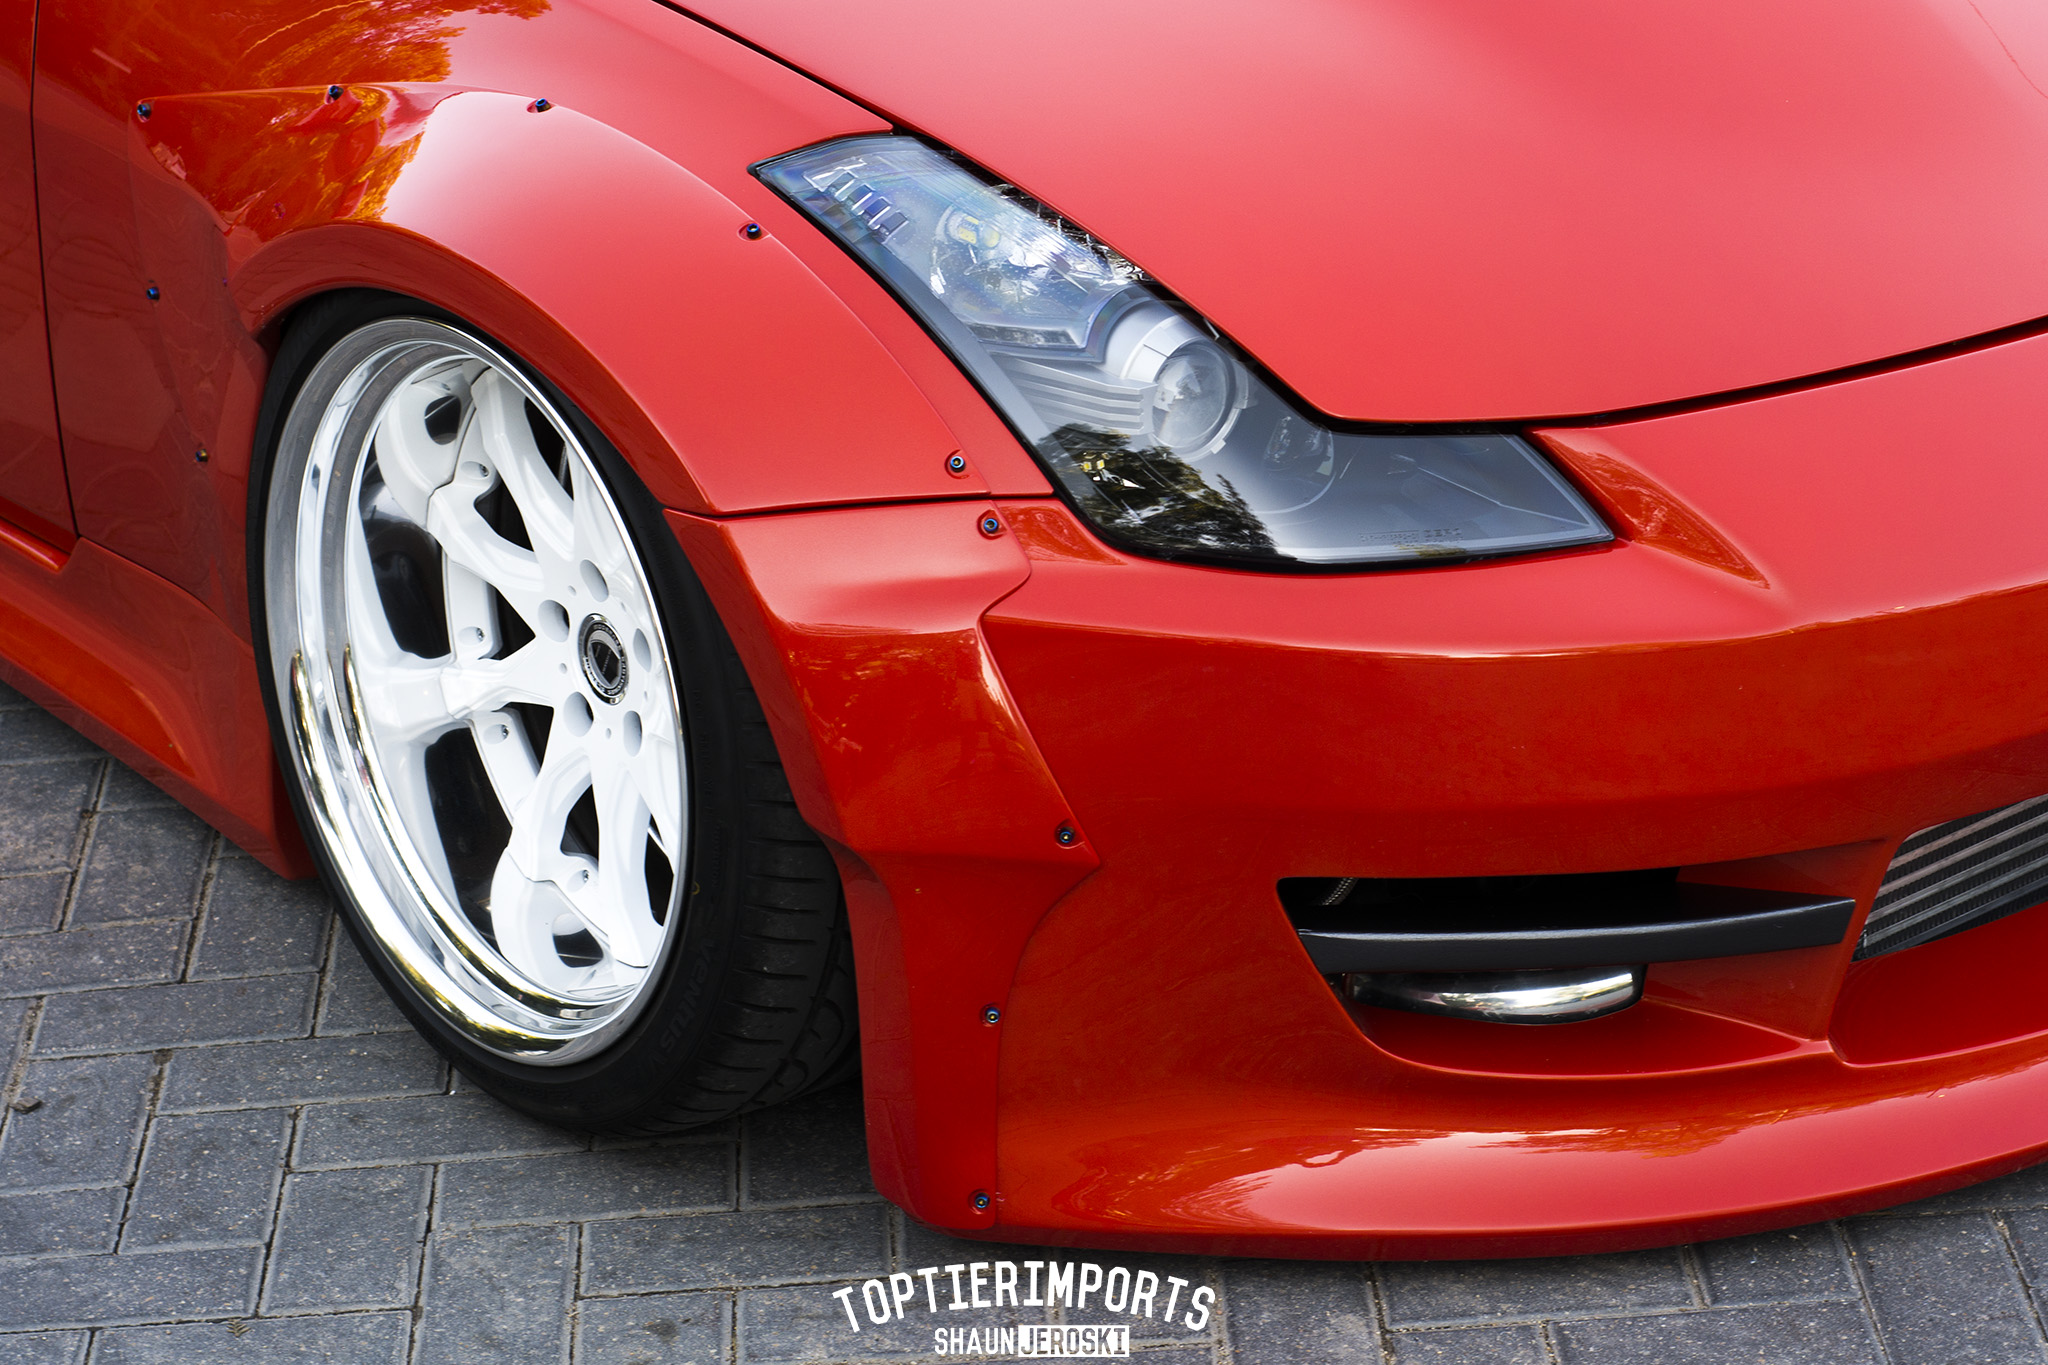
- Stardast Wide Fender Kit (First Production Kit in the World)
- Stardast Front Fender Flares Widened �” and Tapered
- Stardast Front Lower Flare Piece Extensively Modified To Fit Bumper
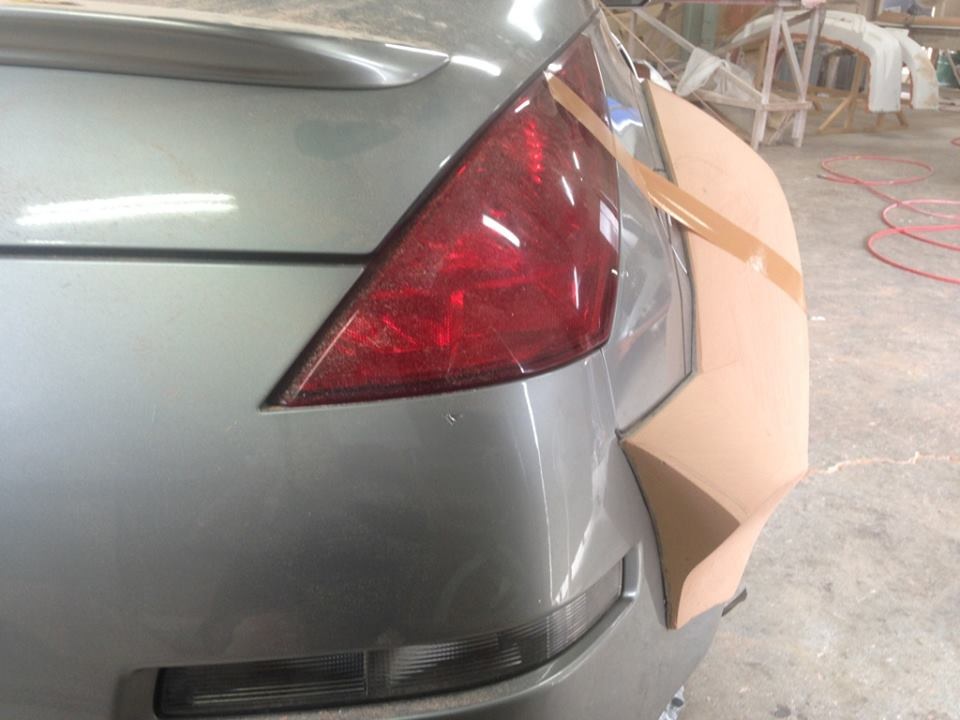
- Stardast Rear Fender Flares Shaved and Extended Lower
- Stardast Rear Lower Flare Piece Reshaped To Fit Bumper
- Front & Rear Fenders Cut & Welded for Tire Clearance
- Scratch Made Rear Wing
- Version Select Bumpers and Side Skirts
- Tucked Rear Bumper Lower Center Section
- Rear Bumper Modified For LED Strip License Plate Light
- Rear Bumper Sound Deadened To Quiet Air Compressors
- Scratch Made Front Bumper Driving Lights
- 08’ OEM Hump Hood
- Hood Extended and Molded Over Headlights
- Shaved Side Fender Emblems & Rear Trunk Emblems
- Shaved Fuel Cap & Antenna
- Shaved Rear Wiper & Sprayer
- Flush Pop-Up Fuel Filler Welded in Trunk Drip Rail
- 08’ Bi-Xenon Headlights
- STI-R Projector Lenses
- ZLEDs Headlight Switchback LEDs, Demon Eye LEDs & Ironman Mod
- ZLEDs Rear Signal Light LED Conversion (1200LEDs)
- Chromed Door Hinges, Door Latches, Trunk Hinges, & Trunk Latch
- TiBurnt Titanium Screws Throughout
- Z1 Motorsports UHP Hatch Struts
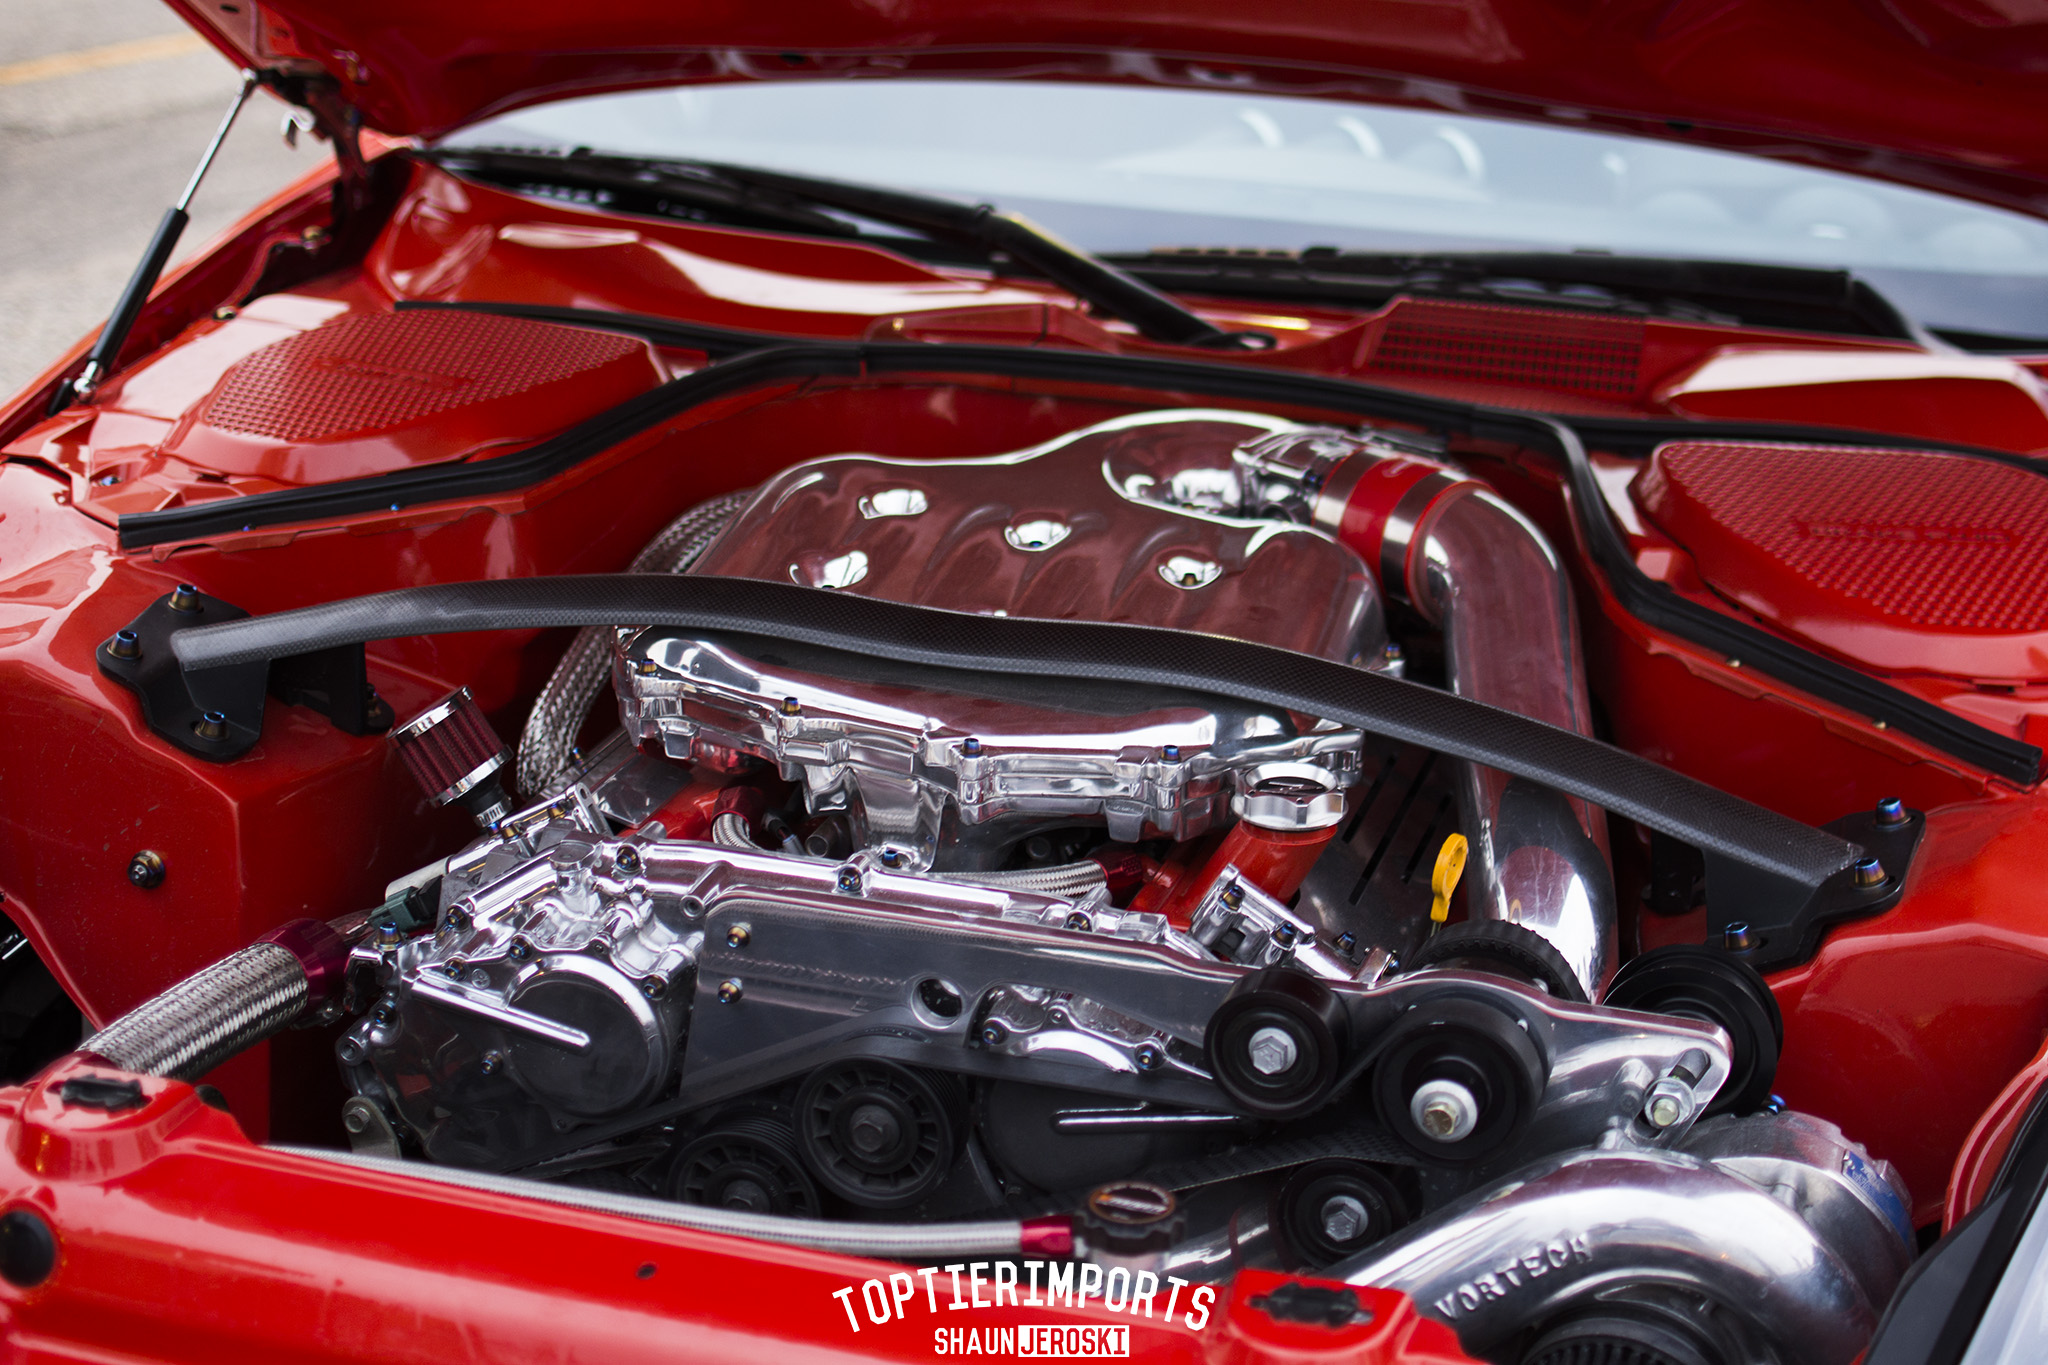
Engine Bay Cosmetic
- Shaved and Painted Engine Bay, Strut Towers & Firewall
- TiBurnt Titanium Hardware Throughout
- Hidden Strut Mounting
- Tucked Brake, AC & Vacuum Lines
- Tucked Wiring Harnesses
- Tucked Power Steering Reservoir & Lines
- Tucked Coolant Overflow & Washer Fluid Tanks
- Tucked Fuel Pressure Regulator
- Braided Stainless Coolant Soft Lines
- Shaved & Chromed Coolant Hard Pipes
- Shaved & Polished Intake Plenum & Lower Manifold
- Polished Idler Pulley, Plenum Spacer, Throttle Body
- Polished & Chromed Timing Chain Cover & Accessory Covers
- Polished Coil Pack Covers
- Painted Valve Covers, Cowl Covers & Core Support
- Chromed Hood Hinges
- The Z Store Hood Dampers
Supercharger System
- Vortech ‘Tuner’ Supercharger Kit
- 3” One Piece Polished Supercharger Up-Pipe & MAF Housing
- Upgraded 3” Intercooler Piping
- Fully Polished Piping, Bracket and Supercharger
- 2.87” Jackshaft Pulley
- 34/28 Tooth Cog Pulley Setup
- Treadstone TR1045 Intercooler
- Added Jackshaft Tensioner Pullies
Fuel System & Engine
- Osiris UpRev Engine Management w/ Map Switching
- Deatschwerks DW300 Fuel Pump
- R35 GTR Fuel Injectors
- Tucked CJM Stage 0 Return Fuel System
- Aeromotive A1000-6 Fuel Pressure Regulator
- NGK One-Step Colder Plugs
- Mishimoto Radiator
- Mishimoto Fans & Shroud
Drivetrain & Exhaust
- Motordyne ART Resonated Test Pipes
- Motordyne XYZ Y-Pipe
- MXP Cat-Back Exhaust System (#1 of 1)
- Comp Clutch Lightweight Flywheel
- Comp Clutch Stage 4 6-Puck Clutch
- Whiteline Differential Bushings
Wheels, Tires & Brakes
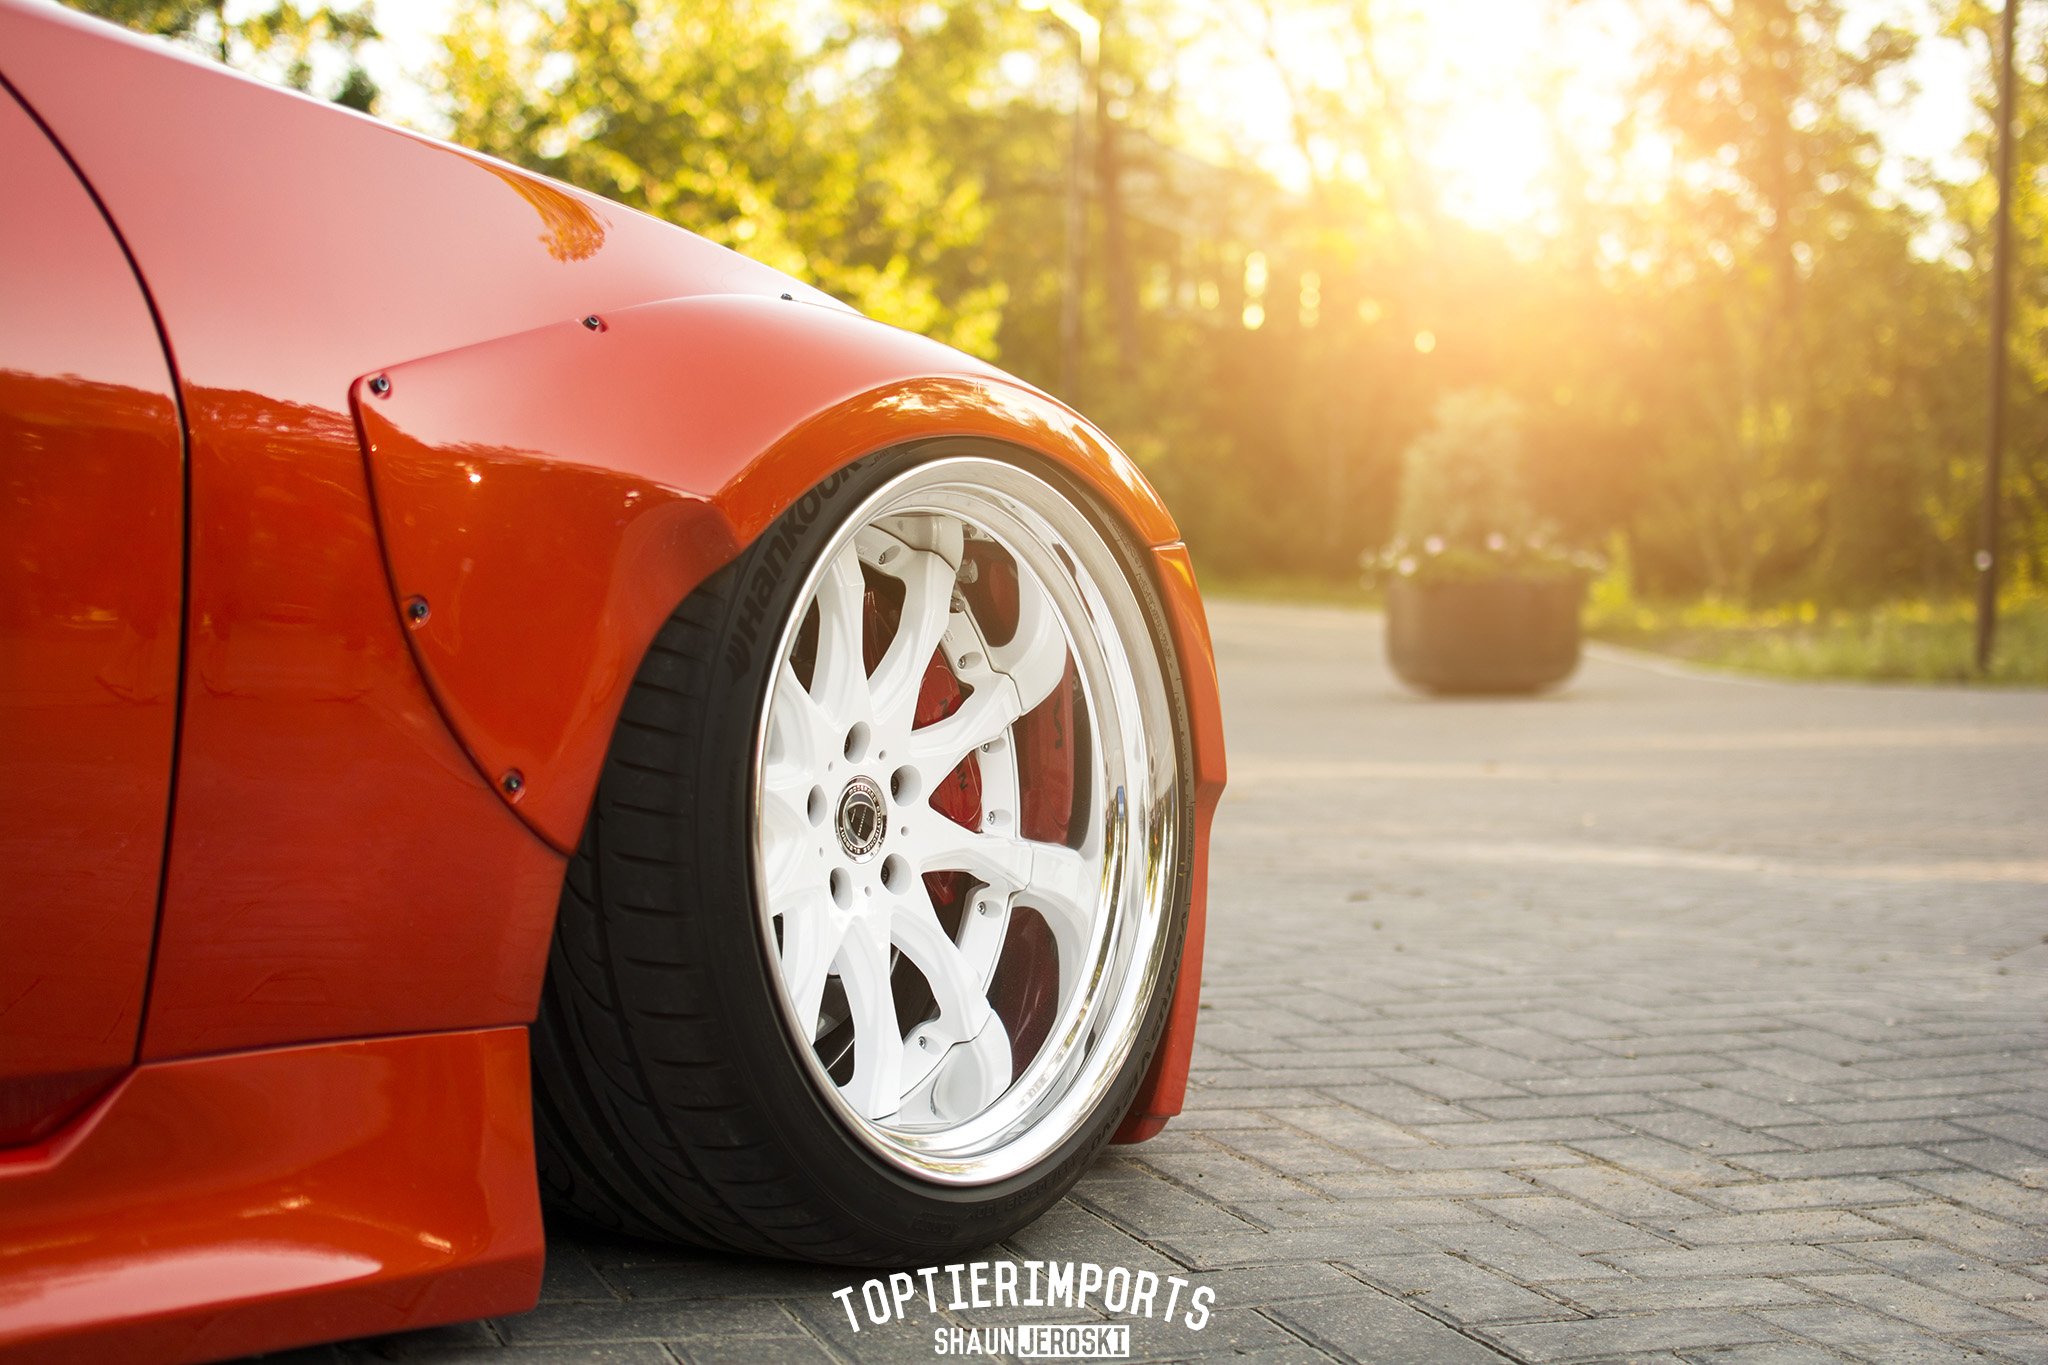
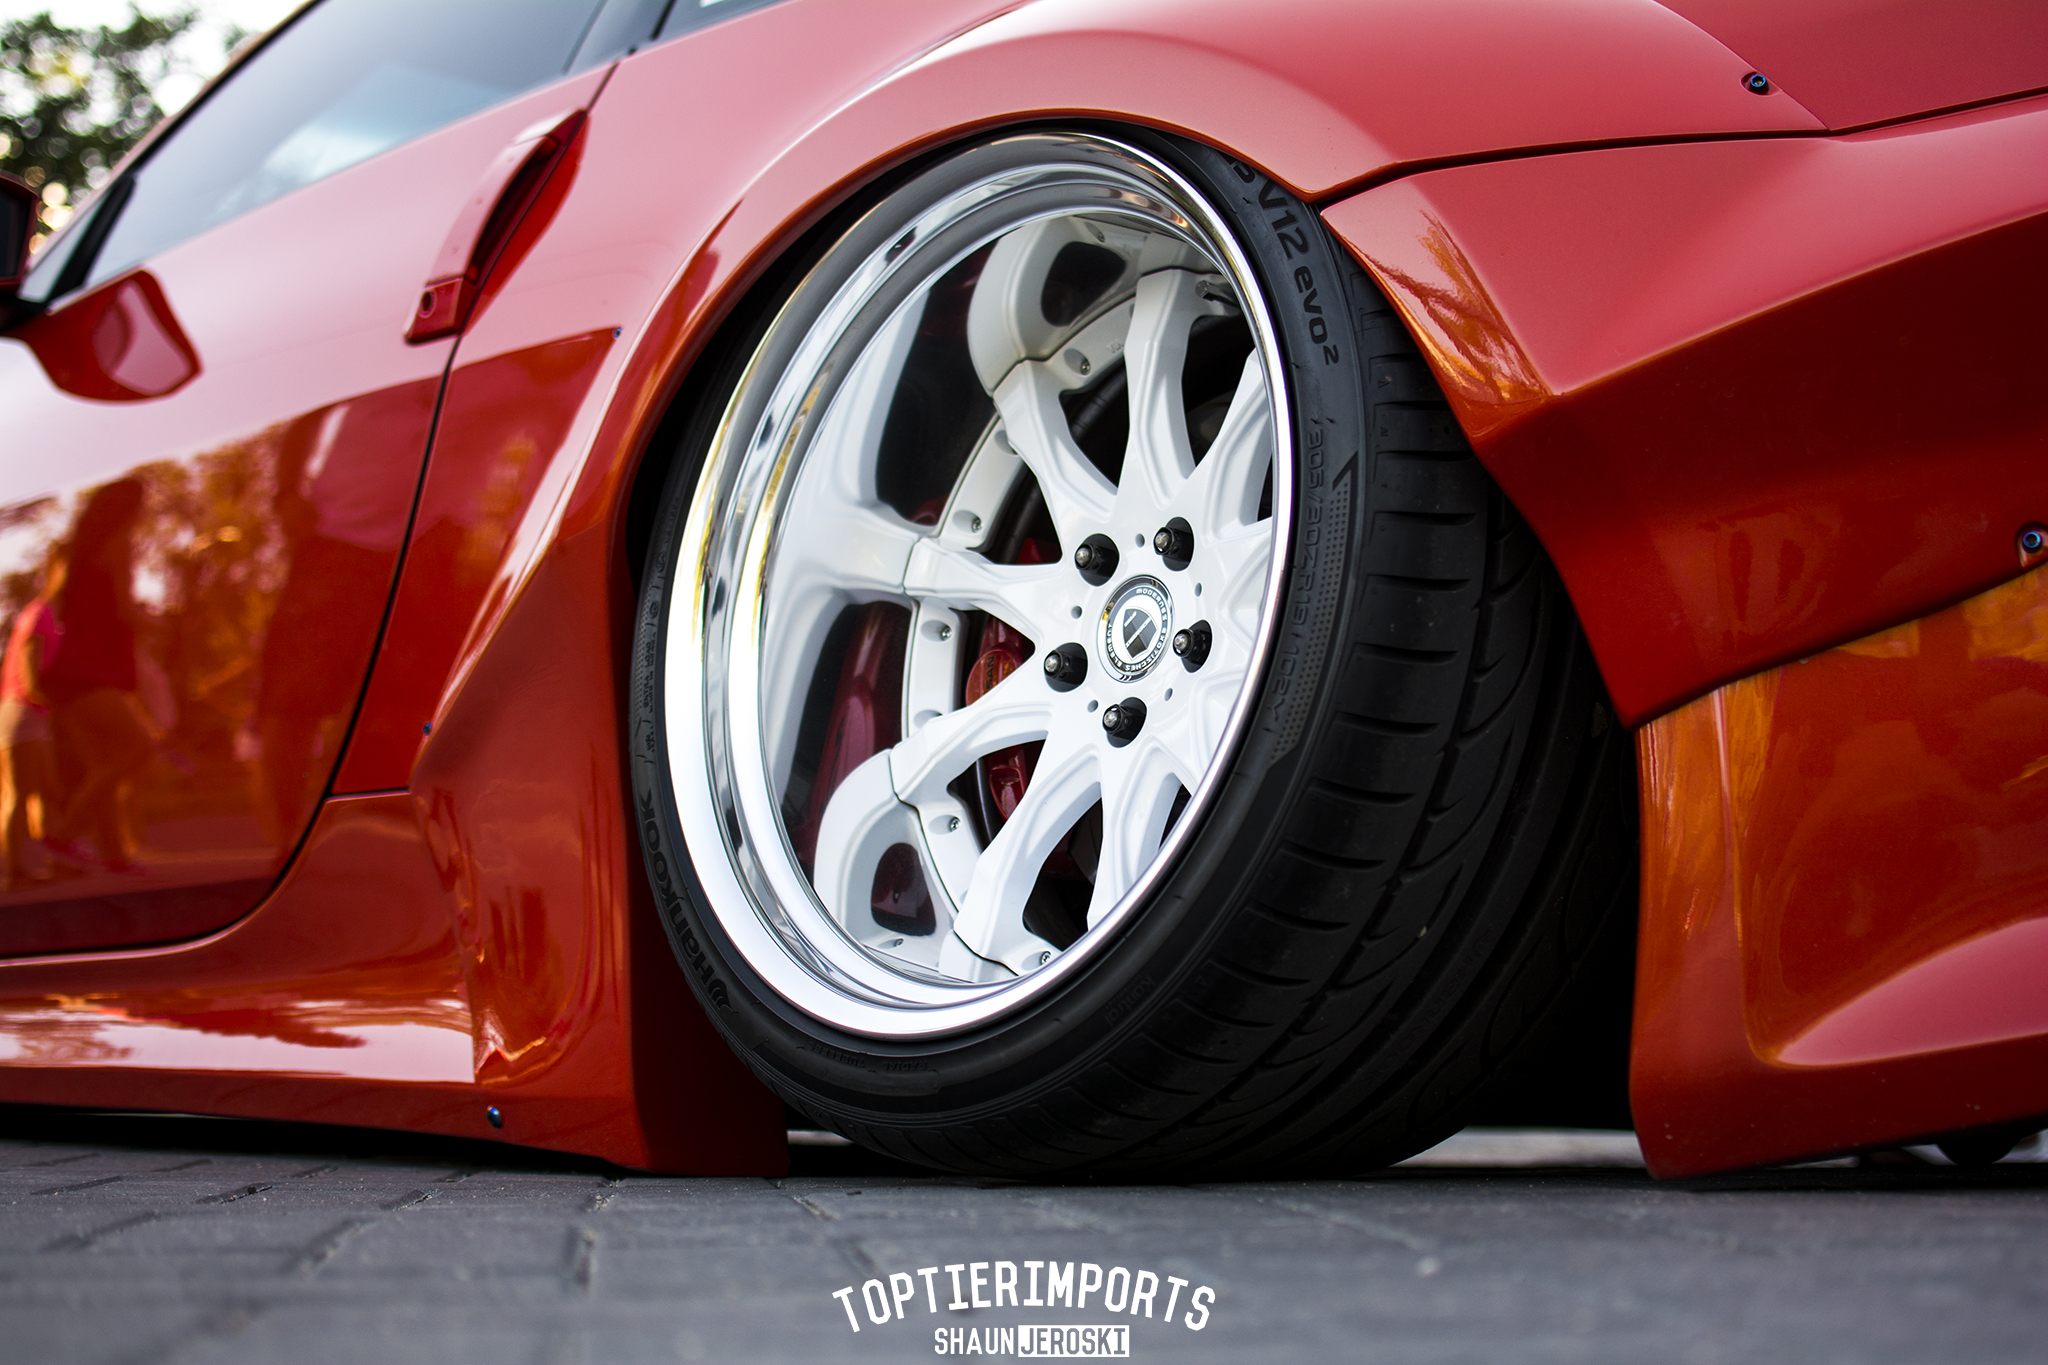
- 19x11.5” Work Schwert SC2 Wheels
- Project Kics iConix Lug Nuts
- Project Kics iConix Red Aluminum Caps
- Hankook 295/30/19 Front, 305/30/19 Rear Tires
- Z1 Motorsports Akebono Big Brake Kit
- Z1 Motorsports Stainless Steel Braided Brake Lines
- DBA Two-Piece 14” Front Rotors
- DBA One-Piece 14” Rear Rotors
Interior
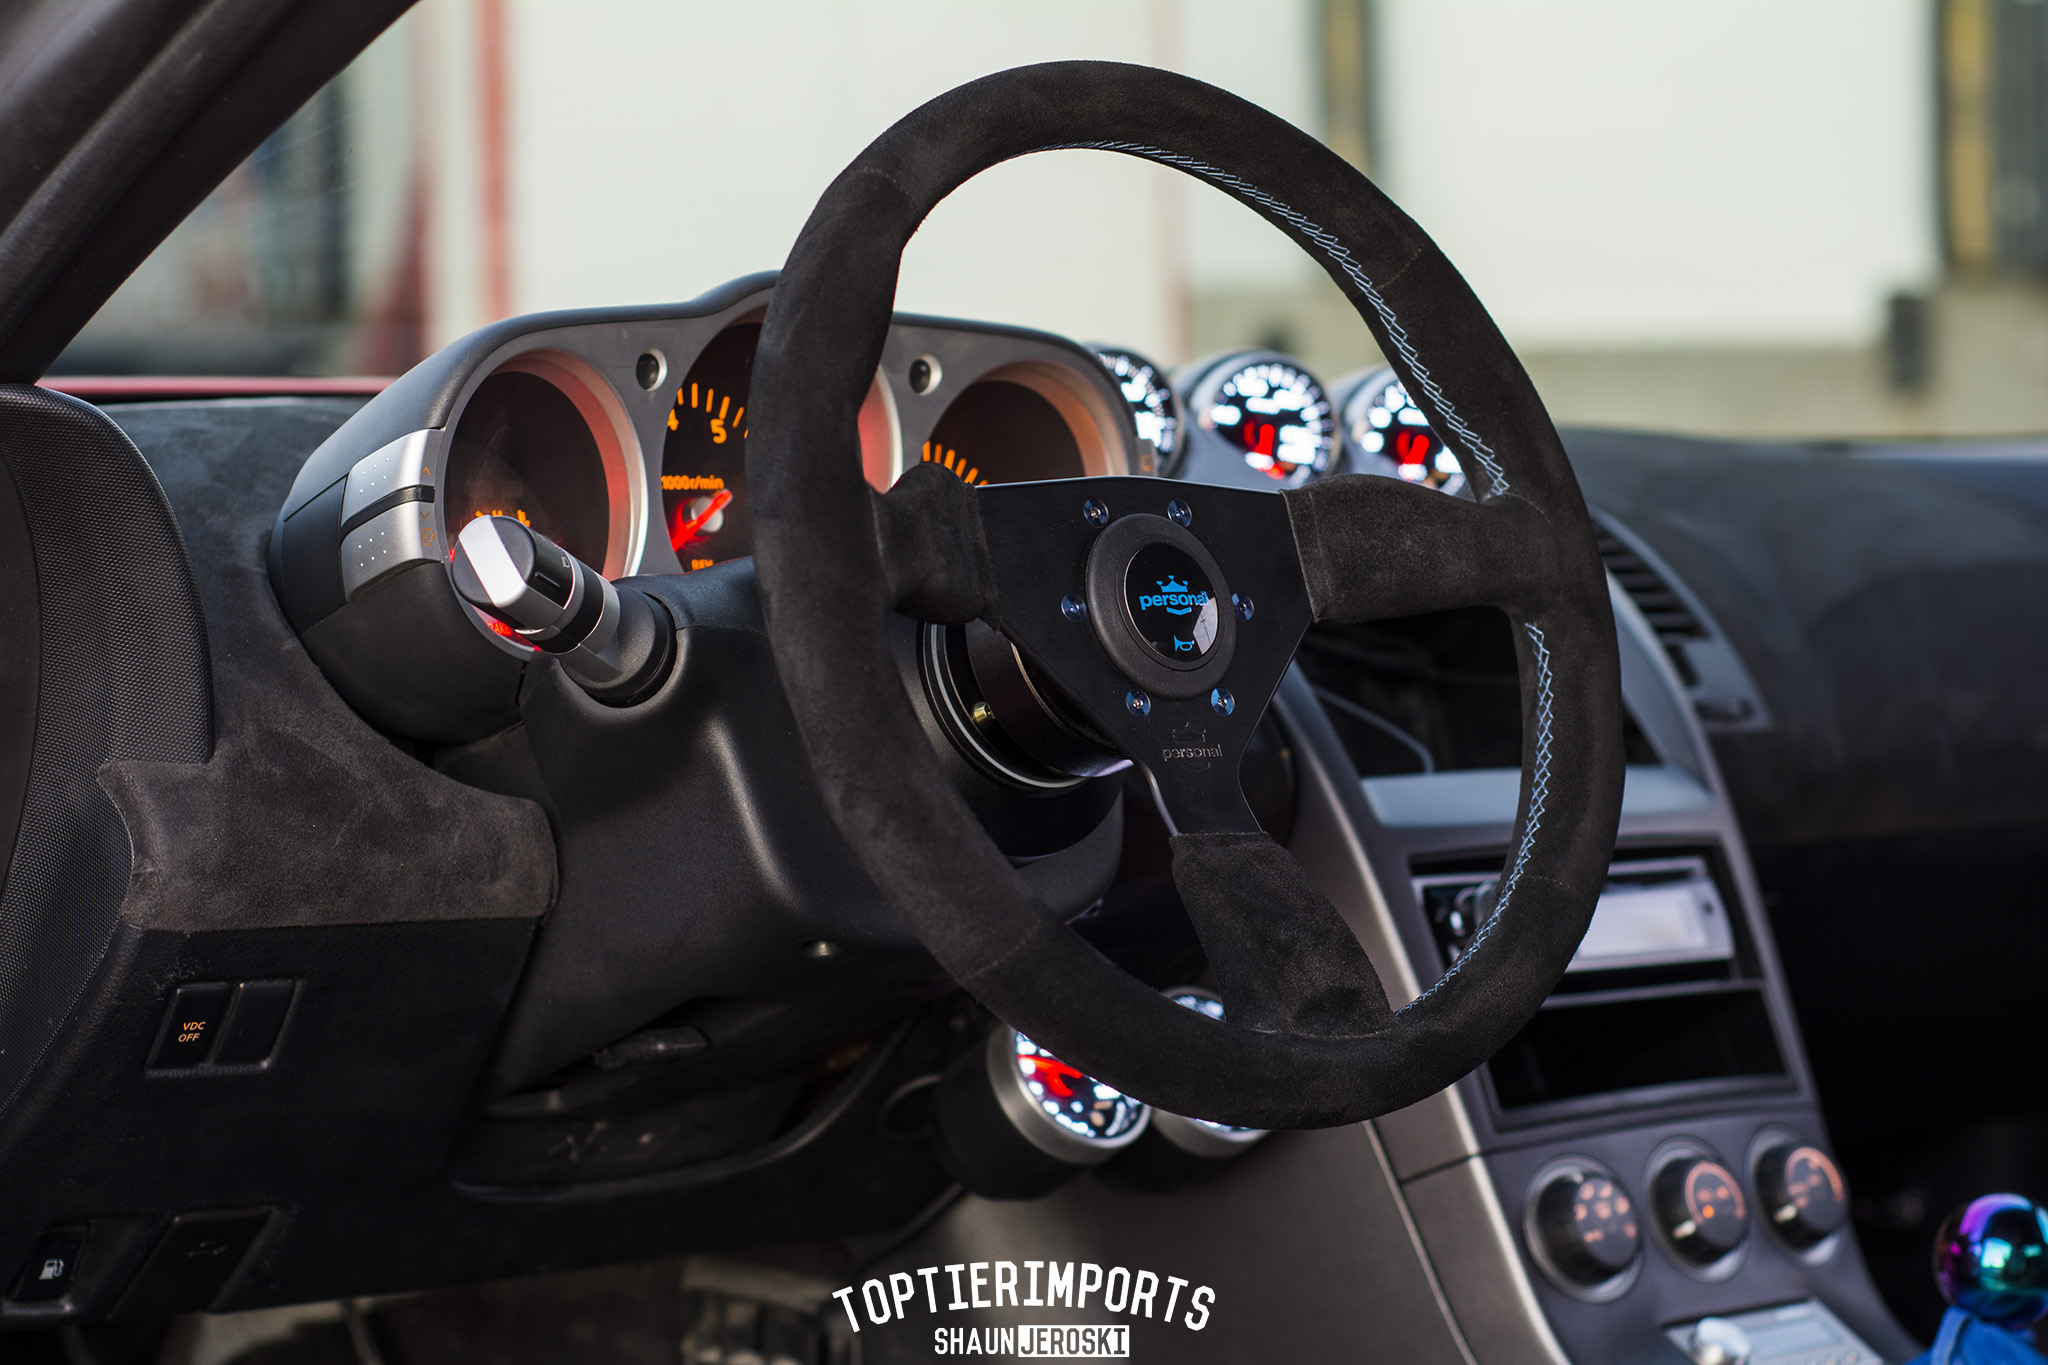
- Relocated Cruise Control Buttons
- NRG Quick Release and Hub
- Personal Neo Grinta Suede Steering Wheel
- TiBurnt Titanium Steering Wheel and Hub Screws
- TiBurnt Titanium Shift ****
- Suede Recovered Headliner
- Suede Wrapped Dash Panels
- Suede Shift Boot
- Black Dome Light Bezel w/ LED Lights
- Defi Gauges in factory location (EGT, Oil Pres, Fuel Pres)
- Defi Gauges in pods (Boost, Oil Temp)
- Matte Charcoal Metallic Grey Vinyl Warp Center Console
- Doors, Roof and Trunk Covered in Wirez Sound Deadener
Audio & In Car Entertainment
- Samsung Tablet molded in Center Console
- Pioneer DEH-80PRS Head Unit
- Audison bitONE Audio Processor
- Audison DRC molded in Shifter Surround
- Hertz Hi-Energy 3 Way Component Speakers
- Mid-Ranges in Doors
- Mids and Tweeters in Custom A-Pillars
- 2x Hertz HDP4 Amplifiers
- 2x Hertz HDP1 Amplifiers
- 2x Hertz HX300D Subwoofers
Suspension
- Fully Hidden Air Ride Install
- Accuair E-Level Air Suspension Controls
- Accuair E-Level Touch Pad Controller
- Accuair VU-4 Valve Block
- Accuair 3 Gal Air Tank
- Accuair Air Dryers
- Viair Air 400C Compressors
- AirLift 32-Way Adjustable Front Air Bag Struts
- AirLift 32-Way Adjustable Rear Dampers and Air Bags
Special Thanks To:
Justin and Kaylene Pryor, JP’s Autobody, Jeremy Wall, Matt Stephens, Billet Metal Works, Brett Evans, Dave Tran, Danny Dunning, Speed Factor Racing, Shawn Perdonic, David Demchuk, Rajan Khinda, Auttumn Trim, TiBurnt, Shaun Jeroski, Nirusan Jayaranjan, Alex Dixon
Exterior
- Custom Blended Three Stage Paint Color
- Stardast Wide Fender Kit (First Production Kit in the World)
- Stardast Front Fender Flares Widened �” and Tapered
- Stardast Front Lower Flare Piece Extensively Modified To Fit Bumper
- Stardast Rear Fender Flares Shaved and Extended Lower
- Stardast Rear Lower Flare Piece Reshaped To Fit Bumper
- Front & Rear Fenders Cut & Welded for Tire Clearance
- Scratch Made Rear Wing
- Version Select Bumpers and Side Skirts
- Tucked Rear Bumper Lower Center Section
- Rear Bumper Modified For LED Strip License Plate Light
- Rear Bumper Sound Deadened To Quiet Air Compressors
- Scratch Made Front Bumper Driving Lights
- 08’ OEM Hump Hood
- Hood Extended and Molded Over Headlights
- Shaved Side Fender Emblems & Rear Trunk Emblems
- Shaved Fuel Cap & Antenna
- Shaved Rear Wiper & Sprayer
- Flush Pop-Up Fuel Filler Welded in Trunk Drip Rail
- 08’ Bi-Xenon Headlights
- STI-R Projector Lenses
- ZLEDs Headlight Switchback LEDs, Demon Eye LEDs & Ironman Mod
- ZLEDs Rear Signal Light LED Conversion (1200LEDs)
- Chromed Door Hinges, Door Latches, Trunk Hinges, & Trunk Latch
- TiBurnt Titanium Screws Throughout
- Z1 Motorsports UHP Hatch Struts
Engine Bay Cosmetic
- Shaved and Painted Engine Bay, Strut Towers & Firewall
- TiBurnt Titanium Hardware Throughout
- Hidden Strut Mounting
- Tucked Brake, AC & Vacuum Lines
- Tucked Wiring Harnesses
- Tucked Power Steering Reservoir & Lines
- Tucked Coolant Overflow & Washer Fluid Tanks
- Tucked Fuel Pressure Regulator
- Braided Stainless Coolant Soft Lines
- Shaved & Chromed Coolant Hard Pipes
- Shaved & Polished Intake Plenum & Lower Manifold
- Polished Idler Pulley, Plenum Spacer, Throttle Body
- Polished & Chromed Timing Chain Cover & Accessory Covers
- Polished Coil Pack Covers
- Painted Valve Covers, Cowl Covers & Core Support
- Chromed Hood Hinges
- The Z Store Hood Dampers
Supercharger System
- Vortech ‘Tuner’ Supercharger Kit
- 3” One Piece Polished Supercharger Up-Pipe & MAF Housing
- Upgraded 3” Intercooler Piping
- Fully Polished Piping, Bracket and Supercharger
- 2.87” Jackshaft Pulley
- 34/28 Tooth Cog Pulley Setup
- Treadstone TR1045 Intercooler
- Added Jackshaft Tensioner Pullies
Fuel System & Engine
- Osiris UpRev Engine Management w/ Map Switching
- Deatschwerks DW300 Fuel Pump
- R35 GTR Fuel Injectors
- Tucked CJM Stage 0 Return Fuel System
- Aeromotive A1000-6 Fuel Pressure Regulator
- NGK One-Step Colder Plugs
- Mishimoto Radiator
- Mishimoto Fans & Shroud
Drivetrain & Exhaust
- Motordyne ART Resonated Test Pipes
- Motordyne XYZ Y-Pipe
- MXP Cat-Back Exhaust System (#1 of 1)
- Comp Clutch Lightweight Flywheel
- Comp Clutch Stage 4 6-Puck Clutch
- Whiteline Differential Bushings
Wheels, Tires & Brakes
- 19x11.5” Work Schwert SC2 Wheels
- Project Kics iConix Lug Nuts
- Project Kics iConix Red Aluminum Caps
- Hankook 295/30/19 Front, 305/30/19 Rear Tires
- Z1 Motorsports Akebono Big Brake Kit
- Z1 Motorsports Stainless Steel Braided Brake Lines
- DBA Two-Piece 14” Front Rotors
- DBA One-Piece 14” Rear Rotors
Interior
- Relocated Cruise Control Buttons
- NRG Quick Release and Hub
- Personal Neo Grinta Suede Steering Wheel
- TiBurnt Titanium Steering Wheel and Hub Screws
- TiBurnt Titanium Shift ****
- Suede Recovered Headliner
- Suede Wrapped Dash Panels
- Suede Shift Boot
- Black Dome Light Bezel w/ LED Lights
- Defi Gauges in factory location (EGT, Oil Pres, Fuel Pres)
- Defi Gauges in pods (Boost, Oil Temp)
- Matte Charcoal Metallic Grey Vinyl Warp Center Console
- Doors, Roof and Trunk Covered in Wirez Sound Deadener
Audio & In Car Entertainment
- Samsung Tablet molded in Center Console
- Pioneer DEH-80PRS Head Unit
- Audison bitONE Audio Processor
- Audison DRC molded in Shifter Surround
- Hertz Hi-Energy 3 Way Component Speakers
- Mid-Ranges in Doors
- Mids and Tweeters in Custom A-Pillars
- 2x Hertz HDP4 Amplifiers
- 2x Hertz HDP1 Amplifiers
- 2x Hertz HX300D Subwoofers
Suspension
- Fully Hidden Air Ride Install
- Accuair E-Level Air Suspension Controls
- Accuair E-Level Touch Pad Controller
- Accuair VU-4 Valve Block
- Accuair 3 Gal Air Tank
- Accuair Air Dryers
- Viair Air 400C Compressors
- AirLift 32-Way Adjustable Front Air Bag Struts
- AirLift 32-Way Adjustable Rear Dampers and Air Bags
Special Thanks To:
Justin and Kaylene Pryor, JP’s Autobody, Jeremy Wall, Matt Stephens, Billet Metal Works, Brett Evans, Dave Tran, Danny Dunning, Speed Factor Racing, Shawn Perdonic, David Demchuk, Rajan Khinda, Auttumn Trim, TiBurnt, Shaun Jeroski, Nirusan Jayaranjan, Alex Dixon
Thread Starter
Registered User
Joined: Sep 2008
Posts: 908
Likes: 28
From: Winnipeg, MB
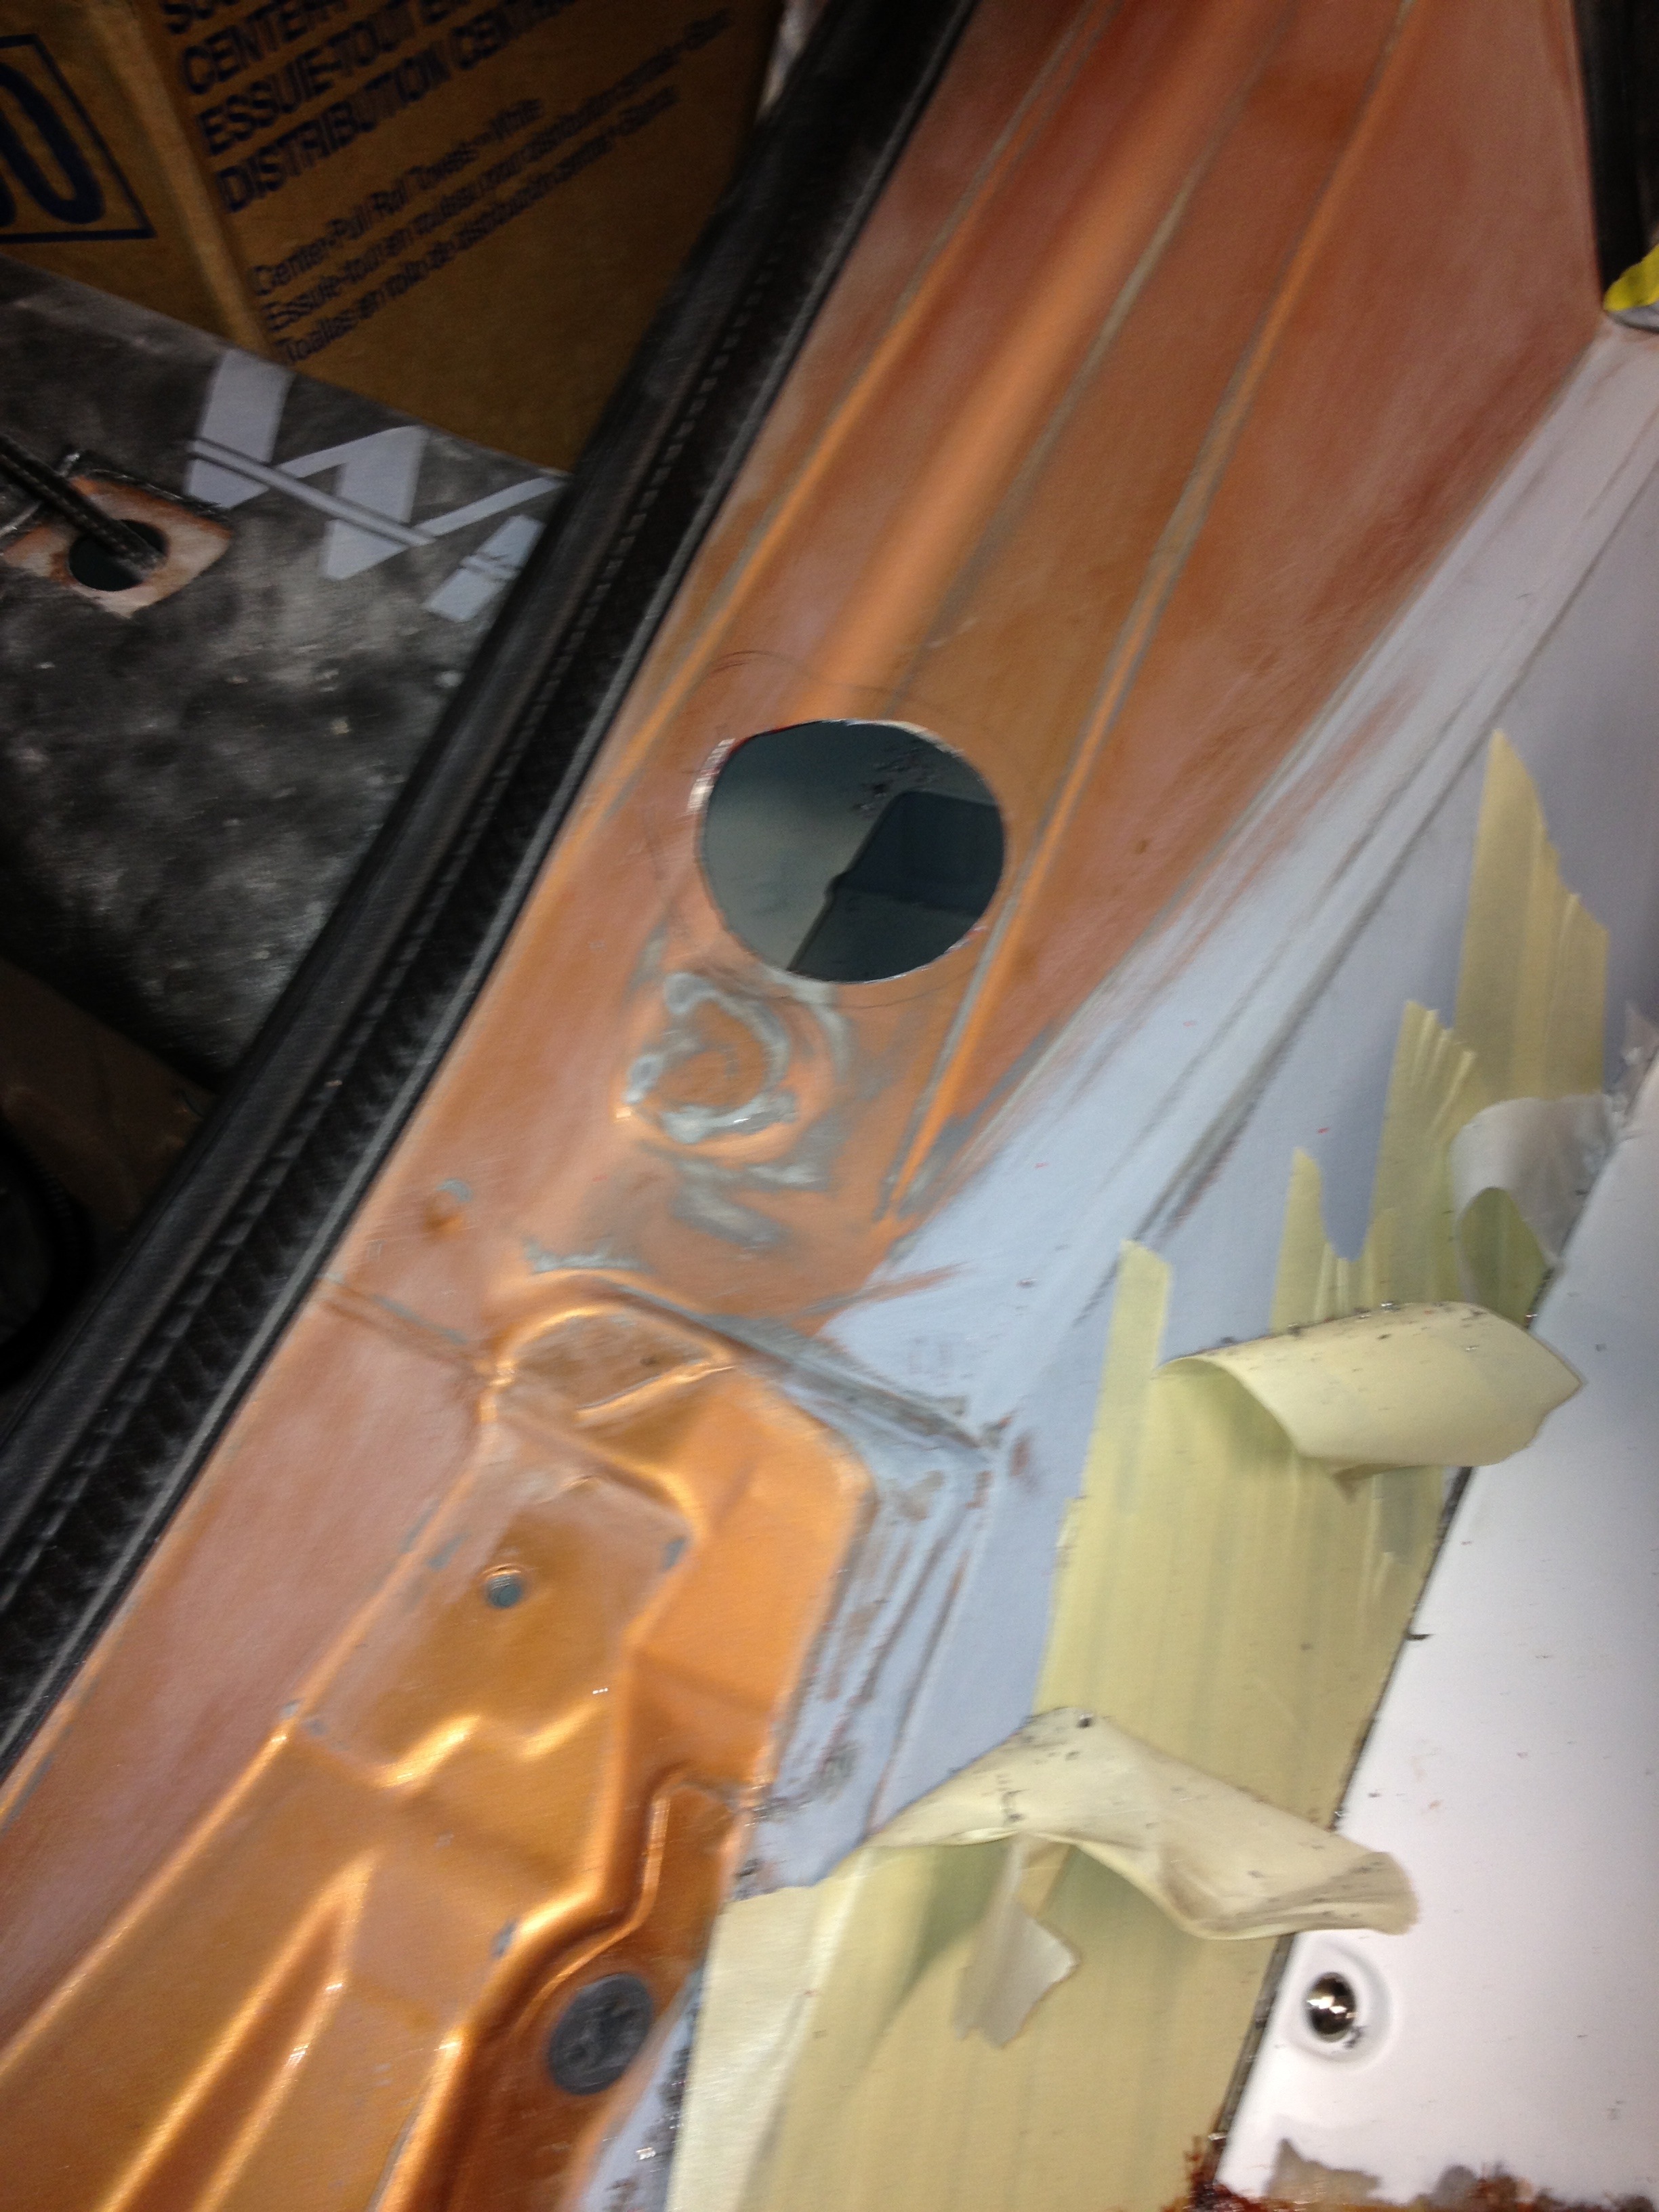
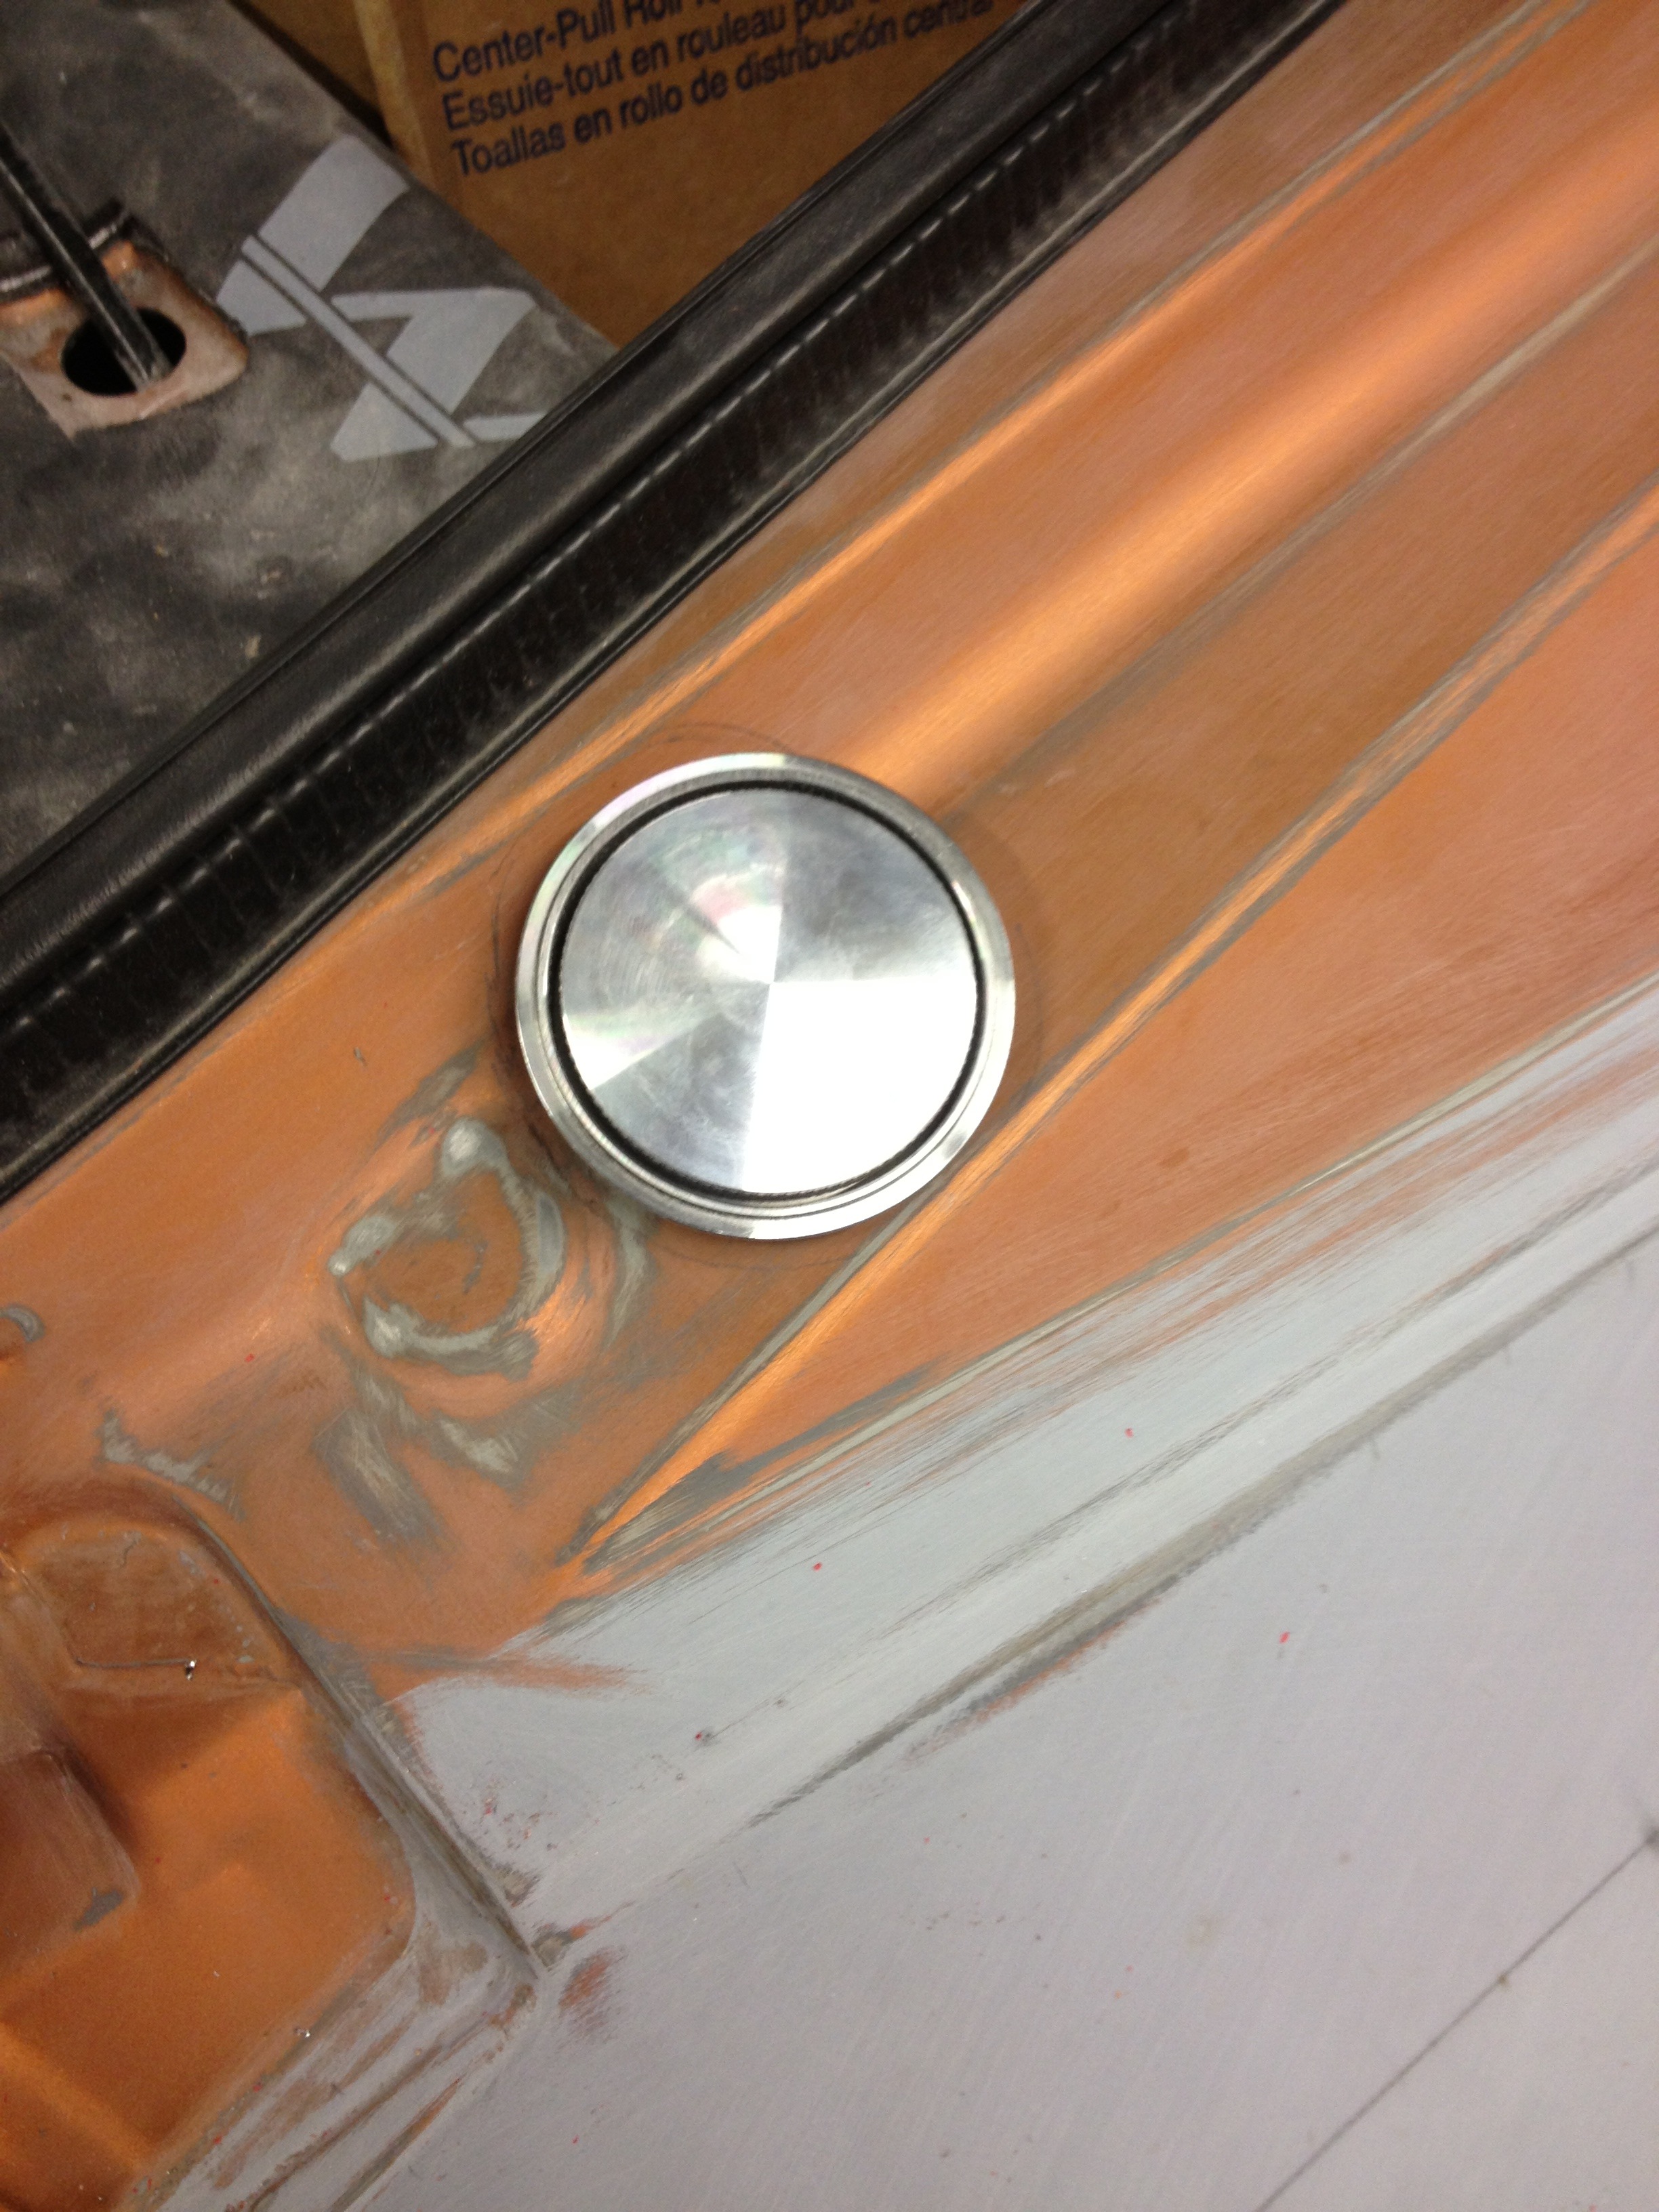
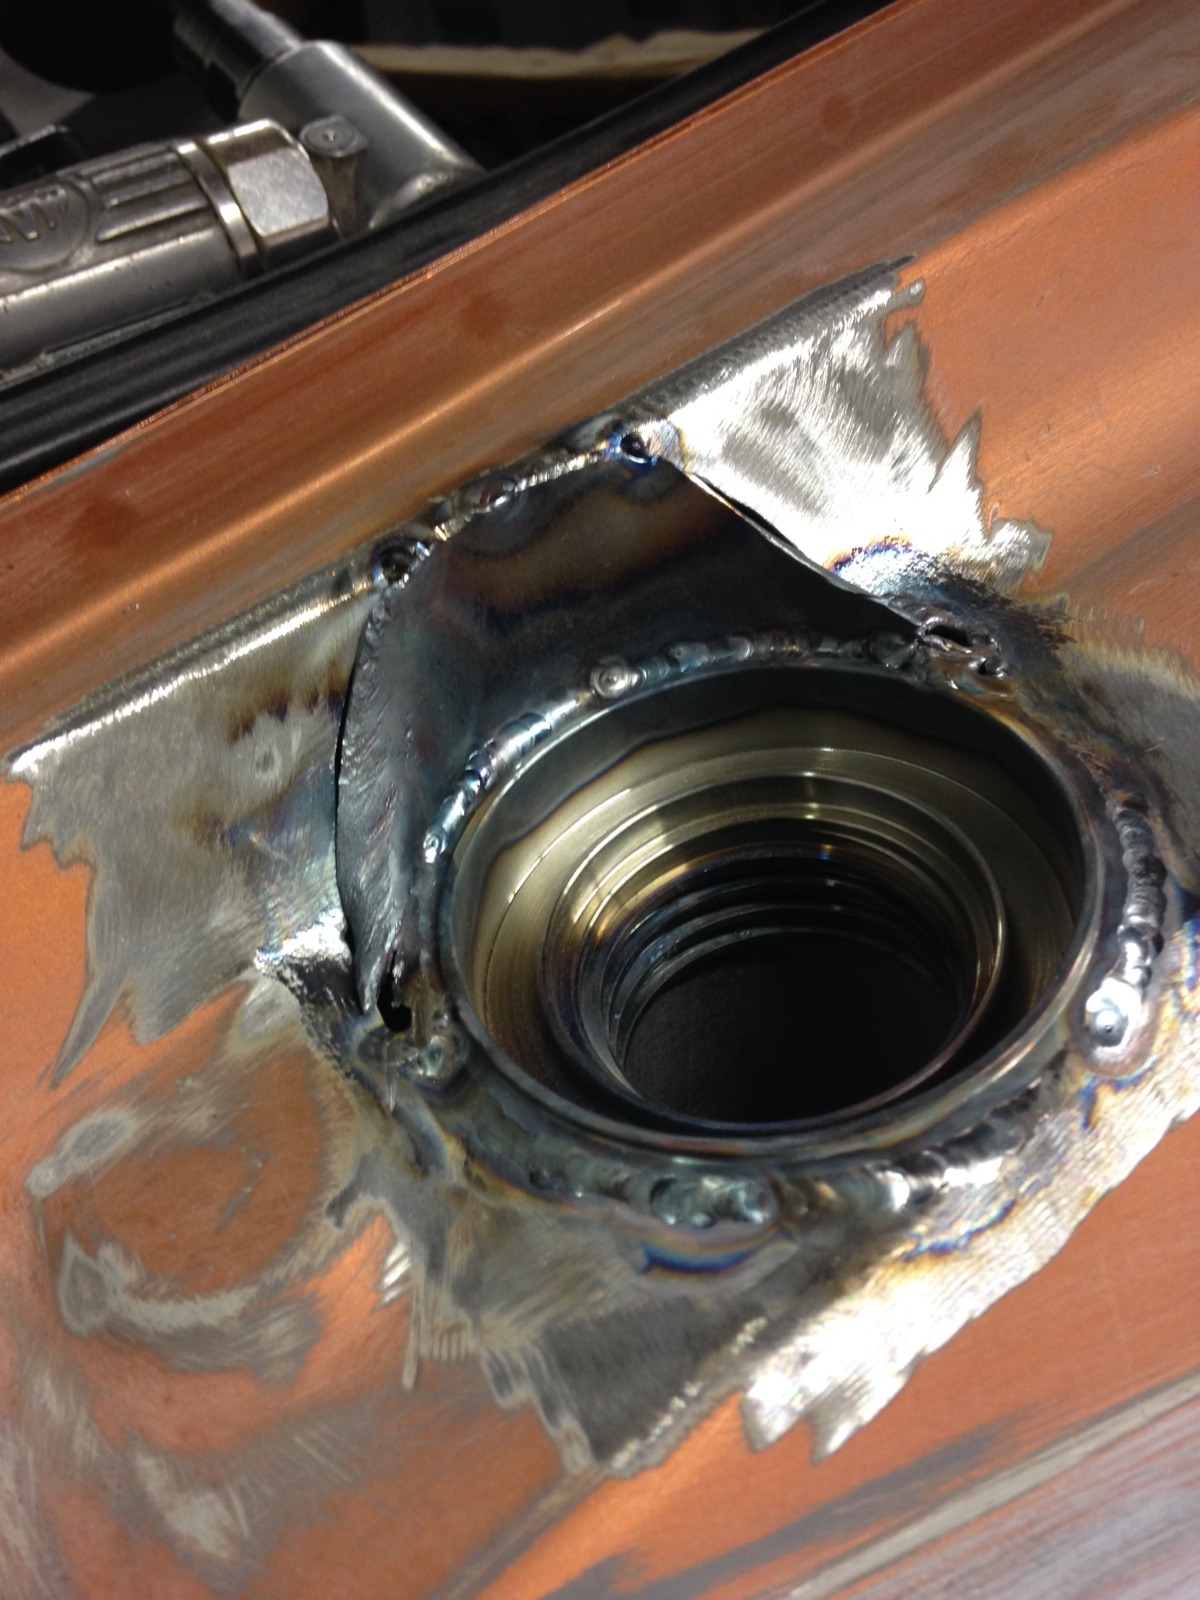
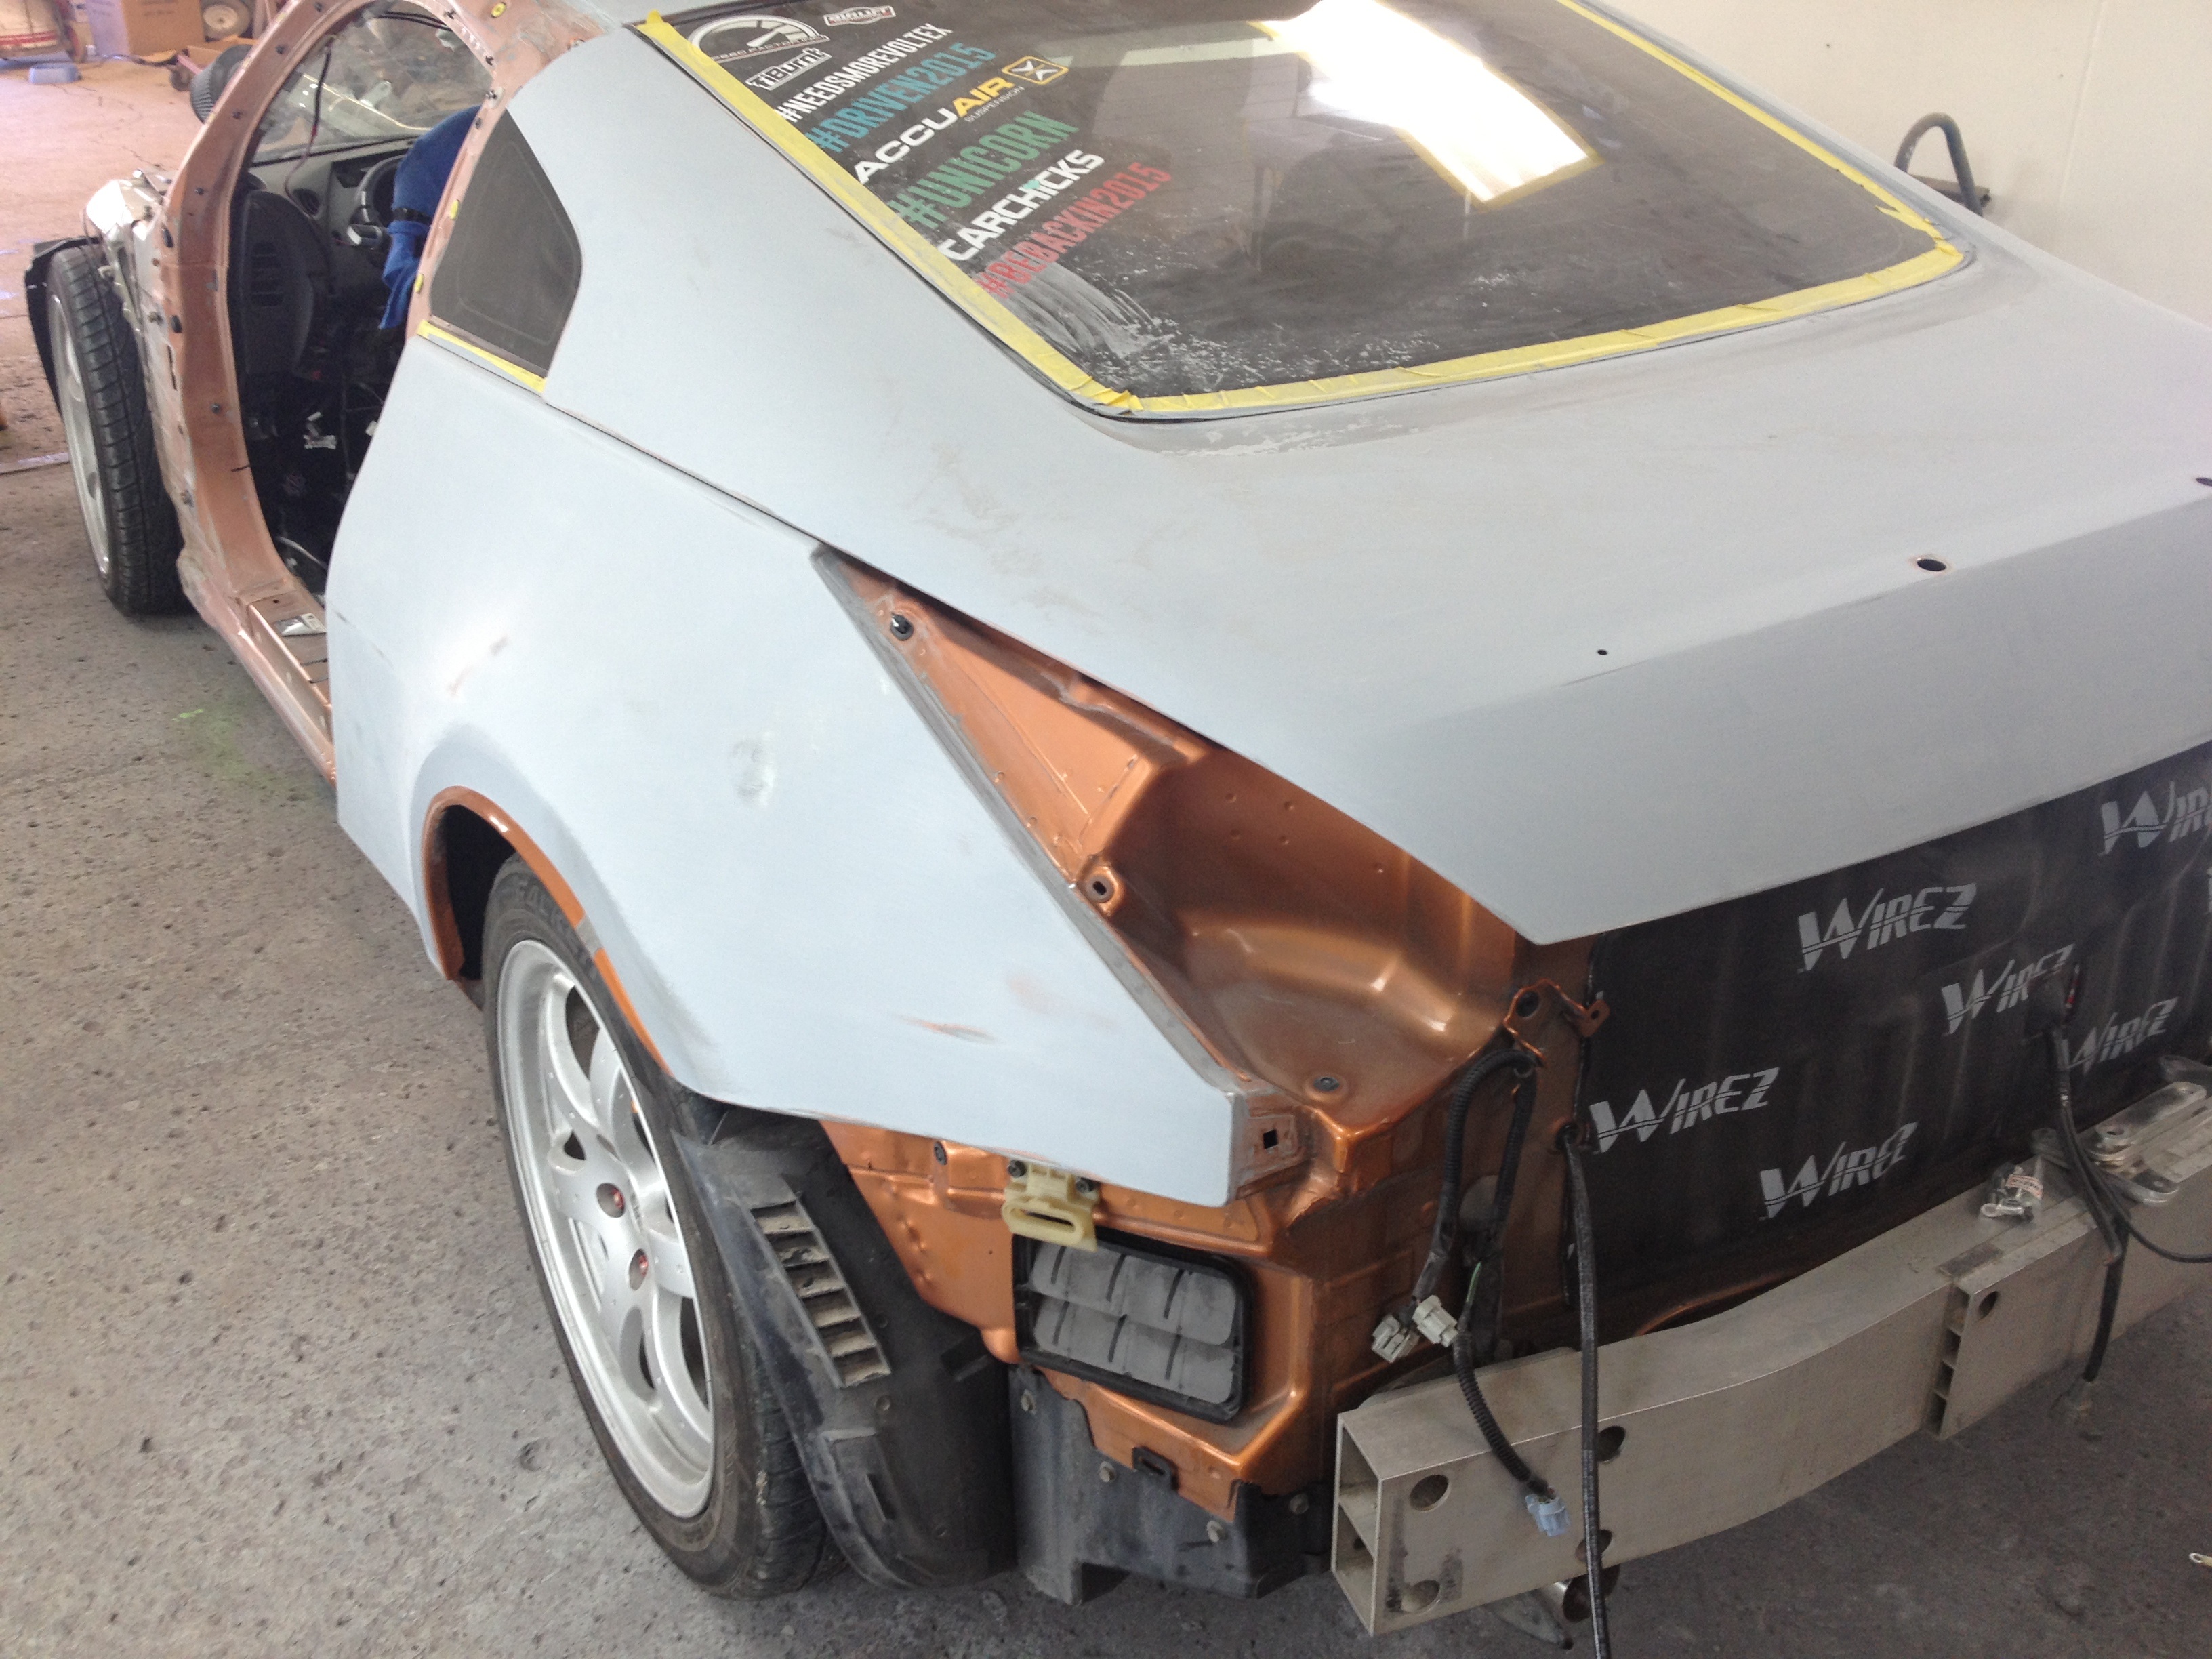
On to the rear fuel filler. It's a flush cap when closed. Push down and turn 1/4 turn and it pops out. You can then unthread it:
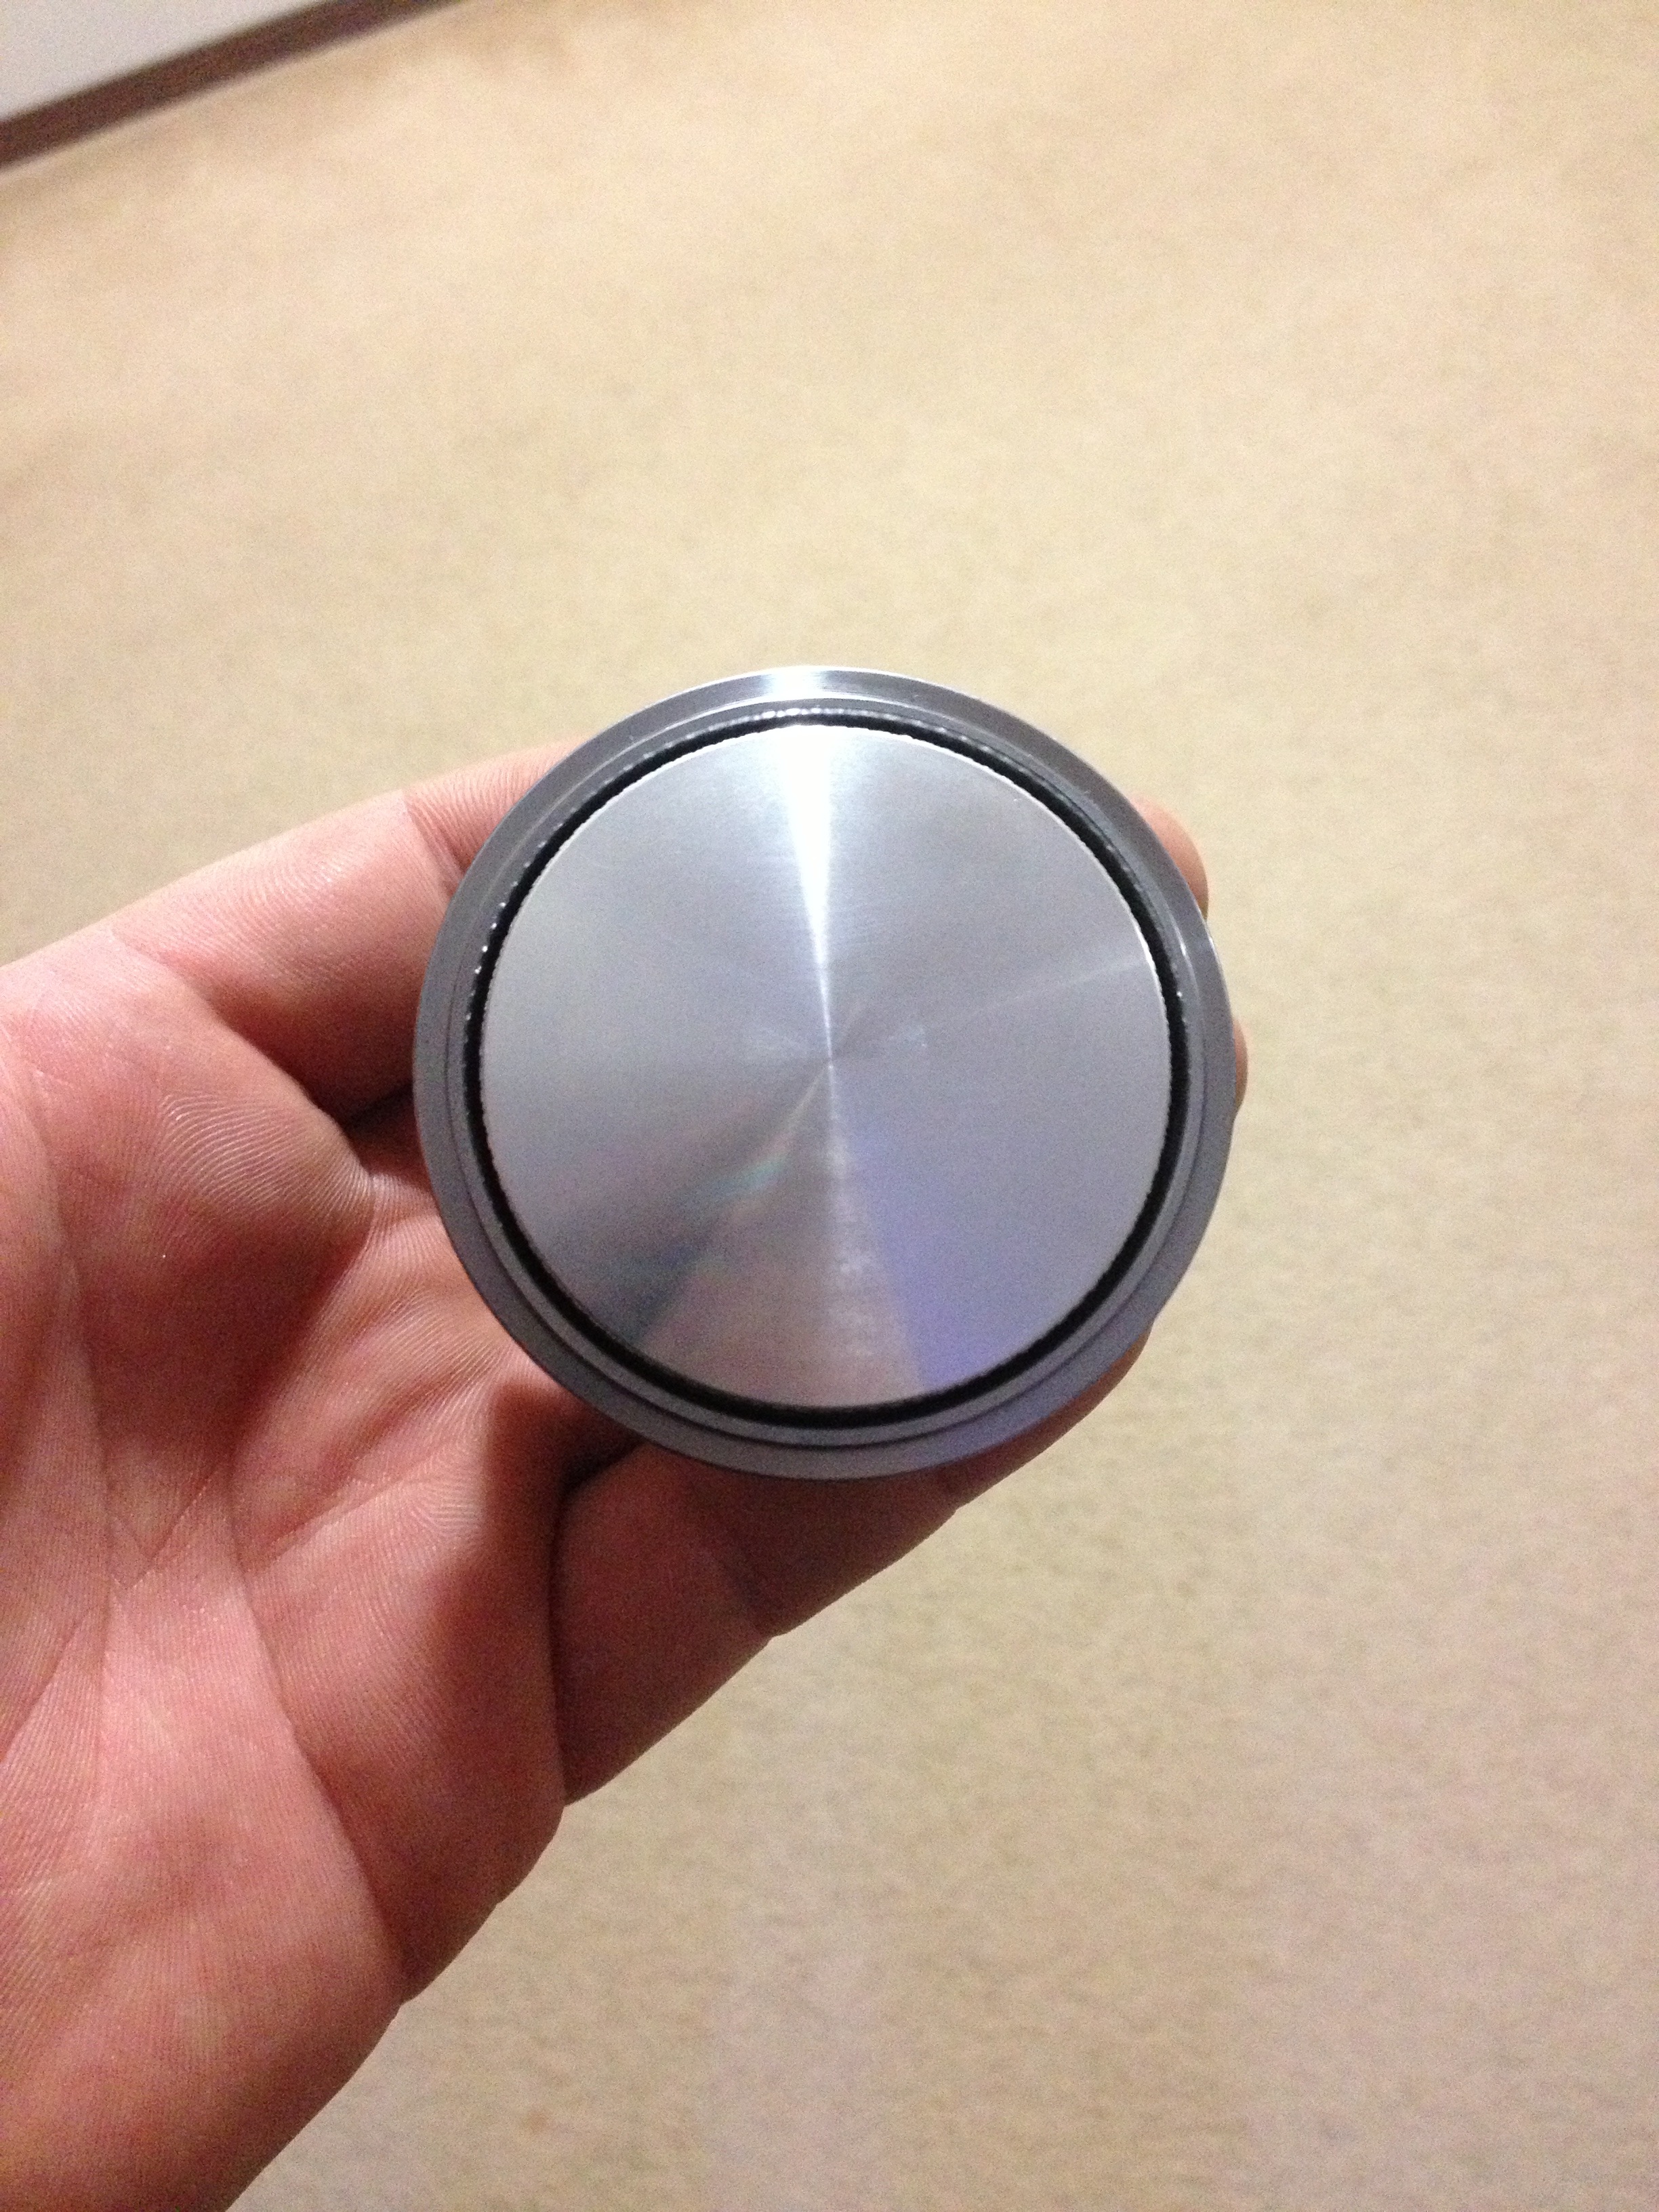
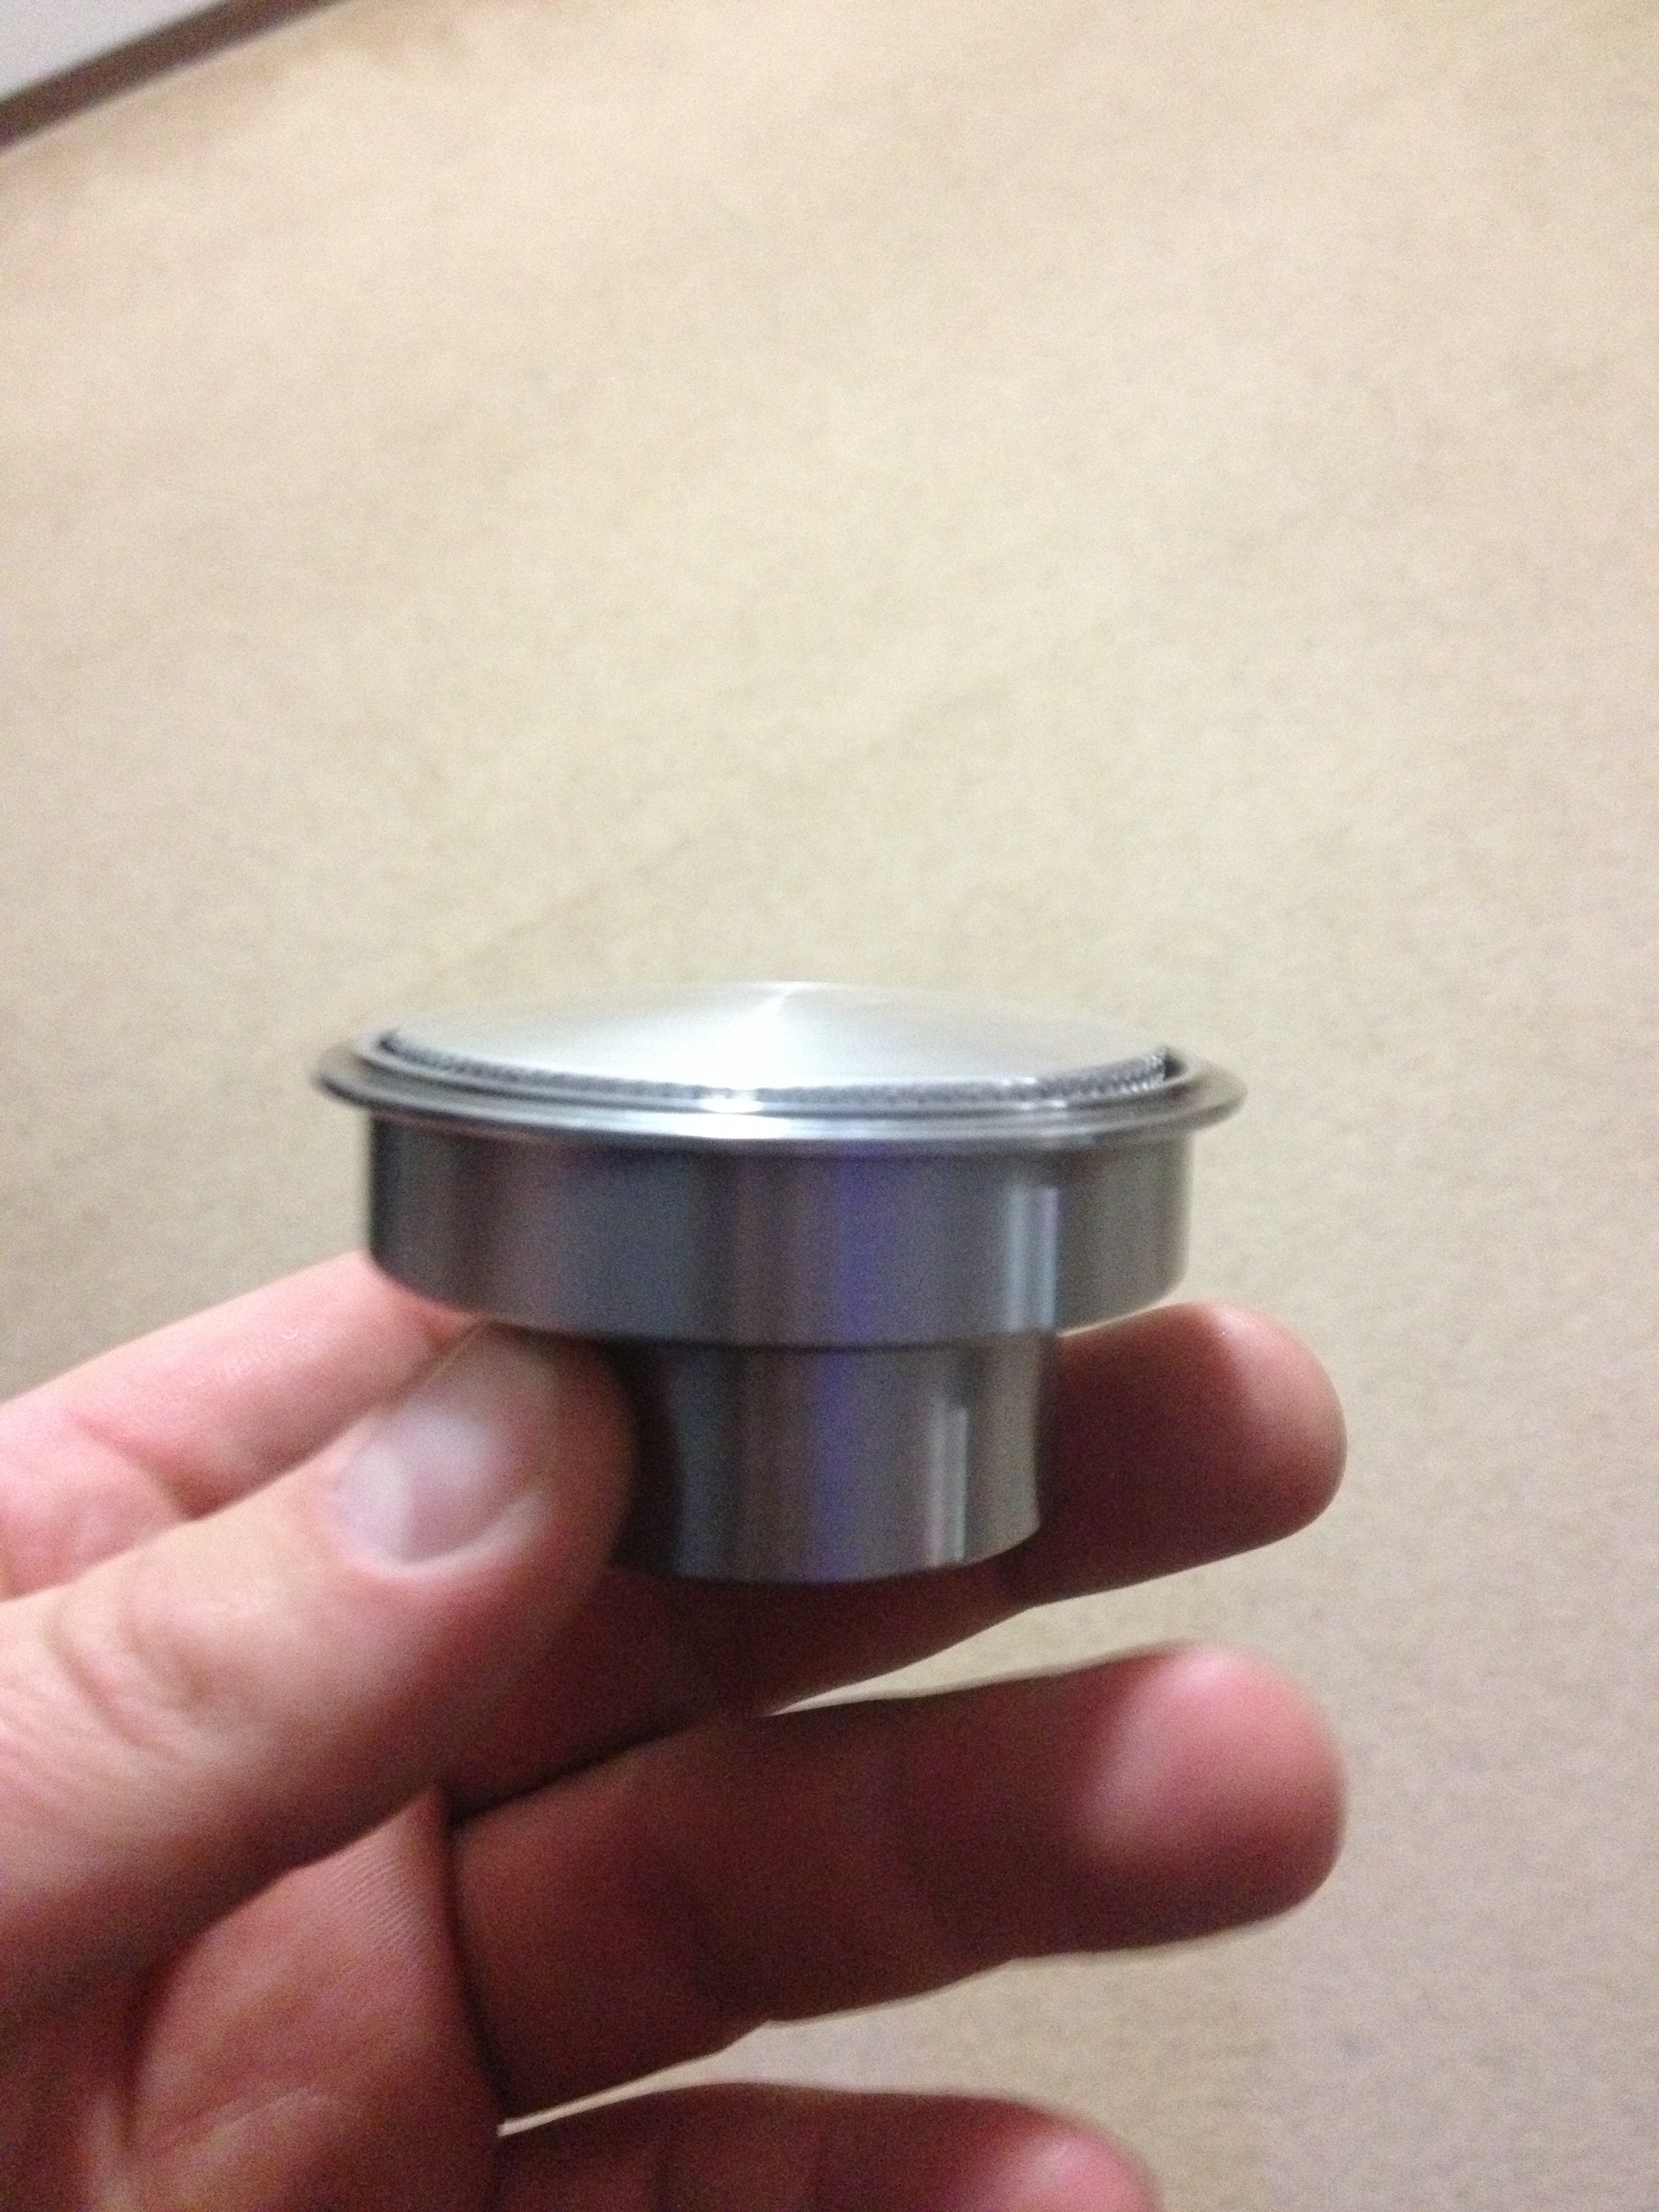
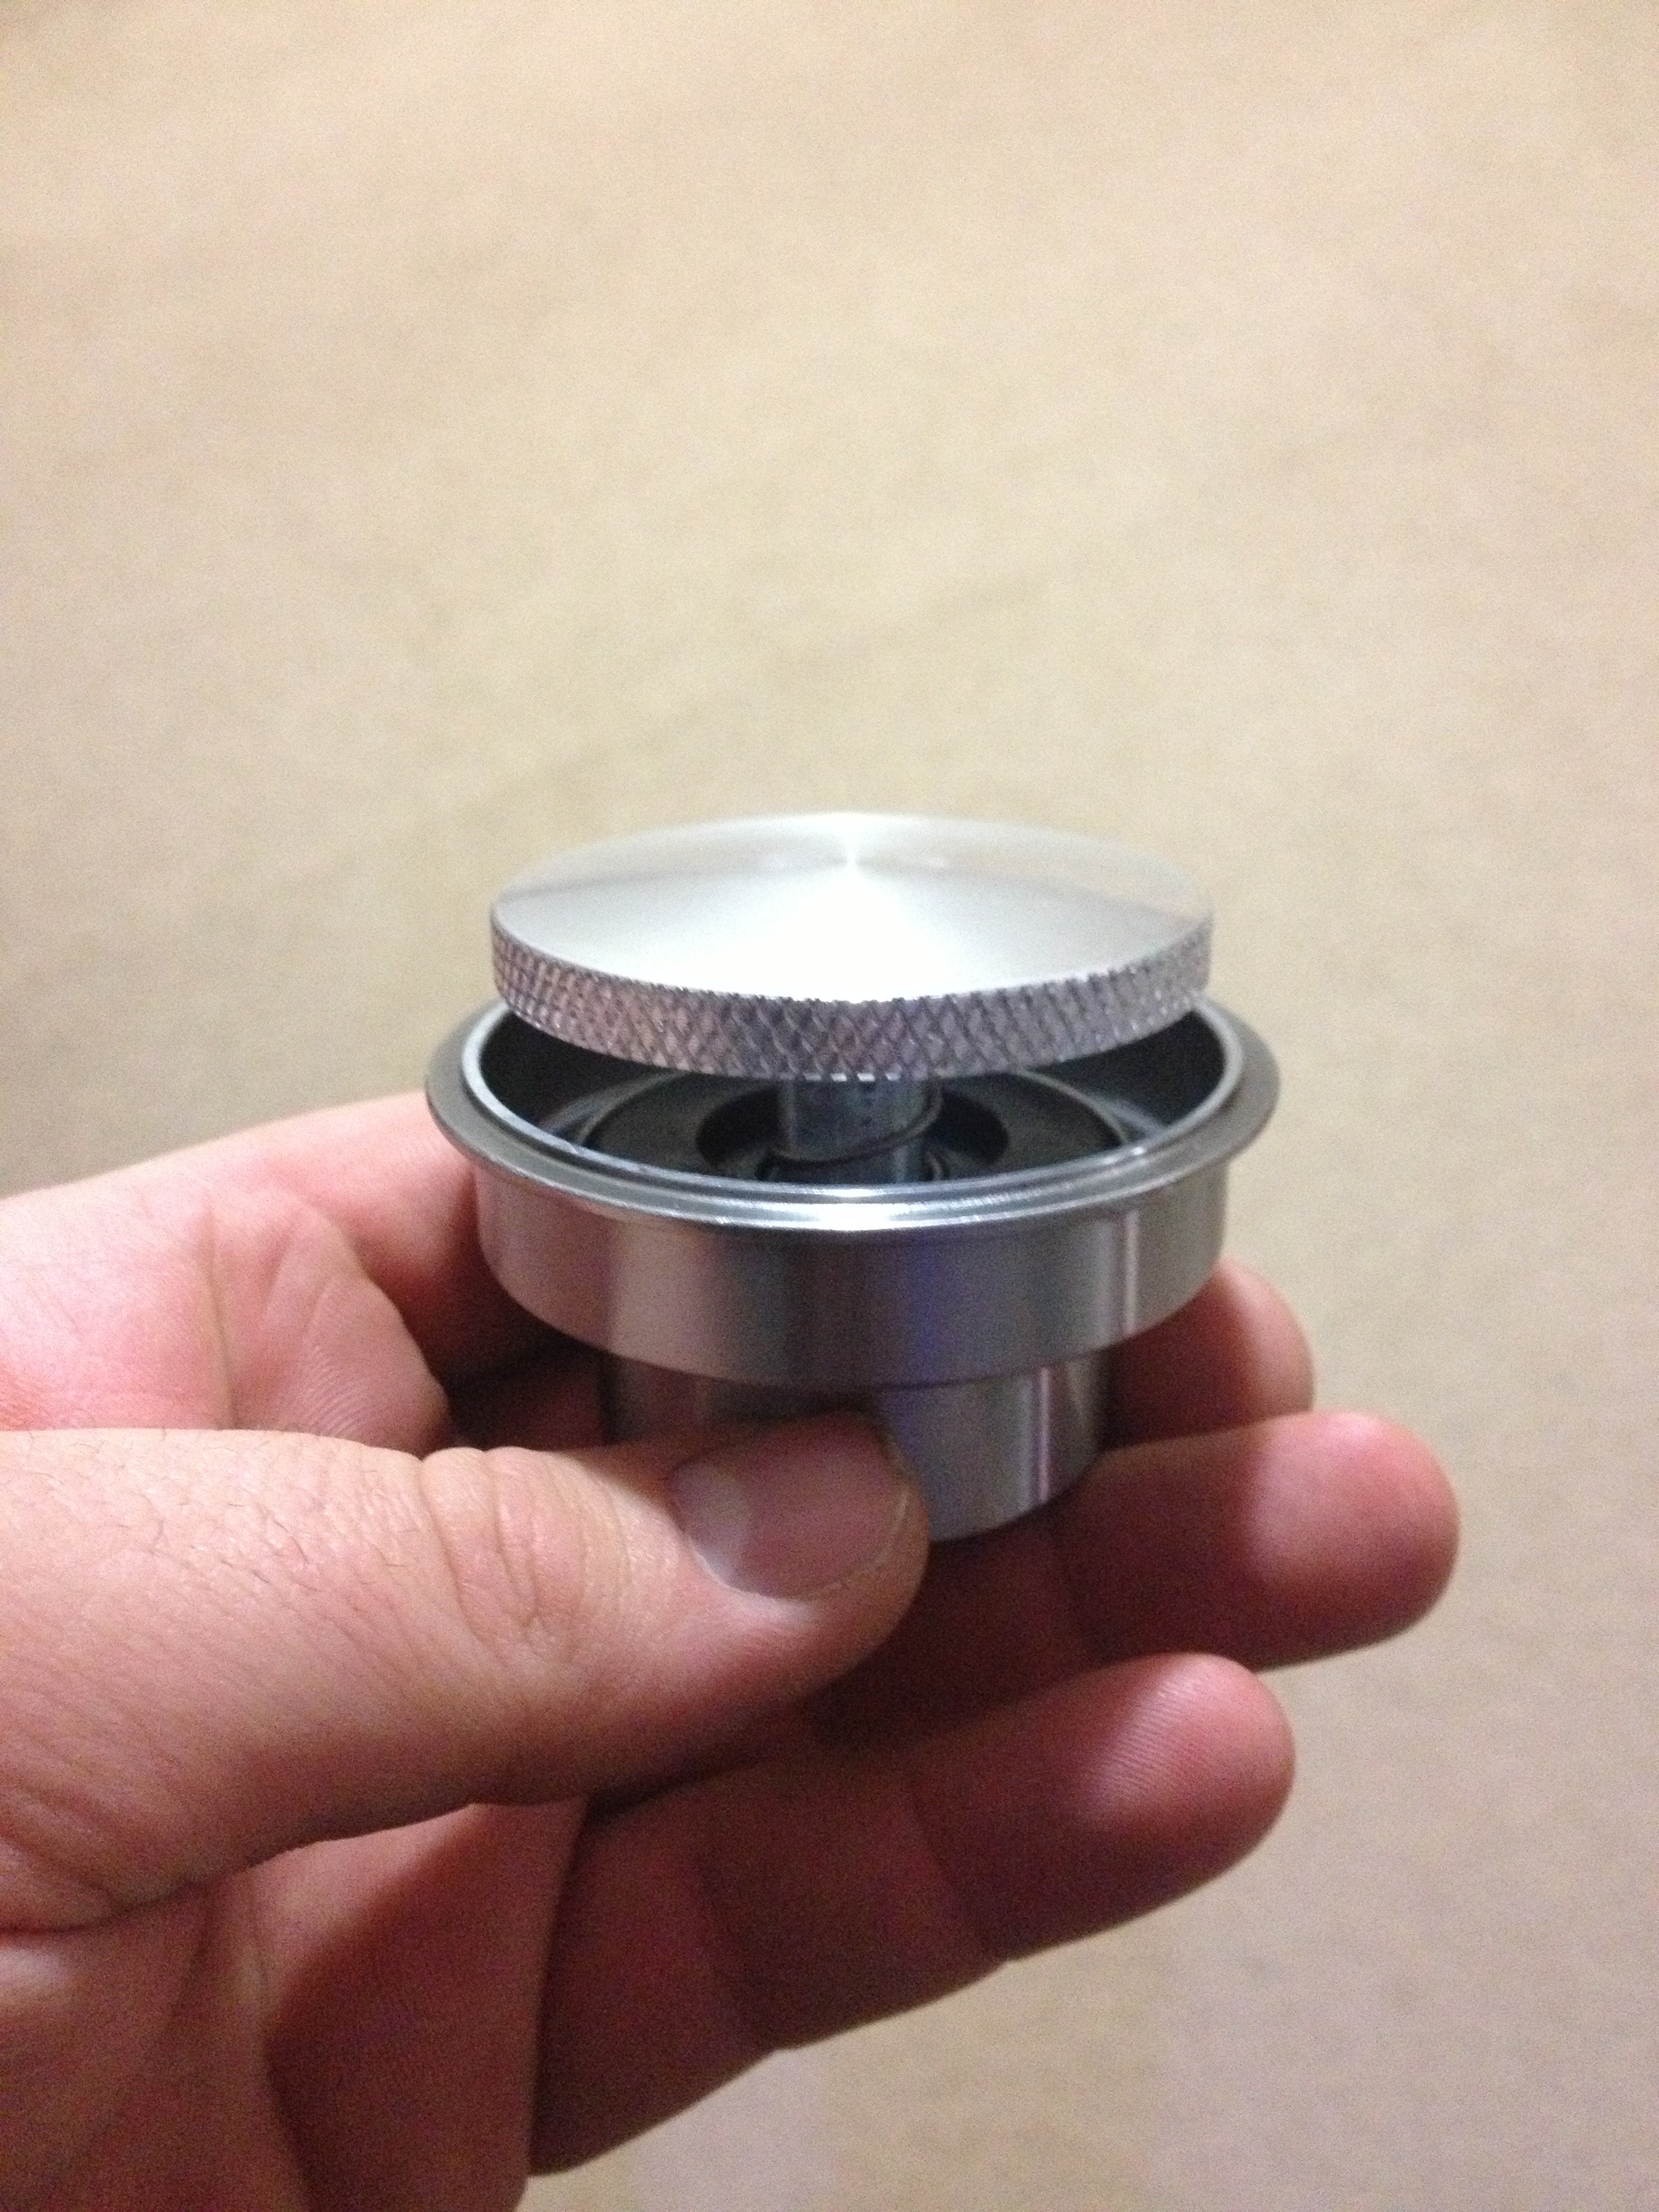
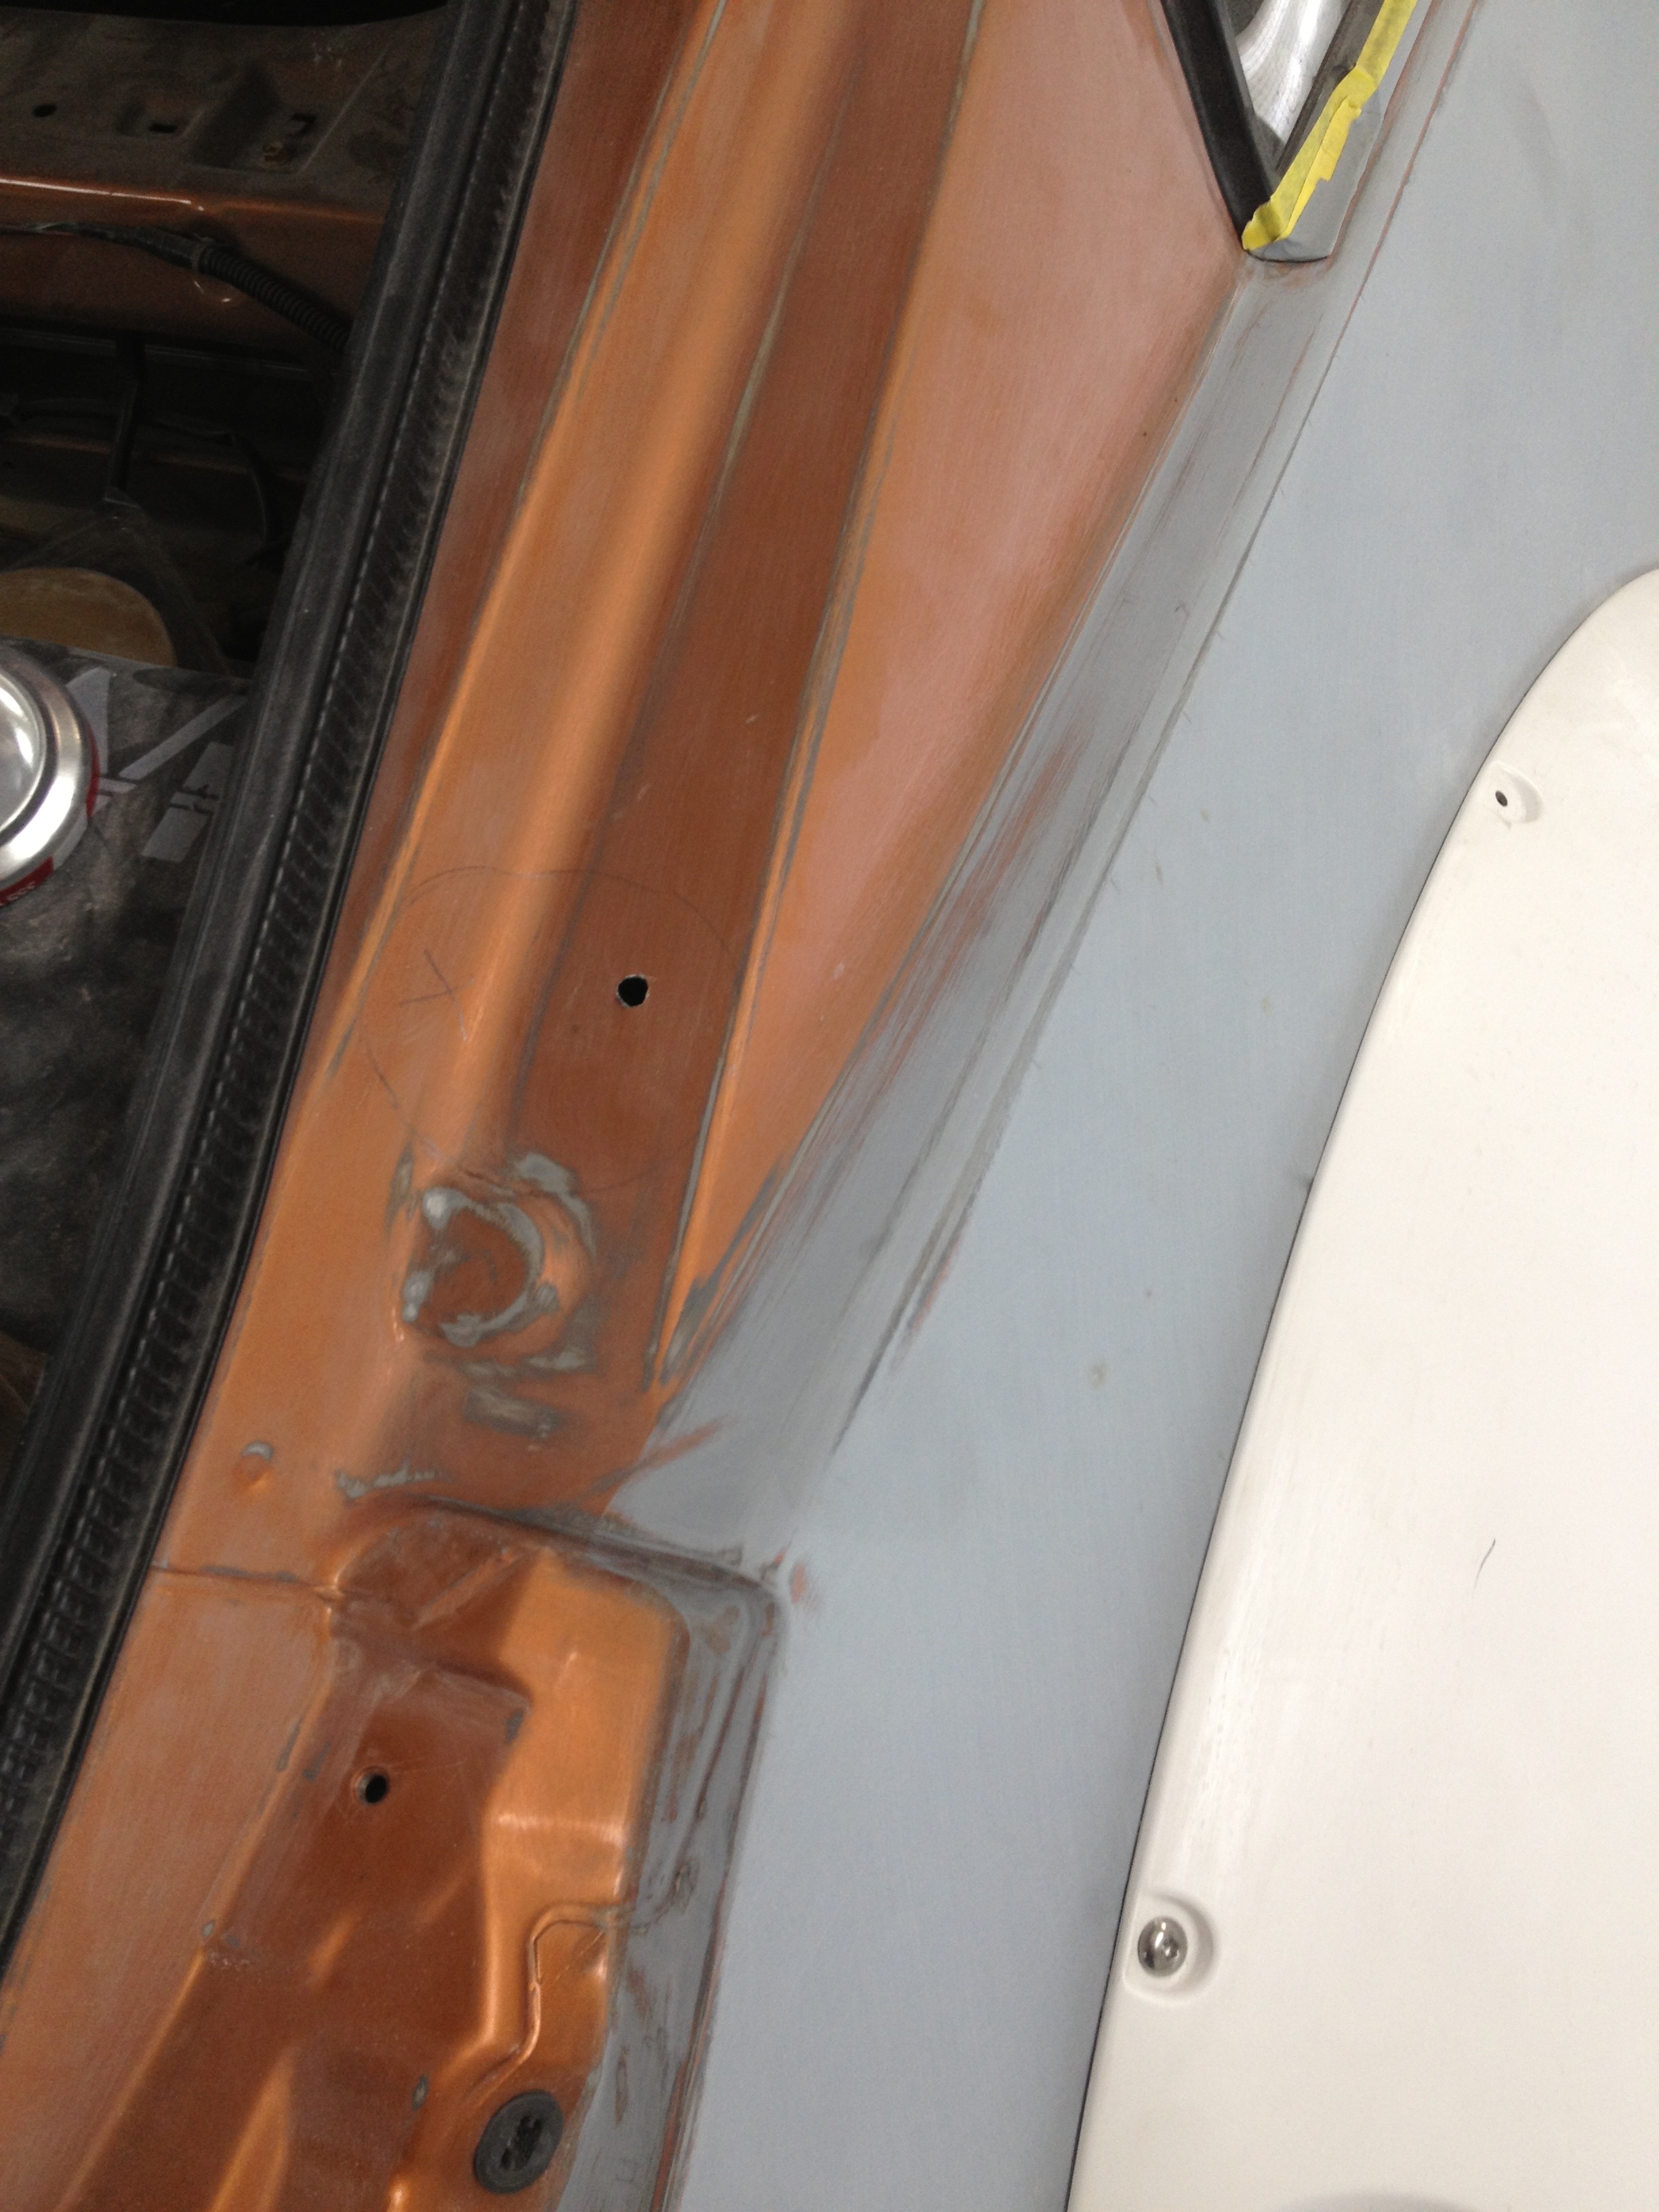
When I bought it I had a rough idea where it was going to go, but you never know what's behind the body panels in the location you want to use. We drilled a small starter hole through the sheet metal, as well as one at the bottom and looked inside to see if we could make that location work.
I wanted to keep the fuel filler cap on the exterior of the vehicle, (it's on the exterior side of the trunk weather stripping) as well as keep all the fuel lines outside the cabin of the car. This location allowed me to meet both of those requirements.
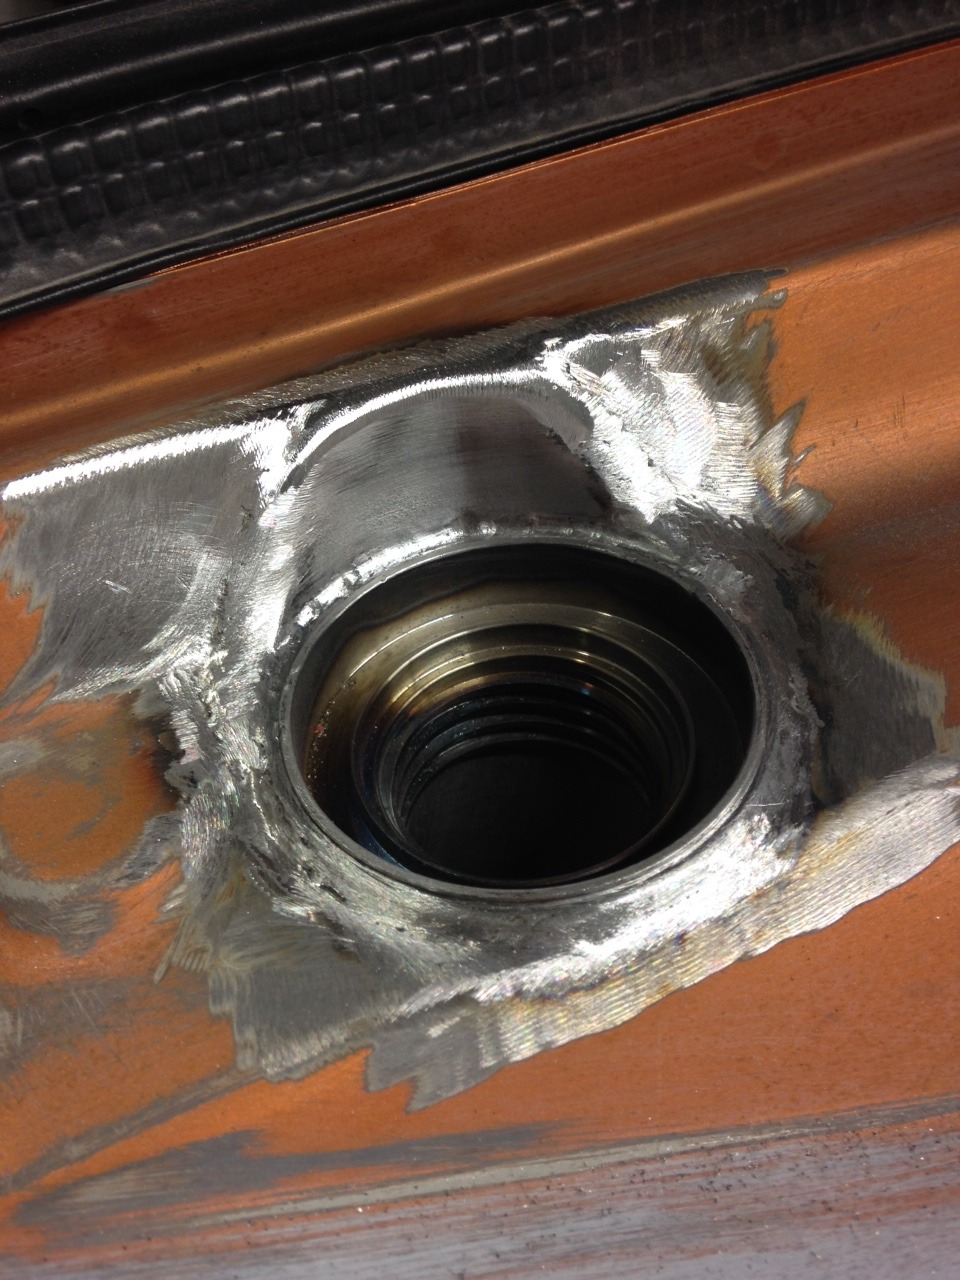
Once we knew the location was good, we cut a bigger hole:
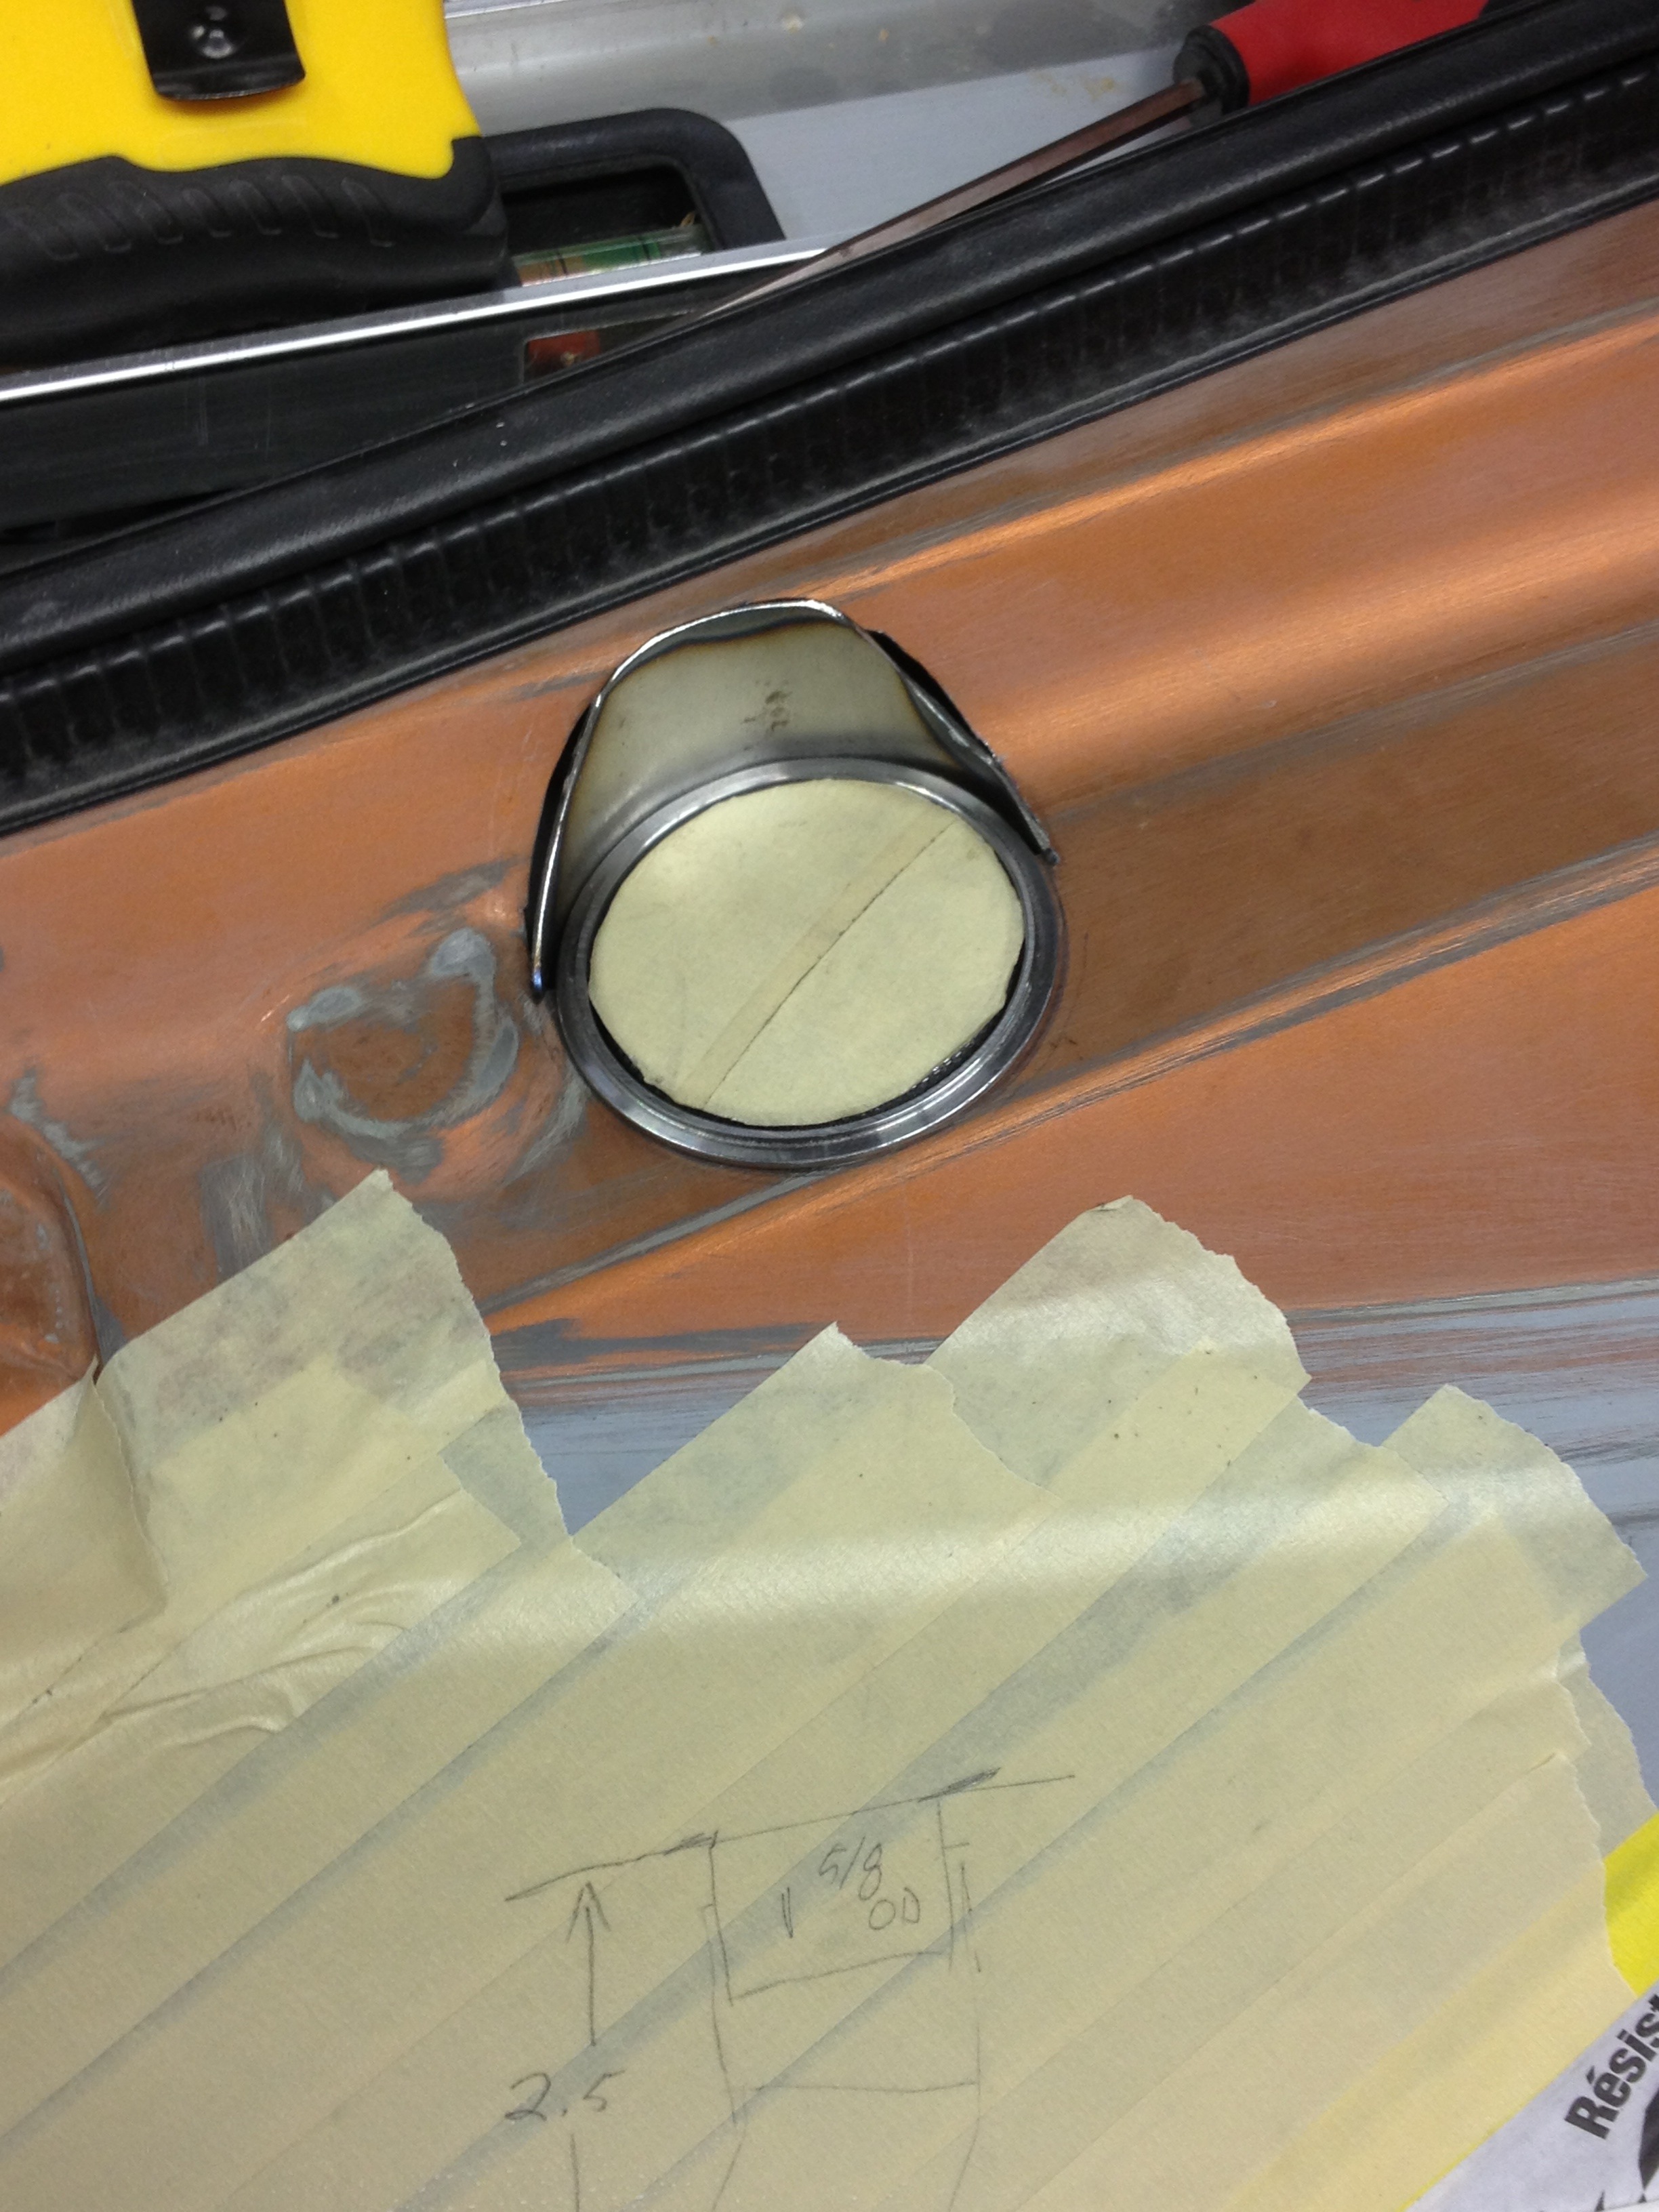
Then test fit the cap:
We ended up needing to cut into the side rail a bit too, no big deal. We formed a new filler piece to weld in. You can see some of our design work and measuring on the masking tape below:


When I bought it I had a rough idea where it was going to go, but you never know what's behind the body panels in the location you want to use. We drilled a small starter hole through the sheet metal, as well as one at the bottom and looked inside to see if we could make that location work.

I wanted to keep the fuel filler cap on the exterior of the vehicle, (it's on the exterior side of the trunk weather stripping) as well as keep all the fuel lines outside the cabin of the car. This location allowed me to meet both of those requirements.
Once we knew the location was good, we cut a bigger hole:

Then test fit the cap:

We ended up needing to cut into the side rail a bit too, no big deal. We formed a new filler piece to weld in. You can see some of our design work and measuring on the masking tape below:

Thread Starter
Registered User
Joined: Sep 2008
Posts: 908
Likes: 28
From: Winnipeg, MB
Cut and prepped:

Starting to tack it in:
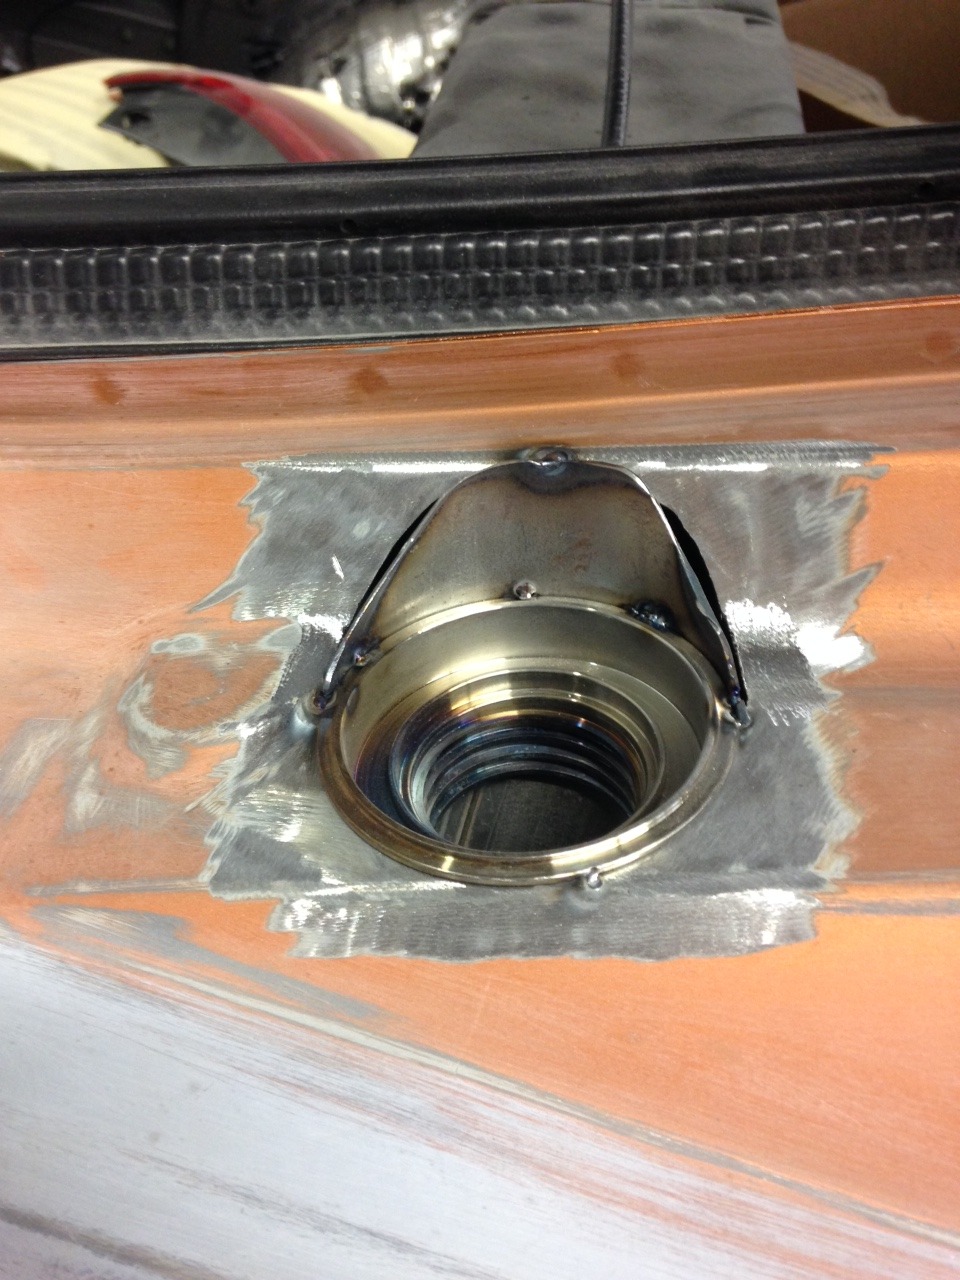
Bending it into shape and welding some more:
Grind the welds smooth:
Glazed, sanded, then high build primer:
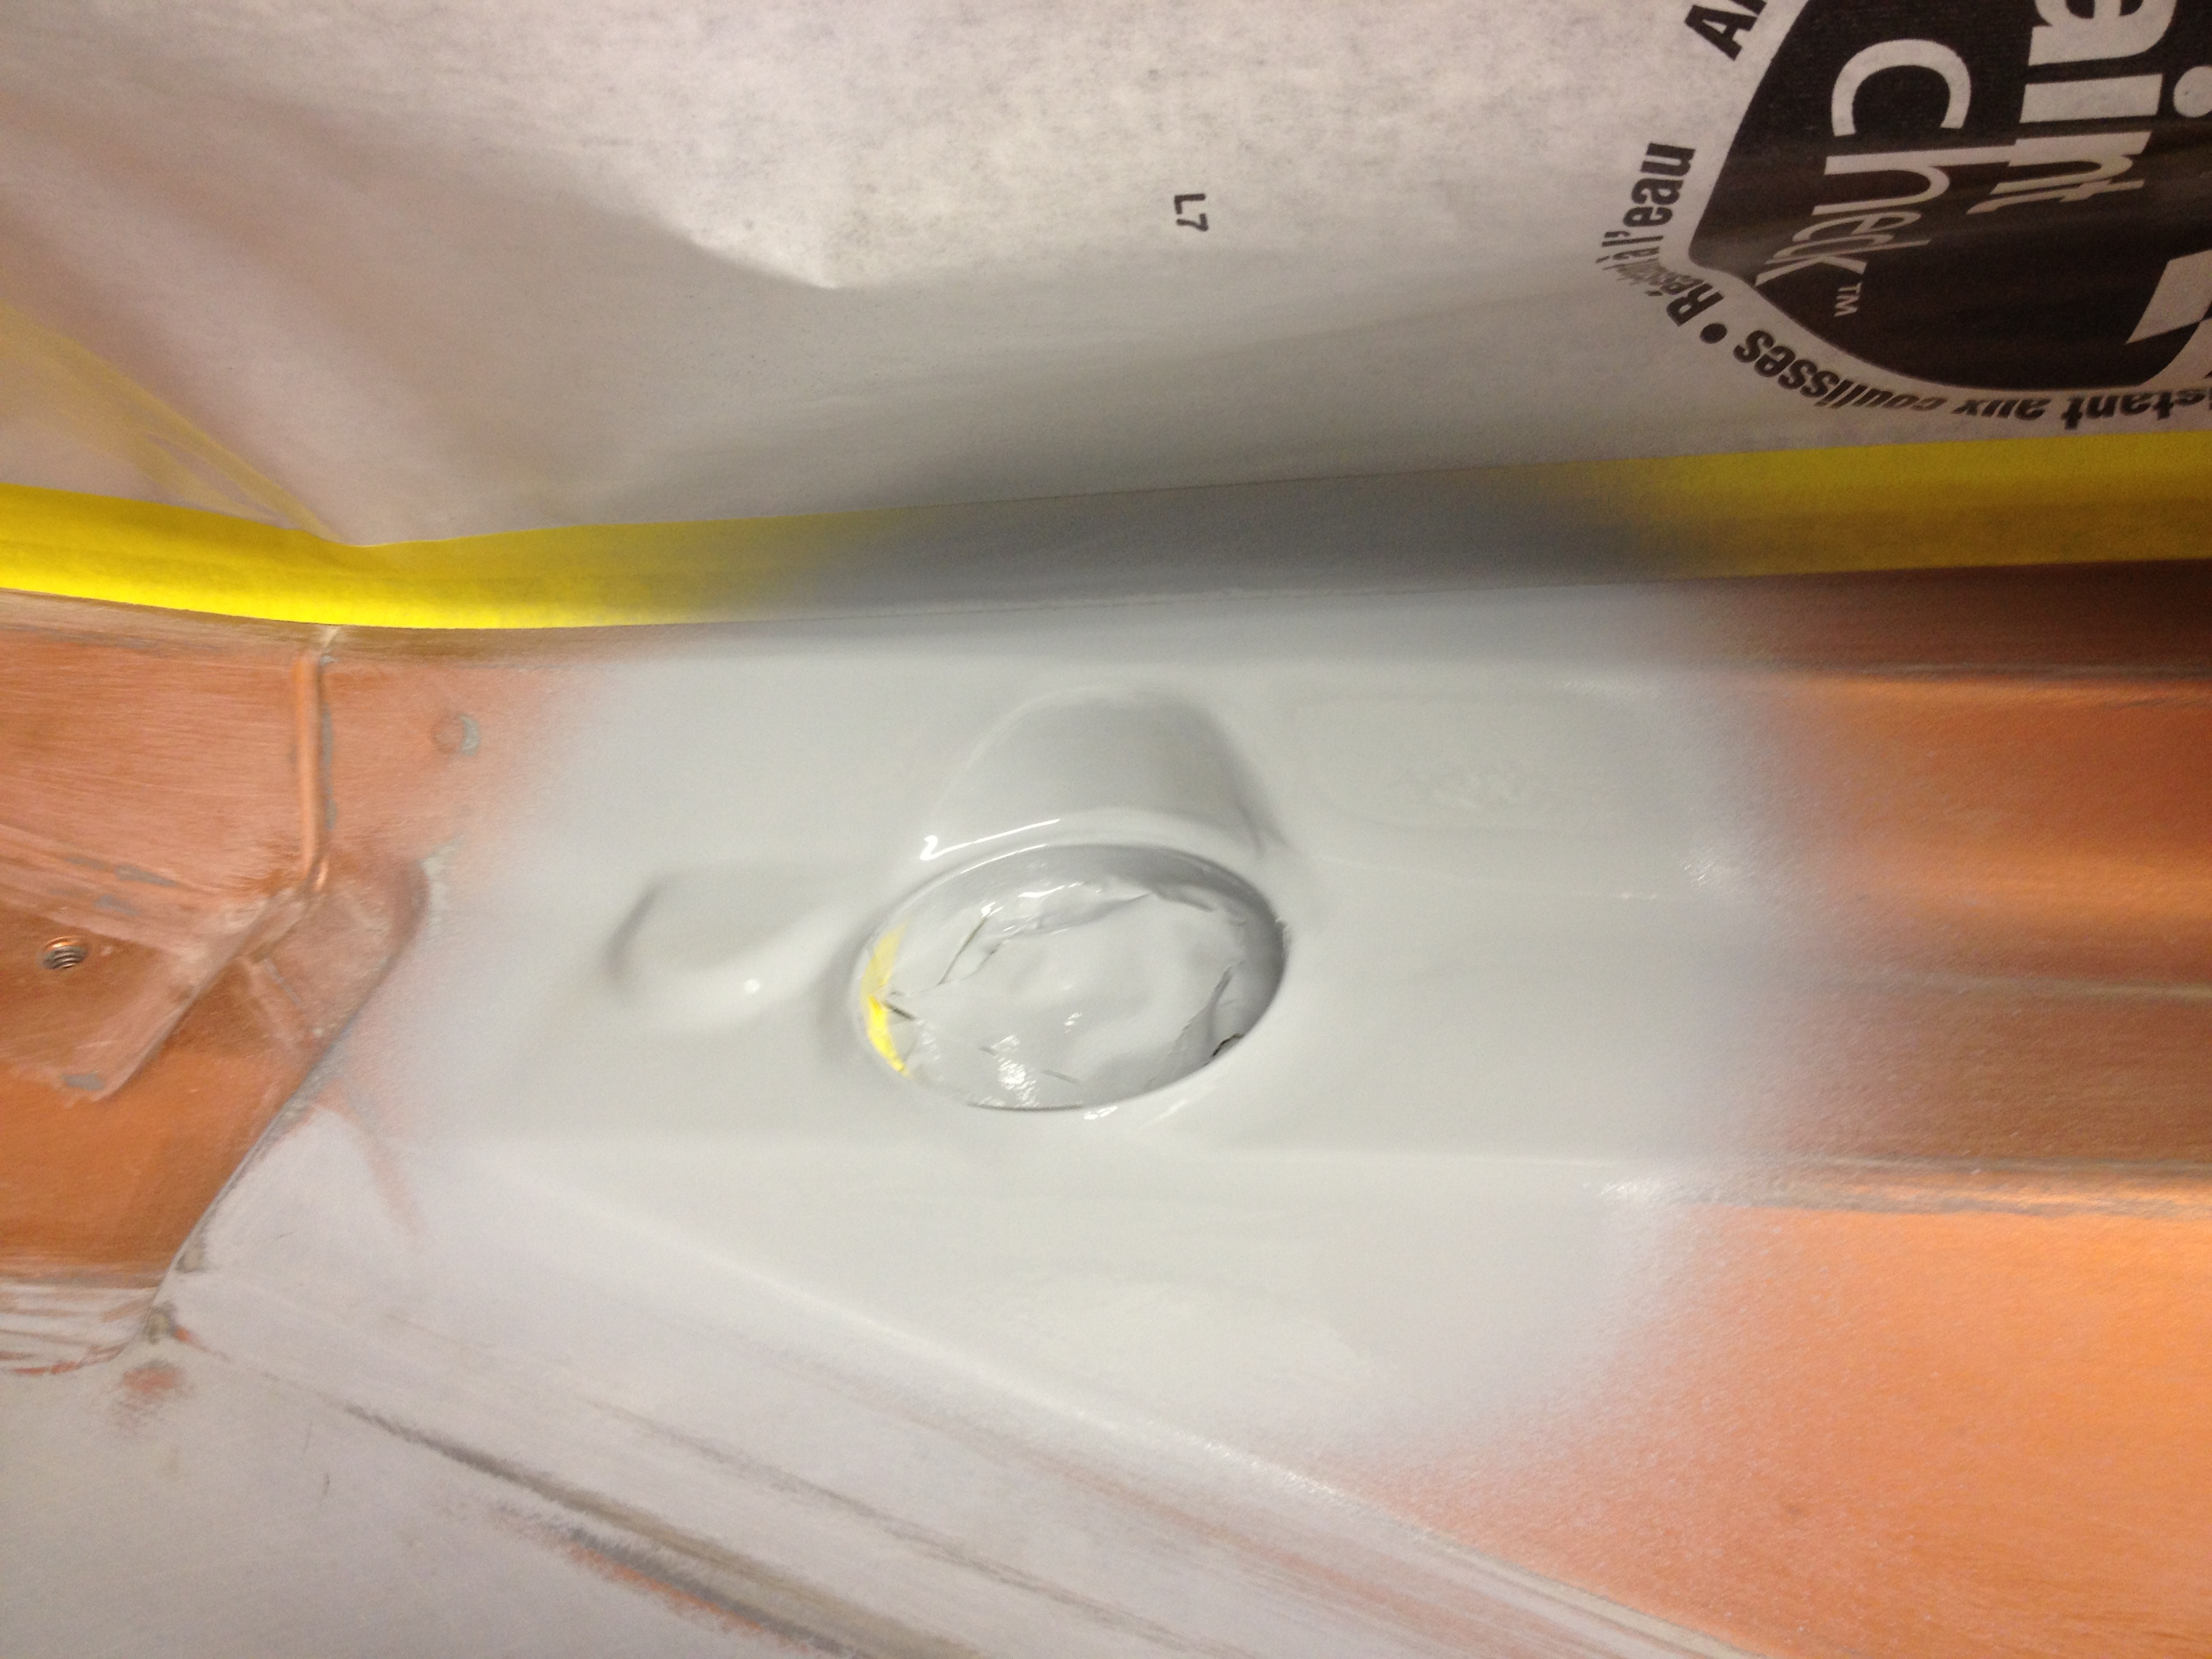
Primer Sanded:
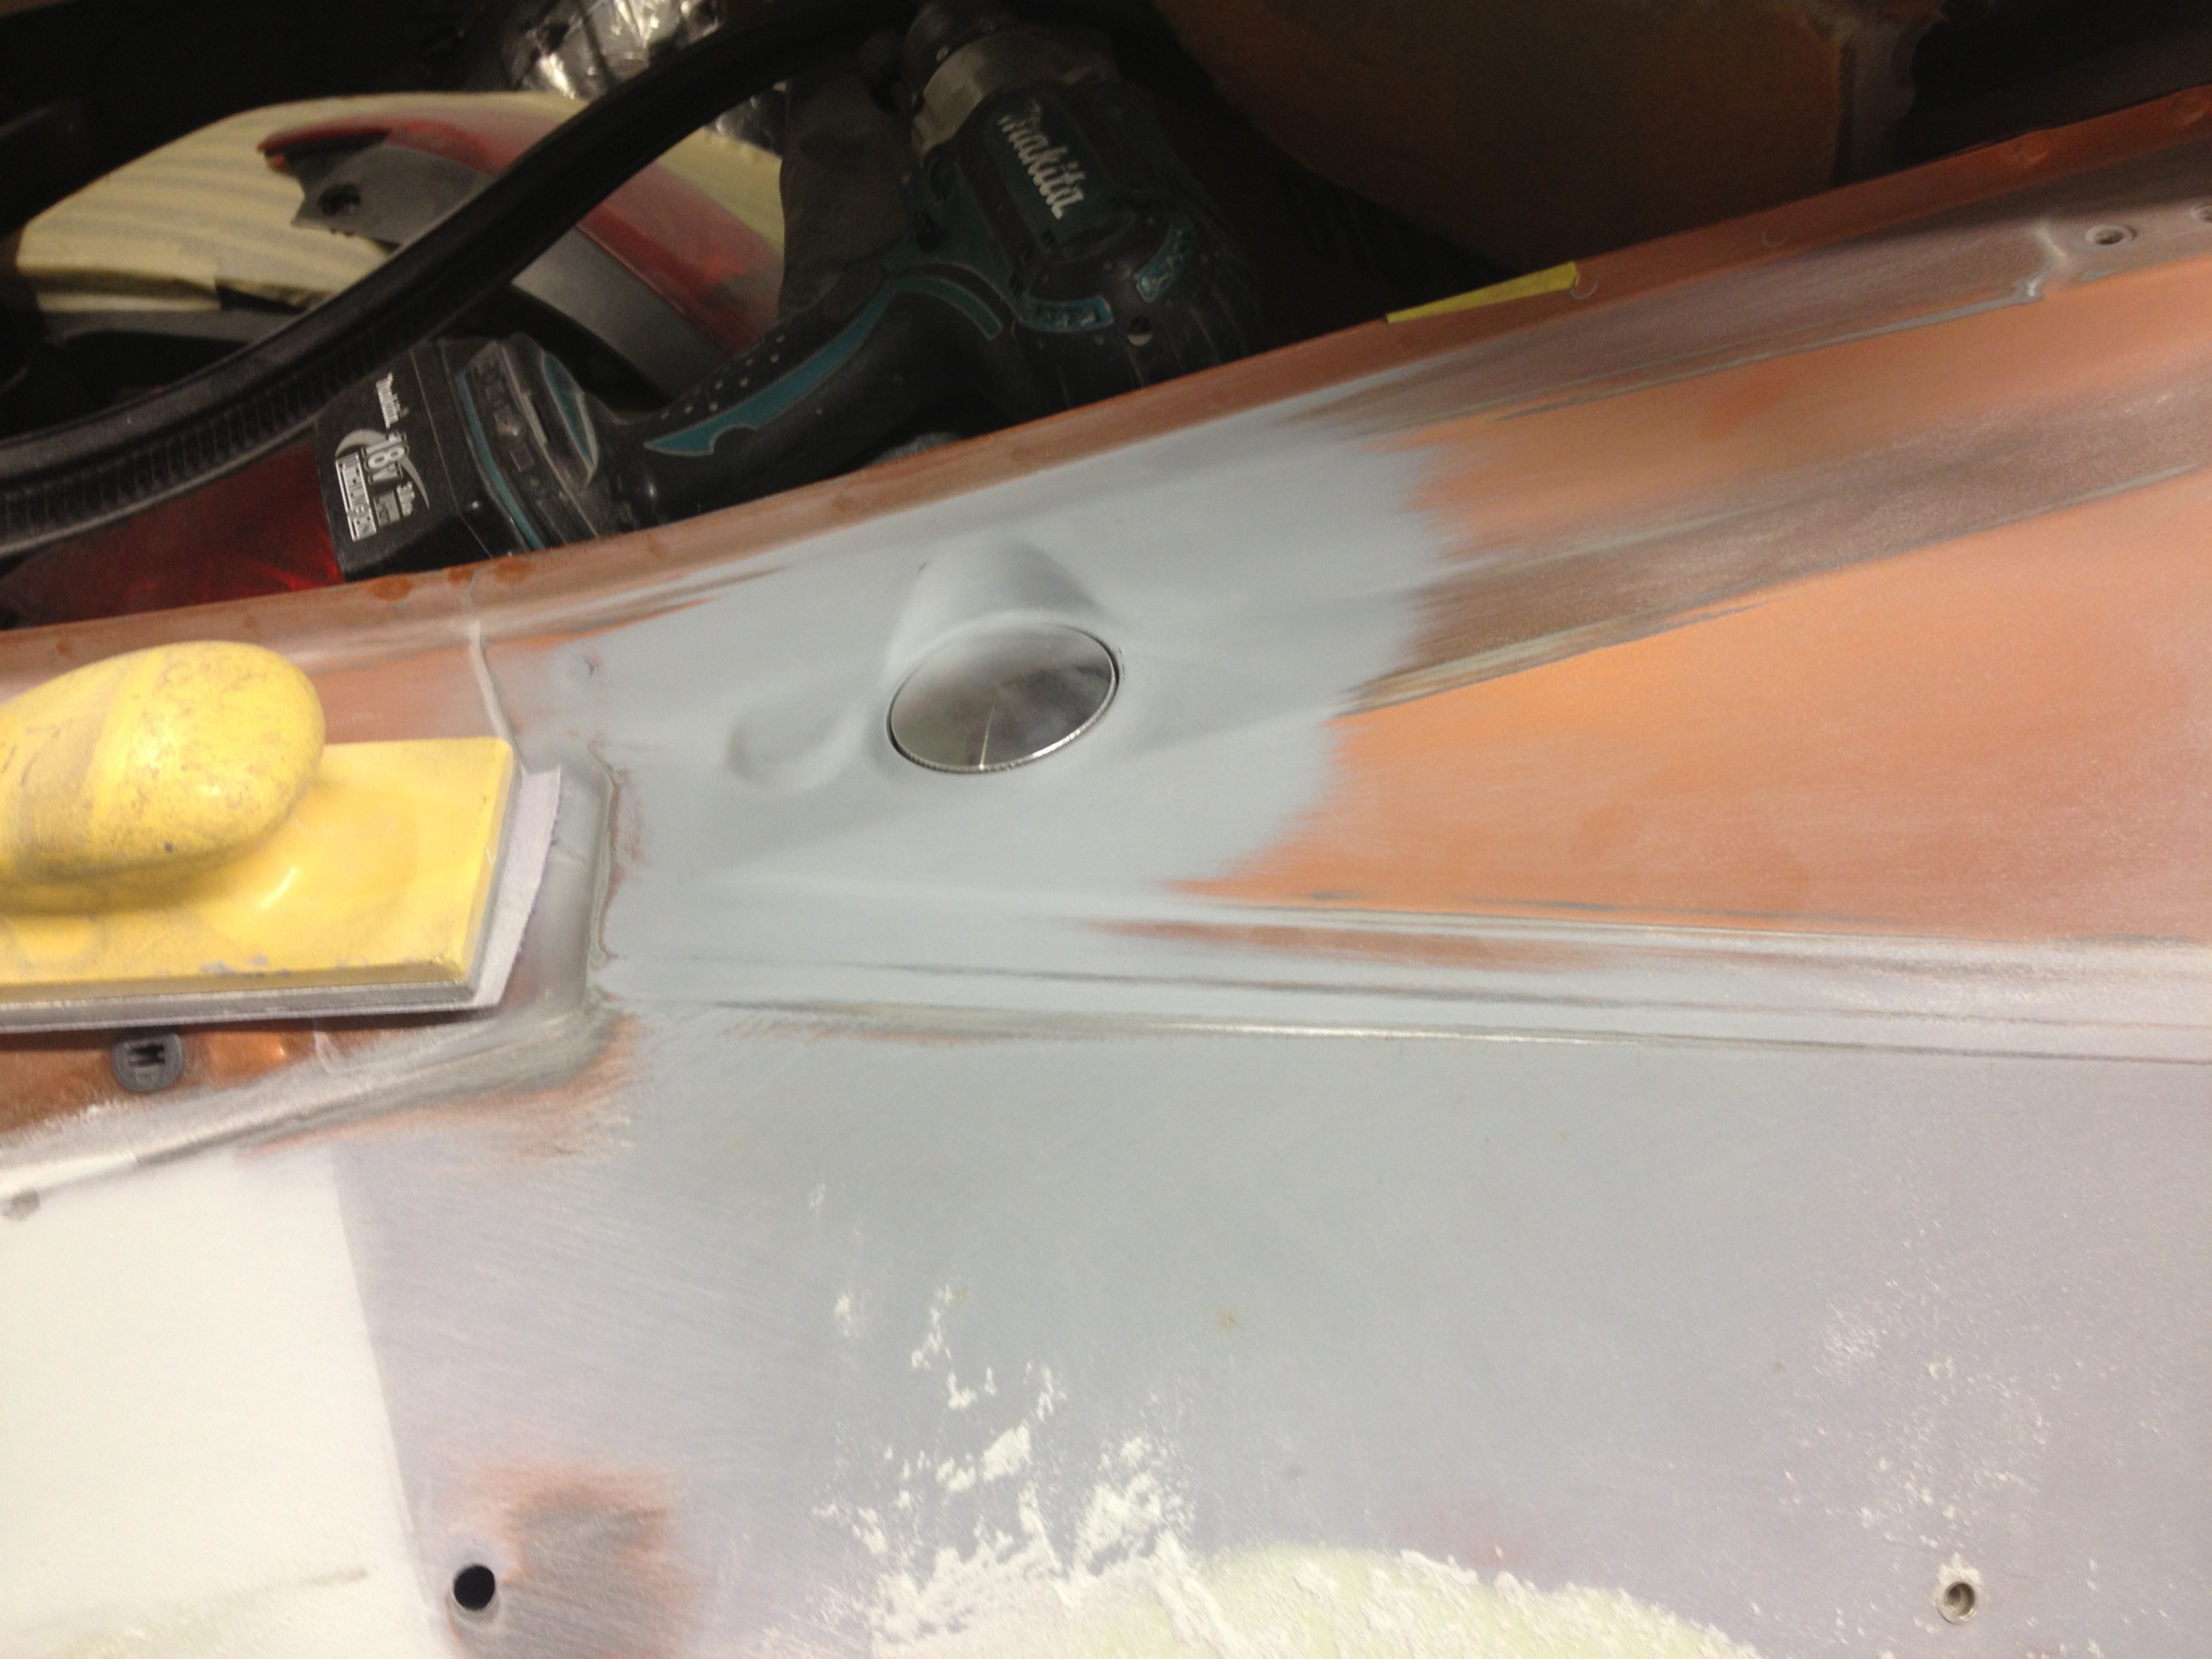
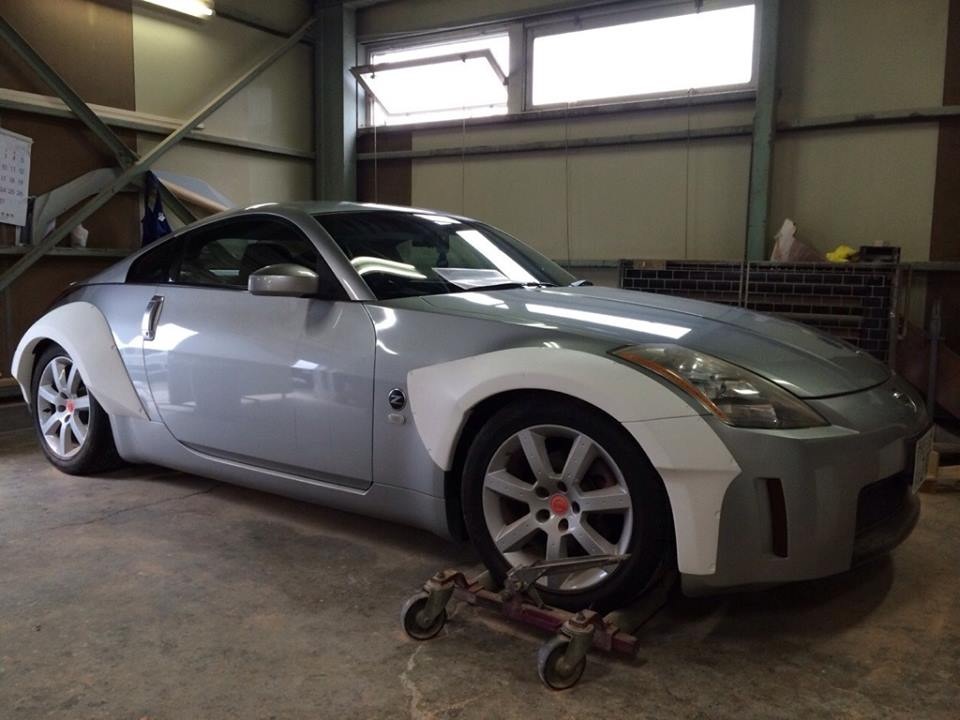
And a misc shot of the car. This would have been some time between the end of May and the end of June this year.

Starting to tack it in:

Bending it into shape and welding some more:

Grind the welds smooth:

Glazed, sanded, then high build primer:

Primer Sanded:

And a misc shot of the car. This would have been some time between the end of May and the end of June this year.

Thread Starter
Registered User
Joined: Sep 2008
Posts: 908
Likes: 28
From: Winnipeg, MB
I'm not going to post the build in chronological order because it would just take too much time to sort everything out to do that way. I'm just going to post each individual aspect start to finish in no particular order.
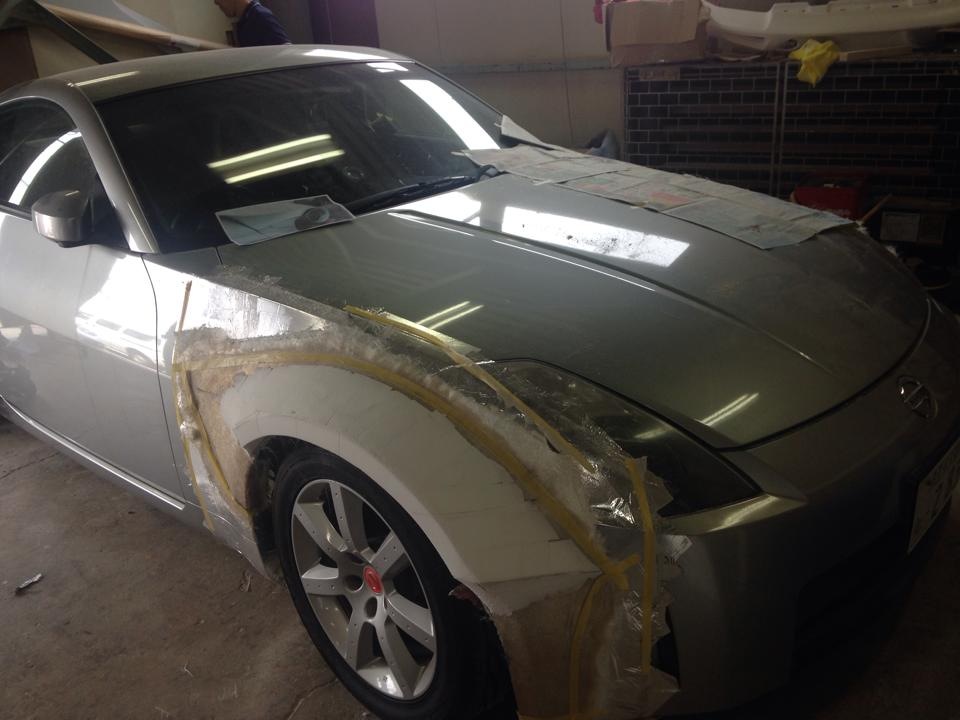
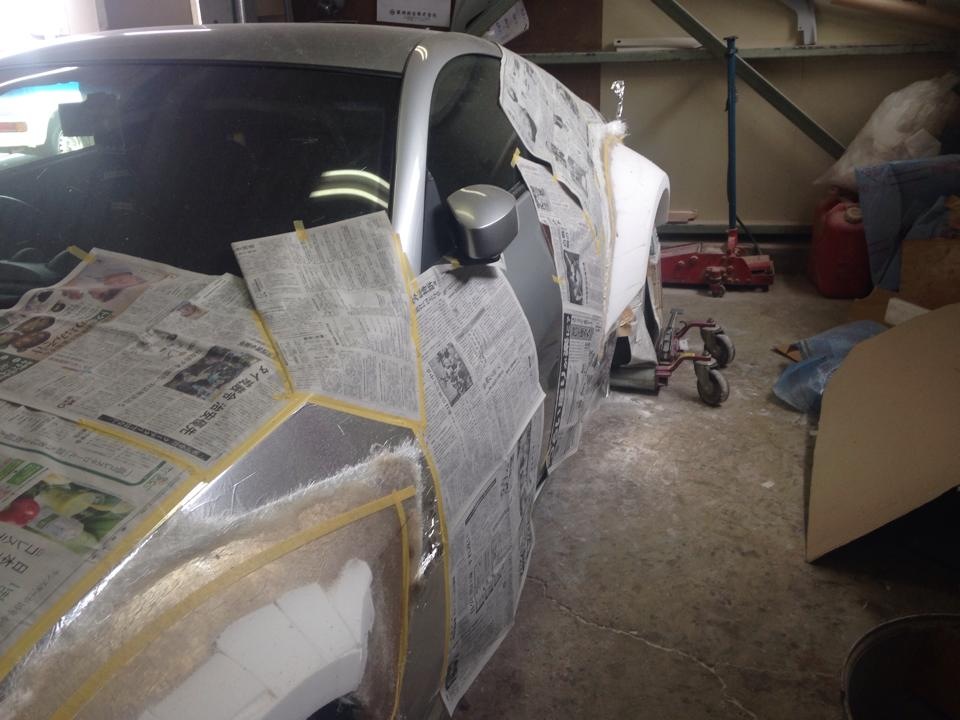
First up are a few pics of Stardast actually fabricating the flare kit in Japan. They didn't make the kit off of their white show car, they actually re-made a kit from scratch to sell. Because of this there are a few differences between the kit on their white car and the production kit they're selling.
I was actually the first person in the world to pre-order this kit, before it even existed and the first in the world to receive my kit. Kinda cool!


Thread Starter
Registered User
Joined: Sep 2008
Posts: 908
Likes: 28
From: Winnipeg, MB
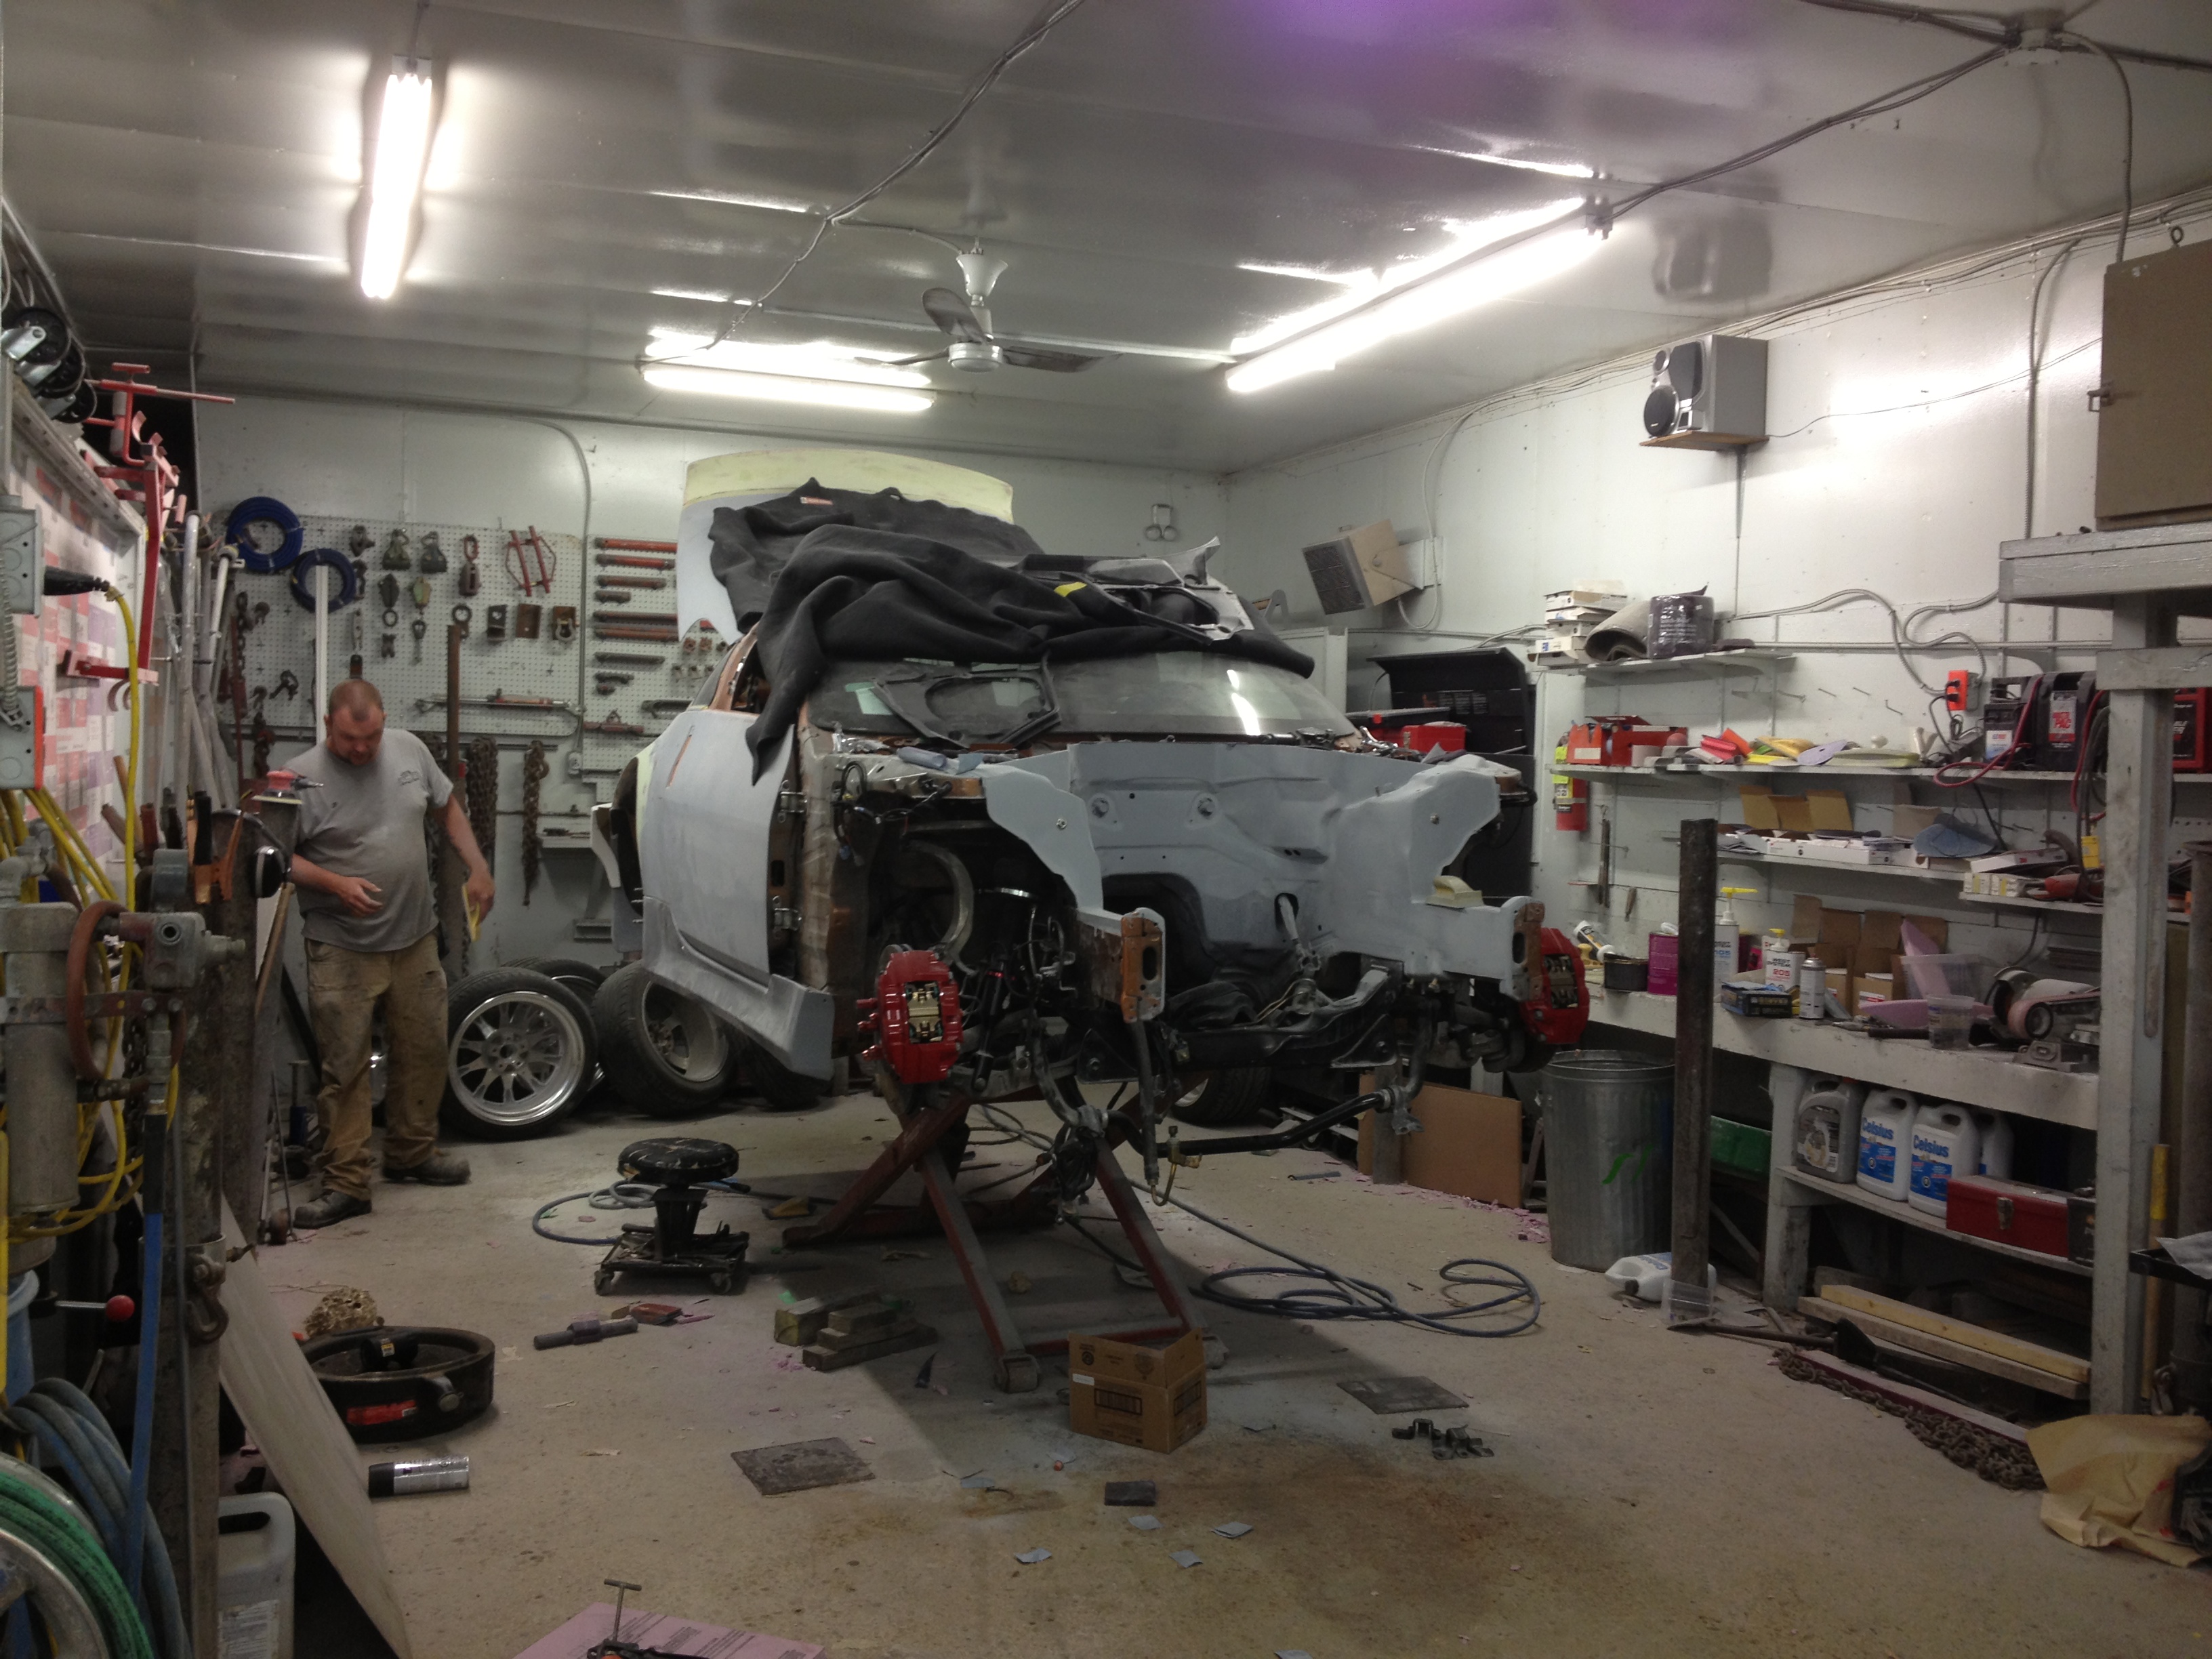
So the car has had the 'rough' body work done and the first few coats of primer done. These coats get sanded with a lower grit of sand paper to get everything level. The car will still get a few more coats of primer, then high-grit block sanding, then paint.
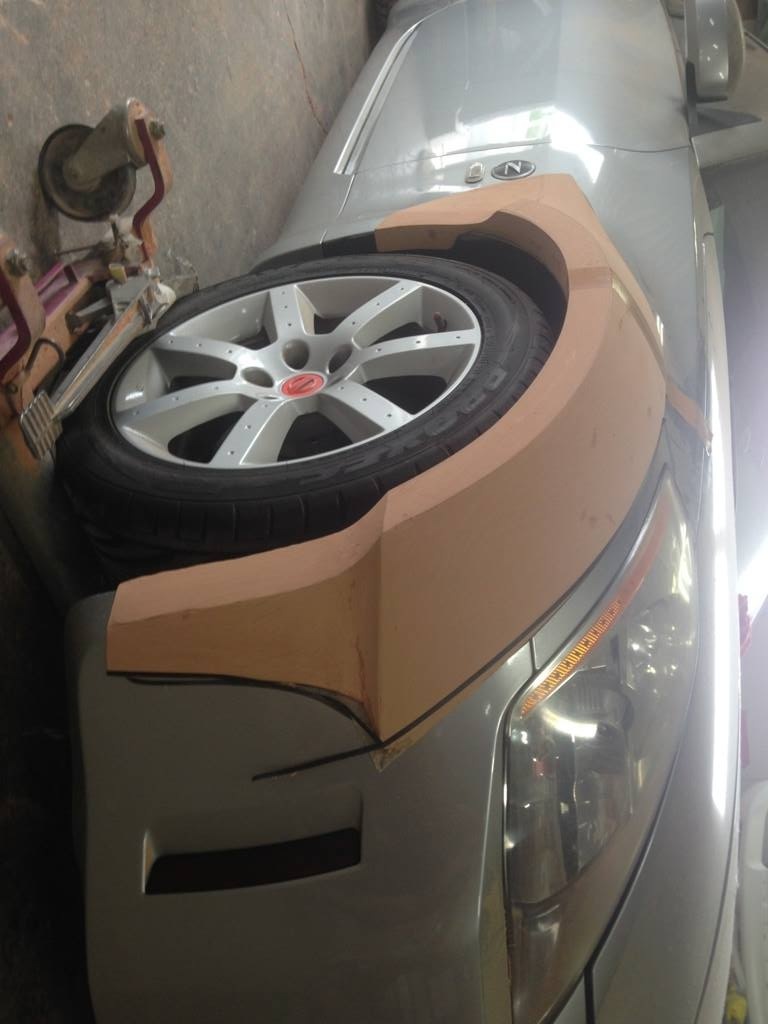
Next up is clearancing the fenders for wheels and tires. I did about 95% of this work myself with some input from my buddy who owns the body shop. With the new wide fenders I'll be running a wider tire and lower offset wheel than stock. The original fender lip would contact the top of the tire when the suspension is lowered, so the fender lip has to go.
The first cut was small and rough. It was done just so we could see inside the fender and see if there was any inner structure we would have to deal with. This cut also starts to seperate the outer fender from the inner wheel well metal.
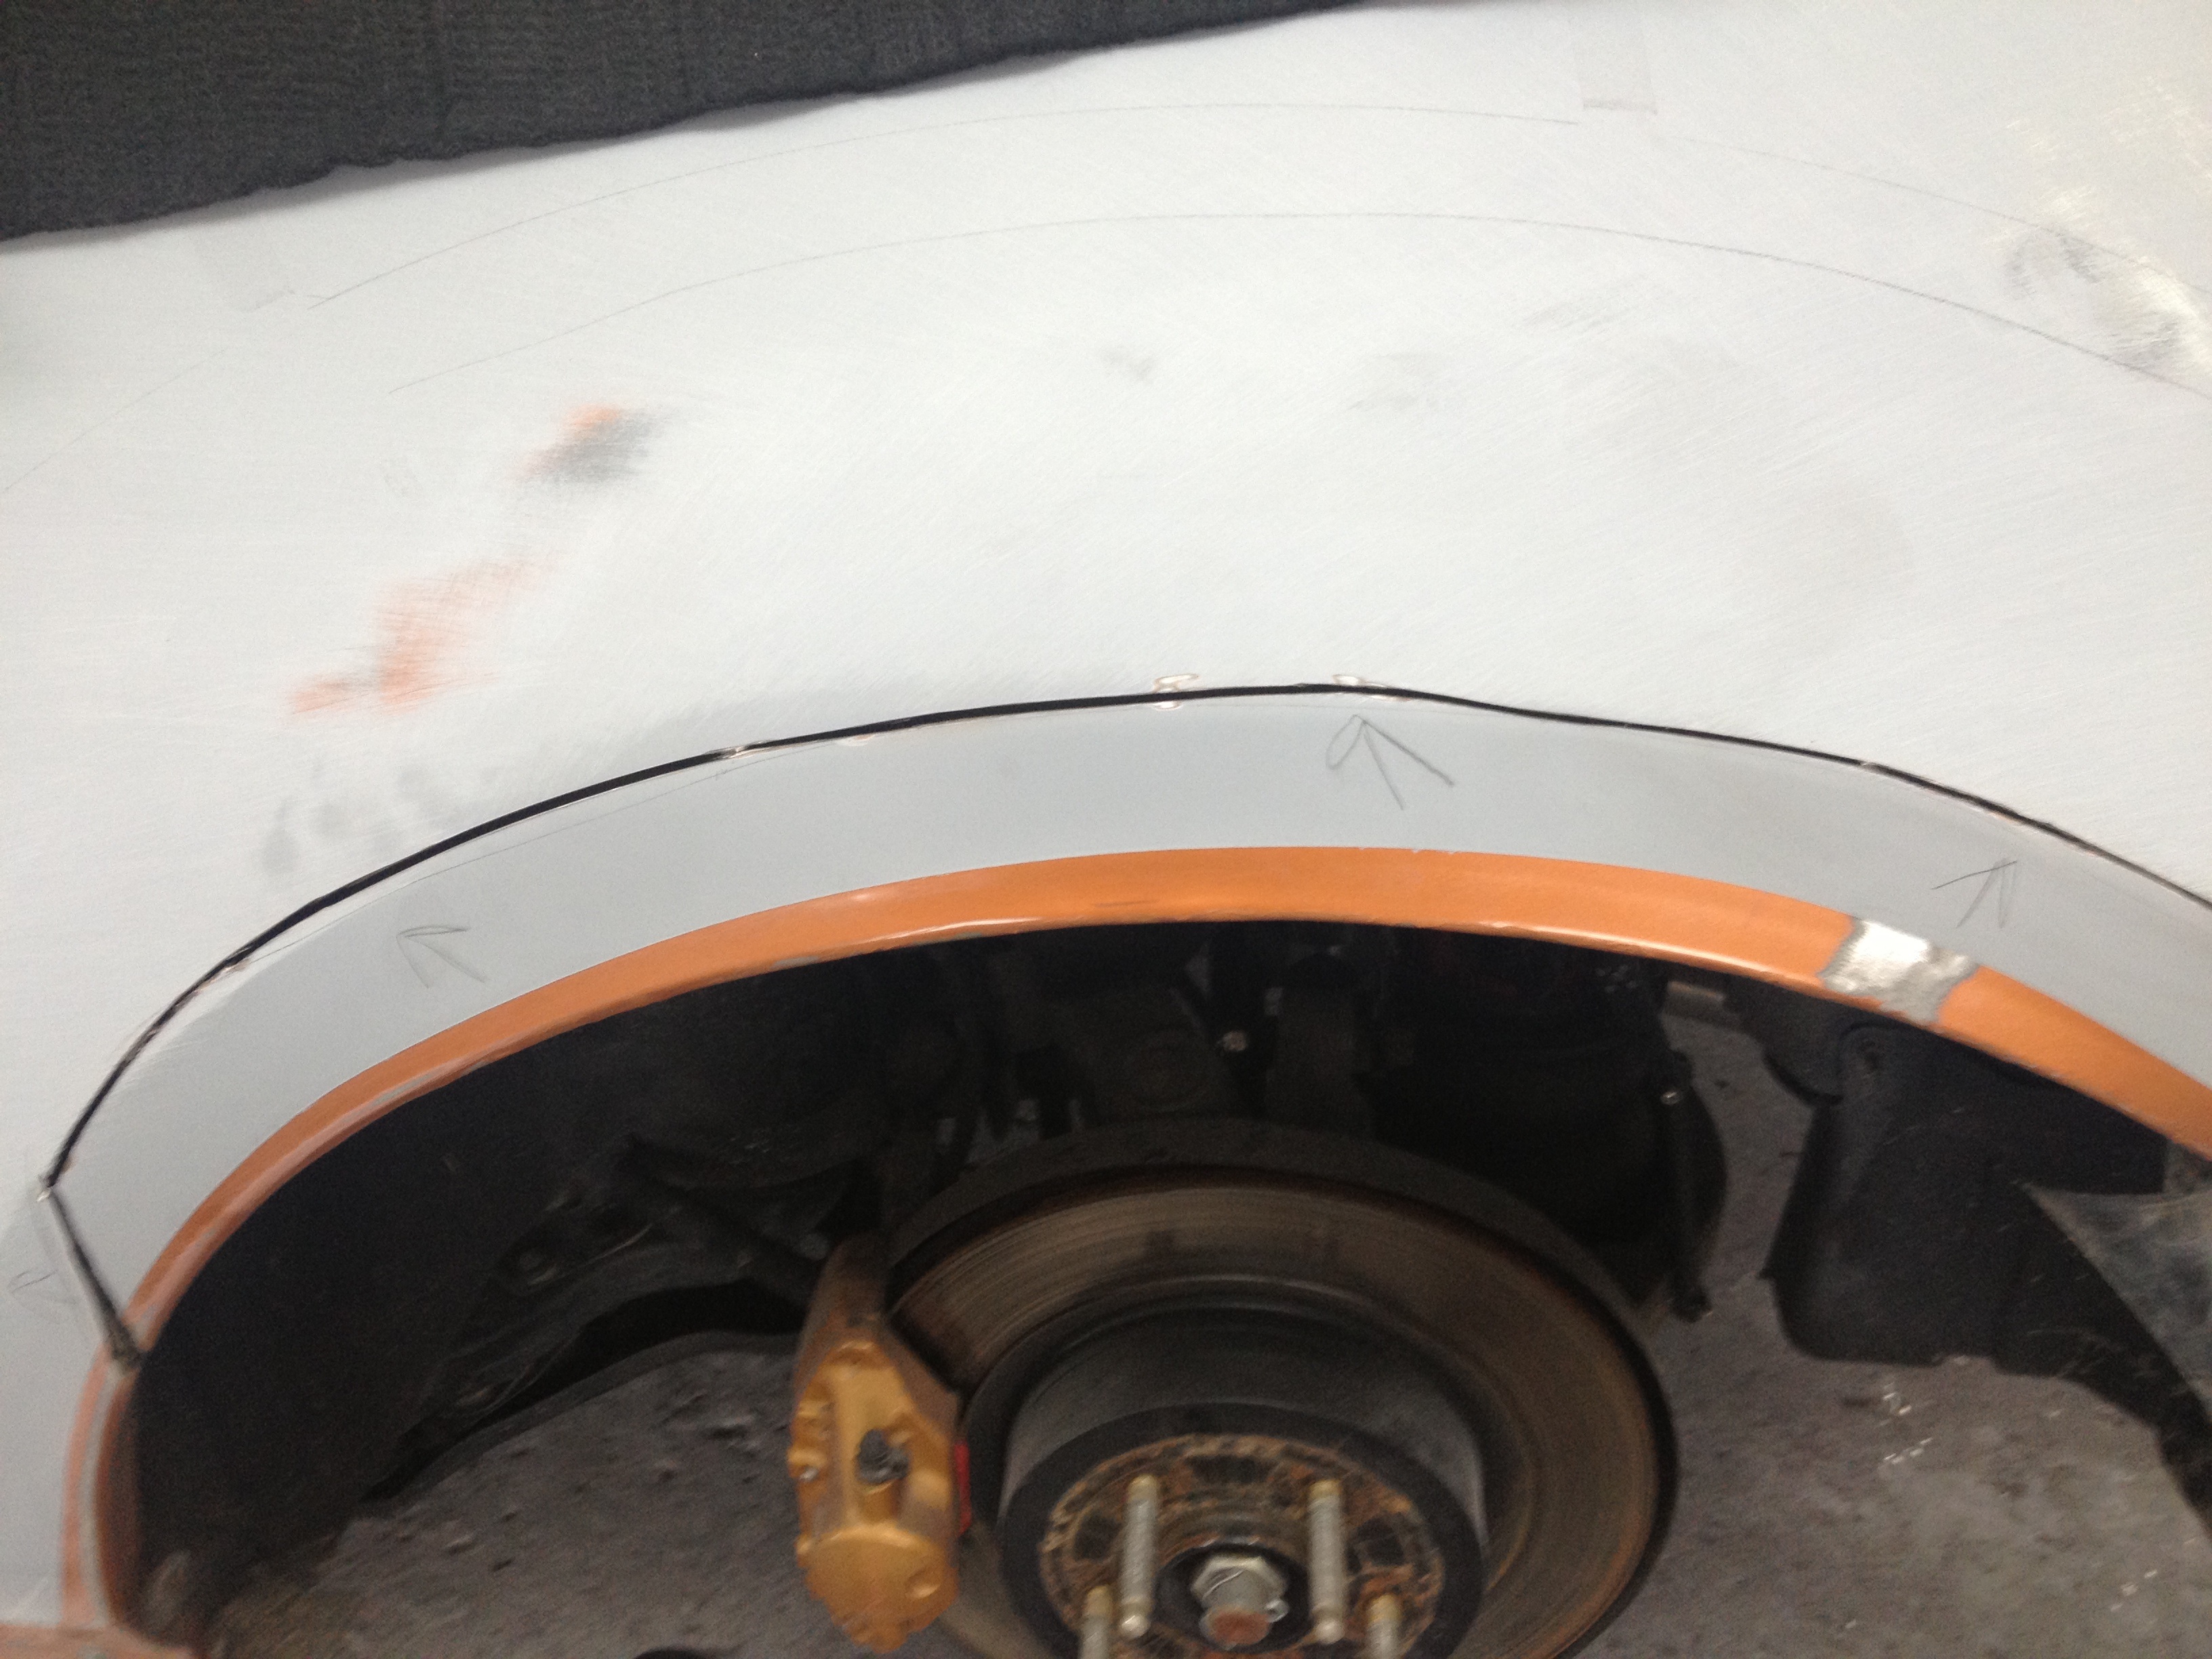
I cut and test fit, cut and test fit abput 4 times to get the size and shape cutout I wanted that would allow the tire not to rub the wheel well with the suspension all the way down.
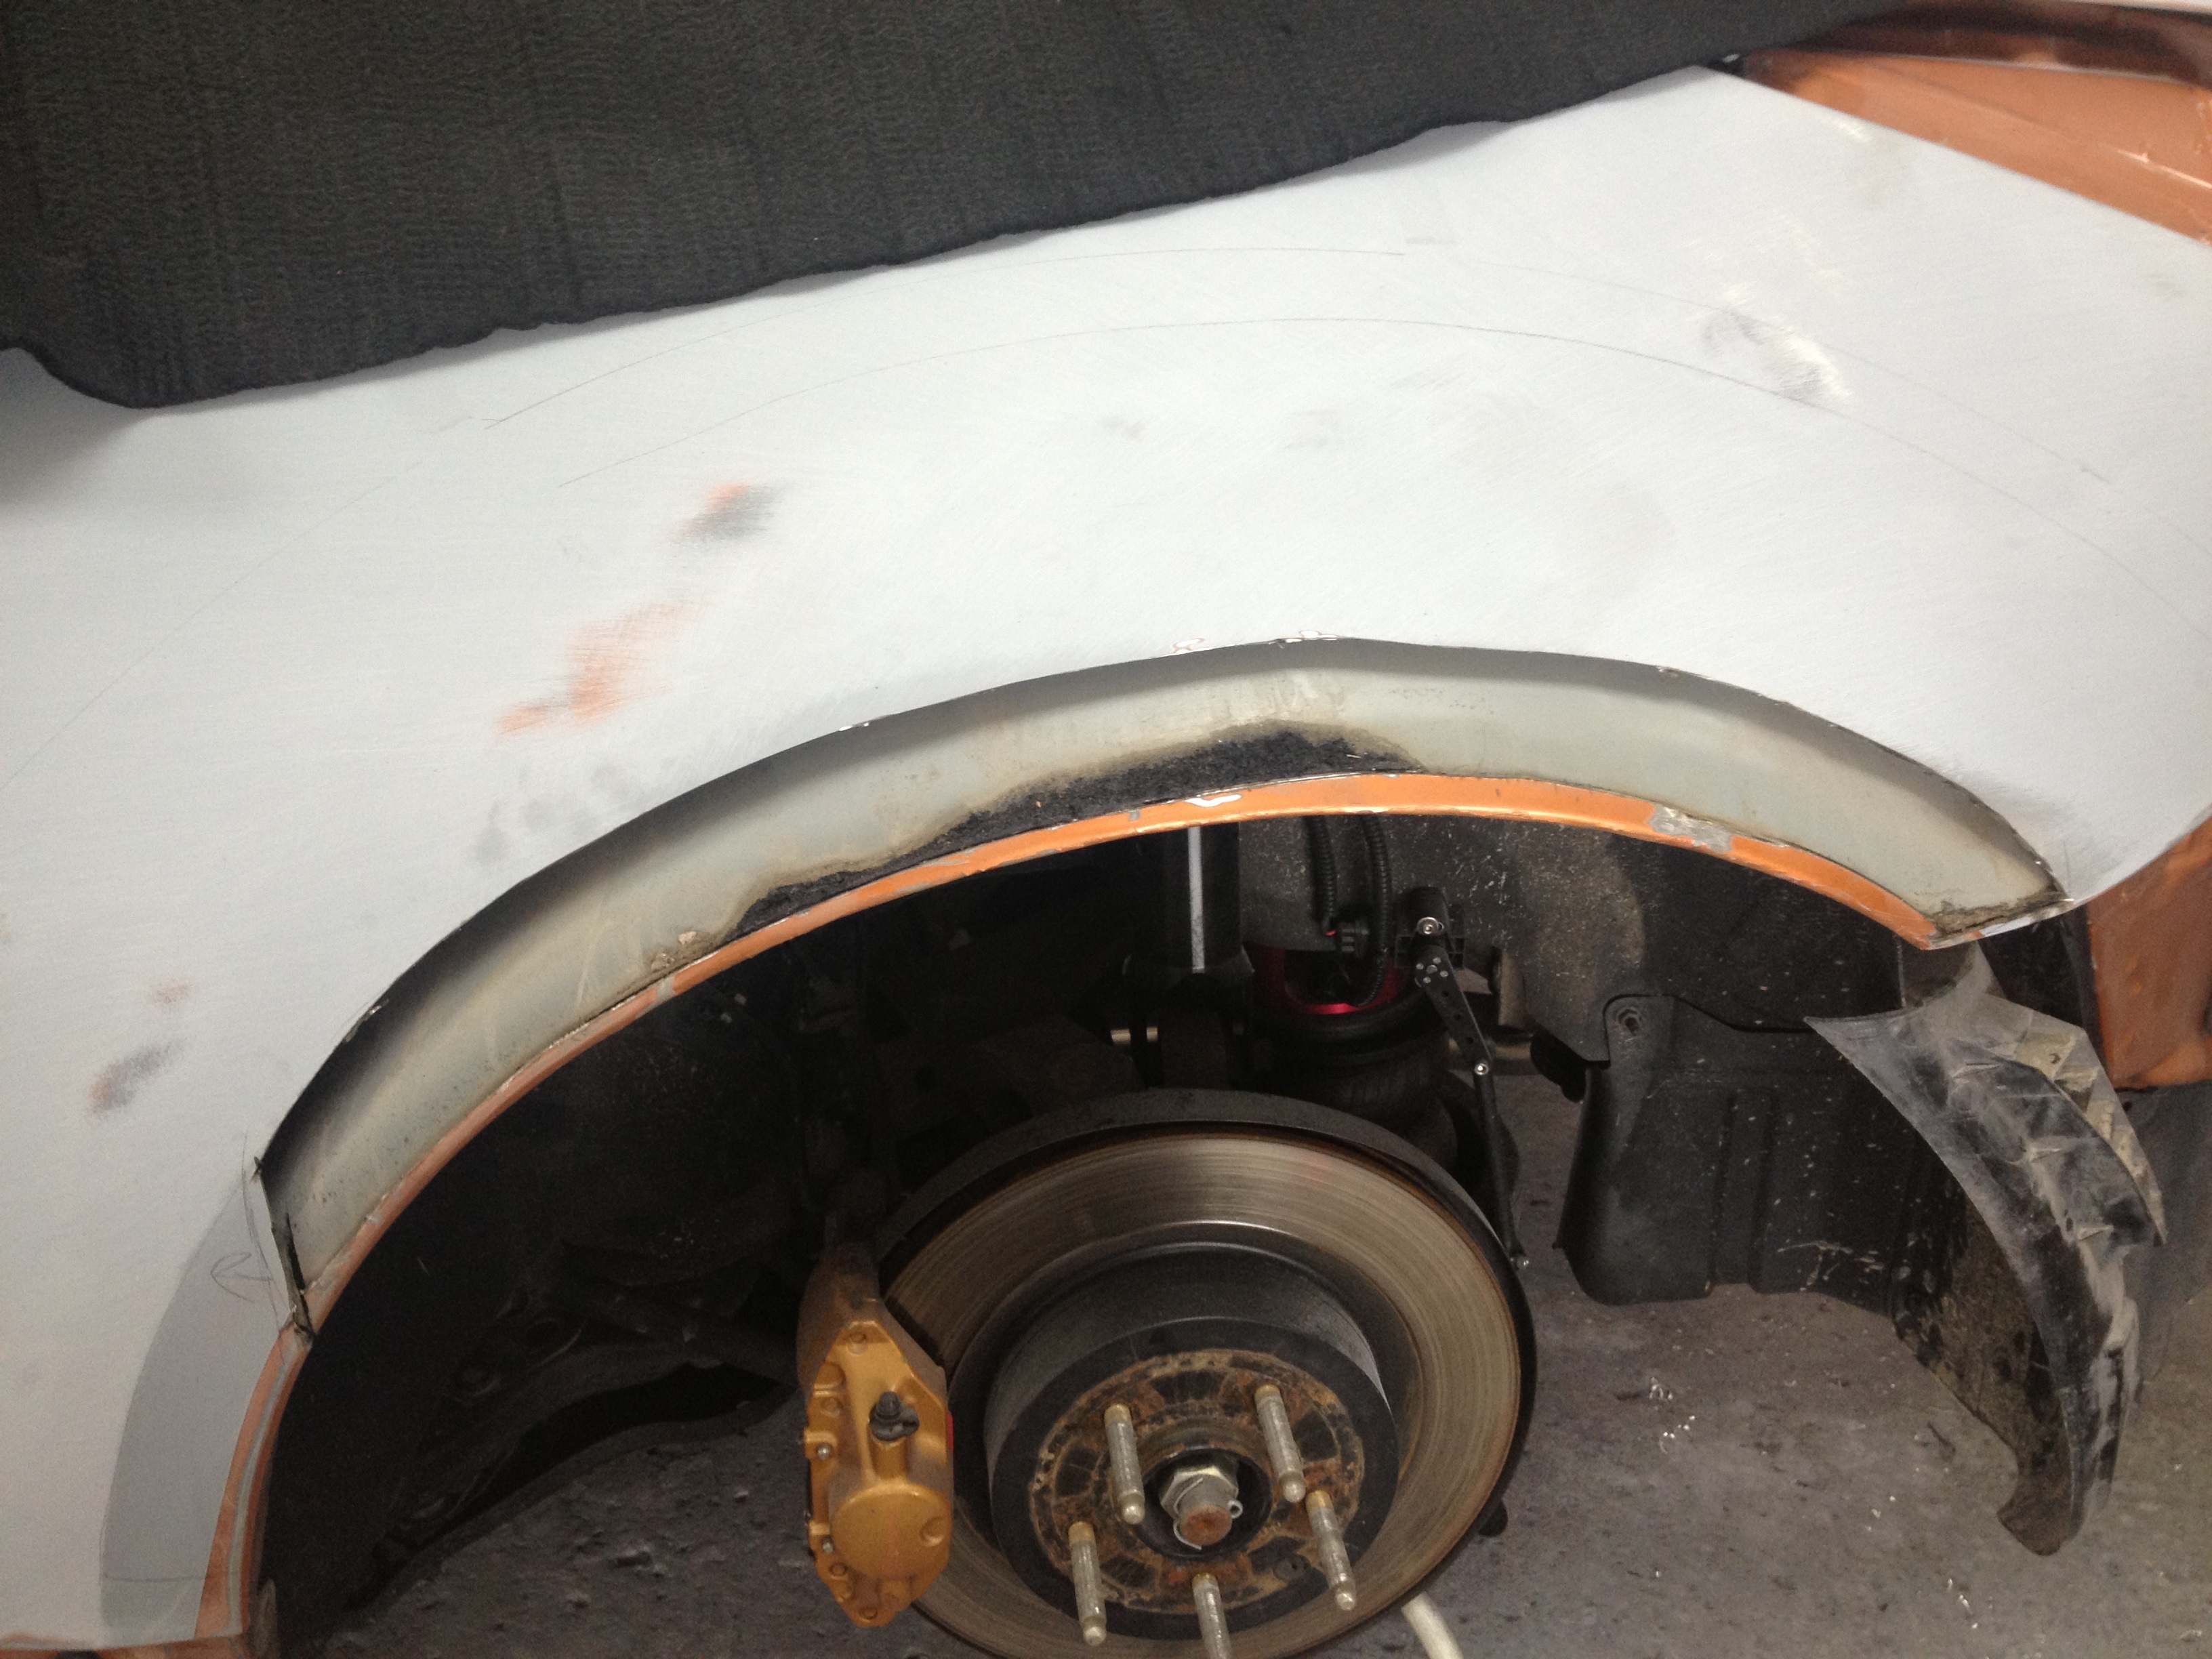
You'll notice the pie cuts on the inner wheel well structure. These cuts allow me to roll the inner metal up so it meets up with the new wheel well cutout.
Here we have the pie cut inner fender and the cut fender lip stripped of paint and ready for welding.
We then tack welded the inner wheel well back to the outer fender making everything one piece again.
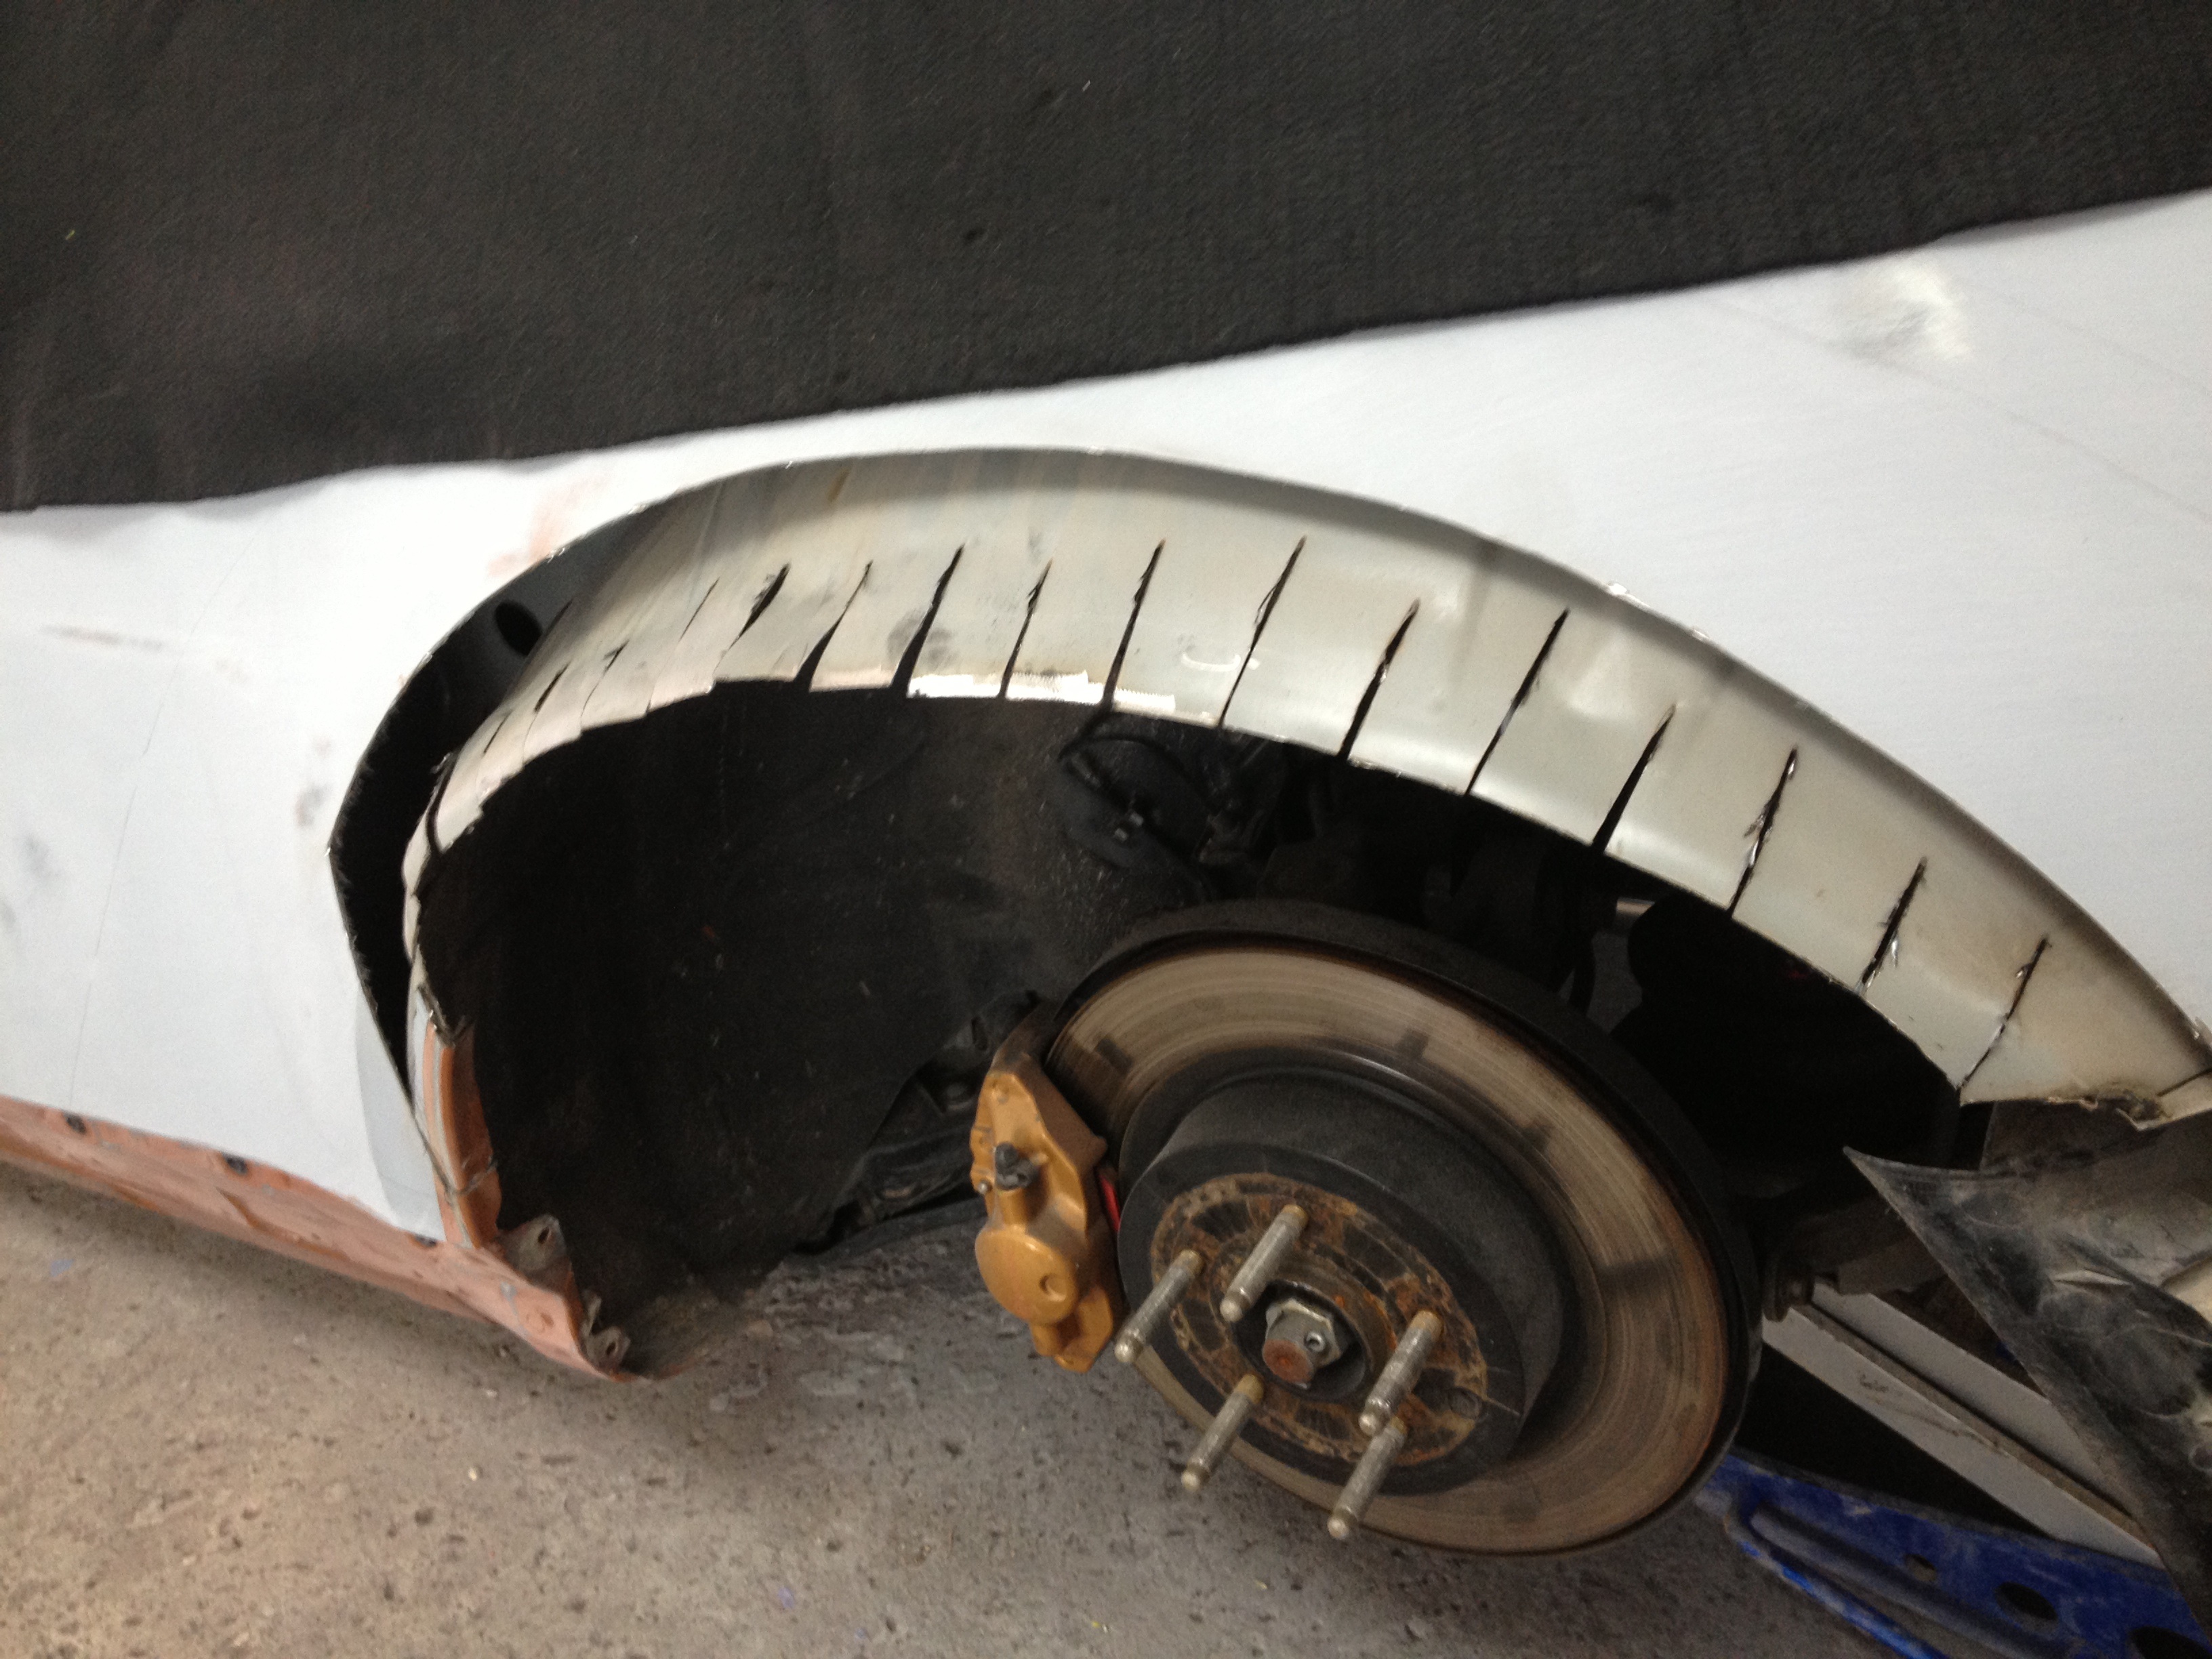
This is the inside of the wheel well. I stripped off all the rubber undercoat and prepped the metal so the pie cuts could be welded back together. Once welded we will re-spray it all with rubber undercoating.
After the inner was welded to the outer fender we cut off the excess metal flaps and ground down the welds slightly. In this pic the pie cuts have yet to be welded, this is why there is a small gap every 1" or so.

Next up is clearancing the fenders for wheels and tires. I did about 95% of this work myself with some input from my buddy who owns the body shop. With the new wide fenders I'll be running a wider tire and lower offset wheel than stock. The original fender lip would contact the top of the tire when the suspension is lowered, so the fender lip has to go.
The first cut was small and rough. It was done just so we could see inside the fender and see if there was any inner structure we would have to deal with. This cut also starts to seperate the outer fender from the inner wheel well metal.


I cut and test fit, cut and test fit abput 4 times to get the size and shape cutout I wanted that would allow the tire not to rub the wheel well with the suspension all the way down.

You'll notice the pie cuts on the inner wheel well structure. These cuts allow me to roll the inner metal up so it meets up with the new wheel well cutout.

Here we have the pie cut inner fender and the cut fender lip stripped of paint and ready for welding.

We then tack welded the inner wheel well back to the outer fender making everything one piece again.

This is the inside of the wheel well. I stripped off all the rubber undercoat and prepped the metal so the pie cuts could be welded back together. Once welded we will re-spray it all with rubber undercoating.

After the inner was welded to the outer fender we cut off the excess metal flaps and ground down the welds slightly. In this pic the pie cuts have yet to be welded, this is why there is a small gap every 1" or so.

Thread Starter
Registered User
Joined: Sep 2008
Posts: 908
Likes: 28
From: Winnipeg, MB
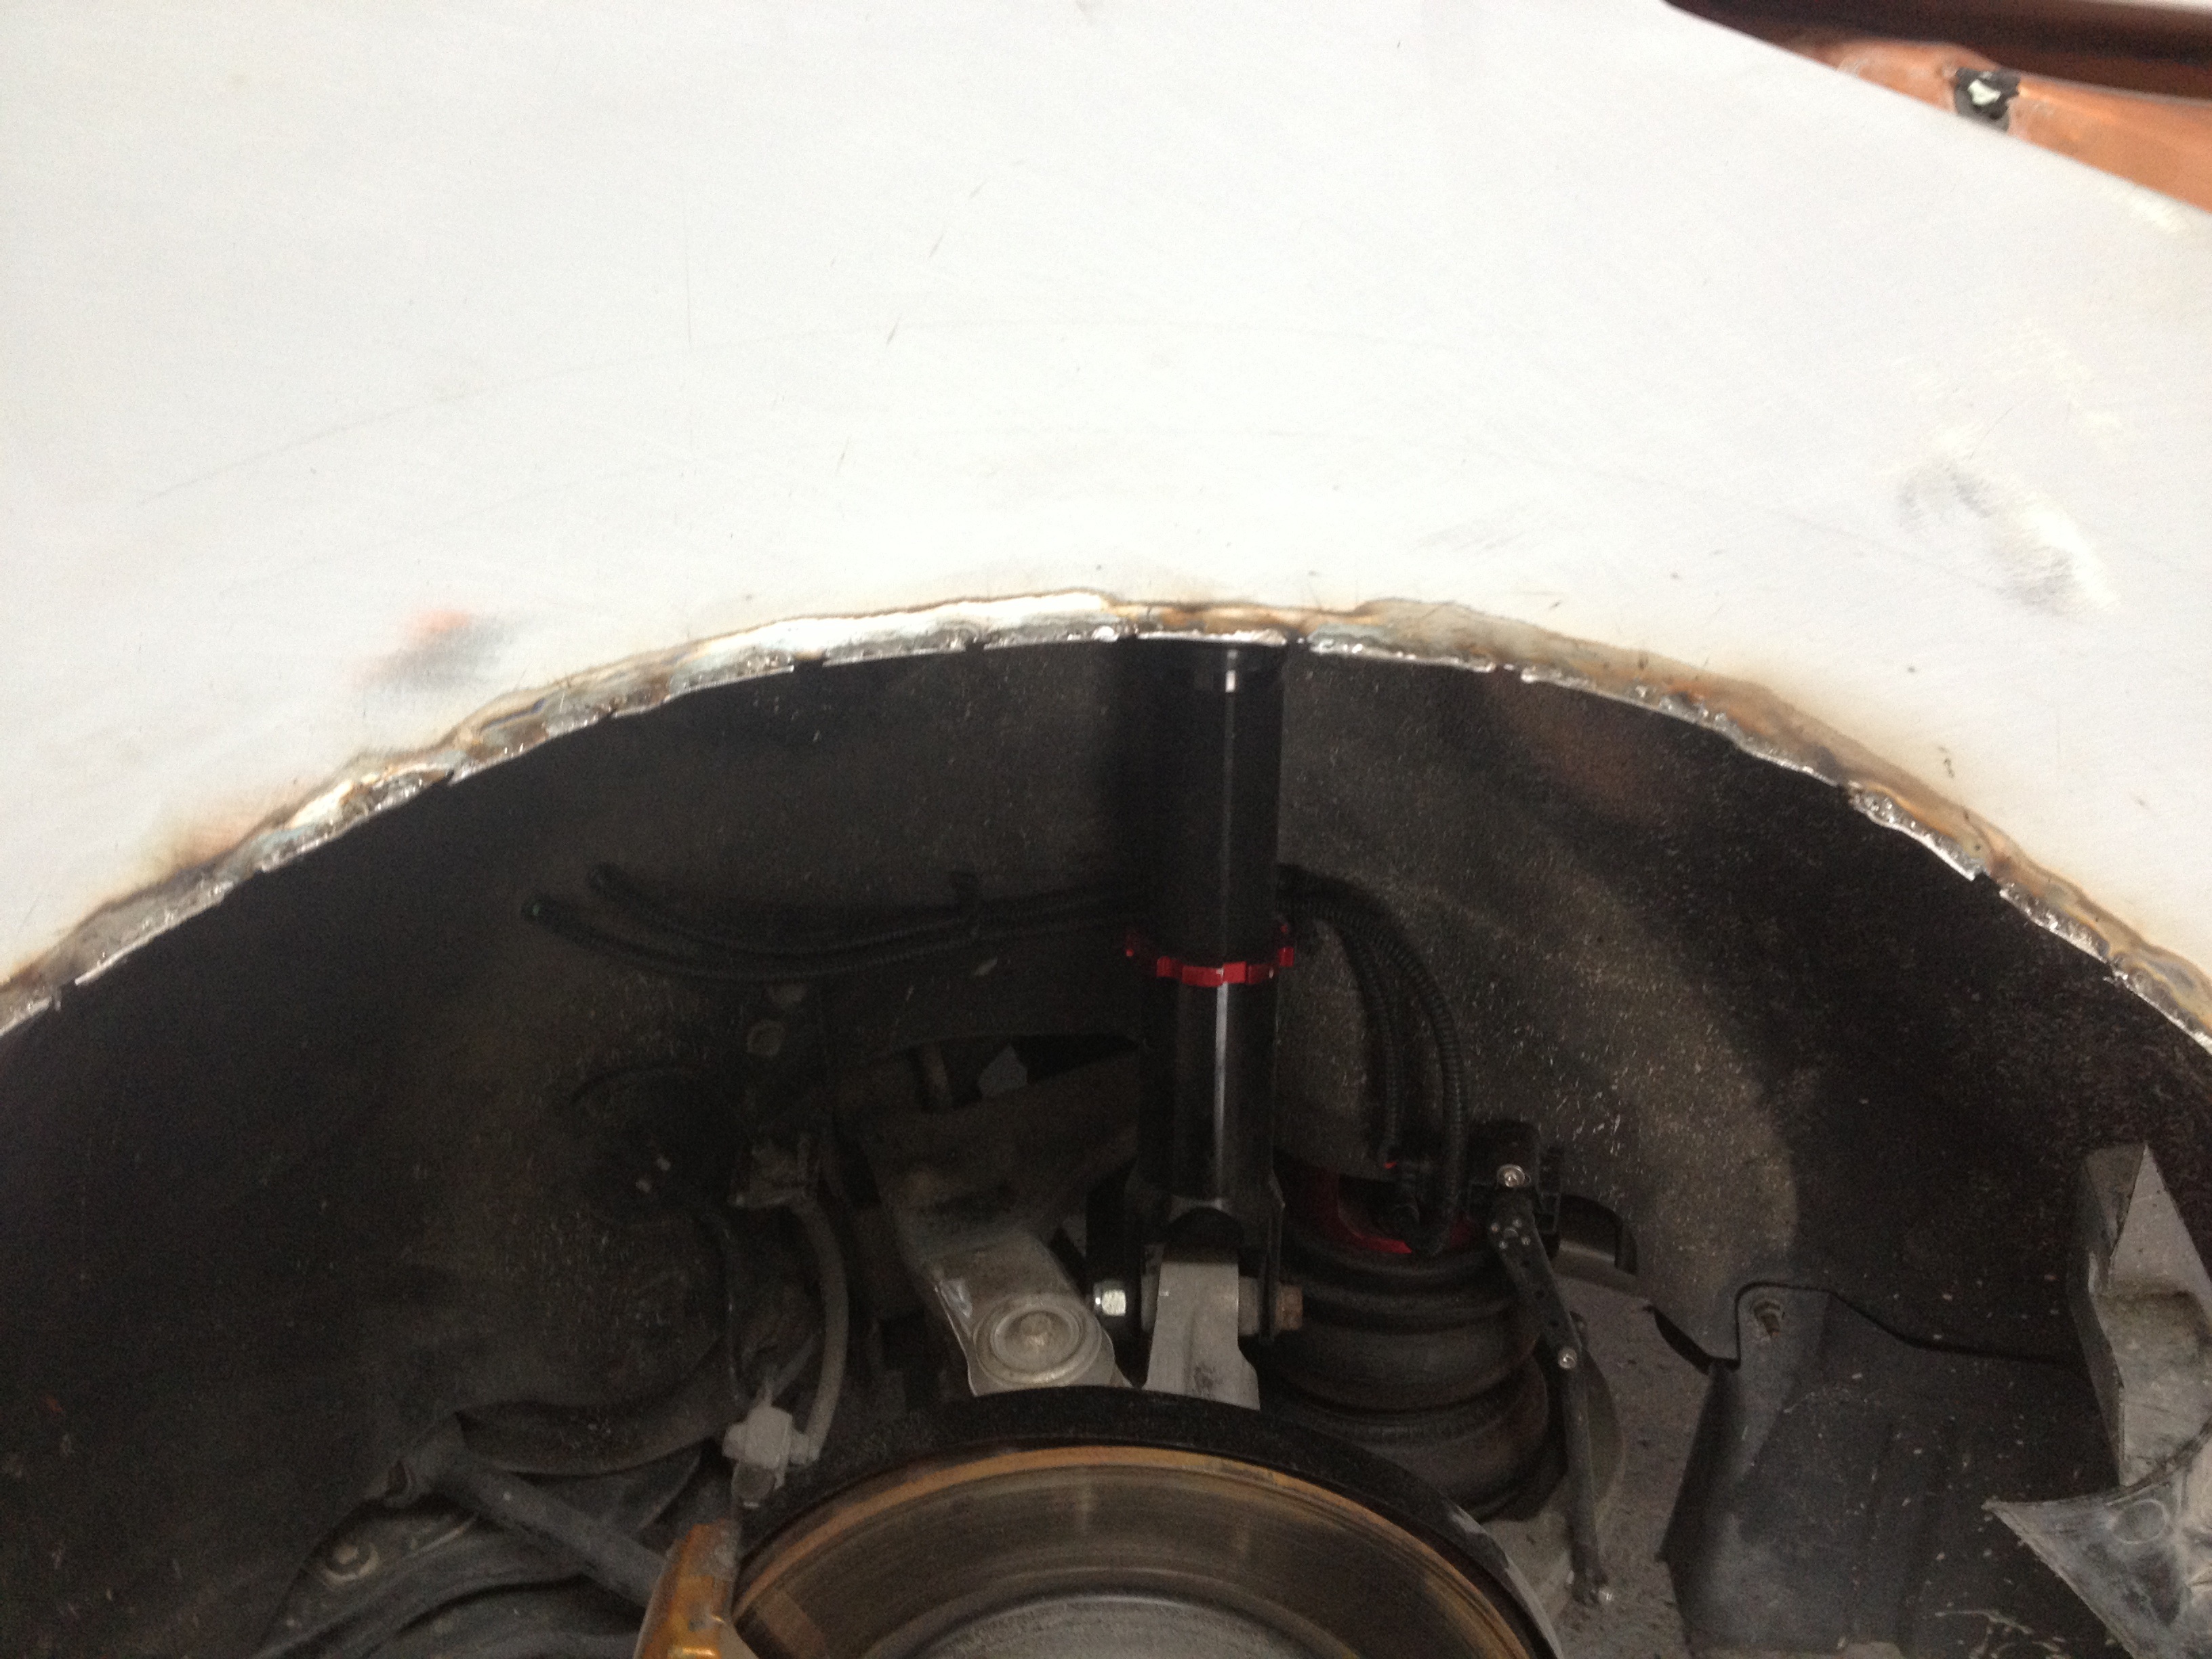
This is a quick vid of the rear suspension and Accuair E-Level operation. From full up to the 20% ride height setting. The rear still goes a bit lower when it's dumped right out. Check out how much the wheel/tire cambers in as the suspension compresses. Click the pic should open the video.

The next video is the clearance between the rear tire and fender lip looking up at the lip as the suspension compresses and extends. Need to get the car aligned at ride height, then I'm going to play with spacers (about an 8mm I think) & do a bit more clearance if required. Right now there is a 1/4" gap or so, but I want to make sure the alignment is good because the alignment will affect the clearance.

One last vid dumping the rear with the wide fender off. Nice and slow which is what I wanted.

The next video is the clearance between the rear tire and fender lip looking up at the lip as the suspension compresses and extends. Need to get the car aligned at ride height, then I'm going to play with spacers (about an 8mm I think) & do a bit more clearance if required. Right now there is a 1/4" gap or so, but I want to make sure the alignment is good because the alignment will affect the clearance.
One last vid dumping the rear with the wide fender off. Nice and slow which is what I wanted.