
my BP build


Hopefully this write up on my BP turbo install will be helpful to others considering forced induction. This is my first time installing an FI system and tuning a car.
I selected the complete stage 1 kit except instead of the HPX MAF sensor I had Sasha fab a down pipe with a catalytic converter and 2 O2 bungs downstream for the OEM narrow band O2 sensors. I also had him place a bung just before the turbo in the up pipe for an aftermarket wideband should I ever need it. I should have asked for another bung for an EGT sensor as well just in case.
A couple of things I learned after the fact may be deal breakers for some. The kit replaces the front crash bar with the intercooler and also requires relocation of the crash sensor. Had I known this beforehand I still would have purchased the kit but I understand if others would not.
So here’s a list of what I got with the kit and few of their specifications:
1. Precision 6266E JB turbo
- 0.68 AR
- 735 hp
2. O2 bung welded into up pipe just before the turbo
3. Custom down pipe
- Random Technology 141-30000 metal matrix cat (3” in/out)
- 2 O2 bungs welded downstream of the cat
4. TiAL Q 50mm BOV
5. TiAL MV-S 38mm WG
6. Treadstone FMIC TRV259
- 1300 hp at max eff 2.0 psi pressure drop
- 25x9x3.5” core
- Can support 1950 cfm
7. Accel Kool Blue KUC0905 conical air filter
- 3.5” x 7.25”
8. TurboWerx Exa-Pump
9. JWT oil pan spacer tapped for oil return line
- Adds an extra quart to the oil capacity
10. Bosch injectors 0280158117
- 550 cc/min, 52 lbs/hr at 50 psi
- OEM pressure is 51 psi at idle
- Comes with harness adapters
11. Treadstone fuel pump TRE342
- 340 lph (up to 700 hp)
12. NGK LFR6AIX-11 spark plugs (1 step colder than stock)
13. UpRev Tuner cable and license
Here are some additional things I bought:
1. throttle body gasket
2. upper plenum gasket
3. lower plenum gasket
4. fuel pump O ring
5. dino oil for break in and flushing the system
6. 60cc catheter tip syringe for priming the pump
7. synthetic oil and filter for once everything is done
8. anti-seize for the exhaust bolts and O2 sensors
9. 18ga wiring in 4 different colors with crimp connectors and wire loom to make the extension wiring for my narrow band O2 sensors
10. class 10.9 M6x1.0 bolt and exhaust hanger tape to support the down pipe
I had most of the tools that I needed but probably spent ~$100 on some additional misc tools.
One of my reasons for choosing this kit was the favorable weight distribution it offered over other methods of forced induction. I weighed the OEM stuff and the kit pieces that replace them. Here is a summary of what I found:
1. OEM crash bar + foam + supports = 12.8 + 3 + 2.4 = 18.2 lbs
2. OEM cat x 2 + bracket = 13 x 2 + 2.6 = 28.6 lbs
3. OEM y pipe = 14.6 lbs
4. OEM intake = 7.4 lbs
5. BP Intercooler + brackets = 25.8 lbs
6. BP turbo to IC piping = 7.8 lbs
7. BP right hot pipe = 5.4 lbs
8. BP left hot pipe = 3.8 lbs
9. BP up pipe = 5 lbs
10. BP turbo = 17 lbs
11. BP intake = 4.8 lbs
12. BP oil pump and bracket = 7.4 lbs
13. BP oil pan spacer = 2 lbs
14. BP IC to TB piping = 5.8 lbs
15. BP down pipe = 7.4 lbs
I may have left off some minor hardware, lines and hoses. This comes out to a net gain of 23.4 lbs. Not bad when you consider how much weight other forms of forced induction add. 7.6 lbs is added by the IC to an unfavorable location but the rest for the most part replaces the OEM stuff that is removed.
Overall, my plan was to:
1. log baseline data
2. install fuel pump and test
3. install injectors and plugs and test
4. install turbo and test
5. tune
Everything was done over the course of about a month which was longer than I thought it would take me. The car is my daily driver and I thought I’d finish it over my 2 week vacation. Fortunately, a buddy of mine had an extra car to lend me when I ran out of vacation time. Except for the oil pan I didn’t really screw anything up nor did I waste a lot of time redoing things. More on the oil pan later. In the end I’m pretty happy with the result. The install looks clean and the car runs great even with my eyeball tune. I have no regrets…so far.
Part 1 Logging a Baseline
I used Cipher to log some baseline data in case I need something to compare to when I troubleshoot problems post turbo install. I recorded the following data under cold, warm, city, hwy and WOT conditions which is what UpRev recommends for their eTune service:
1. A/F CORR-B1 (%)
2. A/F CORR-B2 (%)
3. AFR WB-B1 (AFR)
4. AFR WB-B2 (AFR)
5. ACCEL PED POS 1 (V-Accel)
6. B-FUEL SCHDL (ms)
7. CAL/LD VALUE (%)
8. COOLANT TEMP (F)
9. ENGINE RPM (rpm)
10. IGN TIMING (BTDC)
11. INJ PULSE-B1 (ms)
12. INJ PULSE-B2 (ms)
13. INTAKE AIR TMP (F)
14. MAF GM/S (gm/s)
15. MAS A/F -B1 (V)
16. NB-O2 SEN 2-B1 (V)
17. NB-O2 SEN 2-B2 (V)
18. THROTTLE POS 1 (V-Throttle)
19. URBINE REV (RPM) (Automatics only)
20. VEHICLE SPEED (mph)
Part 2 Fuel Pump
So I essentially got a pump in a box with a few bits of hardware

No instructions were provided other than the instructions from the 350z service manual on removing and replacing the fuel basket which I already had. Fortunately, found the following: http://blog.cj-motorsports.com/2011/...tallation.aspx and followed the instructions nearly exactly. Only thing I did differently was that I did not need to file the retaining cap down to make the pump fit. Also, I cut all the plastic tabs off of the pump.
The pump resides in the tank and it’s easier and possibly safer to replace this with as little fuel in the tank as possible. I was pretty careful but still managed to get fuel on my hands and there were fumes everywhere. Be careful. Avoid conditions that might increase your chance of a static discharge and do this in a well ventilated area.
After installing the basket with a new O ring (I hate reusing gaskets and O rings) I left the seat and cover off and took the car for a test drive. Goal was to make sure the pump functioned and test for leaks. I took some hard sweeping left hand turns to slosh some fuel towards the basket. There was neither fuel seen around basket nor a fuel smell, so I buttoned everything back up.
Part 3 Fuel Injectors and Plugs
This was pretty straight forward. I just followed the service manual instructions for removing and replacing the injectors and plugs and used the wire harness adapters provided with the kit. Only thing I did differently from the service manual was that I did not drain the coolant from the car. I just plugged the coolant line going into the plenum with the smooth end of a big drill bit. Also, the service manual says the spark plug gap should 1.1mm. I measured the gap at 1.025mm. I left the gap alone. Again I used all new gaskets.
Once installed it was time to get my start on ECU tuning. I used http://www.boschdealer.com/specsheets/0280158117cs.jpg to set my injector parameters. I set minimum pulse width to 0.72ms and set latency such that 14v came out to 0.960 ms and 8V came out to 1.757 ms. I started with a K value of 16555 by mult stock K value of 27592 by 330 (stock inj size) and dividing by 550 (new inj size). I then cleared the learned values and started the car. It required some throttle initially to stay running but then idled fine. I then did a cylinder power test to make sure I was getting spark and fuel to each cylinder. Then I increased K to 19000 as it seemed the measured AFRs where a little leaner (15.5 to 16.5) than the target AFR (around 14.7).
Last edited by balaguru; May 16, 2013 at 02:15 AM.
Part 4 Installing the Turbo
I don’t have access to a lift. All I have are standard floor jacks. I lifted the car as high as I could which was a couple of clicks short of the max height on my jacks. I removed my wheels and shoved them under the car for added protection should a jack fail while I was under the car.
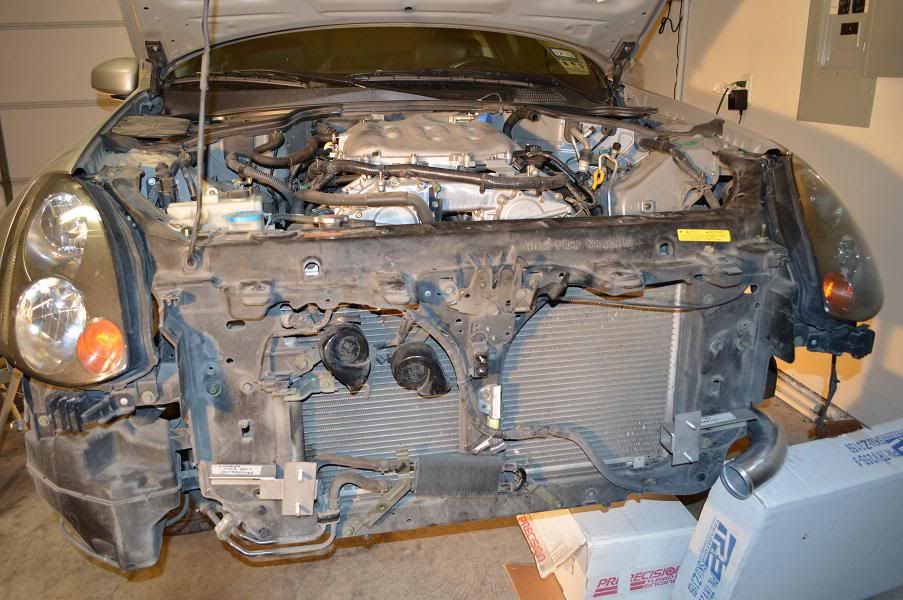
I started by installing the intercooler. I removed the fender liner, bumper cover, impact foam, crash bar, crash bar supports and some other plastic pieces. I rearranged the horns, relocated the crash sensor, cut the lower crash sensor bolt off and relocated the steering cooler. Here is a pic of how I made room for the intercooler. Unfortunately, the brackets when mounted on the car did not reach the intercooler. I drilled new holes in the passenger side bracket and mounted the intercooler.
I then moved on to removing the OEM cats and y-pipe. The hard part of this process was removing the manifold to cat bolts. Depending on your access to tools this can be accomplished from under the car and/or the engine bay. I removed most from under the car. I think I needed to remove 1 from the engine bay. I used several socket extensions like 20-24” of extensions and a U joint. Fortunately, they weren’t frozen and came off with some WD40 and a breaker bar.
I installed the hot piping and turbo as described in the instruction manual. Unfortunately, the cross over pipe made contact with my transmission, so I used a metal cutting wheel on a Dremel tool to remove the ribs on the transmission where the crossover pipe made contact. This gave me about 5mm of clearance between the transmission and pipe.

Also the provided bracket to support the down pipe did not work. Fortunately there is a pretapped hole near the hanger on the down pipe. I used a class 10.9 M6x1.0 bolt and some exhaust hanger tape and the provided poly isolator to support the downpipe. I hope the bolt will hold up to the stress.

Initially, I installed the turbo too low and gave up too much ground clearance. I raised the turbo by loosening the V band between the up pipe and y pipe, turbine bolts, compressor bolts and V band to the down pipe. I could then raise the turbo as much as I wanted. I raised it until I had about 2cm between the turbine housing and body of my car and locked everything down.
I then installed the cold piping to the intercooler. The tricky part here was where the piping crossed the sway bar. My car is lowered significantly. As you lower the car the center portion of the sway bar drops and approaches vertical bringing it closer to the cold piping. I had to spend a fair amount of time adjusting the piping with the couplers loose to get about 2cm between the sway bar and piping at my ride height which was the best I could do. A few of my couplers were secured to the piping in an angled manner. So far none have popped off but I have not let the car hit full boost yet. This process would have been easier and more secure if the piping was routed around the sway bar like it was around the transmission/engine junction. The pics here show my early fitment. I had to make several adjustments afterwards.


Installation of the remainder of cold piping required cutting a hole in the radiator support and bending the AC lines. I had to angle the piping into the throttle body coupler to get the piping to drop towards the hole that I made. I ended up with a slightly bigger hole than I needed because of the trial and error nature of this process. A template like JWT provides may have been helpful. Also the AC line did not need to be bent as far as I bent it. I did not want to bend it back because the line is soft and I did not want to risk breaking it.

Installation of the oil system was straight forward save the oil pan spacer. The oil pump initially made contact with the transmission. To solve this I just kept tightening the outboard bolts to compress the rubber isolators more on that side and angle the pump away from the transmission.
The oil pan spacer. Jeez, this should have been simple but I over thought it. Only thing I ended up doing differently from the instructions that JWT provided was that I did not apply RTV to the pickup spacer. This seemed unnecessary and risky as excess that breaks off here is already past the screen protector. I used the service manual specs for torque and tightening sequence. I had never used RTV before so I wasn’t sure how much to use. I was concerned that if I used too much the excess overhang would break off and gum up the oil system. I ended up redoing this like 4 times even trying the Felpro gaskets which ended up fracturing around a few holes where I depressed the pan while torquing the bolts down. This leaked of course. I fixed the pan with a 3lb hammer and a pin punch. Eventually, I got the hang of how much RTV to use and put the pan on. No leaks so far and a minimum of excess hangs over.
Here is a pic of one of my attempts. This would have been fine had I just allowed it to cure for 24 hrs like I had planned. Instead I redid it because I didn’t know better and ended up bending the pan a bit.

The kit provides a 10cc syringe with a Luer lock. Not sure how you are supposed to prime the pump with this so I found a 60cc catheter tip syringe. To prime the pump I pushed about 180cc of oil through the return line at the fitting to the reservoir. Then I ran the pump to reverse fill the engine with 5 quarts of oil by dunking the line into a pan of oil.
Another thing about the pump. I initially couldn’t find the fuse box that had the washer fuse in it as described in the instructions. I eventually found it when I removed the cowl.

I was surprised at how natural all the wires and hoses routed. For the BOV I just ran a hose from the BOV to the vacuum nipple at the front of the plenum. This was originally capped from the factory. I ran the line along the engine harness up front and secured it down with zip ties.
For the oil pump wiring the length provided was perfect. I was able to run the line from the battery compartment along some OEM wiring to the fuel lines and then down to the pump. I didn’t need to trim it and there was no slack. I secured it all down with zip ties.


For the WG I ran the hose up towards the shifter and then along the aluminum shifter to tranny bracket using zip ties and along the wire harness on the tranny on the driver’s side and then the engine to the fitting in the cold piping just before the TB. I secured it to the driver’s side wideband O2 sensor to keep it from moving over and making contact with the exhaust.
I routed the narrow band O2 sensor extension wiring along the front chassis brace, around its passenger side mount and then along the fuel lines. I used a pretapped hole near the new bungs to secure it with a plastic piece that I found at Lowes.


At this point I was ready to start the car. I used an automotive stethoscope to check every exhaust and intake joint for leaks. I found none. I checked the oil pan, pump and lines for leaks and found none. I then killed the engine to check things out again. This was when I found a milky oily substance dripping from the turbo to down pipe V band and down pipe to midpipe flange. The drip was slow but continued until I had a dinner plate size puddle at each location.

After discussing this with Sasha and on the forum it was concluded that this was just exhaust condensation mixed with a little oil that might have been sitting in the turbo. Since this happened initially I have not seen a single drop come from those joints. I’ve been told a little after a brief cold start is normal.
Part 5 Tuning
I started with the following base tune:
1. Set target AFR to 11.69 for all cells where RPM > 2400 and BFS > 6.07
2. Set fuel compensation to 100%
3. Set high det table to 45 deg in all cells
4. Subtracted 1 deg from timing map at cell (2.43, 1200) and 7 deg at cell (19.44, 6400) and then subtracted a graduated amount of timing for all the cells in-between. I am running a 7psi WG spring
I then flashed the ECU and used RTT to set the K value to 24000 so that my AFR correction ranged between 95% and 105% at idle and free rev to 3k. I saved my ROM and then took the car out for a test drive. I stayed out of boost and logged about 20 minutes of data. The car seemed to run great except occasionally died if I revved the engine and immediately closed the throttle. I will need to work on that. I uploaded the data into djamps MAF tool (thank you BTW for that) to see how far off my MAF table might be. I was surprised to find that it was spot on. Correction was within +/- 5% for the cells that had data and most of the time there was no correction at all. I collected some more data at 50-75% throttle under boost keeping RPM < 5k with the same MAF results. BTW, the car felt peppy at low engine speeds out of boost but the first time it hit boost around 3.5k it became downright spooky. It was like the hand of God came down to push me along. I laughed out loud.
No check engine lights were turned on. I am not sure how long it takes the ECU to register an emission's related DTC. At this point I feel safe using the car as my daily driver. I plan to avoid WOT and high engine speeds until I home the tune in better which will be an iterative process. Here’s my list of things to do:
1. Fix the occasional engine death when warm and falling back to idle
2. Compare wideband and narrow band voltage difference to my preturbo numbers to make sure the cat is working as effectively as my OEM cats -- or at least nearly so
3. Wire some knock phones together as decribed by uprev so I can tune safely
4. Write scripts to map hp/tq and mpg onto the fuel and timing maps so I can start playing with the fuel and timing targets.
Here are a few pics of car with everything installed. Note it’s hard to even tell that it is a turbo as the intercooler is hidden by the bumper cover and the turbo is tucked up under the car. The only tell is the TiAL BOV on the intake piping. I kind of like that sleeper look. I’ve included pics of the ground clearance as well. I do have some rub from the down pipe poly isolator and ground when going over bends in the pavement like my driveway. I’ll likely just need to raise my car a bit.


I don’t have access to a lift. All I have are standard floor jacks. I lifted the car as high as I could which was a couple of clicks short of the max height on my jacks. I removed my wheels and shoved them under the car for added protection should a jack fail while I was under the car.
I started by installing the intercooler. I removed the fender liner, bumper cover, impact foam, crash bar, crash bar supports and some other plastic pieces. I rearranged the horns, relocated the crash sensor, cut the lower crash sensor bolt off and relocated the steering cooler. Here is a pic of how I made room for the intercooler. Unfortunately, the brackets when mounted on the car did not reach the intercooler. I drilled new holes in the passenger side bracket and mounted the intercooler.

I then moved on to removing the OEM cats and y-pipe. The hard part of this process was removing the manifold to cat bolts. Depending on your access to tools this can be accomplished from under the car and/or the engine bay. I removed most from under the car. I think I needed to remove 1 from the engine bay. I used several socket extensions like 20-24” of extensions and a U joint. Fortunately, they weren’t frozen and came off with some WD40 and a breaker bar.
I installed the hot piping and turbo as described in the instruction manual. Unfortunately, the cross over pipe made contact with my transmission, so I used a metal cutting wheel on a Dremel tool to remove the ribs on the transmission where the crossover pipe made contact. This gave me about 5mm of clearance between the transmission and pipe.

Also the provided bracket to support the down pipe did not work. Fortunately there is a pretapped hole near the hanger on the down pipe. I used a class 10.9 M6x1.0 bolt and some exhaust hanger tape and the provided poly isolator to support the downpipe. I hope the bolt will hold up to the stress.

Initially, I installed the turbo too low and gave up too much ground clearance. I raised the turbo by loosening the V band between the up pipe and y pipe, turbine bolts, compressor bolts and V band to the down pipe. I could then raise the turbo as much as I wanted. I raised it until I had about 2cm between the turbine housing and body of my car and locked everything down.
I then installed the cold piping to the intercooler. The tricky part here was where the piping crossed the sway bar. My car is lowered significantly. As you lower the car the center portion of the sway bar drops and approaches vertical bringing it closer to the cold piping. I had to spend a fair amount of time adjusting the piping with the couplers loose to get about 2cm between the sway bar and piping at my ride height which was the best I could do. A few of my couplers were secured to the piping in an angled manner. So far none have popped off but I have not let the car hit full boost yet. This process would have been easier and more secure if the piping was routed around the sway bar like it was around the transmission/engine junction. The pics here show my early fitment. I had to make several adjustments afterwards.


Installation of the remainder of cold piping required cutting a hole in the radiator support and bending the AC lines. I had to angle the piping into the throttle body coupler to get the piping to drop towards the hole that I made. I ended up with a slightly bigger hole than I needed because of the trial and error nature of this process. A template like JWT provides may have been helpful. Also the AC line did not need to be bent as far as I bent it. I did not want to bend it back because the line is soft and I did not want to risk breaking it.

Installation of the oil system was straight forward save the oil pan spacer. The oil pump initially made contact with the transmission. To solve this I just kept tightening the outboard bolts to compress the rubber isolators more on that side and angle the pump away from the transmission.
The oil pan spacer. Jeez, this should have been simple but I over thought it. Only thing I ended up doing differently from the instructions that JWT provided was that I did not apply RTV to the pickup spacer. This seemed unnecessary and risky as excess that breaks off here is already past the screen protector. I used the service manual specs for torque and tightening sequence. I had never used RTV before so I wasn’t sure how much to use. I was concerned that if I used too much the excess overhang would break off and gum up the oil system. I ended up redoing this like 4 times even trying the Felpro gaskets which ended up fracturing around a few holes where I depressed the pan while torquing the bolts down. This leaked of course. I fixed the pan with a 3lb hammer and a pin punch. Eventually, I got the hang of how much RTV to use and put the pan on. No leaks so far and a minimum of excess hangs over.
Here is a pic of one of my attempts. This would have been fine had I just allowed it to cure for 24 hrs like I had planned. Instead I redid it because I didn’t know better and ended up bending the pan a bit.

The kit provides a 10cc syringe with a Luer lock. Not sure how you are supposed to prime the pump with this so I found a 60cc catheter tip syringe. To prime the pump I pushed about 180cc of oil through the return line at the fitting to the reservoir. Then I ran the pump to reverse fill the engine with 5 quarts of oil by dunking the line into a pan of oil.
Another thing about the pump. I initially couldn’t find the fuse box that had the washer fuse in it as described in the instructions. I eventually found it when I removed the cowl.

I was surprised at how natural all the wires and hoses routed. For the BOV I just ran a hose from the BOV to the vacuum nipple at the front of the plenum. This was originally capped from the factory. I ran the line along the engine harness up front and secured it down with zip ties.
For the oil pump wiring the length provided was perfect. I was able to run the line from the battery compartment along some OEM wiring to the fuel lines and then down to the pump. I didn’t need to trim it and there was no slack. I secured it all down with zip ties.


For the WG I ran the hose up towards the shifter and then along the aluminum shifter to tranny bracket using zip ties and along the wire harness on the tranny on the driver’s side and then the engine to the fitting in the cold piping just before the TB. I secured it to the driver’s side wideband O2 sensor to keep it from moving over and making contact with the exhaust.

I routed the narrow band O2 sensor extension wiring along the front chassis brace, around its passenger side mount and then along the fuel lines. I used a pretapped hole near the new bungs to secure it with a plastic piece that I found at Lowes.


At this point I was ready to start the car. I used an automotive stethoscope to check every exhaust and intake joint for leaks. I found none. I checked the oil pan, pump and lines for leaks and found none. I then killed the engine to check things out again. This was when I found a milky oily substance dripping from the turbo to down pipe V band and down pipe to midpipe flange. The drip was slow but continued until I had a dinner plate size puddle at each location.

After discussing this with Sasha and on the forum it was concluded that this was just exhaust condensation mixed with a little oil that might have been sitting in the turbo. Since this happened initially I have not seen a single drop come from those joints. I’ve been told a little after a brief cold start is normal.
Part 5 Tuning
I started with the following base tune:
1. Set target AFR to 11.69 for all cells where RPM > 2400 and BFS > 6.07
2. Set fuel compensation to 100%
3. Set high det table to 45 deg in all cells
4. Subtracted 1 deg from timing map at cell (2.43, 1200) and 7 deg at cell (19.44, 6400) and then subtracted a graduated amount of timing for all the cells in-between. I am running a 7psi WG spring
I then flashed the ECU and used RTT to set the K value to 24000 so that my AFR correction ranged between 95% and 105% at idle and free rev to 3k. I saved my ROM and then took the car out for a test drive. I stayed out of boost and logged about 20 minutes of data. The car seemed to run great except occasionally died if I revved the engine and immediately closed the throttle. I will need to work on that. I uploaded the data into djamps MAF tool (thank you BTW for that) to see how far off my MAF table might be. I was surprised to find that it was spot on. Correction was within +/- 5% for the cells that had data and most of the time there was no correction at all. I collected some more data at 50-75% throttle under boost keeping RPM < 5k with the same MAF results. BTW, the car felt peppy at low engine speeds out of boost but the first time it hit boost around 3.5k it became downright spooky. It was like the hand of God came down to push me along. I laughed out loud.
No check engine lights were turned on. I am not sure how long it takes the ECU to register an emission's related DTC. At this point I feel safe using the car as my daily driver. I plan to avoid WOT and high engine speeds until I home the tune in better which will be an iterative process. Here’s my list of things to do:
1. Fix the occasional engine death when warm and falling back to idle
2. Compare wideband and narrow band voltage difference to my preturbo numbers to make sure the cat is working as effectively as my OEM cats -- or at least nearly so
3. Wire some knock phones together as decribed by uprev so I can tune safely
4. Write scripts to map hp/tq and mpg onto the fuel and timing maps so I can start playing with the fuel and timing targets.
Here are a few pics of car with everything installed. Note it’s hard to even tell that it is a turbo as the intercooler is hidden by the bumper cover and the turbo is tucked up under the car. The only tell is the TiAL BOV on the intake piping. I kind of like that sleeper look. I’ve included pics of the ground clearance as well. I do have some rub from the down pipe poly isolator and ground when going over bends in the pavement like my driveway. I’ll likely just need to raise my car a bit.


Last edited by balaguru; May 16, 2013 at 03:47 PM.

Love it. Just need to fix the problem where it dies occasionally when I let off the accelerator and the RPMs drop to idle. Doesn't happen often but when it does it does it so quitely that I don't realize the engine is dead until I press the accelerator again and notice it's not going anywhere.


Trending Topics


I like it! My g35 is a sleeper as well. Pushing the high HP I am I should get an open front but I just love the stock look plus my e85 cools the combustion chamber plenty.
This is a great write up. I never have the patience to stop and take pictures (and get my camera dirty) while I'm working. When I start working I'm in the zone.
As for the stalling. Do you have an aftermarket clutch? Like someone else asked do you have the idle raised?
Some of the things to help: Raise the idle up to 750-800 since the fast dropping rpms make it hard for the car to catch up. Anything below idle needs to have the timing raised just a slight amount and the fuel increased just a little. That fixed the issue for me when I would push the clutch in to coast to a stop. I just increased timing and richened the mixture in my 500rpm and below cells. Also, after the car is warmed up do a full throttle body reset procedure. Make sure you do it step by step from the manual or it won't hold the settings.
Thanks, guys.
I was trying to avoid the tuner since a good one will probably not want to share the ROM with me. I'd like to be able to tinker with things. I may dyno just to make sure I'm under 400whp. It's my daily driver. Can't afford to bend a rod...yet.
Thanks for your helpful advice in my earlier emails and posts. The clutch is the original OEM piece. My idle is unchanged. I was going to try to fix the problem I had with the engine dieing by adjusting the fueling first since it did this even before I installed the turbo but after I installed the injectors. Thanks for the suggestions. I'll give them a try.
I like it! My g35 is a sleeper as well. Pushing the high HP I am I should get an open front but I just love the stock look plus my e85 cools the combustion chamber plenty.
This is a great write up. I never have the patience to stop and take pictures (and get my camera dirty) while I'm working. When I start working I'm in the zone.
As for the stalling. Do you have an aftermarket clutch? Like someone else asked do you have the idle raised?
Some of the things to help: Raise the idle up to 750-800 since the fast dropping rpms make it hard for the car to catch up. Anything below idle needs to have the timing raised just a slight amount and the fuel increased just a little. That fixed the issue for me when I would push the clutch in to coast to a stop. I just increased timing and richened the mixture in my 500rpm and below cells. Also, after the car is warmed up do a full throttle body reset procedure. Make sure you do it step by step from the manual or it won't hold the settings.
This is a great write up. I never have the patience to stop and take pictures (and get my camera dirty) while I'm working. When I start working I'm in the zone.
As for the stalling. Do you have an aftermarket clutch? Like someone else asked do you have the idle raised?
Some of the things to help: Raise the idle up to 750-800 since the fast dropping rpms make it hard for the car to catch up. Anything below idle needs to have the timing raised just a slight amount and the fuel increased just a little. That fixed the issue for me when I would push the clutch in to coast to a stop. I just increased timing and richened the mixture in my 500rpm and below cells. Also, after the car is warmed up do a full throttle body reset procedure. Make sure you do it step by step from the manual or it won't hold the settings.
Last edited by balaguru; May 14, 2013 at 04:00 PM.

With that BOV installed then i would think that you most def will need the idle raised. How about trying to raise the idle and venting to the atmosphere. Is that where guys recirculate too on the VQ with a single? Pls excuse my ignorance with regards to Tial BOV's.. A slight throttle blip before you think this behavior occurs should help diagnose idle if blipping helps. I think 
Last edited by Highway Riding; May 14, 2013 at 05:15 PM.

New Member
Joined: Feb 2011
Posts: 80
Likes: 0
From: El Paso TX
Great writeup man I had the same basic hickups with my install. On the exhaust however I spaced the hanger about 1/4 of an inch down due to the turbo hittting the chassis when under load. I wanted to ask you how did you route your wastegate/chargepipe vaccum line?
Good luck on the tunning
Good luck on the tunning
Thanks.
Not sure what you mean. The BOV vents to the atmosphere. The line you see running to the plenum is the vaccum signal line that triggers the BOV.
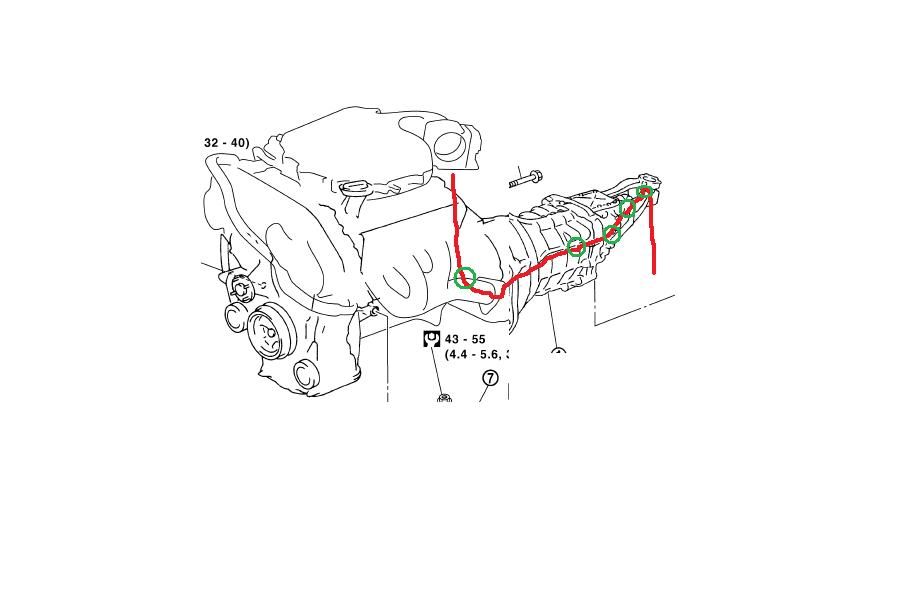
I'll update my post with a drawing showing how I routed the WG, but essentially it goes from the WG up towards the shifter and then along the drivers side of the transmission and engine. Its secured to the transmission and driver's side wideband wire.
With that BOV installed then i would think that you most def will need the idle raised. How about trying to raise the idle and venting to the atmosphere. Is that where guys recirculate too on the VQ with a single? Pls excuse my ignorance with regards to Tial BOV's.. A slight throttle blip before you think this behavior occurs should help diagnose idle if blipping helps. I think
Great writeup man I had the same basic hickups with my install. On the exhaust however I spaced the hanger about 1/4 of an inch down due to the turbo hittting the chassis when under load. I wanted to ask you how did you route your wastegate/chargepipe vaccum line?
Good luck on the tunning
Good luck on the tunning
It's almost a definite to have the idle up to 750-800 with larger injectors.
I would try the full throttle body reset procedure first to see if that helps then increase the timing a degree or 2 down under the idle and increase the mixture a little. Make sure you do it in the rpm range above and below idle in the base fuel schedule that is below idle. I haven't needed to adjust this on an osiris car in a while since I raise the idle but IIRC you might need to add a base fuel schedule line under where it idles.
I would try the full throttle body reset procedure first to see if that helps then increase the timing a degree or 2 down under the idle and increase the mixture a little. Make sure you do it in the rpm range above and below idle in the base fuel schedule that is below idle. I haven't needed to adjust this on an osiris car in a while since I raise the idle but IIRC you might need to add a base fuel schedule line under where it idles.

Fueling is usually the main issue with the rpm drop stalling. Especially if you're using an aftermarket MAF/injectors. Every time my car is retuned (by someone other than me lol) it does that... end up adding some fuel to the idle and cells just above the idle area (ideally on the MAF table) solves it. The problem is slow fueling response (going from fuel cut to idle) and you need to compensate for it.
Last edited by djamps; May 17, 2013 at 05:46 AM.
Yeah. This is what I thought too since I developed the problem after I installed the injectors but before I installed the turbo. Hopefully, should have some time to play with the tune this weekend.
Fueling is usually the main issue with the rpm drop stalling. Especially if you're using an aftermarket MAF/injectors. Every time my car is retuned (by someone other than me lol) it does that... end up adding some fuel to the idle and cells just above the idle area (ideally on the MAF table) solves it. The problem is slow fueling response (going from fuel cut to idle) and you need to compensate for it.