
Engine Part 3 - this time with LOTS of pics (56K beware)


Thread Starter
New Member
Joined: Dec 2003
Posts: 356
Likes: 0
From: Melville, NY
OK so heres where I am so far. I have abut 18 pics i think, that I'm gonna put on here... so give me some time... I am still having trouble figuring out how to do this lets see if it works. Im gonna try one... then put up the rest.. The first pic is the one I spoke about earlier... and the chocolate milk oil that came out of my new (techically used) engine..
[IMG] [/IMG]
[IMG]
[/IMG]
Thread Starter
New Member
Joined: Dec 2003
Posts: 356
Likes: 0
From: Melville, NY
Sorry for the huge pic.. I only hope that its more detailed because of it.. but yay I did it.
The next pic shows what one of the intake valves looks like... this was the worst one.. kinda crappy pic (dont worry the others are good)
[IMG] [/IMG]
This pic is after getting all the pulleys off.. and holy crap. Well you dont need a pulley puller for all of you that want to know... waste of money.. Heres what you do.. (like I did). Pull yourself onto something higher and then jump on a ratchet . Seriously thats what I needed to do.. Ill be sure to get an air gun next time i need to take that off. The other pulleys were ok to remove.
[IMG] [/IMG]
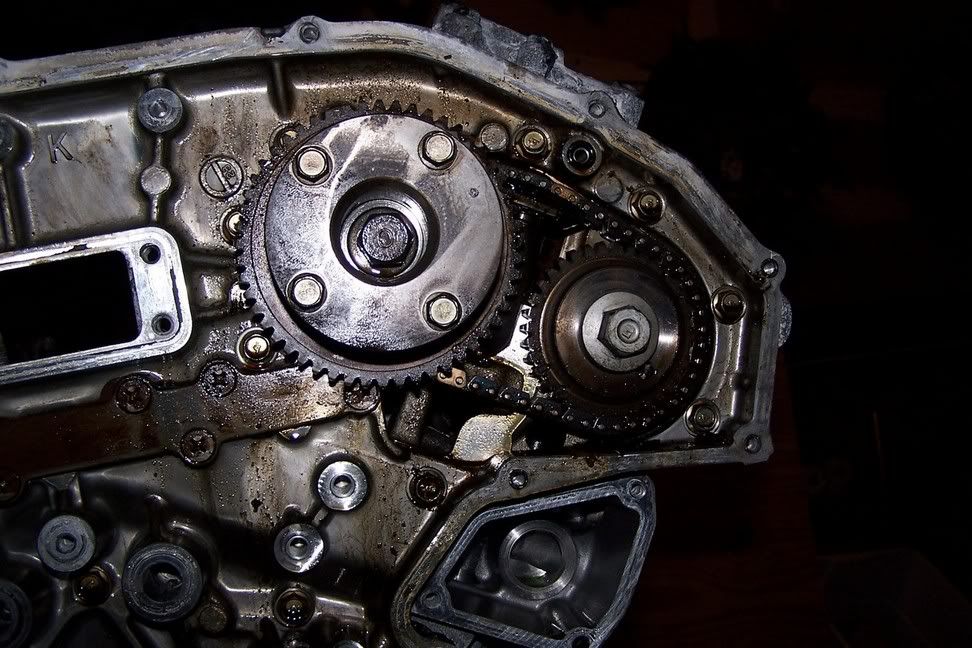
This pic is with the front timing case off kinda neat..
[IMG] [/IMG]
And just so you know.. heres kinda what the cover looks like after its been powerwashed... I still plan on getting it nice and polished... Bling Bling Ill break my postings into 4 pics a post.
I only hope that its more detailed because of it.. but yay I did it.The next pic shows what one of the intake valves looks like... this was the worst one.. kinda crappy pic (dont worry the others are good)
[IMG]
[/IMG] This pic is after getting all the pulleys off.. and holy crap. Well you dont need a pulley puller for all of you that want to know... waste of money.. Heres what you do.. (like I did). Pull yourself onto something higher and then jump on a ratchet
. Seriously thats what I needed to do.. Ill be sure to get an air gun next time i need to take that off. The other pulleys were ok to remove.[IMG]
[/IMG] This pic is with the front timing case off kinda neat..
[IMG]
[/IMG] And just so you know.. heres kinda what the cover looks like after its been powerwashed... I still plan on getting it nice and polished... Bling Bling
Ill break my postings into 4 pics a post.
Thread Starter
New Member
Joined: Dec 2003
Posts: 356
Likes: 0
From: Melville, NY
forgot to put up the picture... here it is...
[IMG] [/IMG]
This is the oil pump.. think i might go with the nismo oil pump that is used with the GT-R... or supposedly.. any thoughts on if I should.
[IMG] [/IMG]
Arrgh.. The freakin' cam sprocket on the right... on both heads that was a pain in the friggin ****... tried using WD-40, jumping on it... hehe.. the problem was you needed one hand to hold a wrench on the cam shaft and another hand to turn this thing, which is torqued well over 100 pounds.. no I dont know about you.. but the way you have to hold it is impossible to get that much strength.. I would consider using 2 people or do what I did... Get a long ratchet and wedge the one wrench so it wont move.. Then do about 15-20 ninja jump smashes with a hammer to the ratchet... Damn I love craftsman tools.. they take a beating..
Heres my pile of crap.. Which I now have in a box.. Im gonna get all new pulleys and polish everything. The exhaust manifolds are still in good shape.. as far as I know.. Any bidders on them???

[IMG]
[/IMG] This is the oil pump.. think i might go with the nismo oil pump that is used with the GT-R... or supposedly.. any thoughts on if I should.
[IMG]
[/IMG] Arrgh.. The freakin' cam sprocket on the right... on both heads that was a pain in the friggin ****... tried using WD-40, jumping on it... hehe.. the problem was you needed one hand to hold a wrench on the cam shaft and another hand to turn this thing, which is torqued well over 100 pounds.. no I dont know about you.. but the way you have to hold it is impossible to get that much strength.. I would consider using 2 people or do what I did... Get a long ratchet and wedge the one wrench so it wont move.. Then do about 15-20 ninja jump smashes with a hammer to the ratchet... Damn I love craftsman tools.. they take a beating..
Heres my pile of crap.. Which I now have in a box.. Im gonna get all new pulleys and polish everything. The exhaust manifolds are still in good shape.. as far as I know.. Any bidders on them???
Thread Starter
New Member
Joined: Dec 2003
Posts: 356
Likes: 0
From: Melville, NY
Heres a pic of some of the timing assembly pieces.. they are now cleaned up and in storage.
[IMG] [/IMG]
In this pic look at the camshaft base on the right.. Its gone... at least some of it.. This was not due to my ninja smashes as I didnt use that (now famous) technique on this.. next pic shows it a little better.
[IMG] [/IMG]
Here it is closer up.. it just fell apart when I took of the sprocket.. luckily I already planned on getting new cams... Hey anybody wanna buy a set of 3 cams...??")
[IMG] [/IMG]
The concern with this is if the little hole right next to the center is too big or if it looks like its bent both ways.. this could have come from the legendary ninja smash. If it is a problem Ill just buy new sprockets...
[IMG] [/IMG]
[IMG]
[/IMG] In this pic look at the camshaft base on the right.. Its gone... at least some of it..
This was not due to my ninja smashes as I didnt use that (now famous) technique on this.. next pic shows it a little better.[IMG]
[/IMG] Here it is closer up.. it just fell apart when I took of the sprocket.. luckily I already planned on getting new cams... Hey anybody wanna buy a set of 3 cams...??
[IMG]
[/IMG] The concern with this is if the little hole right next to the center is too big or if it looks like its bent both ways.. this could have come from the legendary ninja smash. If it is a problem Ill just buy new sprockets...
[IMG]
[/IMG]
Thread Starter
New Member
Joined: Dec 2003
Posts: 356
Likes: 0
From: Melville, NY
Heres a pic with everything from the timing section off.. looks nice doesnt it??
[IMG] [/IMG]
This is my BIG BIG worry.. Please look at this... the pic is really crappy but its the best i can do.. I guess when I was scraping the sealant around the block i might have scraped the block itself.. The gash is about 1.5 inches long.. It has to be less than a mm deep probably less than 1/2 mm deep.. Im hoping sealant will fix that..
[IMG] [/IMG]
Heres a pic with of the heads...witout the cams... looks a little nicer than before..

Heres some more stuff just laying on the floor. Now in a safe location..
[IMG] [/IMG]
[IMG]
[/IMG] This is my BIG BIG worry.. Please look at this... the pic is really crappy but its the best i can do.. I guess when I was scraping the sealant around the block i might have scraped the block itself.. The gash is about 1.5 inches long.. It has to be less than a mm deep probably less than 1/2 mm deep.. Im hoping sealant will fix that..
[IMG]
[/IMG] Heres a pic with of the heads...witout the cams... looks a little nicer than before..
Heres some more stuff just laying on the floor. Now in a safe location..
[IMG]
[/IMG]
Thread Starter
New Member
Joined: Dec 2003
Posts: 356
Likes: 0
From: Melville, NY
Now the pic everyone has been waiting for.. the pistons.. Well one of them is rusted the other two look pretty good. You cant tell from the pic.. but the cylinder walls still have the cross hatch patern on them.... nice.. the pistons are trash anyway so its no bother.. All i care about are the block the heads and the crank... anyone want a set of 5 pistons... hehe
[IMG] [/IMG]
The valves from underneath look much better.. hope you can see it was the best I could get.. The whole head assmebly is going somewhere... dont know where yet.. probably SGP or whoever can do this.. But they are getting Ported and Im going Ti with as much stuff as I can put in there.. also.. polished very nicely too... any ideas on who can do this.
[IMG] [/IMG]
Bottom of the engine.. another bad pic.. but the crank looks good as far as I can see with a flashlight.. really messy project though..
[IMG] [/IMG]
[IMG]
[/IMG] The valves from underneath look much better.. hope you can see it was the best I could get.. The whole head assmebly is going somewhere... dont know where yet.. probably SGP or whoever can do this.. But they are getting Ported and Im going Ti with as much stuff as I can put in there.. also.. polished very nicely too... any ideas on who can do this.
[IMG]
[/IMG] Bottom of the engine.. another bad pic.. but the crank looks good as far as I can see with a flashlight.. really messy project though..
[IMG]
[/IMG]
Thread Starter
New Member
Joined: Dec 2003
Posts: 356
Likes: 0
From: Melville, NY
Well thats it for tonight.. maybe I'll finish tomarrow.. but who knows got work.. as for one problem i am having however hope someone can help me with this as its a pain..
I was able to get 7 of the 8 head studs of the second head.. Head stud number 3 is completely stripped... (hope you like the tripple eek affect).. So i cant get the other head off tonight so I cant see the other pistons.. I was told by my father I can go get some kinda tool called a head stud puller that can get a stipped bolt out.. anyone else know..?? Thats keeping me from moving forward and posting more of these pretty pics..
This is a awesome project so far.. Its really fun especially since I have no experience... I get to see all the things I read about..
Anyway the assembly will go much much slower... The block will be nicely polished then assembled by someone who is a pro... any good ideas (willing to go 2 hours or maybe more from the South NJ/Philly area)
Same thing with the heads... I know its my first time and Im not a complete moron.. let the geniuses do thier thing and Ill put it together like a lego... a lego that really hurts your hands and cuts you up...
I'm gonn put red anodized pulleys on there and anodize the rocker covers red, then I guess put some red wiring and tubing around the engine... then chrome polish the plenum.. which will by the way (hopefully) be from APS.. when that comes out..
How do you guys think all of that will look in my engine bay..?
Oh and what do you guys think of the pics and post? I'll send another update soon... next one will be when the block is completley apart..see ya
I was able to get 7 of the 8 head studs of the second head.. Head stud number 3 is completely stripped...
(hope you like the tripple eek affect).. So i cant get the other head off tonight so I cant see the other pistons.. I was told by my father I can go get some kinda tool called a head stud puller that can get a stipped bolt out.. anyone else know..?? Thats keeping me from moving forward and posting more of these pretty pics..This is a awesome project so far.. Its really fun especially since I have no experience... I get to see all the things I read about..
Anyway the assembly will go much much slower... The block will be nicely polished then assembled by someone who is a pro... any good ideas (willing to go 2 hours or maybe more from the South NJ/Philly area)
Same thing with the heads... I know its my first time and Im not a complete moron.. let the geniuses do thier thing and Ill put it together like a lego... a lego that really hurts your hands and cuts you up...
I'm gonn put red anodized pulleys on there and anodize the rocker covers red, then I guess put some red wiring and tubing around the engine... then chrome polish the plenum.. which will by the way (hopefully) be from APS.. when that comes out..
How do you guys think all of that will look in my engine bay..?
Oh and what do you guys think of the pics and post? I'll send another update soon... next one will be when the block is completley apart..see ya
Trending Topics

Registered User
Joined: Apr 2004
Posts: 416
Likes: 0
From: Houston, Tx
Stop going kung fu on that *****. You are seriously going to **** something up. I would call a mechanic and ask them how to solve some of your problems, like if you know some one who has knowledge of engines ask them.
Good pics Anthony..thanks for sharing with us. As you mentioned, a good impact gun would help you imensively as you break down the motor. Just remember that the block and heads are both AL, so go easy on the martial arts techniques... 
Reagrding the gash in the block, which I couldnt really discern from the picture, I think you are fine. Minor imperfections can easily be fixed by your machine shop...and welding AL is way easier than trying to mess with cast iron.
Also, did anyone else notice that the deck is almost completed CLOSED! I knew the block was sleevd, but didnt realize it was closed. This looks different from the engines I've seen pics of before.
Reagrding the gash in the block, which I couldnt really discern from the picture, I think you are fine. Minor imperfections can easily be fixed by your machine shop...and welding AL is way easier than trying to mess with cast iron.
Also, did anyone else notice that the deck is almost completed CLOSED!
I knew the block was sleevd, but didnt realize it was closed. This looks different from the engines I've seen pics of before.
Thread Starter
New Member
Joined: Dec 2003
Posts: 356
Likes: 0
From: Melville, NY
Turbo Maxima: Thanks for the advice... Im def. getting an impact gun for whatever I try to put back together.. I went to Pep-boys and sears, no one knew what I was talking about at sears.. at pep boys they were so arrogant.. they were like "you shouldnt even bother with it, have you ever done this before" NO dumbass thats why im asking you... The only advice they could give me was that it was probably broke... not exactly what was broke... but according to them... "it" was broke... oh and the ninja smash technique was only used on 3 things... the crank pulley.. and the two exhaust cam sprokets... everything else I was able to do by hand... and not by foot or hammer.. Only thing that happened was the sprocket was literally fused to the intake cam on the left side... dont know what that was about...
The only other thing is the stud i have to remove... gotta find something for it.. it was stripped when i tried to turn it... I didnt even put pressure on it and everything slipped... hopefully I can make it to sears or pep boys before work.. see ya.. thanks for the feedback..
Only thing that happened was the sprocket was literally fused to the intake cam on the left side... dont know what that was about...The only other thing is the stud i have to remove... gotta find something for it.. it was stripped when i tried to turn it... I didnt even put pressure on it and everything slipped... hopefully I can make it to sears or pep boys before work.. see ya.. thanks for the feedback..
Thread Starter
New Member
Joined: Dec 2003
Posts: 356
Likes: 0
From: Melville, NY
And about the deck... I have never seen an engine before this... but the block looks pretty thick after i took the gaskets off.. no wonder this can take so much stock... I still might pin it... if i can...
Hey Anthony, can you take the gasket off and take another pic of the block? I think you are right...the deck is open, but the gasket makes it look closed. It just so hard to tell from the pic.
It just so hard to tell from the pic.

Registered User
Joined: Jun 2002
Posts: 132
Likes: 0
From: Arlington, VA
That oil is really weird looking. Let me know if you figure out what else is in it (water?).
This looks like a fun project. Although, I am sure putting it back together will be quite a chore. I hope you have a service manual!!
Zman
This looks like a fun project. Although, I am sure putting it back together will be quite a chore. I hope you have a service manual!!
Zman
Thread Starter
New Member
Joined: Dec 2003
Posts: 356
Likes: 0
From: Melville, NY
Yeah the service manual is a BIBLE for me....
There was some water in the oil, but luckily there is no rust at all just that choc. milk like oil... so at least the oil gave its attempt to protect the parts and did well..
I'll post a pic w/o the gaskets when I get home... Hope my fiance got me something to take the headbolt that was stripped off... (part you put the alan key in)
Putting it together.. yeah its gonna be a pain.. but really fun.. I know i can do it... plus I'm having experts do the critical moving parts... Bottom end install and cylinder heads... I thought and thought about it and I believe its a safe way to still say I built an engine... kinda like I put a kit together... a very difficult one... but at least I did it... Am i one of the only private owners trying this??
I am a madman....hahaha
VERY NICE man.. i wish i had an extra engine lying around. lol. the pics are as good as gold. take alot more!!! also, thanks for high-res. keep us poster. what are you're plans for this thing? why was one of the cylinders rusted?
Thread Starter
New Member
Joined: Dec 2003
Posts: 356
Likes: 0
From: Melville, NY
Heres the pic with the head gasket off.. sorry if lighting is bad..
Turbo Maxima: Im gonna get sealer tomarrow and cover everything up thanks for the advice... remember all the pics you see are before I clean them.. Once its apart im gonna use my ten-chi cleaning techniques... the powerwasher... Just kidding... i think im gonna send everything to like a jeweler or something they get everything nice and shiny... Anyone know a good place to get things polished..?
[IMG] [/IMG]
Turbo Maxima: Im gonna get sealer tomarrow and cover everything up thanks for the advice... remember all the pics you see are before I clean them.. Once its apart im gonna use my ten-chi cleaning techniques... the powerwasher... Just kidding... i think im gonna send everything to like a jeweler or something
they get everything nice and shiny... Anyone know a good place to get things polished..?[IMG]
[/IMG]
Thread Starter
New Member
Joined: Dec 2003
Posts: 356
Likes: 0
From: Melville, NY
for the last question posted...
The one cylinder was rusted because whoever taped up the intake didnt do so well on one of them.. Its just the top of the cylinder and not the wall so its ok cause im replacing them and the rods anyway...
As for the that dern head bolt.... I found out why.. I was using a 3/8 in. tool and not 12mm... suprising how all of the others came out with no problem... I found out it was 3/8 today when i put in in a 3/8 bolt... seems to fit really really tight.. hope getting a 12mm alan key will help...
I will definatley keep you guys posted with as good as pics that I can get... only problem is its going to be a long process, so bear with me on that...