
Project NISMO TT

I do believe you can probably order them with whatever springs you want. The ones that I got came with 5.8psi springs. If you look through the Tial website, you can see they offer many different spring options.
In your case, you could order a 10.1psi & 5.8psi and install them together to achieve the 16psi (15.9psi) you are after. They make certain sizes of "small" and "large" springs, differences being psi rating and Outside diameter. Notice the red springs are not as big as the yellow ones in the pics I put up, thus, you can put them both in together to get higher boost levels.
However, I would recommend you get either 8.7psi or 10.1psi springs and run a boost controller for higher psi. Basically, the minimum amount of boost you can run depends on your WG springs. Most of the boost controllers I have been looking at are good to 30psi......
I would also be looking at a bigger fuel system than the GTM basic one ( I believe it is only rated for 14psi...I could be wrong on that) as well a Full fuel return system for that kind of boost/power level. From what I've seen guys are making upwards of 600-700whp at those kind of boost levels and that is entering a whole different ball game.... .
.
I would give any one of reputable tuners/builders a call to go over your initial plans and see what they say as well......GL building!
In your case, you could order a 10.1psi & 5.8psi and install them together to achieve the 16psi (15.9psi) you are after. They make certain sizes of "small" and "large" springs, differences being psi rating and Outside diameter. Notice the red springs are not as big as the yellow ones in the pics I put up, thus, you can put them both in together to get higher boost levels.
However, I would recommend you get either 8.7psi or 10.1psi springs and run a boost controller for higher psi. Basically, the minimum amount of boost you can run depends on your WG springs. Most of the boost controllers I have been looking at are good to 30psi......
I would also be looking at a bigger fuel system than the GTM basic one ( I believe it is only rated for 14psi...I could be wrong on that) as well a Full fuel return system for that kind of boost/power level. From what I've seen guys are making upwards of 600-700whp at those kind of boost levels and that is entering a whole different ball game....
.I would give any one of reputable tuners/builders a call to go over your initial plans and see what they say as well......GL building!
As for the fuel system, that's already a go, I've planned to get the full return system, 800-850 injectors and would like a larger fuel pump than the 255 possibly Deatschwerks 300lph.
Edit: I've been told that the stock fuel system is only good till about 425whp then after that it is one of the first thigns to start screwing with your numbers.
Last edited by Nismo350z#0310; Sep 26, 2012 at 11:57 AM.

Joined: Feb 2008
Posts: 13,406
Likes: 130
From: MexiCali dodging potholes
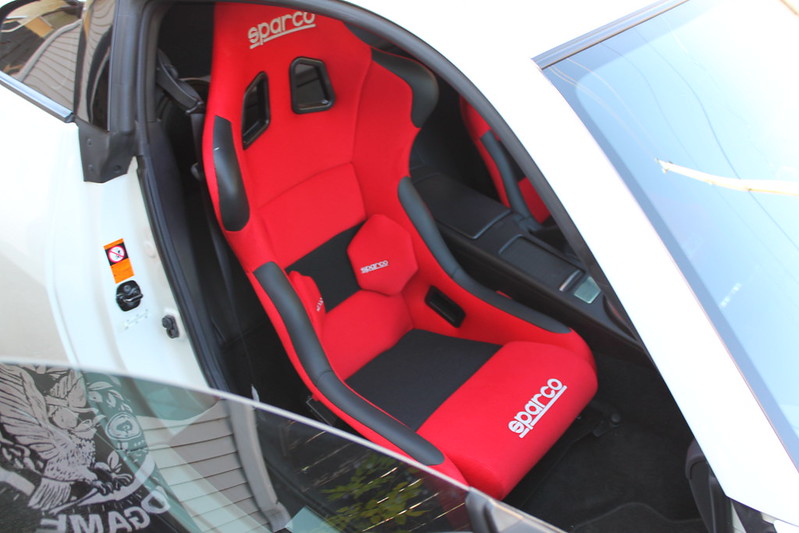
I have been having quite a time with the fighter seats. The bases I got were both the right model #'s, but the passenger side didn't fit properly and I had to cut the legs and re-weld them into the proper locations. Could not get the seats to fit properly with the doors closed either, so I also drilled new holes in the base to place the seat so the "ears" don't rub anymore. I have them as far towards the center as the seat will allow and it only just rubs slightly on the doors now. I may shave the outside "ears" down a bit, 1/4" is all I would need to clear.....
The seats are quite comfy and hold me very tight. I am 6'1" @ 185ish lbs....
I have been searching and searching about this darn weight sensor for the passenger. I can't find much on the electrical specs, but being 3 wires I assume the weight sensor module is basically a three-wire transmitter. Guessing maybe a 1-5v signal with 0v being no one there, 1-3v would be the baby or under weight person and 3-5v being a person of weight enough to engage the airbag. Regardless, I have not been able to figure it out. I guess I could strip the wires and attach a few flying leads to see what voltage and/or amperage is being sent through during the three different scenarios.
I was originally thinking of tricking it to believe there is always a large person there so airbag is activated at all times, but this is not 100% acceptable for me; I would hate to say to any one of my buddies that I can't take their kid for a ride due the airbag potentially deploying....
So...I figured Nissan must sell these weight sensors. haha. No. Couldn't find the sensor on it's own anywhere, dealerships, all the online OEM part sellers etc......Options the way I see it now:
a) by a used seat from an 06-08 and rip out sensor of said seat and install underneath cusion in Sparco seat.
b) Pull sensor from my stock seat and install underneath cusion in Sparco seat.
I have been trying to leave every stock part I remove from the car alone, and do not particularly want to disassemble the passenger bottom, however, Option b is most likely what I will do. There is an awesome DIY on the bladder and sensor removal so hopefully I can tackle that this weekend. Having just the one seat installed is urking me a little......anyways, I'll post some pics of the fail or the win with these plans

Thread Starter
Registered User
Joined: Aug 2011
Posts: 134
Likes: 0
From: Calgary, AB
What I was wondering is, when I purchase the Stage 3 GTM kit, will the supplied wastegates not be able to handle the higher PSI, given thats what the "stage 3" is meant for.
Thread Starter
Registered User
Joined: Aug 2011
Posts: 134
Likes: 0
From: Calgary, AB
Well, I have had my first issue with the TT.....
I have been out of town the last 3 days, so car was sitting. Was 100% the day I parked it. Driving to work this morning, after 15ish minutes on the road, opened it up and as it was building boost (5+ psi) it fell on it's face. Basically felt like I hit a wall in the car, it just felt like the engine halted. It did stay running and continued running fine with no boost. I tried getting into boost a few more times and same thing happened.
The only real difference is it was getting down to 1-2 deg c at night and about 25 deg c during the day, so fairly decent temp swings.
I just went out at lunch to see what it would do again. Warmed it for 15ish mins again and went to hit boost in 3rd, got 5ish psi and did it again. Continued onto lunch.....way back I did a 2-3 gear wot pull and it hit its 9ish psi held steady and pulled fine through 2nd and 3rd.
It's a little weird. Nothing looked out of the sorts gauge wise, looked under the hood and nothing jumped at me ie pipes off etc...
Anyways, I will see if there are any codes when I get home, and then I suppose I will start checking everything to do with the ignition system......keep you posted on what I find.....
** Update > Has not happened since. Was perfect all weekend........Has not had one hiccup since, been in boost 20-25+ times since without a single issue....
Last edited by NismoK; Oct 8, 2012 at 10:15 AM. Reason: Update
Thread Starter
Registered User
Joined: Aug 2011
Posts: 134
Likes: 0
From: Calgary, AB
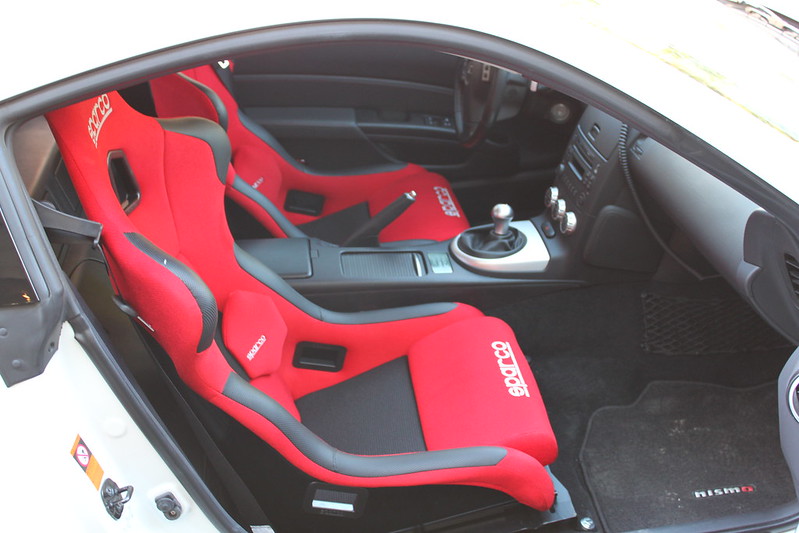
Did the passenger side seat install with the other Sparco Fighter. Regarding the passenger weight sensor, it is a royal pain to get to, but it works perfect with the seats.
I couldn't find anything really on the felt sensor removal so here is a brief rundown of the sensor removal / installation:
Step 1 > Disconnect battery. Wait a few mins for the caps to discharge.
Step 2 > Remove seat from car. There should be 3 wire connections (SRS air bag, seatbelt connection, weight sensor) middle front under seat cusion. Disconnect all three and the 4 main frame bolts and pull the seat out.
Step 3 > Remove the Weight Sensor & SRS wires from the seat base; there are a few plastic ties that hold the wires. Then remove the 4 bolts on the frame base >> see pic below
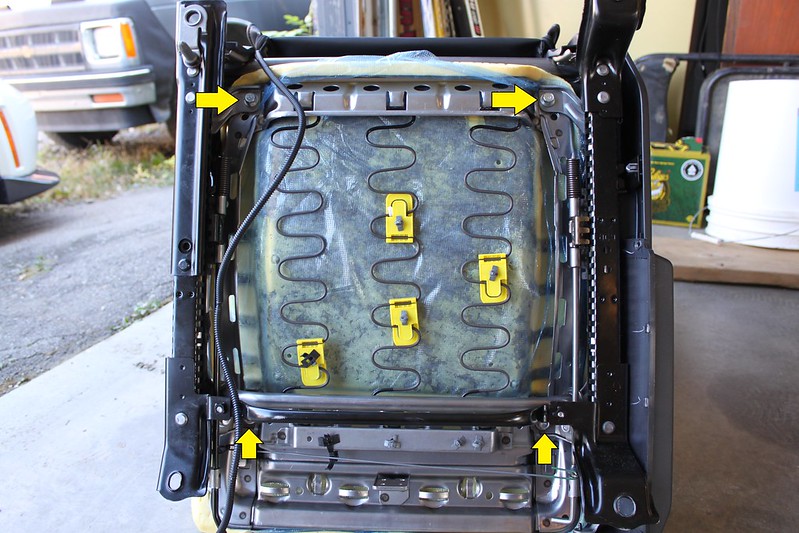
You should be able to slide the base of the seat out of the frame now.
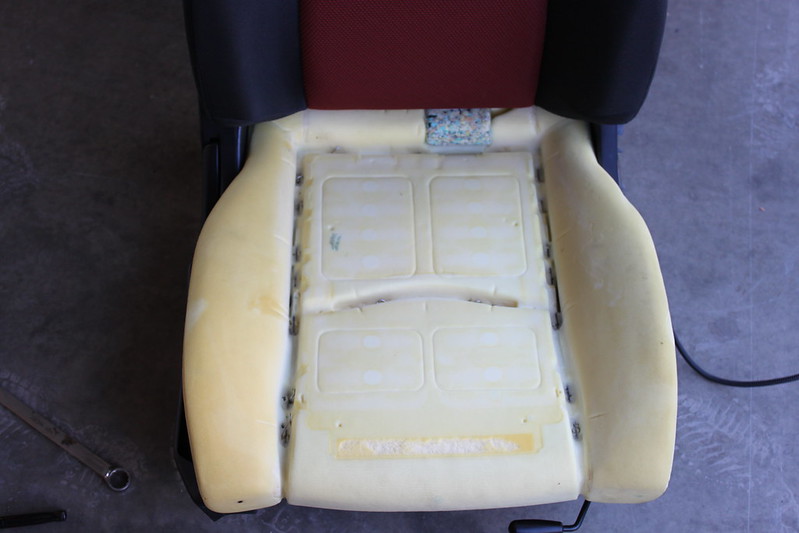
Step 4 > Seat cover is attached via small little "rings" Remove all the rings from the bottom and then you can pull the cover up about half way off. All the seams of the seat are attached with rings as well, you will need to remove them as well. Once all the rings are removed (I used two sets of needle nose pliers to open the rings) you can remove the cover. There will be a big felt pad sensor laying there with a module in a little pocket in the back of the seat. The felt pad is glued a little on the front of the seat foam, easy to peel off. There are few rings holding the sensor pad down as well that have to be removed. Here is a shot of the top of the seat bottom with the cover and sensor removed.
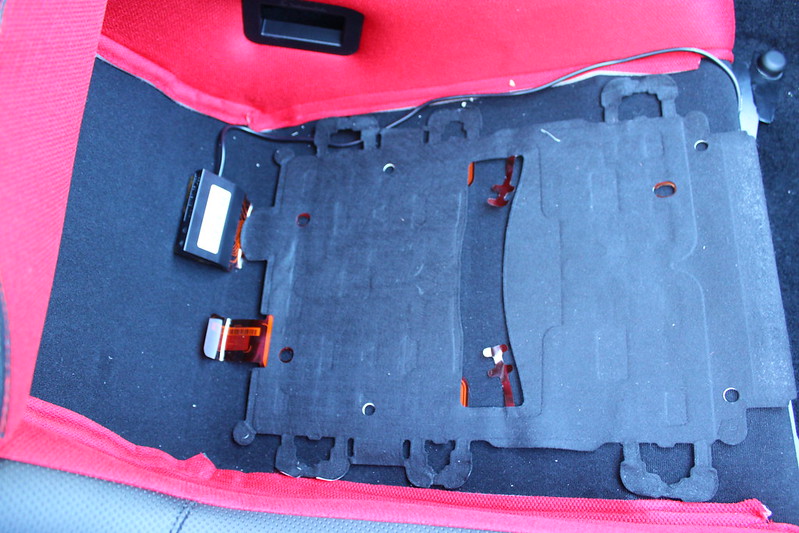
Step 5 > Install the felt pad into your new seat. This is how I mounted it into mine. Luckily the bottom of the Fighters are line with velcro so they re-attach and hold the sensor quite well.
Step 6 > Reinstall seat cusions.
Step 7 > Transfer Seatbelt holster to new seat. All I needed extra was a nut for the bolt.
Step 8 > Get a 2.2 ohm resistor and install that between the leads in the SRS wires (yellow attachments) and tape-off/cover the end with electrical tape.
Step 9 > Put the new seat into the car, attach the seatbelt senor wires and and the weight sensor wires back to their original spots. Bolt seats down.
Step 10 > Re-attach battery and you should be able to start the car and not have to do the SRS light reset procedure. If you have the light on, try the reset procedure, or something is not installed properly. The only difference in any wiring should be a resistor in place of the old seat air bag wires.
*** Side note: Before I disconnected everything I started the car. The Pass/Off light (center along roof) came on for a few seconds then went off. I sat down in the passenger seat, that light came on for a few seconds then went off. From what I have read this is correct operating procedure. After the install, it acted in the very same manner so I assume that it is working correctly. I had no codes either when I scanned with Cipher on the SRS system after the install.
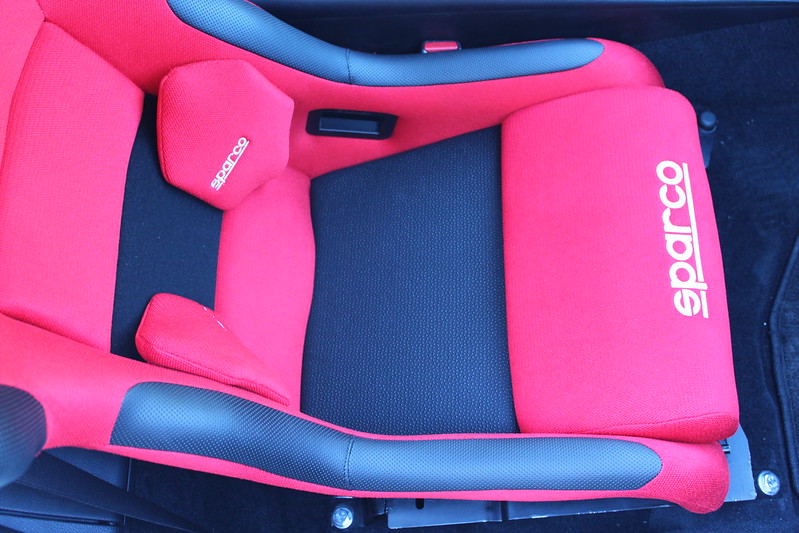
Here is the finished product.
I couldn't find anything really on the felt sensor removal so here is a brief rundown of the sensor removal / installation:
Step 1 > Disconnect battery. Wait a few mins for the caps to discharge.
Step 2 > Remove seat from car. There should be 3 wire connections (SRS air bag, seatbelt connection, weight sensor) middle front under seat cusion. Disconnect all three and the 4 main frame bolts and pull the seat out.
Step 3 > Remove the Weight Sensor & SRS wires from the seat base; there are a few plastic ties that hold the wires. Then remove the 4 bolts on the frame base >> see pic below
You should be able to slide the base of the seat out of the frame now.
Step 4 > Seat cover is attached via small little "rings" Remove all the rings from the bottom and then you can pull the cover up about half way off. All the seams of the seat are attached with rings as well, you will need to remove them as well. Once all the rings are removed (I used two sets of needle nose pliers to open the rings) you can remove the cover. There will be a big felt pad sensor laying there with a module in a little pocket in the back of the seat. The felt pad is glued a little on the front of the seat foam, easy to peel off. There are few rings holding the sensor pad down as well that have to be removed. Here is a shot of the top of the seat bottom with the cover and sensor removed.
Step 5 > Install the felt pad into your new seat. This is how I mounted it into mine. Luckily the bottom of the Fighters are line with velcro so they re-attach and hold the sensor quite well.
Step 6 > Reinstall seat cusions.
Step 7 > Transfer Seatbelt holster to new seat. All I needed extra was a nut for the bolt.
Step 8 > Get a 2.2 ohm resistor and install that between the leads in the SRS wires (yellow attachments) and tape-off/cover the end with electrical tape.
Step 9 > Put the new seat into the car, attach the seatbelt senor wires and and the weight sensor wires back to their original spots. Bolt seats down.
Step 10 > Re-attach battery and you should be able to start the car and not have to do the SRS light reset procedure. If you have the light on, try the reset procedure, or something is not installed properly. The only difference in any wiring should be a resistor in place of the old seat air bag wires.
*** Side note: Before I disconnected everything I started the car. The Pass/Off light (center along roof) came on for a few seconds then went off. I sat down in the passenger seat, that light came on for a few seconds then went off. From what I have read this is correct operating procedure. After the install, it acted in the very same manner so I assume that it is working correctly. I had no codes either when I scanned with Cipher on the SRS system after the install.
Here is the finished product.

How do these aftermarket seats feel compared to stock?
I have been contemplating getting some seats but my issue is the feel- i.e. body position, back position, in relation to steering wheel and shifter.
I have been contemplating getting some seats but my issue is the feel- i.e. body position, back position, in relation to steering wheel and shifter.
Thread Starter
Registered User
Joined: Aug 2011
Posts: 134
Likes: 0
From: Calgary, AB
Who knew passenger seats were so complicated.
Those Sparco's are freakin' gorgeous.
They really set off the color combo of the exterior.
Those Sparco's are freakin' gorgeous.
They really set off the color combo of the exterior.
How do these aftermarket seats feel compared to stock?
I have been contemplating getting some seats but my issue is the feel- i.e. body position, back position, in relation to steering wheel and shifter.
I have been contemplating getting some seats but my issue is the feel- i.e. body position, back position, in relation to steering wheel and shifter.
I will also say, the stock ones are a little softer, but that should be a given when converting to a full solid shell seat. Getting in and out with the taller sidewalls is a little awkward but not in a way that I wish for the stock ones back.
The way I have these set, they are in almost exactly the same position I had my original stock one at > distance and height wise. I also put 7/16" spacers between the seat and slider rails on the front to give a bit of a recline to it as the stock position was a little to far forward leaning for me. Then I set the passenger seat in the same position so the seats would be in identical positions.
I can easily see myself in these seats for hours at a time without getting sore or uncomfortable. Overall really happy with them.
Yeah it is not a plug and play operation haha. I do believe I could easily put it all back together one day if I ever decided to go back to stock. Nothing has been ruined and/or damaged during removal. Thanks, yeah that Red goes really well with the red stitching in the NISMO.
The fit me perfect. 6'1" @ 185ish lbs. Everyone so far that has had a seat in them seems to love them too. Two major first impressions are 1) They really hold you / hug you and 2) they are quite comfortable. My butt used to slide around a little when cornering hard, not anymore. The 2 lumbar supports on these ones are adjustable as they have velcro backs, as well you can order different thickness bottom pads etc.
I will also say, the stock ones are a little softer, but that should be a given when converting to a full solid shell seat. Getting in and out with the taller sidewalls is a little awkward but not in a way that I wish for the stock ones back.
The way I have these set, they are in almost exactly the same position I had my original stock one at > distance and height wise. I also put 7/16" spacers between the seat and slider rails on the front to give a bit of a recline to it as the stock position was a little to far forward leaning for me. Then I set the passenger seat in the same position so the seats would be in identical positions.
I can easily see myself in these seats for hours at a time without getting sore or uncomfortable. Overall really happy with them.

OP, have you noticed any differences in the suspension and feel of the car. One of the issues I'm worried about is the geometry and/or weight distribution might be negated a little due to the extra weight that is applied to the front with all the turbo and inter-cooling parts. Any input on this?
Joined: Feb 2008
Posts: 13,406
Likes: 130
From: MexiCali dodging potholes
Just drive knowing your a little heavier up front! I highly doubt the kit's weight can be felt during a drive due to the power it now gives! What the weight on the box the kit comes in...may say on the shipping note!
Just like if you had a square setup/ staggered/shitty tires/soft race slicks...drive accordingly!
Just like if you had a square setup/ staggered/shitty tires/soft race slicks...drive accordingly!
Thread Starter
Registered User
Joined: Aug 2011
Posts: 134
Likes: 0
From: Calgary, AB
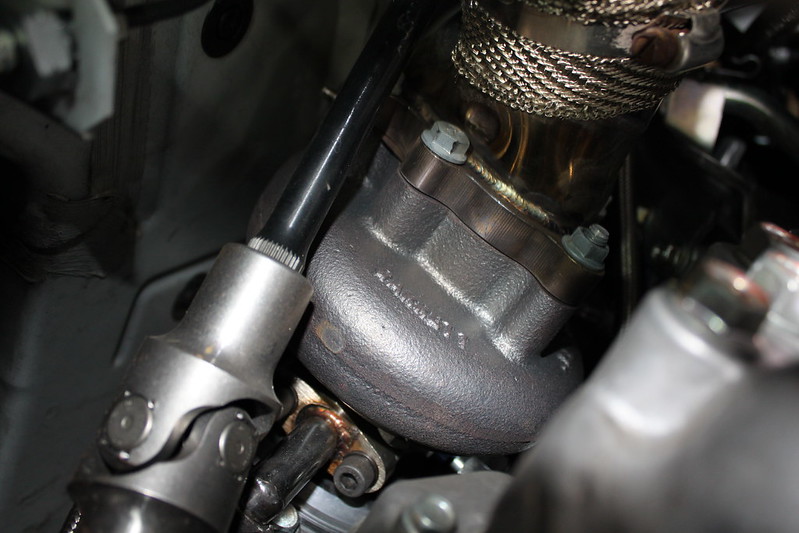
Is that lower steering joint/knuckle aftermarket? I just replaced mine with an OEM one and it is nowhere near as nice as this. Curious where you got it.
Just drive knowing your a little heavier up front! I highly doubt the kit's weight can be felt during a drive due to the power it now gives! What the weight on the box the kit comes in...may say on the shipping note!
Just like if you had a square setup/ staggered/shitty tires/soft race slicks...drive accordingly!
Just like if you had a square setup/ staggered/shitty tires/soft race slicks...drive accordingly!
Thread Starter
Registered User
Joined: Aug 2011
Posts: 134
Likes: 0
From: Calgary, AB
OP, have you noticed any differences in the suspension and feel of the car. One of the issues I'm worried about is the geometry and/or weight distribution might be negated a little due to the extra weight that is applied to the front with all the turbo and inter-cooling parts. Any input on this?

Just drive knowing your a little heavier up front! I highly doubt the kit's weight can be felt during a drive due to the power it now gives! What the weight on the box the kit comes in...may say on the shipping note!
Just like if you had a square setup/ staggered/shitty tires/soft race slicks...drive accordingly!
Just like if you had a square setup/ staggered/shitty tires/soft race slicks...drive accordingly!
Joined: Feb 2008
Posts: 13,406
Likes: 130
From: MexiCali dodging potholes
The kit comes in two boxes, total weight of both packages was 144lbs. Keep in mind that is shipping weight and you remove a fair amount of weight with everything stock that comes off......yeah it just takes a bit to get used to the extra power and where the new limits are. For the most part it drives and handles the same as before, just has a fair bit more power....
Stock cat and headers are heavy!

those seats are pretty nice and clean in that interior that's for sure. I have Brides that i am going to install soon, not sure if im going to go the route of the airbag sensors or not, seems like a pain in the butt!!