DIY SPL front/rear differential bushings
 11-27-2010, 04:53 AM
#1

This took about 5 hours total but not because it's hard but because we didn't have the tools so we had to improvise. This would have been a 2 hour job or less if we had the right tools. I want to thank Kenny@K&D Auto for the help.
The key to getting this done was a 3.5" 12 gauge aluminum pipe I used as an intake for my car. I had a spare pipe and we cut a piece off a little longer than the bushing itself. The bolt we used is a cylinder head stud from a motor and was very strong and did not break.
For the ears of the bushings we simply used a socket with a hammer to take them out and a wood block to drive them in and finish off with a press.
We torqued everything to factory spec with a SnapOn digital torque wrench except the new bushings and went slightly higher.
The problem is that SPL only tapered one end of the rear bushing and because of that it was intended to go in only one way, from the back of the car towards the front. The OEM bushing is tapered at both ends so it goes in from both sides easy. Since the SPL one was not, we had had to center it constantly with a wood block and a hammer because it wasn't tapered and did not want to go in straight until the half way point.
I would strongly recommend that SPL revise the bushing so that it's tapered at both ends because no one is going to drop down the entire cradle for the install.
The car feel much better than before, going straight at 80-85mph or making slow or hard turns and wheel hop is all but gone. It's much easier to corner hard now and feel the car. There is some hardly noticeable gear noise now but only on deceleration and very light acceleration and only at certain speeds. Does not bother me since it's hardly audible and I like the noise. Sounds like a very faint whistle.
The axles were lubricated with Teflon to prevent them from clicking in the future. Red Locktite was used on all the bolts.
Last edited by Andrei; 06-14-2013 at 11:05 AM.
 11-29-2010, 04:33 AM
#3
350Z-holic

iTrader: (60)
Join Date: Jan 2006
Location: San Antonio/I miss DFW, TX
Posts: 11,204
Likes: 0
Received 28 Likes
on
19 Posts
The problem is that SPL only tapered one end of the rear bushing and because of that it was intended to go in only one way, from the back of the car towards the front. The OEM bushing is tapered at both ends so it goes in from both sides easy. Since the SPL one was not, we had had to center it constantly with a wood block and a hammer because it wasn't tapered and did not want to go in straight until the half way point.
I would strongly recommend that SPL revise the bushing so that it's tapered at both ends because no one is going to drop down the entire cradle for the install.
if you read my DIY, i talk about removing the rear pin stay and letting the subframe droop down a bit....doing this will more than allow the spl bushing to go IN from the rear with the existing taper that it has.
Noted as steps 12 through 12c:
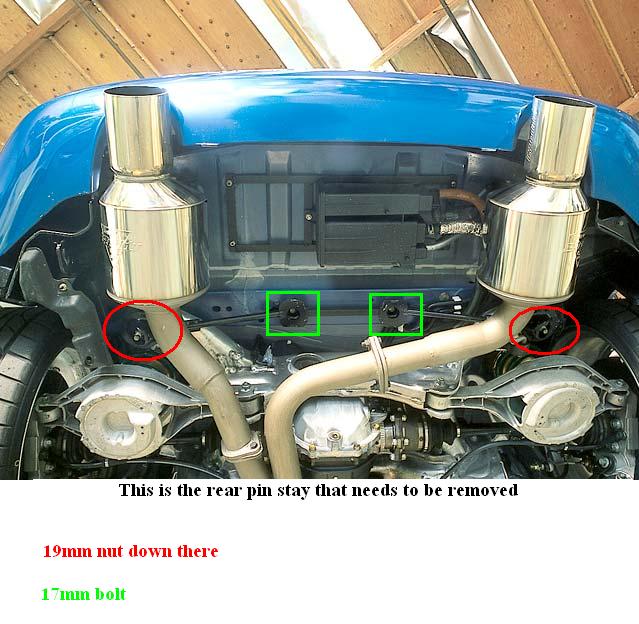
12. Remove bolts on the rear pin stay - two (17mm socket) bolts in the center.
12a -Remove the two (19mm socket) nuts on the ends common to the rear subframe-to-unibody mounts.
12b -Remove the pin stay and place it out of the way.
12c -reinstall the two end 19mm nuts by bench pressing the subframe back up into the air only enough to catch the first 5 or so threads.
THIS WILL ALLOW THE REAR SUBFRAME TO DROOP DOWN A WEE BIT gaining you even more access to the rear subframe oem blown bushing!!!
PIN STAY IS THIS BLACK STEEL PIECE:
heck, removing the pin stay along, and reattaching the 19mm nuts to hold the rear subframe back up gives enough room......its the pin stay that hits/doesnt let the spl bushing line up exactly..
-J
Last edited by JasonZ-YA; 11-29-2010 at 04:35 AM.
11-29-2010, 06:57 AM
#4
But I have a 05 sedan and the cradle would have to go down a lot to clear the spare tire well so it would probably have to come down completely.
Either way the bushings last forever and I wont have to do this again.
Either way the bushings last forever and I wont have to do this again.
Last edited by Andrei; 11-29-2010 at 09:41 PM.
06-10-2011, 06:52 AM
#6
Registered User
iTrader: (8)

Join Date: Jan 2008
Location: Vegas
Posts: 123
Likes: 0
Received 0 Likes
on
0 Posts
Why didnt you put this up on g35driver Andrei? lol
This is about the only way to do it for the sedan it looks like. PITA to get the bushing lined up right, i'm sure, but probably worth it in the end right?
This is about the only way to do it for the sedan it looks like. PITA to get the bushing lined up right, i'm sure, but probably worth it in the end right?
Trending Topics
 04-14-2014, 06:44 AM
#9

Thanks for this writeup!
I was wondering, I discovered my bushing was bad when I lifted the back and checked if my rear wheel bearings made noise( which they did not). ( I have been experiencing a howling noise from the rear at speeds, which gets louder the faster I go). Would this bad bushing be responsible for this noise? ( apart from my tires probably)
I was wondering, I discovered my bushing was bad when I lifted the back and checked if my rear wheel bearings made noise( which they did not). ( I have been experiencing a howling noise from the rear at speeds, which gets louder the faster I go). Would this bad bushing be responsible for this noise? ( apart from my tires probably)

Thread
Thread Starter
Forum
Replies
Last Post
Lt_Ballzacki
Brakes & Suspension
39
08-06-2021 06:19 AM
350Z Project X
Suspension
9
10-10-2015 09:23 AM