
How to Restore Steering Wheel Tutorial
 01-18-2016, 07:17 PM
#1
New Member
Thread Starter

-A TUTORIAL IN PROGRESS-
Hello fellow Z'ers!
Here I will attempt to restore my steering wheel. As you could see from the pictures, my steering wheel has taken a beating over the years - Mostly from the sun and not EVER cleaning it. A thick layer of palm-sludge has crusted over the outer layer of my wheel and has started falling off and onto my clothes. I started looking into getting a new steering wheel.

It basically came down to a few options:
- Buy brand new wheel for $1000.
- Buy a used steering wheel from Ebay for $75 - $125.
- Send in wheel to RedlineGoods. They have different colors to choose from and they do a good job from what I've seen. $130 shipped for the pre-cut leather and another $150 to have them install it. If you want, they can make your wheel a bit thicker than OEM for a few extra $$.
- Buy pre-cut leather from LeatherSeats.com ($155). They also do installations I believe.
- Re-wrap/stitch it up myself using leather scraps found on the internet.
Im broke and enjoy tutorials so I decided to try re-wrapping it myself.
Items needed:
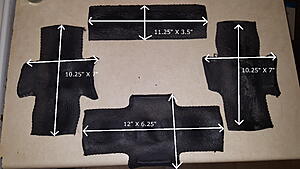
- Quality leather can be found all over Ebay and Amazon. You will need 4 leather pieces with at least these dimensions: 12"x4", 13"x7", 11"x"8", and another 11"x8". I found alot of sellers on Ebay selling scraps. Sometimes in bunches of small scraps, sometimes In one big scrap piece. I bought a scrap piece for $18 that is 4-square feet.
- Waxed polyester thread. Im using 1mm. $6.
- A needle that matches the size of the thread. Size 32 in my case.
- Leather glue or spray adhesive
Steering Wheel/Airbag Removal:
There's videos on youtube on how to do this. Basically you need a TT30 Torx socket ($6), a 19mm socket, and a small flathead screwdriver to get it done. Not hard at all. Just don't strip the torx bolts. Also, be careful when removing airbag or you'll explode your face. Seriously, don't point the airbag towards you and don't drop/bump it.
Once you have the steering wheel off, remove all the plastic parts (few screws) and you're ready to start removing the leather.
Leather removal:
I used a knife to cut the stitching while pulling on a flap of leather. Its pretty easy. Once you get the groove of it, you'll be ripping through 5 stitches at a time. Be careful not to cut into the rubber under the leather.

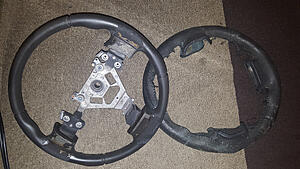
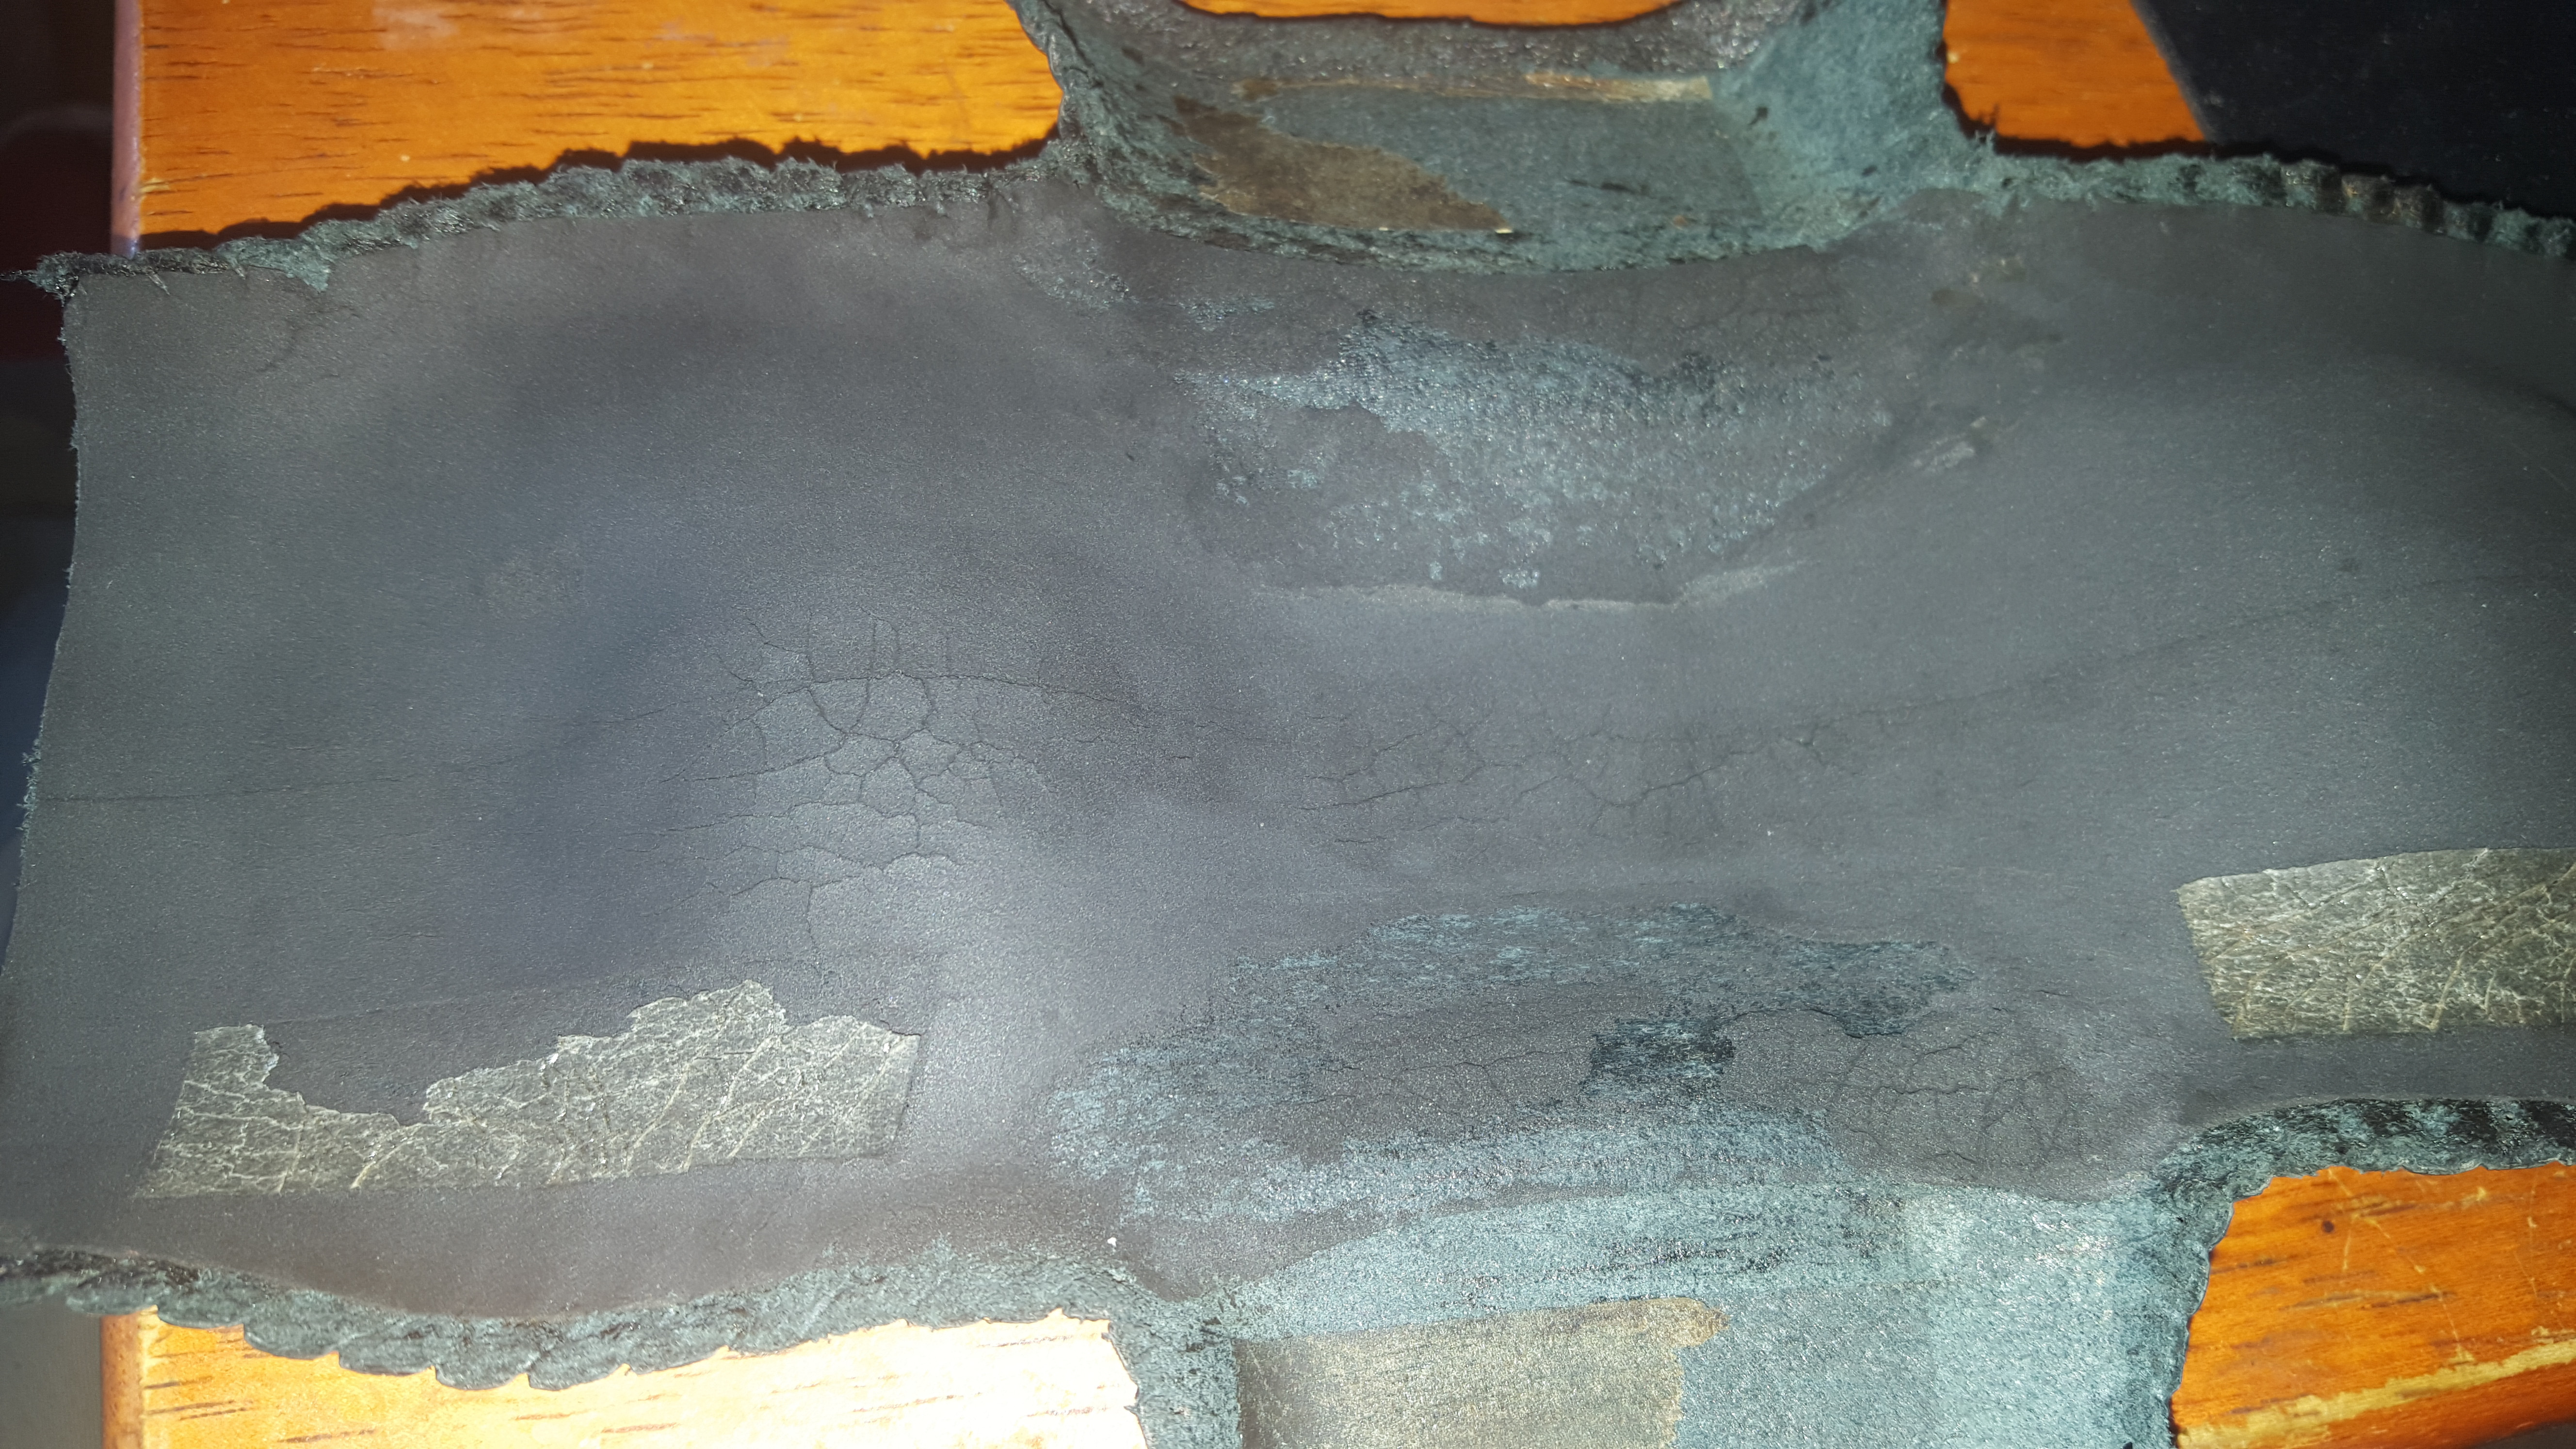
Keep these 4 pieces to use as a template for your new leather. I flattened them overnight by placing them in between books and setting a heavy object on top. Note that the pieces on the left and right are exact mirror image copies of each other.
Clean up/Prep Steering wheel:
After you have removed the leather, youll notice there's black stuff still stuck to the steering wheel. I used my thumb to rub it off. Clean the steering wheel.

UPDATE: Leather is in the mail. My plan was to trace the leather onto a 8x11 sheet of paper and scan them onto my computer so I would have 4 jpeg files that anyone could easily print out and use as a template, BUT unfortunately the leather is over 11 inches so I am trying to figure out another way...any ideas? I also have emailed Nissan to see if they could give me any information about the materials used. ie thread size/type, leather type, glue, etc..
TO BE CONTINUED..
Hello fellow Z'ers!
Here I will attempt to restore my steering wheel. As you could see from the pictures, my steering wheel has taken a beating over the years - Mostly from the sun and not EVER cleaning it. A thick layer of palm-sludge has crusted over the outer layer of my wheel and has started falling off and onto my clothes. I started looking into getting a new steering wheel.
It basically came down to a few options:
- Buy brand new wheel for $1000.
- Buy a used steering wheel from Ebay for $75 - $125.
- Send in wheel to RedlineGoods. They have different colors to choose from and they do a good job from what I've seen. $130 shipped for the pre-cut leather and another $150 to have them install it. If you want, they can make your wheel a bit thicker than OEM for a few extra $$.
- Buy pre-cut leather from LeatherSeats.com ($155). They also do installations I believe.
- Re-wrap/stitch it up myself using leather scraps found on the internet.
Im broke and enjoy tutorials so I decided to try re-wrapping it myself.
Items needed:
- Quality leather can be found all over Ebay and Amazon. You will need 4 leather pieces with at least these dimensions: 12"x4", 13"x7", 11"x"8", and another 11"x8". I found alot of sellers on Ebay selling scraps. Sometimes in bunches of small scraps, sometimes In one big scrap piece. I bought a scrap piece for $18 that is 4-square feet.
- Waxed polyester thread. Im using 1mm. $6.
- A needle that matches the size of the thread. Size 32 in my case.
- Leather glue or spray adhesive
Steering Wheel/Airbag Removal:
There's videos on youtube on how to do this. Basically you need a TT30 Torx socket ($6), a 19mm socket, and a small flathead screwdriver to get it done. Not hard at all. Just don't strip the torx bolts. Also, be careful when removing airbag or you'll explode your face. Seriously, don't point the airbag towards you and don't drop/bump it.
Once you have the steering wheel off, remove all the plastic parts (few screws) and you're ready to start removing the leather.
Leather removal:
I used a knife to cut the stitching while pulling on a flap of leather. Its pretty easy. Once you get the groove of it, you'll be ripping through 5 stitches at a time. Be careful not to cut into the rubber under the leather.

Keep these 4 pieces to use as a template for your new leather. I flattened them overnight by placing them in between books and setting a heavy object on top. Note that the pieces on the left and right are exact mirror image copies of each other.

Clean up/Prep Steering wheel:
After you have removed the leather, youll notice there's black stuff still stuck to the steering wheel. I used my thumb to rub it off. Clean the steering wheel.
UPDATE: Leather is in the mail. My plan was to trace the leather onto a 8x11 sheet of paper and scan them onto my computer so I would have 4 jpeg files that anyone could easily print out and use as a template, BUT unfortunately the leather is over 11 inches so I am trying to figure out another way...any ideas? I also have emailed Nissan to see if they could give me any information about the materials used. ie thread size/type, leather type, glue, etc..
TO BE CONTINUED..
Last edited by openupitsdave; 01-21-2016 at 11:58 PM.

The following users liked this post:
kno (01-19-2016)
01-18-2016, 08:51 PM
#3
Super Moderator
MY350Z.COM
MY350Z.COM


iTrader: (8)
Eagerly waiting to see your next comments
01-19-2016, 05:12 AM
#4
New Member
In.
01-19-2016, 09:56 AM
#5

For the template issue...just take picture of the leather with a ruler on top of the leather.
In photoshop cut the picture into two 8 x 10 images. One top and one bottom...be sure to divide the picture at the same point on the ruler so that the the top half and the bottom half are both cropped at say the 7" mark.
Then a person that wants to use your template simply needs to print two files instead of one per piece of 11" leather....they cut out the outline of the leather on both sheets, overlaying them on top of each other where the 7" mark is in both pictures, and then tape them together.
Then they put the taped up template down on the actual leather and cut out the leather.
Saved
Last edited by savedbygrace; 01-19-2016 at 09:59 AM.
01-19-2016, 10:09 AM
#6

You could also make a second template in Photoshop for 11x17. A near by print shop should have no problems with that and should be inexpensive for black and white.
For anyone looking for thread I would also recommend Ritza 25 "tiger" thread. Its UV resistant polyester and can be bought in multiple widths. I used it for redoing the stitching on a nismo wheel and liked it.
For anyone looking for thread I would also recommend Ritza 25 "tiger" thread. Its UV resistant polyester and can be bought in multiple widths. I used it for redoing the stitching on a nismo wheel and liked it.
Last edited by rancor; 01-19-2016 at 10:48 AM.
The following users liked this post:
openupitsdave (01-19-2016)
Trending Topics
01-19-2016, 05:39 PM
#8
New Member
Thread Starter
In photoshop cut the picture into two 8 x 10 images. One top and one bottom...be sure to divide the picture at the same point on the ruler so that the the top half and the bottom half are both cropped at say the 7" mark.
Then a person that wants to use your template simply needs to print two files instead of one per piece of 11" leather....they cut out the outline of the leather on both sheets, overlaying them on top of each other where the 7" mark is in both pictures, and then tape them together.
Then they put the taped up template down on the actual leather and cut out the leather.
Saved
Rancor, I have access to a 11x17 scanner/printer and I think most print shops have em so I think that is the more fail-safe route. I should have the Jpg files uploaded by tomorrow.
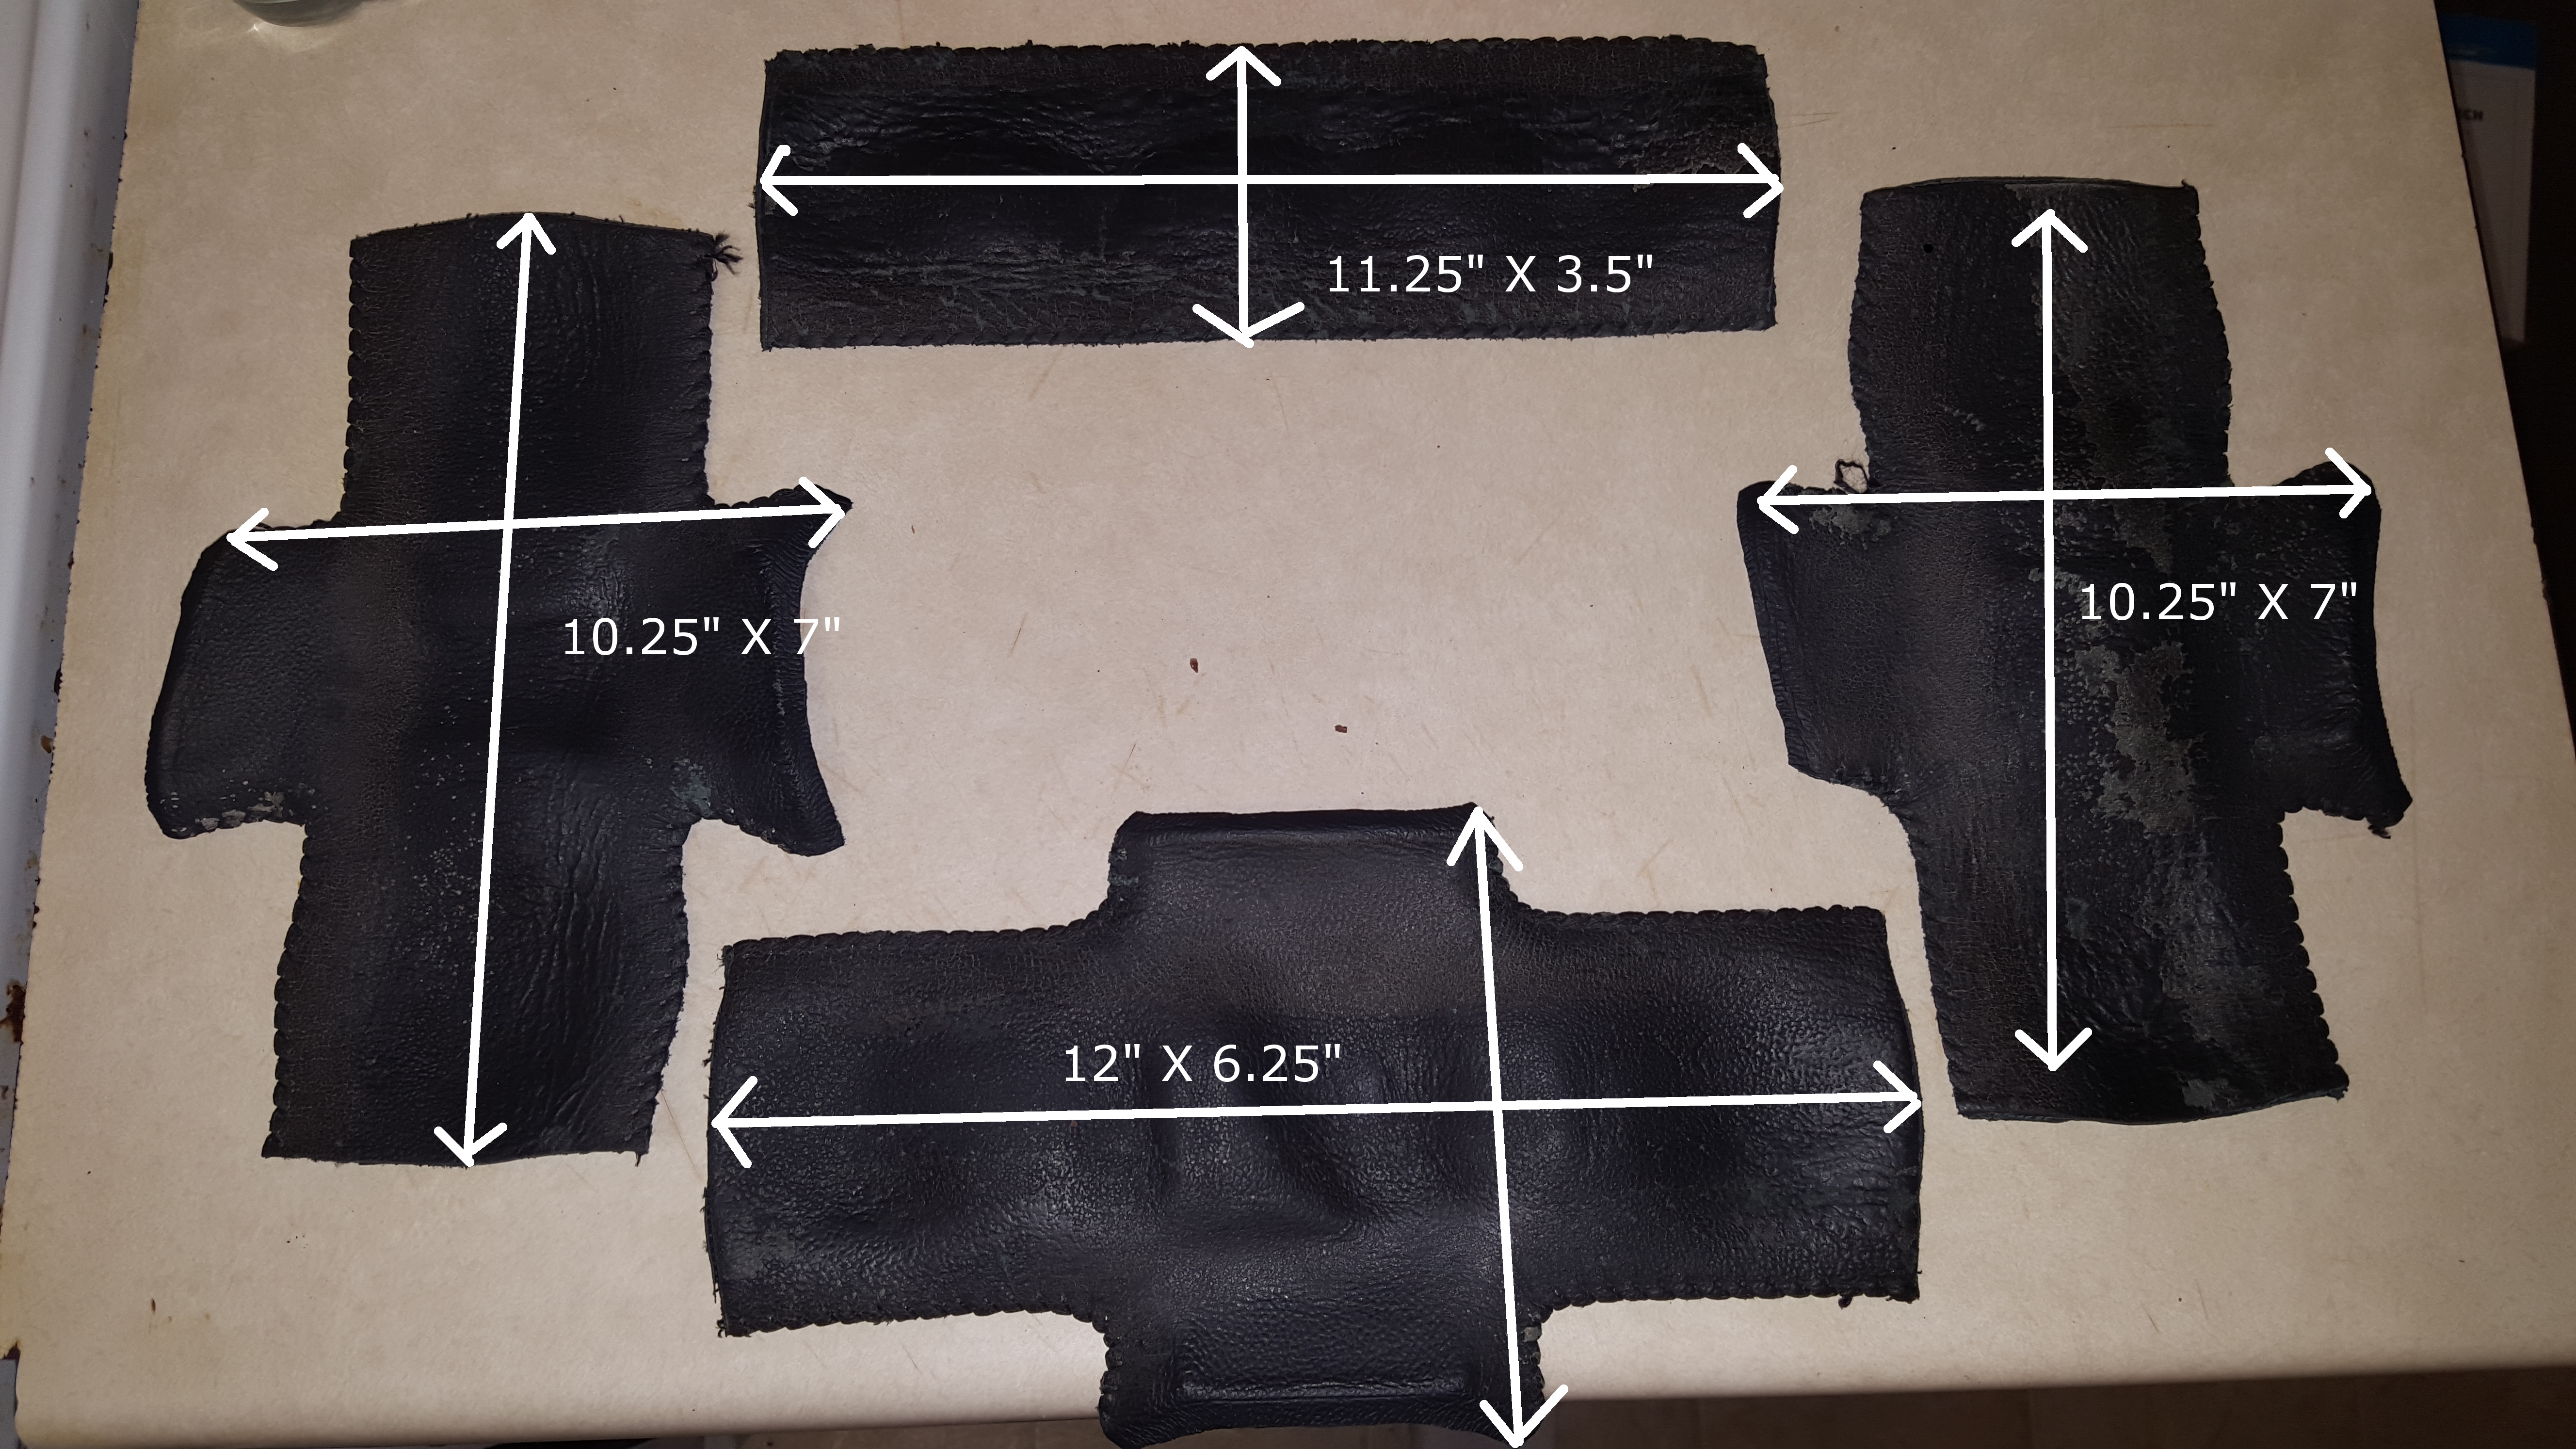
Instead of removing the stitching at the seams when I took apart the sections, I used scissors and cut at the seams, so the measurements could be off by a few milimeters. These measurements are NOT what should be cut in your new leather. They're just to get a rough idea of what size leather pieces to buy. Wait until I do some testing and fitting of the new leather. Then I will post up the template and show the dimensions that should be cut.
Also, Nissan emailed me back with this message in regards to what kind of glue, thread, and dimensions they used: "In regards to your inquiry, we apologize that the information you are seeking cannot be disclosed. Please be advised that due to the sensitivity of the propriety information, Nissan is not in the position to move forward with your request. We apologize a more favorable response could not be given.
Meh, oh well..Im havin fun.
I just bought another scrap of upholstery leather for $18. :]

Last edited by openupitsdave; 01-20-2016 at 07:19 AM.
01-19-2016, 11:59 PM
#9
For glue just use any leather glue.
Mine was Eco Flo Leather Cement, found it at a local crafts store.
Thread is Tiger Thread.
Dimensions that Nissan uses don't matter. It's the shape that matters most, and automotive leathers stretch....you'd be surprised how much....so be precise with your cuts to make life easy, but if you're short a little bit and it won't wrap around the wheel quite completely it can still just be pulled and pulled and it will stretch over....stretch the leather before you glue it...get the leather prepped and stretched and test fit so all you have to do is lay it around the wheel, glue it down, and then lace it up in your preferred stitching pattern.
Saved
Mine was Eco Flo Leather Cement, found it at a local crafts store.
Thread is Tiger Thread.
Dimensions that Nissan uses don't matter.
It's the shape that matters most, and automotive leathers stretch....you'd be surprised how much....so be precise with your cuts to make life easy, but if you're short a little bit and it won't wrap around the wheel quite completely it can still just be pulled and pulled and it will stretch over....stretch the leather before you glue it...get the leather prepped and stretched and test fit so all you have to do is lay it around the wheel, glue it down, and then lace it up in your preferred stitching pattern. Saved
Last edited by savedbygrace; 01-20-2016 at 12:00 AM.
 01-20-2016, 07:08 AM
#11
New Member
Thread Starter
For glue just use any leather glue.
Mine was Eco Flo Leather Cement, found it at a local crafts store.
Thread is Tiger Thread.
Dimensions that Nissan uses don't matter. It's the shape that matters most, and automotive leathers stretch....you'd be surprised how much....so be precise with your cuts to make life easy, but if you're short a little bit and it won't wrap around the wheel quite completely it can still just be pulled and pulled and it will stretch over....stretch the leather before you glue it...get the leather prepped and stretched and test fit so all you have to do is lay it around the wheel, glue it down, and then lace it up in your preferred stitching pattern.
Saved
Mine was Eco Flo Leather Cement, found it at a local crafts store.
Thread is Tiger Thread.
Dimensions that Nissan uses don't matter.
It's the shape that matters most, and automotive leathers stretch....you'd be surprised how much....so be precise with your cuts to make life easy, but if you're short a little bit and it won't wrap around the wheel quite completely it can still just be pulled and pulled and it will stretch over....stretch the leather before you glue it...get the leather prepped and stretched and test fit so all you have to do is lay it around the wheel, glue it down, and then lace it up in your preferred stitching pattern. Saved
 But yeah, it really comes down to finding the right dimensions and taking stretch into consideration.
Rancor, did you lay your leather right overtop the rubber? Your wheel looks amazing btw. I dont expect mine to come out that good on the first try. I just ordered some Ritza 1mm thread as well in grey. Alot of good reviews on this thread.
Last edited by openupitsdave; 01-20-2016 at 12:38 PM.
01-20-2016, 04:21 PM
#13
Yes. The thing im concerned about is, Nissan used some type of spray on padding or glue on the bottom side of the leather which, if I were to not use on my new leather, would affect the overall dimensions of the leather sections. I would have to compensate by cutting the leather smaller than OEM. OR I could find out what kind of glue/padding they used. I believe the padding acts as an insulator between the leather and the rubber on the steering wheel. It might be better in the long run to use it. I wish Nissan told me what material they used But yeah, it really comes down to finding the right dimensions and taking stretch into consideration.
Rancor, did you lay your leather right overtop the rubber? Your wheel looks amazing btw. I dont expect mine to come out that good on the first try. I just ordered some Ritza 1mm thread as well in grey. Alot of good reviews on this thread.
But yeah, it really comes down to finding the right dimensions and taking stretch into consideration.Rancor, did you lay your leather right overtop the rubber? Your wheel looks amazing btw. I dont expect mine to come out that good on the first try. I just ordered some Ritza 1mm thread as well in grey. Alot of good reviews on this thread.
Huh? I've stripped two wheels at this point and the glue is not anything that adds girth to the wheel.... ? Regardless...what glue they used makes no difference in template making or applying the template....you cut the leather from the template...lay it on the wheel, and then trim back any excess...take it off, create holes, put it back, glue it down, lace it up.
"I believe the padding acts as an insulator between the leather and the rubber on the steering wheel. It might be better in the long run to use it."
There is no padding other than the rubber....if you're talking about ADDING padding no...its job is not to insulate...it's just to make the wheel thicker or softer feeling.
"I dont expect mine to come out that good on the first try. I just ordered some Ritza 1mm thread as well in grey"
The key is getting the leather to fit correctly BEFORE you stitch a thing...make sure the leather wraps around the wheel tightly without having to pull it and stretch it to make the gap close....the fit should be cut right so that where the leather goes around the wheel and then meets the other side of the leather...the part you lace up...those two edges of leather just need to be very close to perfect for the entire width that is being sewn up. That way you don't have to use the thread leverage to pull the gap closed when you pull the seams tight during stitching....if you have perfect seams you'll have perfect stitching because you can just easily use consistent tension in the thread pulling...but if you try and compensate with the thread by pulling it tight to force a gap to close, that's when the thread looks tight and bunched up in one place and then loose and clean stitched in other areas....that's the key....perfect seams, and glue it down before you stitch...you can stitch while you wait for the glue to dry, and don't put glue close to the seam....just glue the leather down away from the stitches.
01-20-2016, 09:17 PM
#14
New Member
Thread Starter
Huh? I've stripped two wheels at this point and the glue is not anything that adds girth to the wheel.... ? Regardless...what glue they used makes no difference in template making or applying the template....you cut the leather from the template...lay it on the wheel, and then trim back any excess...take it off, create holes, put it back, glue it down, lace it up.
"I believe the padding acts as an insulator between the leather and the rubber on the steering wheel. It might be better in the long run to use it."
There is no padding other than the rubber....if you're talking about ADDING padding no...its job is not to insulate...it's just to make the wheel thicker or softer feeling.

There's also what looks to be double sided tape
Last edited by openupitsdave; 01-21-2016 at 08:28 AM.
01-21-2016, 01:49 PM
#15
As for sourcing locally I don't think it is sold in the US normaly and I ended up buying it online from rocky mountain leather supply.

Thread
Thread Starter
Forum
Replies
Last Post
M-train
Engine & Drivetrain
2
12-31-2015 02:11 PM
jrreed350togo
2003-2009 Nissan 350Z
36
01-07-2003 08:30 AM