When you click on links to various merchants on this site and make a purchase, this can result in this site earning a commission. Affiliate programs and affiliations include, but are not limited to, the eBay Partner Network.
But gotta tell ya, when I was growing up, there were days I couldn't see across the bay (I had a great view) as the haze and smog was so bad. Then, went to school in SoCal and there were days I couldn't see down the block it was so bad. Then came catalysts, electronic controls, OBD-II and stringent smog laws. I'll take the blue skies over the golden brown ones. Any day. Besides which, 287bhp in the Z or 447 wheel in the Benz is just fine for how I use my cars. So yeah, our smog laws suck. Because you still have to go back to 1975 model year cars to be exempted!! UGH. Hahahahahahahahaaaaaaaaaaaaaaaa.....
I hear ya. I visited LA in the early 90s for work then took a jaunt down to Hunington Beach (is that right name?) and looking back at LAX I was shocked at the brown smog engulfing the city.
On the exhaust headers.... are you replacing the manifolds with headers or...???
I'm doing short tube equal-length exhaust manifolds (Carb Legal DC Sport...the only CARB legal manifolds sadly), the OEM Cats will remain.
Originally Posted by MicVelo
That last one is a big gotcha. Since our cars are OBD smog only (no sniffer), the new smog systems are geared to detect changes in firm/software from OE almost as soon as its plugged in.
I'm aware of the CARB legal nuances. Truth be told, most Smog shops don't have the newer equipment to check firmware revisions/patches, or simply don't bother. I know this is something that CARB wants to push and have enforced. Luckily this is one area where layers of gov't bureaucracy moving like molasses is a good thing. It will probably be another 5-10 years before this level of check is widely adopted. By then, we're all supposed to be in EVs anyways (This, in a state where rolling blackouts during the summer are the norm ).
Ultimately, I'm aware of the risks and I'm willing to take them. I may not even live in CA in the next 5 years. This state has been circling the drain for a while now. Sure it has great weather, but I think that's about it.
-Icer
Last edited by icer5160; Sep 20, 2022 at 08:45 PM.
It's the Stainless Sphere mid way down the page....mine is bead blasted but there are different finishes you can get. With the engraving though he said you have to go with bead blasted.
Just finished my full exhaust setup so I thought I'd share how it sounds.
Tomei Shorty equal length headers
Berk resonated test pipes
Motordyne XYZ pipe with high flow catalytic converter
Tanabe Medallion catback (resonator with muffler)
Update on my Z progress over this past weekend. No pictures today, I was in the zone and pinched for time. Nothing really exciting, just the little details...
The rear end is all back together (axles & sway bar). I also took the time to re-condition the W-Brace. It got the same treatment as the axles. All the bolt/nut/washer hardware was thoroughly cleaned in gasoline and wire brushed before assembly. New cotter pins installed for the axle nuts. Both axle splines and hubs got a thin coating of Honda M-77 assembly paste, as per the TSB recommendations on the Axle click issue. I also like to use a few drops of motor oil on all the bolts (threads) during the assembly process. This helps prevent rust, galling threads, and generally makes things much easier when maintenance is done later.
While I was at it, I removed the heat shields (the one under the trunk and the other one in front of the diff) cleaned them up, then coated the back side of them (chassis facing side) with 3M underbody coating to help cut down on road noise. Since I had to disconnect the e-brake cables to get one of the heat shields, I also cleaned up the cable connections and re-greased them. They linkage looked like a ball of black goo from the amount of grease the factory put on.
Lastly, I started work on preparing the transmission for removal. Fluid has been drained, wire harness completely disconnected, slave cylinder removed, starter removed, and all the bell housing + trans mount bolts have been cracked loose. I got a real good finger buster from one of the upper 17mm bolts violently breaking free (hoping my fingernail doesn't fall off!). All that's left is disconnecting the shifter from inside the cab and the trans is ready to come down.
I can't believe all you old OG @ssholes are still are on here....! 😉😘
Wait.. OLD OG @sshole DEFINITELY includes myself lol.. 🤣
I had a busy year or two, but this last month has been SAVAGELY busy...
I am far past burnt out, but like Ahab and Moby Dk.. I have no choice but to see this thru.
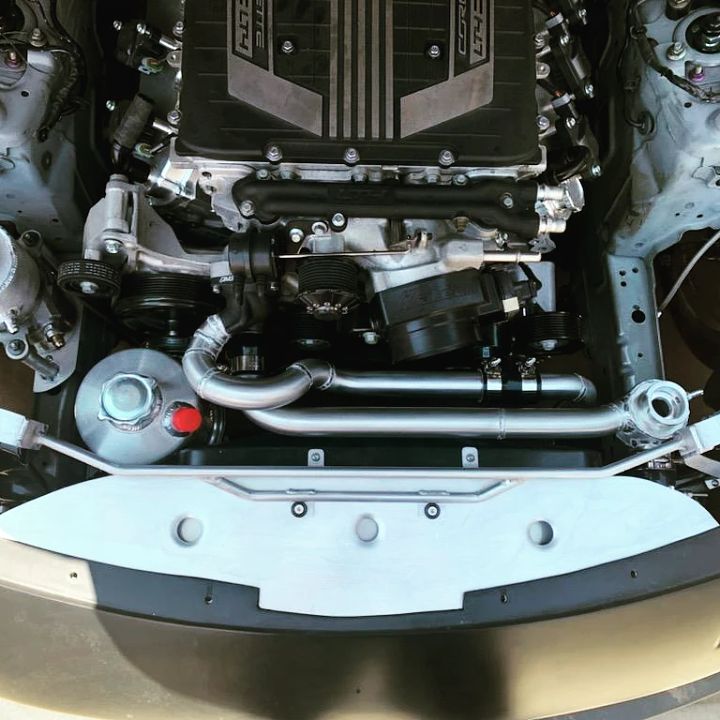
Sent the car off to the Fabricator to add the griffin radiator and single 15" fan/shroud.. Had the electric power steering pump and dry sump tank mounted to the front frame tusks.. And then got it back, pulled it all back apart and painted the entire engine bay and front chassis using STEEL-IT gray paint.
Finally finished our self designed billet cnc swap specific oil pan for this damn engine (LT4/ vette dry sump.)...
Had it sent to the anodozers to add a layer of protection.... We chose a deep gold color..
Finally got the interior back from the upholstery guy after having tlot sit there a year and a half... (why is it ALWAYS like this?!)
Holley ecu was wired up and I got the Holley pro dash not only installed in the Mako Motorsports dash but I got it wired up and working properly.. Just a few more lose ends like locating turn signal and high beam indicator signal wires...
The custom made re- body was done like... Mmm. Two years ago... I don't think I posted any progress in this thread tho... So there's a pic of that in there too..
The front was widened to 76" and the front suspension was lengthened to match using fdf fab upper and lower steel arms and a custom length fdf compression arm, all rose joints now.
In the process now of making mount brackets for the dual 12*12*2 vibrant water cores for the super charger.. And
I still have to duct up all the cooling items so they mate up to the bumper holes cleanly still..
Plumbing this all is gna get wild.. But yeah man, aside from not having funds for a transmission yet /still... I'm almost done w this thing.. Can't wait to never touch this car again.
Last edited by bmccann101; Sep 29, 2022 at 09:00 AM.
Wow! That is a no bs, pro build you got going bmccann101. You gotta post some vids once you have it running! Major props for the extreme effort to do it right!
-Icer
Update on the Z refresh progress. Not as much as I would like to report, gotta make time for family after all
The transmission is down. No drama, no fuss! Came out nice and easy. I'm very happy I kept my custom made 3/4" plywood adapter plate from my last Z clutch job. It bolts to the bottom of the trans using the O2 harness bracket bolt location & the front CAT brace bolts. All the plate does it help balance the CG of the trans and keep it from rolling over on you. Basically it stabilizes the trans while it's on the jack and makes the re-install SUPER easy!
Elsewise, I spent a good amount of timing removing the flywheel, (cracking those T55 bolts was no joke, high temp loctite was in evidence on the threads). I also noticed a tiny amount of oil (not pictured) behind the OEM flywheel bolt locations, right on the center hub of the crank. At 1st I thought it was my rear main seal leaking, but nope, the seal area is bone dry, this looks like oil used during the install of the flywheel (more on that later).
The transmission got a nice cleaning with some degreaser and my pressure washer, followed up with some brake clean in the bell housing area. The throwout bearing was definitely showing it's age, it's getting replaced, already pressed onto the carrier (not pictured). All the grease (fork pivot ball, bearing carrier, and input shaft splines) is getting replaced with fresh Honda UREA grease, really good stuff!
What I don't quite understand (but I have my suspicions), is why the clutch was slipping to begin with. Almost every time I did a moderate to hard pull in 3rd, 4th, or 5th gear, the clutch would slip. Usually if I was climbing up a hill (and there are many on my commute). The old clutch has plenty of material left on it. The pressure plate and flywheel still have their factory machine markings, but there are blotches, which I suspect are from grease/oil. The OEM clutch kit + flywheel are original, however this engine was Warranty replaced by Nissan years ago for the oil consumption issue common on 06s. The dealership handled all the labor and it looked like the technician went a bit overboard on the grease. There was a fair amount on the input shaft splines and face of the throwout bearing. I suspect, the disk and friction surfaces of both the pressure plate and fw are contaminated. This would explain the chatter issues and the slipping problems. None of this really matters anymore as I'm slapping in a single piece flywheel and new clutch from Zspeed. There's a few other issues I noticed about the car from the dealer who did the engine replacement. They straight-piped the heater core coolant line, deleting the bleeder valve, since I've purchased this car, I've been able to hear the air bubbles trapped in the heater core upon cold start. I also discovered that the mass damper on the side of the transmission (near shifter linkage) is missing. The dealer also Warranty replaced the CD009 for failed synchros, but only later realized it was a leaking slave cylinder . The new trans either never shipped with the mass damper, or the previous owner removed it for weight savings (not sure which). I have a spare CD009 with the damper intact, so that's getting resolved (yes, I'm putting it back on the Z, Nissan had a reason for putting that thing there).
Next weekend, the plan is to start tackling the removal of the cats and stock headers. Best do it now while the transmission is out! Depending on tool access issues, I may need to remove the hard coolant lines, we shall see.
Cheers! Trans down! Nicely balanced. OEM stuff looking filthy. OEM Clutch again kit (nothing cleaned up) Close up on the problem areas of the pressure plate. OEM Flywheel. Closeup on the problem areas. Thickness of the OEM disk. Thickness of the brand new Zspeed disk. Crank is cleaned up and ready to receive the new flywheel. New ZSpeed Quiet Clutch Disk. Lots of embedded fibers. Bell Housing all nice and clean now.
I drove mine to city hall to drop off my tax bill, and and and.... Put some little rodent deterrent devices inside... Hopefully it doesnt become a rodent habitat this year.
With temps in the 70s and no rain in the forecast, finally found a good day to give her a good wash and finished waxing right as the sun was going down.
Radiator and Fan Shroud have been removed to prepare for the Koyorad and coolant hose install, but also to give better access for the exhaust manifold swap. TIP - If you can, it's much easier to drop the radiator out the bottom vs. the top (less chance of damaging the condenser as well). I have decided not to go with full silicone hoses after further research. To be fair, all the hose sweating issues I've read reports about have been with HPS and Z1, I don't know if the CZP hoses I purchased will have the same issues. They are priced about the same, so I suspect they all come from the same factory.
Last week I took some time with a buddy to re-condition the exhaust system I will be using. Nothing crazy, not looking for a mirror finish, I actually like the brushed look we got from the red Scotch-brite belt we used on his variable speed machine. That machine really made short work of tarnish and light rust. We also used a mini pneumatic belt sander (such a cool tool) to get into the tight spots, again using red scrotch-brite belts. In future, I may come back and wet sand + polish the rear mufflers, but they aren't really visible so it doesn't matter much. I'm more concerned about rust. Although advertised as SS, only small portions are actually stainless, the majority of the piping is steel. You can also tell by the type of welds. By contrast, the Motordyne ART pipes are nearly 100% stainless steel.
Thus far, I have removed the right side (passenger side) exhaust manifold. I've been taking my time to ensure I don't strip nuts or scratch painted surfaces. If you have a lift, this job would be easier, but still time consuming. Doing it on my back with hand tools increases the difficulty. My back, neck, and arms get fatigued. Dirt & dust falling in my eyes leads to putting on eye protection only to get fogging issues causing poor visibility, those kinds of things. I'm a patient guy and I'm not under a time constraint, so not throwing in the towel. Going to see this through.
I discovered other interesting mistakes from the dealership that warranty replaced the engine. Aside from the heater core hoses, they used more cheap worm gear hose clamps for the oil cooler lines (not good), they made them so tight those hoses are virtually destroyed. They also put the exhaust manifold gaskets on backwards (embossed side facing out/away from block). Surprisingly no leaks from the manifolds.
I'm also including some pics of the rear end completed and the re-conditioned W-brace. I'm taking some time off work in the coming weeks, so hoping to get things put back together before Thanksgiving.
Cheers! Exhaust pieces finished (not all components shown) X-Pipe partially complete. The center is how most of the pipes looked before conditioning. Re-painted W-Brace. If you look close you can see some deep scrapes on the front edge from previous lowered life. Rear Diff and axles looking so much cleaner now. Radiator and Fans out. Wow, you can see the ground. Condenser is zip-tied up to keep the AC lines from getting stressed. Passenger side stock Manifold out. Shot of the engine after removing the manifold. Tight working conditions! Even worse if you do this with the trans in. The very front nut was the hardest to get on this side. Next up! The driver's side!
Last edited by icer5160; Oct 19, 2022 at 11:39 AM.
Torque adapters are a game changers when it comes to headers. The gaskets are mirrored in a way, both sides are embossed but there is a correct way to install, dictated by triangles
Yes, I'm thinking I may invest in a set of metric torque adapters (or just a single 14mm, very niche tool and not cheap). They aren't really critical for removing the OEM manifolds/headers. The OEM headers are designed for easy access to all the studs using deep sockets. But these can really make life easier for equal length manifolds. Removing the headers off my old engine while on a stand was not that simple because of the pipe bends. Some of the studs/nuts are partially blocked, meaning you won't get straight shot access with a deep socket + extension. I had to use a short socket + U-joint + extension or a 14mm box wrench (to get things started). Either way, not ideal and will be considerably more difficult using the same tools for the in-car install.
Credit to AnthonyJ350 for his detailed guide on removal and installation. His tips/tricks have saved me a lot of time and removed a good amount of grief from the equation. He also used a torque adapter for some of his Tomei header studs if I remember correctly.
Cheers!
Yes, I was the one who recommended Tomei headers and the torque adapter to him. I fully understand if you only buy one, I've been a mechanic for 13 years and only have 3 lol.
One of them was the 14mm specifically for the headers.
Drove around the hood today. Was pleasantly surprised i didn't need to jump start it. ( sitting about 3 weeks) trying to get the motivation up to swap wheels for the winter..
Anyone know how well summer performance tires hold up in below zero storage?


 ).
).


.jpg?width=960&height=720&fit=bounds)


 . The new trans either never shipped with the mass damper, or the previous owner removed it for weight savings (not sure which). I have a spare CD009 with the damper intact, so that's getting resolved (yes, I'm putting it back on the Z, Nissan had a reason for putting that thing there).


