When you click on links to various merchants on this site and make a purchase, this can result in this site earning a commission. Affiliate programs and affiliations include, but are not limited to, the eBay Partner Network.
Let us know what you find about the leak. If it wasn't leaking before you parked it, then I would suspect something bottom end to be the culprit (oil filter, drain plug, rear main seal). I think the most common leak points for VQs are the valve covers, oil dipstick tube, and oil filter sandwich plate. I've never seen a leak at the front timing case, lower oil pan, or upper oil pan. It may not be engine oil though, could be related to the power steering system, which uses ATF and should have a red/pinkish color if not very dirty. I hope it's something easy to tackle!
Cheers!
-Icer
Drivers side window motor went out on me....it lasted for 18 years and 86k miles so I guess I can't complain. Replaced it yesterday with a new motor from Amazon after watching multiple videos on how to do it. Took me about 5 hours but that's cuz I'm old, slow and careful...also had to run to Lowes to get a #3 Philipps head screwdriver for the motor screws after realizing nothing I had would work. Works like new now so all good. Ready for the passenger side to go out now.
Drivers side window motor went out on me....it lasted for 18 years and 86k miles so I guess I can't complain. Replaced it yesterday with a new motor from Amazon after watching multiple videos on how to do it. Took me about 5 hours but that's cuz I'm old, slow and careful...also had to run to Lowes to get a #3 Philipps head screwdriver for the motor screws after realizing nothing I had would work. Works like new now so all good. Ready for the passenger side to go out now.
I've been lucky. Previous owner installed new motors just before I got the car ten years ago and 5k miles ago. They're due though... Having the telltale signs of rolls-up-on-auto-up-then-they-drop-6"-at-top. Just dealing with them on manual up (with the switch) and will replace when needed. Have spares on hand, just lazy.
Having issue with passenger power lock. It wants to unlock but doesn't. Discovered this one day when I bought a HUGE load of groceries and couldn't open the door with power after the trunk was full and I still had stuff to load. Of course. Ha!
I made a detailed YT video on rebuilding the power window motors. Buying a new one is not necessary unless the safety/limit circuit is bad on the motor. Since you're local, I could even help out with the work. I've taken apart my doors so many times, I can get that thing dismantled with window & regulator/motor out in less than 10 minutes, maybe even just 5 minutes if I was really hustling. The trick to doing a window motor, at least the way I do it, is re-calibrating the window location in relation to your door seals. If your window is not cracking (small 10-20mm drop) when you open the door, then you have a window alignment issue. Getting the glass aligned properly so that it seals and drops down when opening the door...all without introducing wind/whistling while driving is easier said than done.
Just wanted to mention this since I see a lot of online tutorials on window motor or regulator swaps, but they never discuss the glass alignment. On a normal car with a fully framed window, this would not be necessary, but our Zs are somewhat unique in that the glass is not fully framed. It relies on the body A + B pillars and roof sill to make a good weather proof seal. Too tight and the window won't crack open properly, too loose and you get water intrusion or annoying whistling/wind noise while driving.
Cheers!
-Icer
Your fender liner is clean enough to eat off of Icer.
Did some vinyl work, bringing pinstriped wheels back, changed up Akebono, and added "Nissan" logo from 1960-1967. Now I gotta power wash my driveway, recent rains caused some greens.
Last edited by mr. sparco; 02-01-2023 at 03:56 PM.
Was going to take it to Costco... Went to go warm it up and the battery is dead... Was going to jump it but decided it was just easier to take a different car.
For the window glass adjustment portion, I never made a video on that. But here's the instructions from the FSM on how to adjust the glass angle.
NOTE: Based on your description of the symptoms, you most likely need to adjust the window's position on the regulator mounts (Three M6, 10mm fasteners with large washers). You could have the glass pushed too far forward, the most common wind noise comes from the B Pillar seal. Loosen those bolts and slide the glass towards the B-pillar a smidge, that should take care of the whistling. If you notice the rubber glass guide channel at the rear-view mirror being overly stretched/pushed with the window rolled up, then you need to re-adjust the front of the glass down lower on the forward regulator mount. I hope that makes sense. Fine tuning the door glass in these cars is complex. I start with the bolts that hold the glass to the regulator mounts to get the window X & Y position correct, then I finish up with fine tuning the "tilt" angle adjustments to ensure everything slides up and down freely while still maintaining a good seal.
I forgot to mention/clarify one of the notes in the FSM pic I posted above. The "glass and guide rail mounting bolt" that is mentioned is NOT depicted in the drawing. The adjusting bolt shown there is the "regulator mounting bolt and nut". The guide rail mounting bolt is located towards the door hinge area, above the speaker (forward part of the door). I believe both bolts use a jam nut and a stud with a flat head cut in them. You need to loosen the jam nut and turn the stud with a flat head screw driver clockwise or counter clockwise to adjust the glass angle. These should be easy to identify because they are a bright brass color. It's a good idea to use a little loctite on these jam nuts before final torque down, it's not uncommon for these to come loose if you roll with an upgraded sound system and like heavy bass. This is one of the common sources of rattles in 350Zs.
Usually when the guide rail adjustment is out of spec, the glass will bind against the interior or exterior window belt molding. You can get an idea of how the window is aligned, by inspecting the glass location in the guide channel molded into the rear view mirror mount (just next to the tweeter cover). If it's not centered, it will bind up. I actually need to do some fine tuning on my driver's side door glass, which I plan to tackle this coming weekend. My window glass on the driver's side cracks when opening the door, but if I open it gently/slowly the glass will sort of stick. A light tap will make it drop down all the way. It's sticking/binding against the glass belt molding which is part of the interior door card/panel. I think I need to adjust the guide rail bolt clockwise slightly. I went to far the last time I worked on this part of the car and I ran out of time to fiddle with it more. Lesson learned, always put the door card back on and test the function of the window before calling it. My mistake was that I only tested the window function without the door card in place. The final test is taking it out for a test drive at freeway speeds and praying you don't have any whistling noises.
This whole process is tedious with a lot of trial and error, I've only become this knowledgeable about the 350Z door glass because I've hit all of these issues at some point, thus requiring me to take apart the door again and again to make adjustments and I still haven't quite gotten my driver's door glass perfect! Live and learn I guess!
Cheers!
-Icer
When I get to this adjustment, I'll start a seperate thread and loop you in, Icer. I don't really have any binding or alignment issues, per se...just that the window doesn't hold fully in when closed - maybe that's a matter of having to adjust it so the top "tilts inward" in order to have a better grab on the seal at the top of the door opening.
As for "What did I do to my Z today?" well, yesterday...actually, day-before-yesterday... I had to push it out of the shop garage and push it back into the other stall because the battery drained and it wouldn't start (I needed to work on my truck in the stall the Z was in). I then put the battery on a charger. I'm asking a lot of that old battery (it's an Interstate from 2015, which is from well before I bought the Z in March-2018) - I'll have to replace it before I start driving the Z regularly in Spring.
Replaced the battery (didn't want to end up like dboy) and first tire shine since 2019, my z has been neglected.
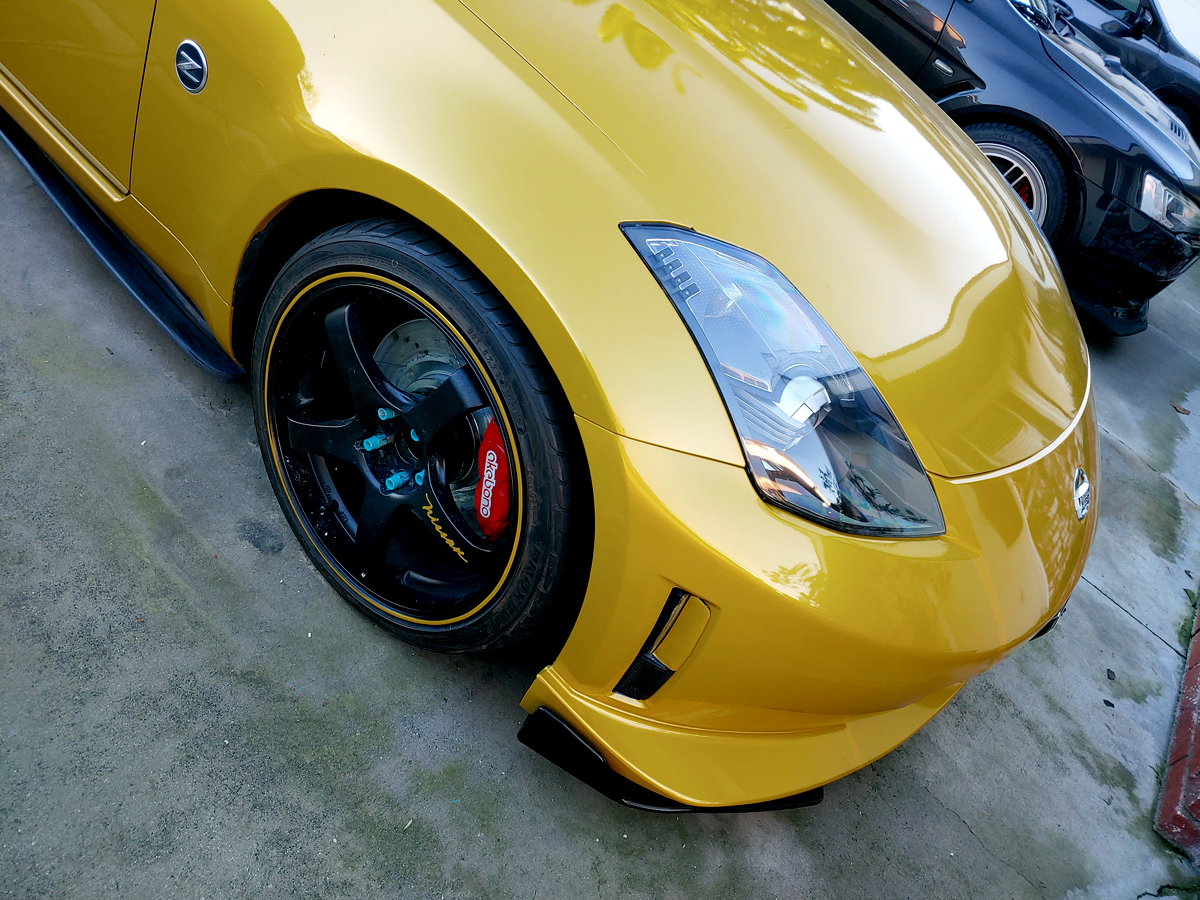
Damn Sparco! That color looks amazing. Is that a wrap job or proper paint? I honestly can't tell. Not many cars can pull off a bright yellow tone, but your Z33 does it justice! What color is that exactly? It's like a gold/mustard yellow. Hard to put my finger on it depending on the picture, lighting, and angle.
Cheers!
-Icer
I haven't posted an update for a hot minute, but that doesn't mean I haven't been busy on the Z! Over the past month interior improvements have been the focus. I have daily-ed the Z for the past 3 weeks straight. During those 3 weeks of "road trials" I was reminded and plagued by a number of interior rattles, odors, and noises. The first item I wanted to tackle was the AC odors. I have already used Kool-It products twice on this car and after just a day or two of driving, the funk coming from the vents was still present. This issue has plagued this car since I purchased it.
This odor issue is not noticeable/present 100% of the time, it only shows itself after running the AC on cold for a period of time (15-30min drive). Parking the car for a few hours, then running it again, but this time with the AC off and just pulling in outside ambient air or running the heat. In essence, condensation needs to form in the AC heater core/evap core box. The moisture is activating w/e bacteria, mold, or mildew is living there. When warmer air is introduced, the smell is released through the vents as the moisture evaporates. I'm sick of it! So I went full retard to knock this out!
I rolled the windows down, disconnected the negative terminal on the battery, then pulled apart the lower dash on the passenger side, pulled the PCM, and dropped the blower box. This helps to expose the side of the AC Core box. From there, you can start unclipping the wiring for the blend door actuators, then remove the actuators, and then remove the side cover of the core box. Sounds so simple when writing this, but the whole process takes a good amount of time to accomplish without breaking anything, but it can all be done with basic hand tools. 10mm socket, #3 philips, some angled pliers, and a trim removal set (and maybe some swearing). Similar to the clutch pedal work I did before, the hardest part about this job is working in such a tight/confined space. Visibility is poor for some of the fasteners and must be removed/installed entirely by feel.
With the side cover of the core box removed, you get direct access to both the Evaporator Core and Heater Core. The heater core is somewhat obstructed by the box and a blend door, but there was enough room for me to get the cleaning products/tools where they needed to be. What did I use? Well, I fabricobbled an extension to my steam cleaner attachments using a silicone straw used for those DIY home shake kits (like Nutribullet). I recycled the spray hose from my Kool-It kits onto the can of Frost King (heavy duty cleaner). After removing the cover, I was a little surprised to see the inside of the box looked mostly clean. There wasn't much dirt or dust or anything obvious that stood out. Just a tiny amount of buildup at the bottom of the box from my previous cleaning attempts.
Methodology...
Phase - 1) I filled the entire core box with Frost King, taking the necessary precautions with towels to protect the interior. I also had a catch pan under the car to keep my floor clean/dry. I let the foam king stuff set up for about 15-20 minutes before going in with my steamer contraption on the highest pressure/heat setting. I went nuts hitting both the heater and evap. cores with steam. I tried to get steam into every row of both and all the nooks of the box. Not an easy task, the silicone straw was flopping around like a wet noodle, but I didn't have any better ideas at the time (or parts for that matter to make something better). The steam was insanely hot, even with gloves on, I couldn't hold the straw in position for more than 20-30seconds at a time, forcing me to take breaks and re-position. Once I felt I had achieved the results I wanted (really can't tell visually without a color endoscope), it was just a "not so simple" matter of putting everything back together again so that I could start phase 2 of the deep cleaning. While I put things back together I also took my time and wrapped the wiring harness with interior Tessa Tape. I also insulated anything that could make a potential dash rattle (brackets, clips, etc).
Phase - 2) The second portion of the deep cleaning calls for using the Service Rite AC Refresh kit. This is a Toyota approved AC cleaning kit that, unlike the Kool-It kit, uses both a foaming agent and antibacterial disinfectant aerosol spray. The Service Rite P/N is 00053-00008, you can get it on Amazon. I had never used this product before, but the research I did on this kit showed that it's worth the price. The foaming agent (the entire bottle) was injected into the drain tube of the AC box, this tube is accessed from under the passenger carpet. Pretty simple, shake the bottle, spray it in for 10-15 seconds, stop, shake the bottle again, and keep spraying (rinse and repeat until you run out). Once the bottle is empty, put back the drain hose into the floor pan, and wait 10-15 minutes for the foam to condense and drain out into a catch pan under the car. The second stage of the kit uses the aerosol can. With the engine off, but key on, turn the AC blower fan to max, use outside air setting (not recirculate), forward dash vents, and set the temp. to cold, then spray about half the can into the blower intake. On the 350Z, this requires you to remove the battery cover. I did this with the rear hatch open and windows completely rolled down. After half the can is used, switch the temperature controls to heat (keep engine off) and change the blend doors to defrost/floor vents. Then unload the rest of the can. I left the blower motor running for a few more minutes to help circulate the cleaner through all the vents/ducting.
Since conducting this deep clean cycle, the odor hasn't returned, it's been two weeks. The aerosol agent is perfumed (lemon scent I think), but it's not overpowering and dissipates after a few days. I think the real trick here is getting all the ducting in the dash (changing vent locations) and hitting the heater core more by changing the blend door positions through the temperature controls (hot vs. cold). I'm sure my insanity with the steam cleaner and Frost King helped, but that still only targets the core box, not the ducting. So far, I'm very pleased with the results. I no longer cringe or begrudge using the AC.
More updates to come in another post. Enjoy the pictures!
Cheers!
-Icer
Passenger Side of the AC Core box after removal of the blower box. Blend door actuators & wiring still in place. Side panel removed, AC expansion valve at the top. Frost King treatment in progress. Close up shot of Frost King product. Originally designed for outdoor AC condensers, works great for automotive applications. My Steamer with silicone straw attachment. Service Rite kit I used. I ripped the photo off the Amazon listing. But this is exactly how it looks.
Another Z refresh update. This is a mix up mechanical and interior.
My Z has been troubled by the "hard to fill fuel tank" TSB NTB08-082. Even my previous Z had this issue on occasion, but I knew which gas pumps in town to use that didn't exhibit this issue. Well years have passed and nearly all the gas stations have updated their pump handles. Now it seems that anywhere I go to fill, the pump kicks off around 50% tank capacity. It's become the norm instead of the exception. So, I planned to tackle this issue with the fix/solution laid out in the TSB instructions. I picked up the FLV Cover and a new gas pump O-ring seal to prepare for the work. While I was at it, I decided it would be best to tackle some other issues with the interior and add some upgrades/improvements.
Issues to tackle aside from TSB...
1) Interior rattle from passenger side B-pillar panel tapping the roof frame pillar cover where the seatbelt exits.
2) Passenger seat interior metallic rattle.
3) Driver's seat squeak (think old rusty spring mattress sound).
4) Replace fuel pump to get rid of a constant high frequency ringing or whining sound (Sounds almost like capacitor whine from electronics or that noise when you 1st turn on an old CRT monitor and it warms up).
Upgrades...
1) Add second glove box behind Driver's seat.
2) Add Course Motorsports custom phone mount (made for the 350Z) with wireless/Magsafe charging.
To install the extra glove box, I had to remove both B-Pillar panels to get to the rear deck/glove box panel, and to make the fuel pump and TSB work easier, I removed both seats. So all of these items were ideal to tackle at the same time. I got the glove box idea from a YT video I saw years ago. Just search "350Z hidden storage."
The B-pillar rattle fix was easy. Just a few strips of 1mm thick felt tape with a sticky backing. It was easy to spot the witness marks where the two plastic panels were making contact. After the rear storage panel was removed, getting the fuel pump out is easy. The hard part was getting my arm in the fuel tank and bent in such a way that I could install the FLV cover bracket. I included some screencaps of the installation pics from the TSB. Snapping the cover onto the valve wasn't that hard by feel, but just getting my hand where it needed to be was really difficult. The other annoying part was doing all of this, with fuel still in the tank. I ran the car until it was only 1/10th full, but even then the tank still had a lot of fuel in it (maybe 5 inches deep). I wrapped my whole arm in a large plastic garbage bag and kept it tight with some rubber bands. This kept the fuel off my skin for the most part. I ended up having to poke my hand through the bag once I got to the valve area, the bag was interfering with my finger dexterity and was also getting sandwiched between the cover bracket and the valve body. Luckily, this section of the tank was above the fuel fill level, so it was dry. My skin was only exposed to raw gas for a few seconds while I pulled my arm out of the tank. Overall a success, but not a fun task.
I put the new fuel pump in with the new O-ring and buttoned things down, During the re-assembly I added in the extra glove box and cleaned things up. Pretty easy/straightforward. Just wish I could have retained the little cable/limit wire for the second box lid. The seats were next. I discovered that the wire linkage on the passenger seat was making all the noise, initially I thought it was contacting the metal bracket that the seat belt harness is clipped to, but it was actually the wire harness itself that was tapping the wire linkage. I discovered this after re-installing the seat in the car (after I took the picture). All that was needed was some Tessa tape on that section of harness near the wire linkage between the seat rails, problem solved. I have a recording of the noise linked here.
The driver's seat squeak was coming from the front left corner where two pieces of the steel seat pan are tack welded together (See pic). There's just enough flex in the joint to cause the metal to rub and squeak. A little bit of garage door spray lubricant from Blaster instantly solved this problem. I'm sure you could fix this without removing the seat, but having them out really made the fuel tank work and glove box addon easier.
Lastly, the Course Motorsport phone mount. I have an iPhone 12 Pro and this mount is in the perfect location. My phone fits it perfectly (just enough clearance). If you have a larger phone like a pro max model, I would not recommend this mount. I didn't like the adapter & cable that came with the kit so I picked up a better, shorter, USB-C charge cable with a 90-degree head and a better 12V adapter that sits more flush inside the passenger side 12V outlet. Still I wish I could have found a more stealthy way of running the charge cable, but I don't like the idea of cutting up my dash or messing with the factory wiring much. It's still pretty well hidden, I can't even see it from the driver's seat and I rarely have passengers, so this will have to do for the time being. I'm really impressed with how fast this thing charges my phone (like 15% charge gain in 10 minutes).
The car is all back together and I'm happy to report that the TSB solution actually worked. I took my Z out for a drink at the local petrol station & I specifically chose a pump that gave me trouble in the past. This time around the tank filled up about 90-95% or 9/10ths before it kicked off. So not a perfect fix, but I'll take it! Much better than only getting a 50% fill! That annoying ringing/whining from the pump is gone and both the passenger seat and driver seat noises are totally gone. Finally some peace inside the Z. Yes there's still a few random noises I can hear coming from the rear of the car and on occasion I hear a noise from the dash tapping the glass. I will be getting to these later, right now those are very infrequent and honestly nowhere near as loud or irritating as the ones I just fixed (seriously, the passenger seat rattle was driving me nuts!).
Next week (Monday the 13th), I'll be dropping my Z off at the body-shop for some TLC to the front end and other goodies. More updates will follow after (should be about 3 weeks before I get it back).
Cheers!
-Icer
FLV Cover Bracket P/N and how it looks. Fuel Pump O-Ring Seal P/N. Where you have to reach in the tank. This guy in the pic is either really small or I'm just a big dude. Barely fit my arm in there! How the cover should look installed. Old fuel Pump. Works fine, just noisy. Two glove boxes FTW. Glad I saved it from my old Z. This is the welded area of the seat pan that was squeaking like crazy. Notice how the steel pieces interlock near the welds. Where the harness intersects the linkage wire is where the noise was coming from. Course Motorsports mount + upgraded cable & adapter. Front view of the mount. Love this thing. Can't wait to upgrade my stereo.
Just wish I could have retained the little cable/limit wire for the second box lid.
I couldn't find a picture right away of how I did it, but I know I have one. I wound up arranging them next to one another where they sit between the gloveboxes. I'll post it here when I find it.
I'm curious - did you have any clip towers break when you removed the large cover panel for the glovebox openings? I had to spend a lot of time with a plastic welder and stapler to fix those on mine. The plastic on the towers is very thin and was extremely brittle after all these years. Before I've had it, my Z spent a lot of time stored outdoors.
I'm curious - did you have any clip towers break when you removed the large cover panel for the glovebox openings?
Hey khnitz,
Amazingly, no, I didn't break any clips. I was nervous about that going into it, but I took my time and used a trim removal tools to get pressure where it needed to be. One of the white plastic fasteners behind the armrest compartment stayed attached to the metal framework, but it did not break, it just slipped out of the panel as I was removing it. I had to use a punch from inside the metal frame to get that fastener removed without breaking it. Otherwise, everything went smoothly.
Let me know how to retained the cable for the 2nd glove box door. I still have all the pieces, including that limit/damper cable.
Cheers!
-Icer

 01-10-2023, 05:27 PM