
Homemade Splitter Design and Mounting


<a href="http://www.flickr.com/photos/61208532@N05/8685015268/" title="Untitled by terrasmak, on Flickr"><img src="http://farm9.staticflickr.com/8396/8685015268_25517812e9_c.jpg" width="800" height="600" alt="Untitled"></a>
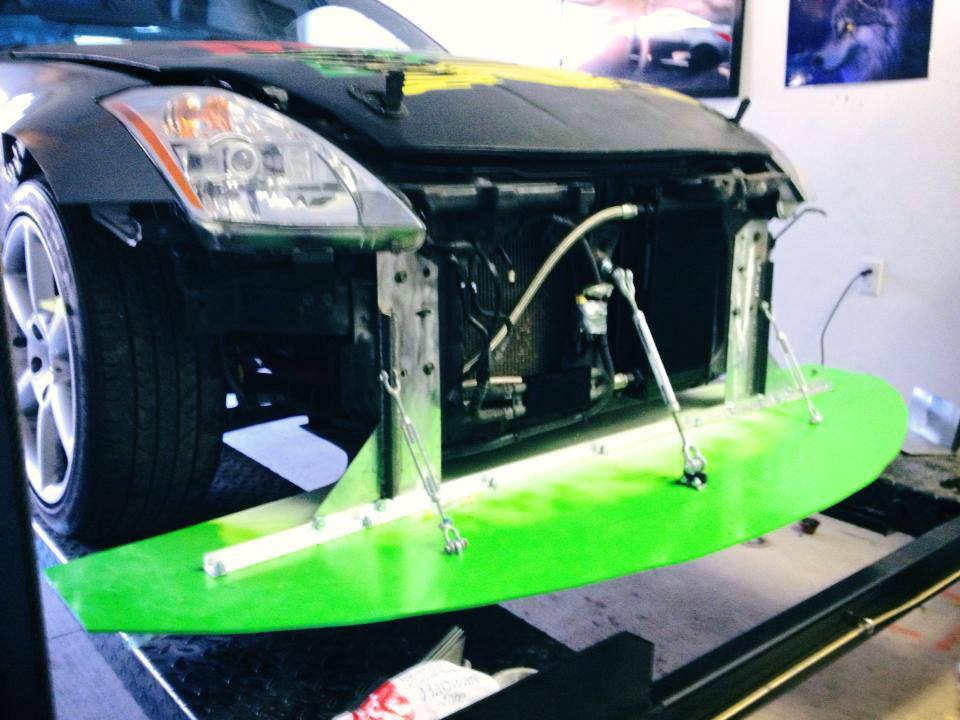
All together, next i will remove the canards, probably one set at a time for testing.
All together, next i will remove the canards, probably one set at a time for testing.
Thread Starter
New Member
iTrader: (21)
Joined: Sep 2006
Posts: 8,159
Likes: 107
From: London, Ontario, Canada
my god i love the flap in front of the wheel. I was thinking of doing the same thing. does it shield the wheel from the front as well? more detailed pics from other angles?
What support rods are those?
What support rods are those?
They completely cover the front of the tire. You can see where i rivited in the backets to the bumper where they are held on, just a simple 90 degree aluminum bracket then they are bolted to the bracket, i used aviation style nutplates on the back of the brackets.
The support rods are just 1/4 hiem joints, available at my local hardware store for about $6 each, then 1/4-28 allthread cut to length. The lower mount point is 90 degree 1/8 aluminum , the upper is 1/16 steel angle cause i needed the strenght when making the mount about 1 inch off the bumper.
Also in the pic, i blocked off the outer sections of the radiator opening for better aero. I used 1/16 aluminum for it, that section is lined up with the core support, no need for air to hit the core support. Brake ducts will be mounted in the blockoff at a later date. http://www.aircraftspruce.com/catalo...uctflanges.php is what i'm using , the same flanges will be rivited to the OEM brake backing plates.
Last edited by terrasmak; Apr 27, 2013 at 12:21 AM.

<a href="http://www.flickr.com/photos/61208532@N05/8685015268/" title="Untitled by terrasmak, on Flickr"><img src="http://farm9.staticflickr.com/8396/8685015268_25517812e9_c.jpg" width="800" height="600" alt="Untitled"></a>
All together, next i will remove the canards, probably one set at a time for testing.
All together, next i will remove the canards, probably one set at a time for testing.
Thread Starter
New Member
iTrader: (21)
Joined: Sep 2006
Posts: 8,159
Likes: 107
From: London, Ontario, Canada
mine is almost complete,
going to make some shrouding to stop air from going straight out the wheel wells. might make some side spats. but good to go and passed 200 lb test and run to 200 kmh / 120 mph at the airport on sunday.
the beauty of it is how easy it is to put on and off. it's held on my 8 bolts that go where the crash beam mounts to the chassis. so 8 bolts and one bolt for the main support rod. there are two claw like metal pieces welded to the frame at the back and the splitter just slides into it like resting on a shelf at the back.
So it comes on and off to go on the trailer.
Thread Starter
New Member
iTrader: (21)
Joined: Sep 2006
Posts: 8,159
Likes: 107
From: London, Ontario, Canada
So I just weighed the entire splitter system including brackets and supports. 31.8 lbs which is heavier than I would have liked. But used steel for the uprights. So it is making the car about 0.125 seconds per lap slower based on weight. Hopefully the car is faster than that based on aero benefit.
Anyone else weigh their set ups? Let me know if you include the crash beam or not.
Anyone else weigh their set ups? Let me know if you include the crash beam or not.

My splitter and air dam weighed about 16lbs. If you include all the hardware and such it still would not be more than 20lbs. I can stand on mine and jump up and down on it. I weigh about 165lbs.
Thread Starter
New Member
iTrader: (21)
Joined: Sep 2006
Posts: 8,159
Likes: 107
From: London, Ontario, Canada
Yeah I can stand on mine as well. The splitter weighs 12 pounds.
It's the steel plates that make it bolt on that make it a bit heavy. But I am not running the crash beam.
It's the steel plates that make it bolt on that make it a bit heavy. But I am not running the crash beam.


Did you find it helped at all? I follow you on FB and youtube(so much hate about the class you're racing in)
I know you were saying it had to be at a 0* angle to the ground
I know you were saying it had to be at a 0* angle to the ground
Thread Starter
New Member
iTrader: (21)
Joined: Sep 2006
Posts: 8,159
Likes: 107
From: London, Ontario, Canada
I ran with r compounds. It's still being over powered by the apr wing. I left the suspension settings the same to get a feel and now I have understeer vs before it was perfectly balanced. So going to make some adjustments to both the splitter and the suspension and see how it goes
Looks like you blocked off the outer parts of the Nismo bumper like i did.
How much wing angle are you running? I run between 2 and 4 degrees up on the center section.
How much wing angle are you running? I run between 2 and 4 degrees up on the center section.