
Dual rear calipers ebrake


On welding the .25 step for the calipers, I was working on the exact same thing but I ran into issues.
My caliper mounting brackes are off a 06 so they are the same calipers but the mounting bracket is for a bigger rotor, so my mounting points are rally close to the knuckles.
It will work but room for a step down is not with in my confert zone and the .25 in plate on the step will be puching right up against the knuckles I can shave some of the knuckle but for some reason I dint like that idea!
My current thought is I take my .1875 steel and make the plate and then add a .120 spacer on the hub. Then machine .170-.190 off the mating surface
Of the caliper brackets. But the amount of metal Iam taking off the brackets is real close for my confert.
What are your thoughts of my plan?
just machine the back of the non-brembo calipers down. There is a section that can be machined down that wont even affect threads. so all you need is shorter bolts.
-J

Will do Iam shaving the caliper brackets tonight and Iam going to start making the adapters plates I will take pics and post them up.
Iam also droping the subframe to replace the sub and diff gushing replacing them with solids and Ian working 12hr shifts 6 days a week so it might take some time before I can install and test.
Iam also droping the subframe to replace the sub and diff gushing replacing them with solids and Ian working 12hr shifts 6 days a week so it might take some time before I can install and test.
Last edited by rubabealf; Oct 27, 2010 at 05:03 PM.


Here are some pics of the build so far.
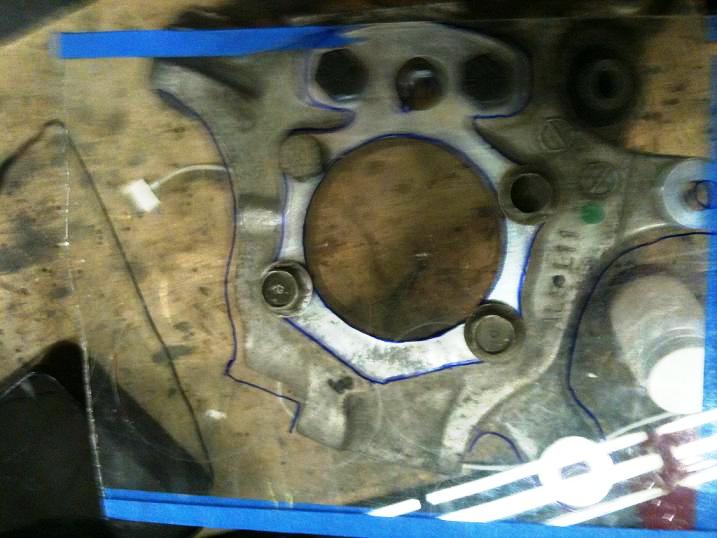
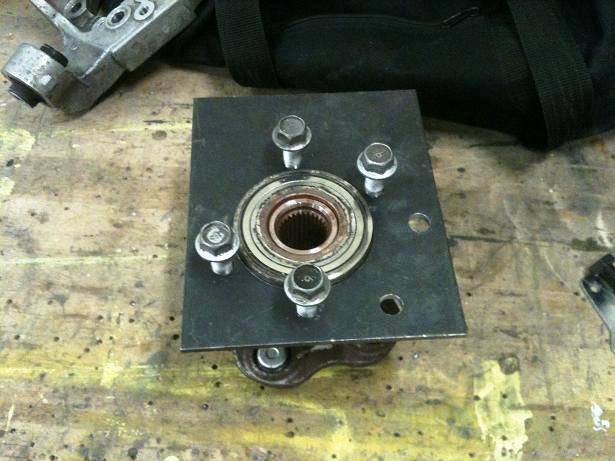
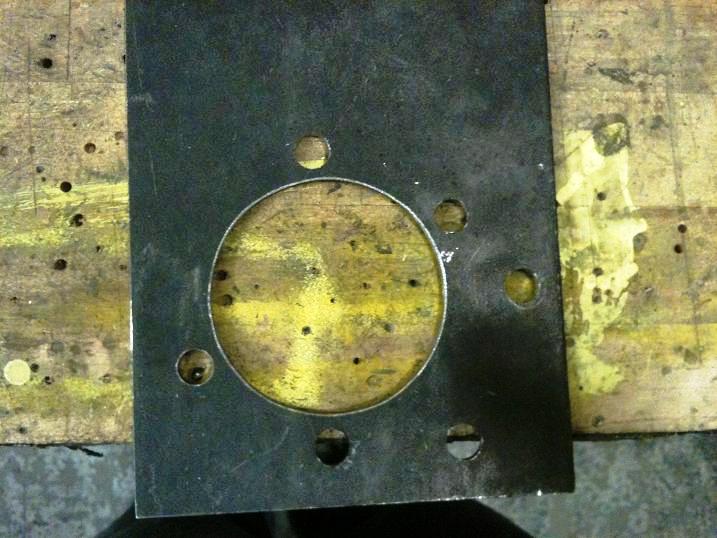

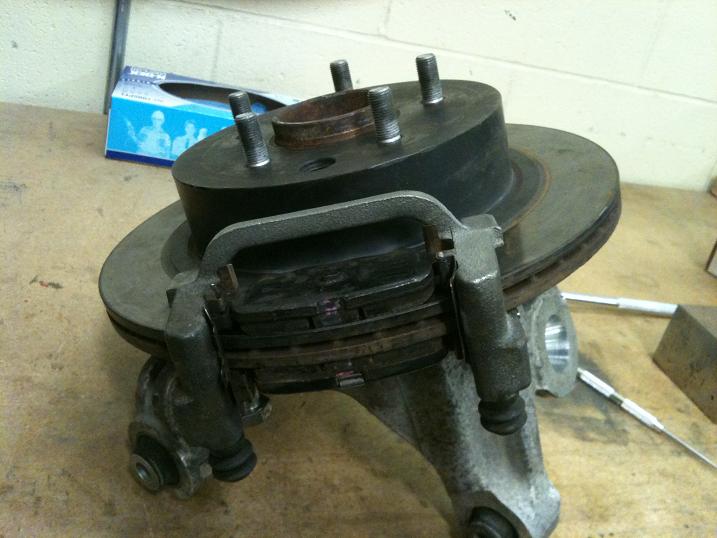
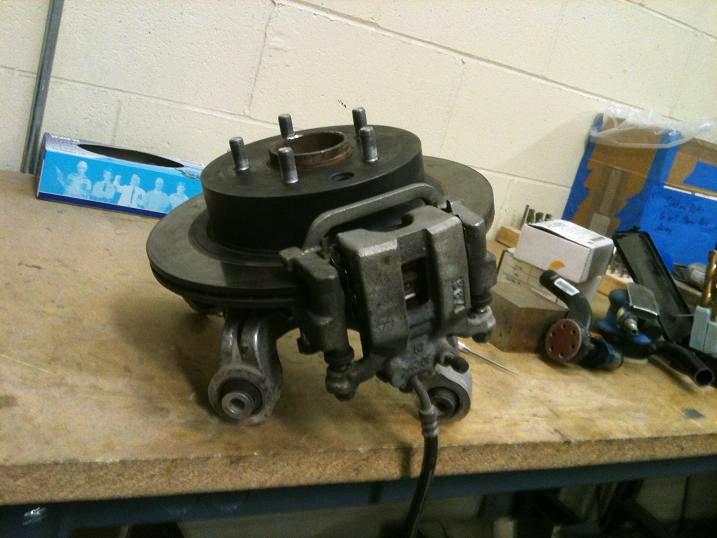
I decided to go with the 3/16 steel plate and im going to weld in some re-informants as soon as i have a day off of work. also I was worried about the lack of space left on the hub centering so I added the spacers under the rotors in staid.
total spacer size is .14 to .15 made from 7050 T-6(its all whe had for scraps in the thickness that i needed) so I isodine the aluminum pieces and will throw a light coat of primer cuz that type of alum likes to start pitting ez.
I machined .170 off the caliper bracket I feel it was alot but should hold up fine!
one thing i almost missed is the brake sheild is .060 think Im not keeping the drums so i deleted it and almost forgot to make up the thickness.
I also fabed up 6061 T-6 Amlum .25 bracket spacers for the main calipers that connect the two holes together to add a little strength cuz of the huge spacing, then i will add a .75 or so washer.
so far the brakes calipers are perfectly centered can't wait to finish and bolt her up.
more to come!
Last edited by JasonZ-YA; Nov 5, 2010 at 06:02 AM.
also I was worried about the lack of space left on the hub centering so I added the spacers under the rotors in staid.
total spacer size is .14 to .15 made from 7050 T-6(its all whe had for scraps in the thickness that i needed) so I isodine the aluminum pieces and will throw a light coat of primer cuz that type of alum likes to start pitting ez.
total spacer size is .14 to .15 made from 7050 T-6(its all whe had for scraps in the thickness that i needed) so I isodine the aluminum pieces and will throw a light coat of primer cuz that type of alum likes to start pitting ez.
-J
Sorry for the confusion.
Ok the stock mounting point is .30 in below the matting surface of the hub and .060 in on the sheild, total of .360 in.
So the adapter plate is .1875 thick so now the gap from caliper mount points to hub surface is .4875 in with out the sheild.
So to make is so the second calipers mounting points are .360 below the adapter plate mounting surface. So remove material from the calipers .170 then I added .150 shim under the rotor making the clearance .320. The shim is placed on the 5 wheel bolts under the rotor. The reason for this is if I put the spacers where the adapter plate is on the hub centering to the knuckes part The thickness of it is very little.
Now u need a spacer for the main calipers close to same thickness of plate and shims, witch is basically .3375 thick, the spacers are one peice that link the two caliper bolts holes (the reason for attaching the hold is to add a little strenth cuz the gap is so thick) together and it's .25 thick to make up for the extra gap just add a washer. .075 not .75 sorry.
Hope this clears it up im sick and very tires from working 12 hrs a day 7 days a week.
Last edited by JasonZ-YA; Nov 5, 2010 at 06:02 AM.
I will take some more pics later to help out.
If I were to do this again I would have bought a pair of 03-05 calipers instaid of the 06 calipers. My mounting points where too close to the knuckles to a cut and weld in a step. Witch would have made is so I didn't haft to shave the calipers! I would imagine u would have the clearance with the older ones!
If I were to do this again I would have bought a pair of 03-05 calipers instaid of the 06 calipers. My mounting points where too close to the knuckles to a cut and weld in a step. Witch would have made is so I didn't haft to shave the calipers! I would imagine u would have the clearance with the older ones!
Last edited by rubabealf; Nov 1, 2010 at 08:49 PM.
Eliminate the spacer under the rotor....
Weld steel thick plate/s to the back of the mount hole locations, back drill the holes you already have, then machine down the top (original) surface.......creating a step...
-J
Weld steel thick plate/s to the back of the mount hole locations, back drill the holes you already have, then machine down the top (original) surface.......creating a step...
-J
Ya u would think so. The steel will hold but cuz it is thin it might have more flex than I would like so im welding in some extra prices to keep it from flexing.
Also the knuckles them selves are cast alum, witch is not that strong of stuff in the first place.
Also the knuckles them selves are cast alum, witch is not that strong of stuff in the first place.
Last edited by rubabealf; Nov 2, 2010 at 04:33 PM.
Ya, gusset the bracket if you feel that will help...
I would look at putting an emboss ment
or steel spacer or metal plate and back drill the existing hole into it...then machine down the face of your bracket. weld...
-J
I would look at putting an emboss ment
or steel spacer or metal plate and back drill the existing hole into it...then machine down the face of your bracket. weld...
-J
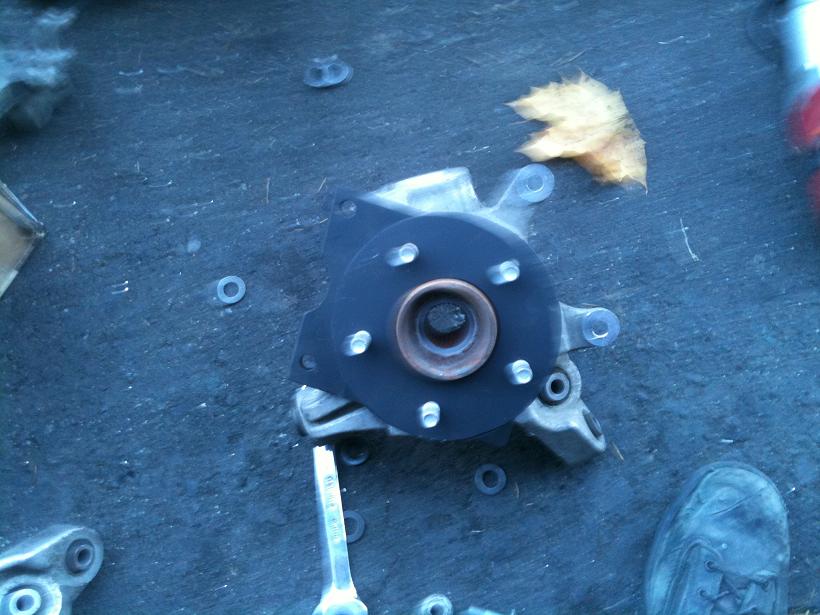
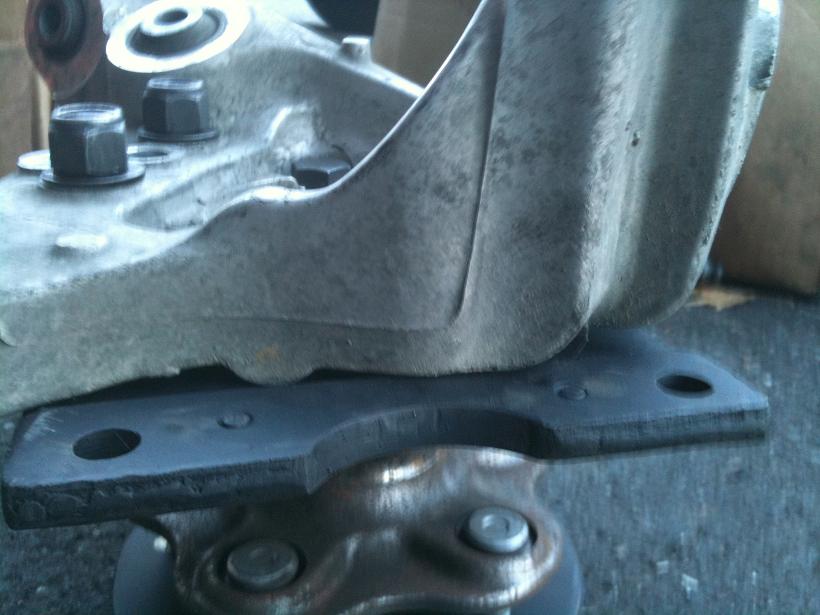

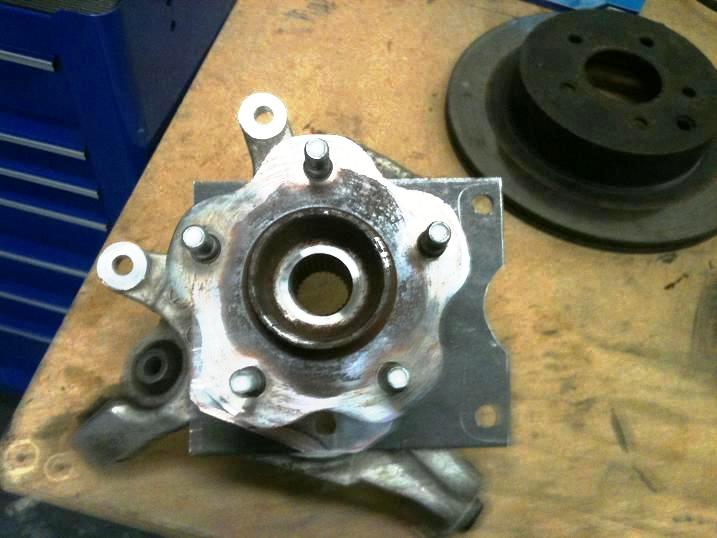
Well here u go. They are installed and are epic, locks them up no sweat! sorry it took me so long to post up more info and I wish I could have taken more pics, the last month has been F*%(ing nuts! also on top of the calipers I also put in solid subframe and solid diff bushings, I also have a event next sat so I wanted at least a week of testing to make sure everything is ok.
The duel calipers where one of the only things that went pretty smooth, I went with the spacers under the rotors it took some tweaking but i got the disk run-out withing specs.
As you can see from the pics I added a plate to the back of the mounting holes and welded the seams. i felt that the edge distance on the holes were real close and it would help with over all strength.
I was going to weld a rib or strip of steel along the sides of the plates but said screw it. (felt it was unnecessary)
I didn't feel conformable with machining down the mating surface .150 inch to make up for the shims cuz the welder I was using was a week flux and my welding skills are weak. also I would have wanted more overlap of the backing plate but could not cuz it was too close to the knuckles.
One thing I should have done is have the mating surface shaved flush. on the passengers side the steel plate was 0.030 off and i had to make a shim to get the calipers to sit flush(I didn't even notice till I first tested them out and I could tell something was wrong with the brake)
while doing all of this I was working 12 hr days 6-7 days a week and my girlfriend is in the hospital (nothing to bad she had some surgery and is in for a few days)
So i probably missed somethings, if you guys have any questions hit me up.
I will keep you guys updated over the next few weeks and will see how it holds up to the stresses of track use.
Last edited by rubabealf; Nov 12, 2010 at 06:03 PM. Reason: shrinked pics....J
Nice work...wow the two combined spacers must have really put a number on your offset, plus that spacer looks big?.....what high offset wheels are you running and what width?
ya, keep us updated on pics and how it works out please..
congrats on completion, with the holidays approaching and all, im still at template stage of mine and haven't had time to work on it at all........been attending a few autoX events and working on other things lately, bushings im changing on my car and mods to another vehicle i have thats been sucking all my time.
-J
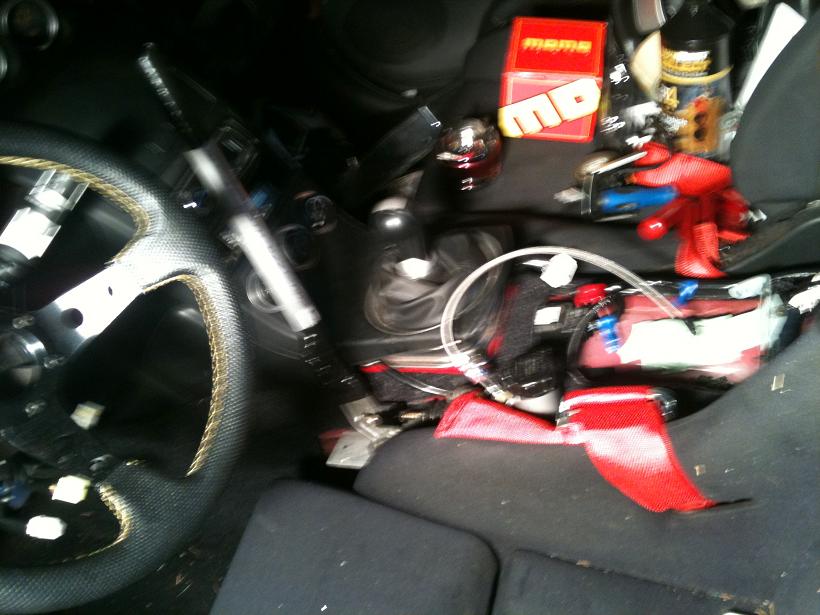
Also, what exact ebrake handle did you buy? CNC staging brake handle??? post up pics, part numbers, site you bought it from, etc...
what fitting sizes were the lines? any issues routing? how did you pass from outside to inside the car?
-J
what fitting sizes were the lines? any issues routing? how did you pass from outside to inside the car?
-J
I used a wilwood .625 cylinder with a wilwood pedal modified for a handle i got them from summit racing I took your info from one of your other post on hydro e-brakes.
http://www.summitracing.com/parts/WIL-260-2636/
http://www.summitracing.com/parts/WIL-340-1289/
LOL on my offset, I have a pair of cheap wheels that i dont know the offset but they bring the tire way in with just the 1in wheel spacers they were about right but I also have a pair of rear OEM wheels that i use both sets are burner wheels. dont know the specs of the none OEM wheels just got them off cragslist about a year ago for cheap. but the tires i use are 225-245 18s
my next project will be to get thiner spacers and correct the wheel offset. total added was about .5 of a inch.
I used 3/16 brake line from autozone and a Tee fitting from a near by parts store that specializes in lines and fittings for a bout 10 bucks.
I installed the lines above the subframe while it was removed(made things 10 times easer) and just used the huge hole from the parking brake used to be I ran the lines along where the cables used to run along the drive shaft tunnel. I picked up points to add line clamps where ever i could.
I though of this after i installed the lines but it would have been much easer to keep the lines inside the car ran them along the back to the truck attached the Tee fitting and then drilled a holed in both wheel wells for the lines to feed into.
one thing I would like to change is the handle has alot of movement (more that i was expecting) but still is not hard to pull and lock them up.
I was thinking I may have installed the residual pressure valve in backwards but there were no instructions with it! all i had was a arrow pointing in one direction so i assumed it was with the flow of pressure?