Handbrake modification (not a tighten post)
 02-09-2009, 05:23 PM
#1
Registered User
Thread Starter

I was wondering if anyone has played with the idea of adding a shaft to lengthen the factory handbrake giving you more leverage and put the handbrake in a better location?
I've been thinking about using some pipe we have at work and putting a small kink bend into it so it clears the interior trim and leave plenty of room to get a hand in there. Also, I was going to drill a hole in it, insert a small metal rod and weld it in place so once the added shaft was installed, it would act as a "drift ****" holding the release in. I'm not really worried about keeping the car all mint or anything, so I was thinking I could attach this by removing the boot and drilling 2 holes through the factory handbrake lever and using 2 long bolts/nuts to hold the shaft on. Something easily removeable so I can DD and park like I'm used to.
Anyone have something simular to this or possibly a better way of going about it besides for upgrading to a hydraulic handbrake?
The thing I'm sorta worried about drilling 2 holes through the factory lever is that at least on the 240sx the handbrake lever is thin sheet metal and I'm worried with only 2 small long bolts it may tear or something.
Feedback?

 02-09-2009, 07:53 PM
#3

I think I heard about somebody switching it out with one from a 240. I had the same Idea you had though: Basically a pipe bend at the end that slides over the handle putting a bolt the through it to engage the button and threading a couple of holes to torque some nuts down on the handle to keep it all in place. The trick is making it look pretty (that if you care, if it's a strait drift machine all is good) Post some pics if you go through with it I'll do the same.
Last edited by albinobob; 02-10-2009 at 03:49 AM.
02-11-2009, 01:48 PM
#4
Registered User
Thread Starter
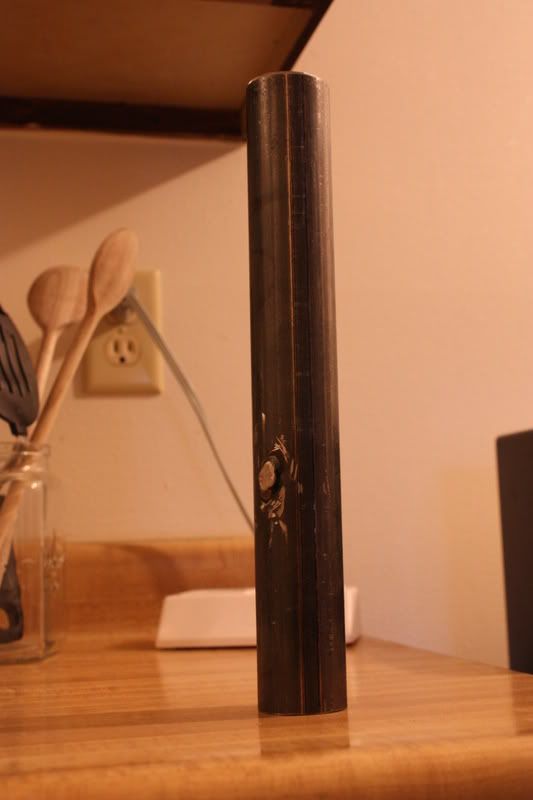
On my 30min lunch break today I took a pipe that just happened to fit and this is what I did:
Cut it 12" Long
Drilled a 3/8" hole 4 1/4" from the end
Put a 3/8" steel rod in and tacked it for now
I don't know the ID of the pipe, but it slides over the handbrake lever with the leather still on it. It was a really tight fit so I didn't bother trying to actually mount it and decided to see if it would work.
Unfortunatly, it was raining today but I gave it a shot anyway. It worked really well, but I think that 12" is a bit too long. I was able to grab it fine and so long as I wasn't in first gear, had no problems with the gearshift being in the way. The worst part for now is that my handbrake is already sorta loose so when I pulled it, it seemed really sloppy.
I'm still trying to figure out a better way to mount it rather than just drilling a hole through the factory boot. I thought about stich welding a hose clamp on the end and using that as insurance to make sure it doesn't slide around. Even though, the way it is now, I just made sure to pull back and hold down and didn't have any problems. I'm just hesitant to permently mount this thing so I'm trying to make it easily removable for street driving.
I'm waiting for my project mu pads to show up and then once I put them in, I'll give an update.
BTW, its not pretty, but it works. I do plan on cleaning it up and painting it black.


Maybe if I get tired of this I might make a nicer one, but I doubt it. Though I would like to heat this thing up and give it a very slight bend away from the gearshift and slightly upwards, but idk.
Function > looks
Cut it 12" Long
Drilled a 3/8" hole 4 1/4" from the end
Put a 3/8" steel rod in and tacked it for now
I don't know the ID of the pipe, but it slides over the handbrake lever with the leather still on it. It was a really tight fit so I didn't bother trying to actually mount it and decided to see if it would work.
Unfortunatly, it was raining today but I gave it a shot anyway. It worked really well, but I think that 12" is a bit too long. I was able to grab it fine and so long as I wasn't in first gear, had no problems with the gearshift being in the way. The worst part for now is that my handbrake is already sorta loose so when I pulled it, it seemed really sloppy.
I'm still trying to figure out a better way to mount it rather than just drilling a hole through the factory boot. I thought about stich welding a hose clamp on the end and using that as insurance to make sure it doesn't slide around. Even though, the way it is now, I just made sure to pull back and hold down and didn't have any problems. I'm just hesitant to permently mount this thing so I'm trying to make it easily removable for street driving.
I'm waiting for my project mu pads to show up and then once I put them in, I'll give an update.
BTW, its not pretty, but it works. I do plan on cleaning it up and painting it black.
Maybe if I get tired of this I might make a nicer one, but I doubt it. Though I would like to heat this thing up and give it a very slight bend away from the gearshift and slightly upwards, but idk.
Function > looks
02-19-2009, 03:07 PM
#5
Registered User
Thread Starter
So a little update before I install the project mu pads.
3rd gear + feint + handbrake = nice.
Found a dry area today that I previously had problems with the handbrake locking. Using my new handle, everything worked perfectly. I can't wait to try it out with the new pads installed. Hopefully it'll be this weekend. Anyway, I should have some details with that setup after the first midwest drift day at gateway. 240's running 3rd gear so I'm expecting top of 3rd or maybe 4th. Should make for some fun times.
<object width="425" height="344"><param name="movie" value="http://www.youtube.com/v/E1Jt730HZfk&hl=en&fs=1"></param><param name="allowFullScreen" value="true"></param><param name="allowscriptaccess" value="always"></param><embed src="http://www.youtube.com/v/E1Jt730HZfk&hl=en&fs=1" type="application/x-shockwave-flash" allowscriptaccess="always" allowfullscreen="true" width="425" height="344"></embed></object>
05-15-2009, 09:55 AM
#6
Registered User

Join Date: May 2009
Location: Arizona
Posts: 1
Likes: 0
Received 0 Likes
on
0 Posts
When I started drifting I used to duct tape my ebrake button down, but the handle was still too far back to grab as fast as I wanted. I stripped the ebrake boot and plastic, then removed the button and other internals. the tooth that locks onto the gear is free floating now. I set the tooth back as far as possible, then drilled a hole where now when I put the cotterpin through it, it will hold the tooth away from the gear. Next I took a basic decent size flat tip screw driver and jammed it into the opening where the buton was. I duct taped the screwdriver to the body on the handle. Oh yeah that made a HUGE difference. After some adjusting of the ebrake cables, I was high speed longsliding no problem (for a while). This will work good if ur doing low speed parking lots and just having fun. The bad thing about the stock ebrake system in the Z is that it was never meant to stop a fast moving car. One night while practicing, I entered a longslide at 80+ and when I pulled the ebrake handle a loud popping and clinking noise emitted from the driver rear wheel. I found that the pin that holds the ebrake pad to the slit in the dustplate was ripped out! the metal was fanned out and broken. We tried using other drum brake kits and bolting the pad in place with the slack it needs for operation, but it never was the same. I looked into the Project Mu 350z shoes, but it doesn't solve the issue of how its mounted. The pins will rip out again. After talking with Chris Forsberg and doing some research, the second caliber for the ebrake alone was the best solution. A custom hydraulic handbrake with its own calipers is what all the pros went to after going through the same thing I did. We are in the process of building the Custom Hydraulic handbrake system now. Sorry for the long reply. I hope this helps.
05-18-2009, 12:35 AM
#7
Registered User
Thread Starter
Way ahead of you.

Just a staging brake, but say what you want, the handbrake being used while braking isn't a big deal.
Thanks for trying to get back to me on this. After I had to weld my adjustment bolt back on I said **** bothering with the factory system unless its parking the car. So my project Mu's are doing a good job of that and my endless pads are taking care of the important things:
Trending Topics
 05-18-2009, 07:48 AM
#9
Registered User
Thread Starter
05-18-2009, 09:11 AM
#10
Registered User
iTrader: (2)

Join Date: Sep 2004
Location: j.e.r.Z.e.e
Posts: 232
Likes: 0
Received 0 Likes
on
0 Posts
05-18-2009, 10:37 AM
#12
350Z-holic

iTrader: (60)
Join Date: Jan 2006
Location: San Antonio/I miss DFW, TX
Posts: 11,204
Likes: 0
Received 28 Likes
on
19 Posts
Awesome Nackers........that was my thoughts exactly on where to "tie in" in my drift 101 sticky (post 34)........glad to see it out there and working.........cool...
The connections you made with the two tee's are in the FRONT passenger wheel wheel right?
-J
The connections you made with the two tee's are in the FRONT passenger wheel wheel right?
-J
Last edited by JasonZ-YA; 05-20-2009 at 06:06 AM.
05-18-2009, 10:41 AM
#13
350Z-holic
iTrader: (60)
Join Date: Jan 2006
Location: San Antonio/I miss DFW, TX
Posts: 11,204
Likes: 0
Received 28 Likes
on
19 Posts
ahh. i get how you did it now...that kills your abs from working properly though...
then again, on a drift only car that doesn't matter....just some FYI...
oh and i love your e-brake handle placement coming up through the shifter boot.......awesome!!
-J
then again, on a drift only car that doesn't matter....just some FYI...
oh and i love your e-brake handle placement coming up through the shifter boot.......awesome!!
-J
Last edited by JasonZ-YA; 05-18-2009 at 10:52 AM.
05-18-2009, 10:49 AM
#14
350Z-holic
iTrader: (60)
Join Date: Jan 2006
Location: San Antonio/I miss DFW, TX
Posts: 11,204
Likes: 0
Received 28 Likes
on
19 Posts
See it looks like you tied into connection p/n ( 46313 ) on the passenger side, by makeing two lines into one, you killed ABS. (which is all good if your okay with that).
This set up should allow for ABS to be retained as the willwood master res "is" a master and doesn't use the cars master for pressure.
https://my350z.com/forum/drift/39963...ml#post6587128
-J
This set up should allow for ABS to be retained as the willwood master res "is" a master and doesn't use the cars master for pressure.
https://my350z.com/forum/drift/39963...ml#post6587128
-J
05-22-2009, 01:55 PM
#16
Registered User
Thread Starter
ABS was still working before I disconnected the plug. It didn't work when I pulled the handbrake but in the wet with a hard foot brake it was still working. Same with the VDC.
All in all it cost around $200 with the cnc staging brake, lines, and fittings. Just a lot of work.
All in all it cost around $200 with the cnc staging brake, lines, and fittings. Just a lot of work.
05-23-2009, 04:38 AM
#17
350Z-holic
iTrader: (60)
Join Date: Jan 2006
Location: San Antonio/I miss DFW, TX
Posts: 11,204
Likes: 0
Received 28 Likes
on
19 Posts
^ ya, the ABS has 4 dedicated lines going - one to each wheel, it will not work properly on the road with two lines Tee'd to one - then to hand brake - then back tee'd to the two lines back to the rear......that means, coming out of the ABS block they are NO LONGER 4 dedicated lines? get it??
with your hydro set up, your ABS WILL NOT work correctly. The Z has cross braking - activated by ABS.
With this set up, if your daily driving and you come to a sudden braking situation, only ONE of your front wheels will activate during ABS and your car will jerk you to one side.
be aware....
oh, and read this thread, and my post/replies on there - This guy has a very similar set up as you............i know how it was installed - https://my350z.com/forum/brakes-and-...too-early.html
-J
Last edited by JasonZ-YA; 05-23-2009 at 05:23 AM.
05-25-2009, 07:49 PM
#19
350Z-holic
iTrader: (60)
Join Date: Jan 2006
Location: San Antonio/I miss DFW, TX
Posts: 11,204
Likes: 0
Received 28 Likes
on
19 Posts
Do you drive with ABS one? daily drive the car or only track?? Or do you pull the ABS fuses and disable when on the road? Cause that can be dangerous like Kevin8086 learned.....
-J
05-26-2009, 07:21 PM
#20
Registered User
Thread Starter
I've been driving with the "Big grey plug" disconnected since the last event. I've never had abs before so I'm pretty used to it, though I know abs is better for daily driving.
I'll reconnect it and give it a test run on a closed course.
I'll reconnect it and give it a test run on a closed course.