Hydro ebrake writeup


Notes before reading this.
See these references and read them thoroughly before attempting this:
https://my350z.com/forum/drift/39963...ing-the-z.html
https://my350z.com/forum/brakes-and-...rs-ebrake.html
https://my350z.com/forum/brakes-and-...e-install.html
http://www.gtfactory.jp/cms/page.php?4
Keep in mind that there are a few ways to install a hydraulic ebrake, this is simply the method I chose. This method is not necessarily the best, but I felt it was the best for me. The method you choose should only be done after thorough research done by yourself on the benefits and disadvantages of each setup.
CAUTION: This modification requires tampering with the factory brake lines and design. If you do not feel you are mechanically inclined enough to perform something like this, then don't. Take it to a reputable shop that can do it for you. Any incorrect step can result in dangerous results that can pontentially damage your car, or worse, put you in danger.
CAUTION: Make sure to adhere to the FSM's specifications for brake fluid and follow it's directions for bleeding your brakes.
CAUTION: This disables ABS
NOTE: These are not specific instructions on how to do this modification, I am simply showing how I went about it. How you go about this modification is solely up to you and you take all risk in attempting it.
So I finally got my Powered by Max SLC hydraulic ebrake in. The OEM parking brake on the Z33 is just that.... for parking. It won't lock the rear wheels at all while moving, it will only slow them down at best, even when pressing in the clutch and turning the steering wheel. I replaced the stock brake shoes with P.Mu "drift" brake shoes a couple of years ago but they only lasted for one event and then just reverted to something exactly like stock. Years later I want to improve my driving with more techniques but without an ebrake that can lock the rear wheels I felt extremly limited. That's where this thing comes in.
I started out with the hydro. It didn't come with any instructions or anything helpful for installation. But fortunately I had been pestering my friend Kim (Ktran), who also has a Z with a ksport hydro ebrake (now upgraded to a Wilwood cylinder), about information pertaining to installing this thing. After scouring forums and studying the FSM I had a pretty good idea on how to go about this.
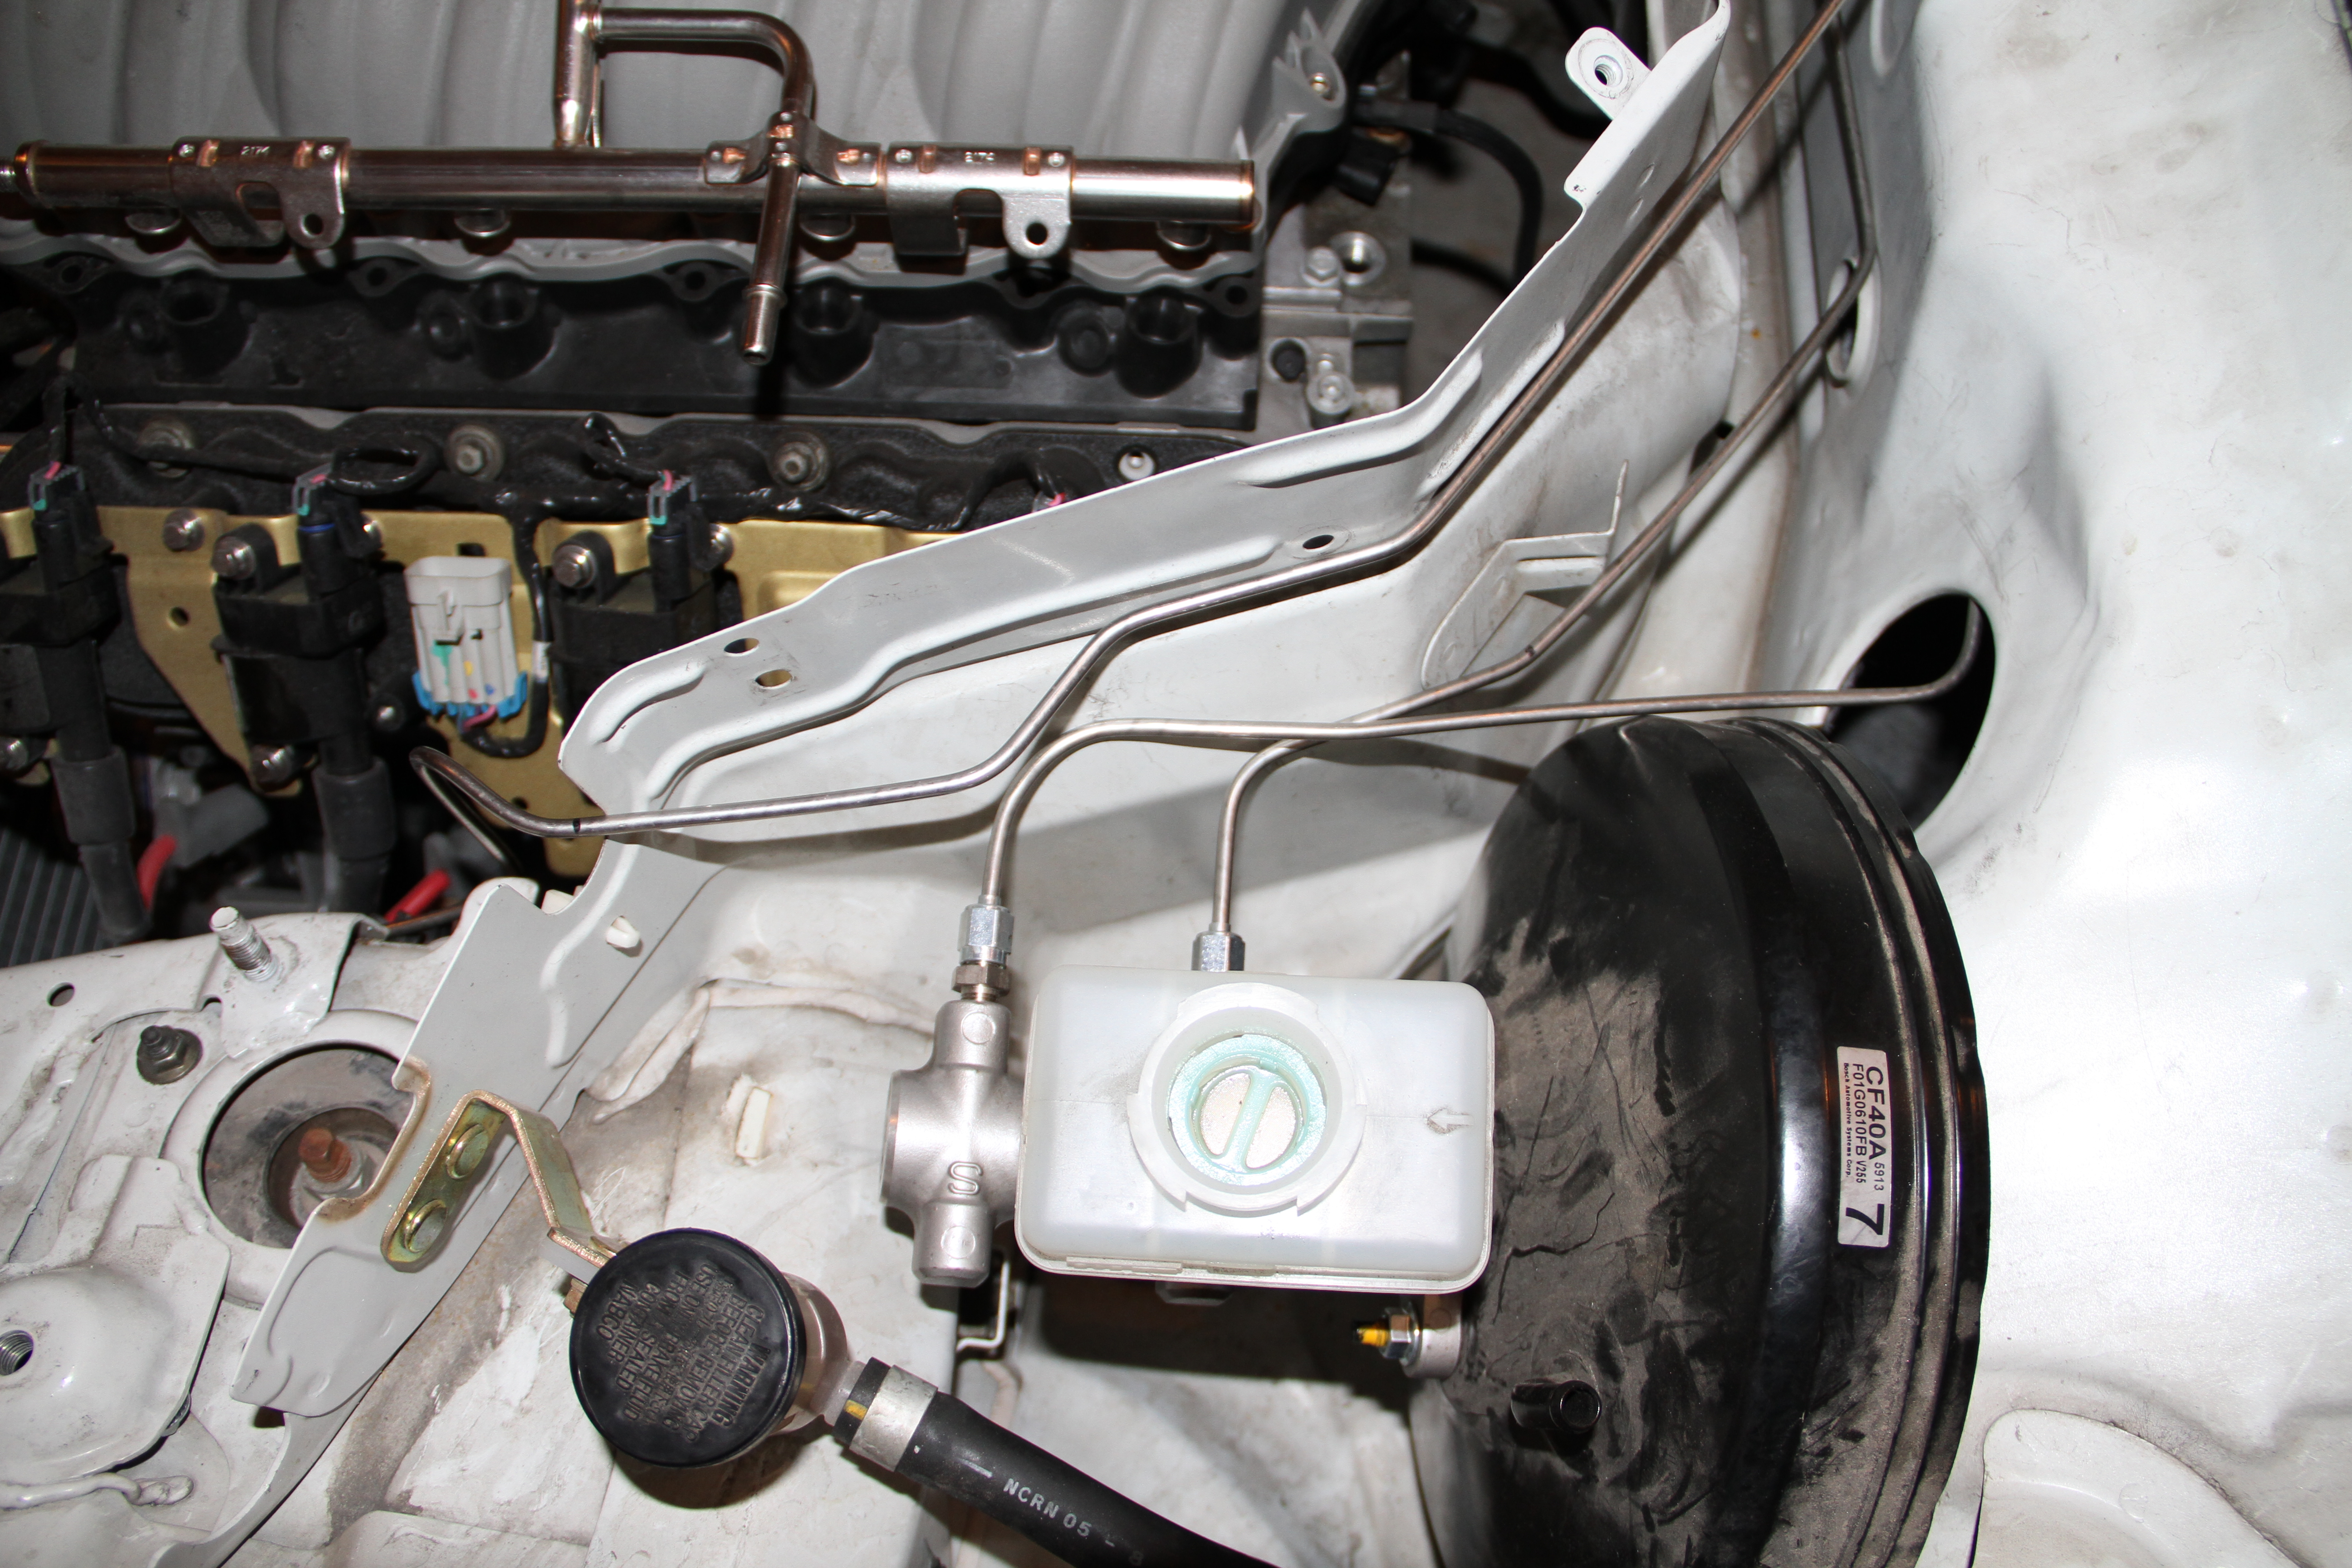
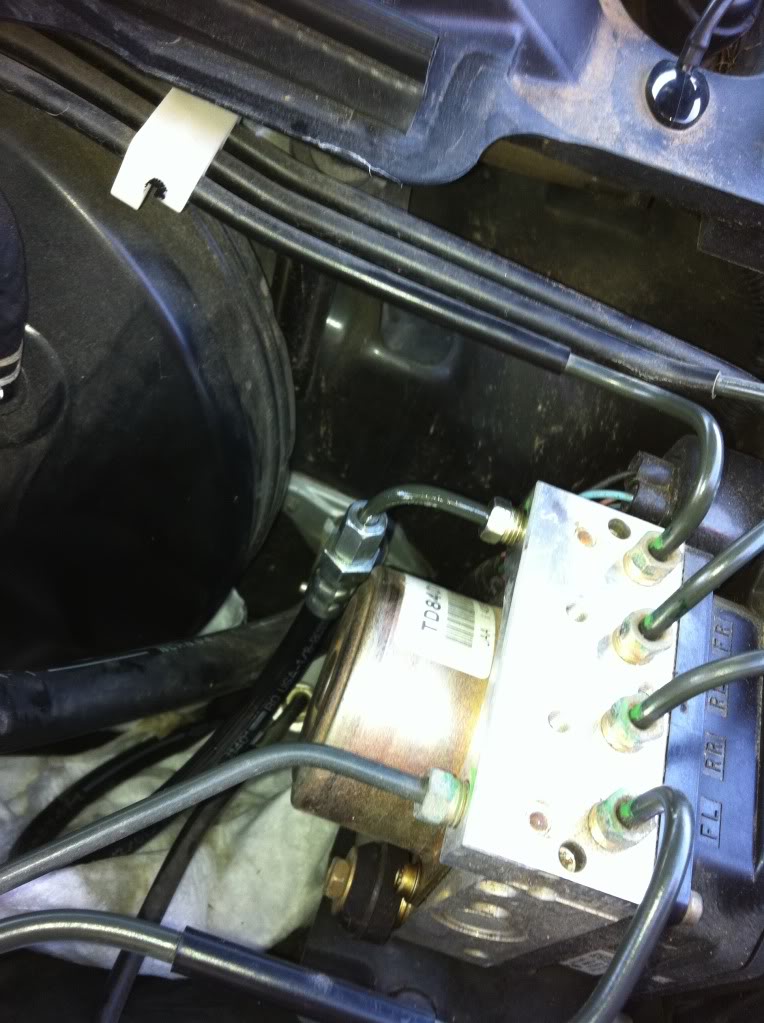
The first step was to have two lines made. One line comes from the secondary port of the master cylinder to the inlet of the hydro cylinder (the port on the end), the other goes from the outlet of the hydro (the port closest to the frame) to the secondary port of the abs block. These two lines replace the factory hard line that goes from the secondary outlet of the master cylinder to the secondary port of the abs block, tying in the hydraulic ebrake to the braking system (hence the hydro being an "in-line" setup).
First you have to get an idea of how long you need the lines. I just used some string and zipties and threaded them from where I wanted to mount the hydro in the car to where the lines need to go in the engine bay. Then you have to get your lines made to length and have the right size fittings fitted to the lines. Luckily there is an amazing shop in town that specializes in things like this, I had both lines made in a few minutes (after a little begging and pleading that I needed the lines done in a day lol). I had them remove the stock fittings from the secondary hardline I removed to use for the lines going back to the master and abs block, they used all new fittings for the ports in the hydro cylinder. The lines were about $80, which isn't bad considering other people pay from $120-$160 for their lines.
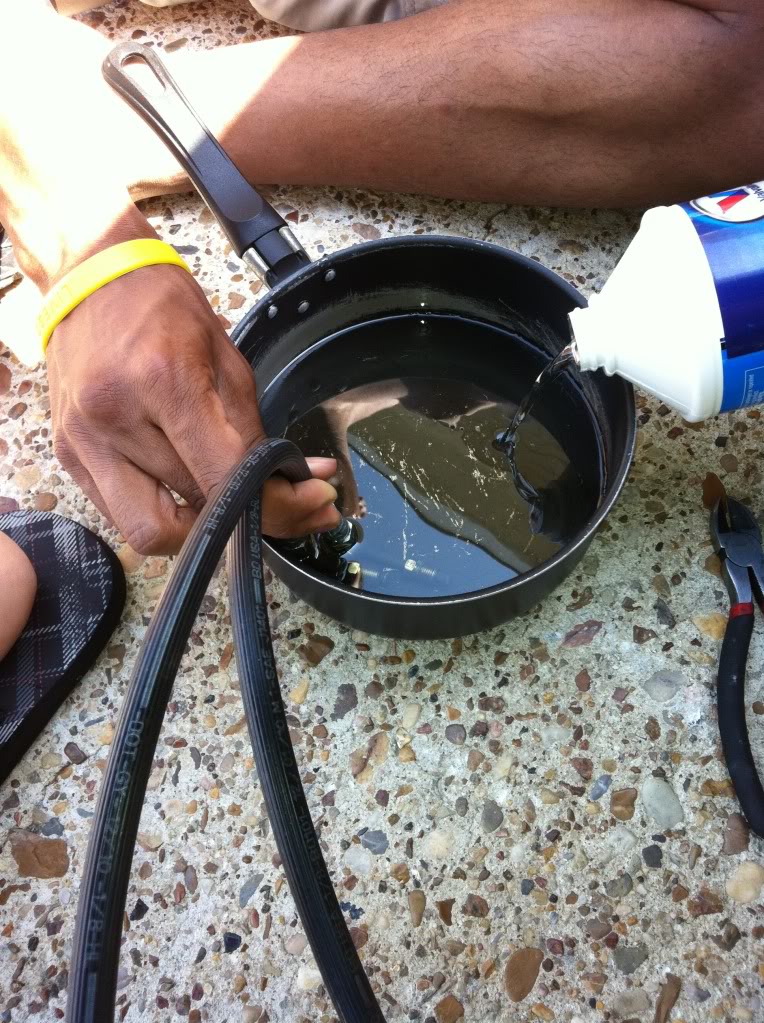
After installing the lines into your hydro it would be in your best interest to bench bleed the hydraulic cylinder. It saves a huge amount of time and effort. All I did was pour brake fluid into a crappy pot and actuate the hydro. Pretty simple process, just pump until you don't see any more bubbles. Make sure that the lines and pot are higher than the hydro cylinder so the air can actually escape, you also want to make sure that both lines stay submerged in brake fluid.
The next step was to actually install the lines and remove the factory hardline. Easy enough, just have to make sure you don't mix up the lines, again zipties came to the rescue lol. I just put a ziptie on the line going into the inlet side of the hydro that goes to the master cylinder to identify it after threading it through the car.
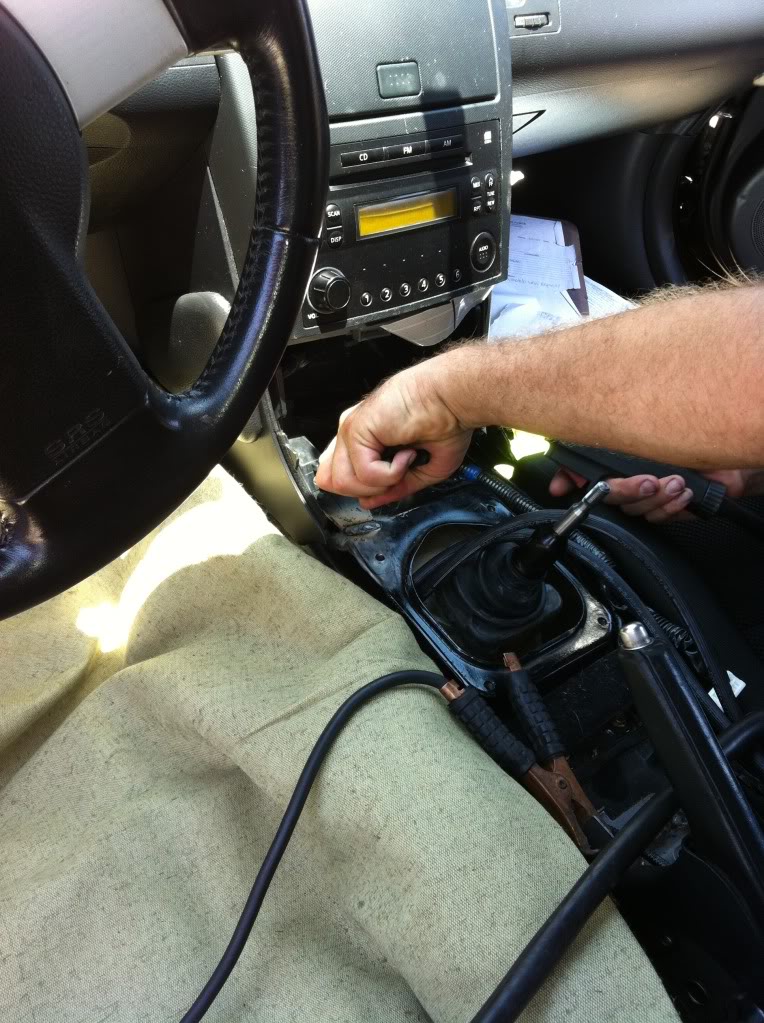
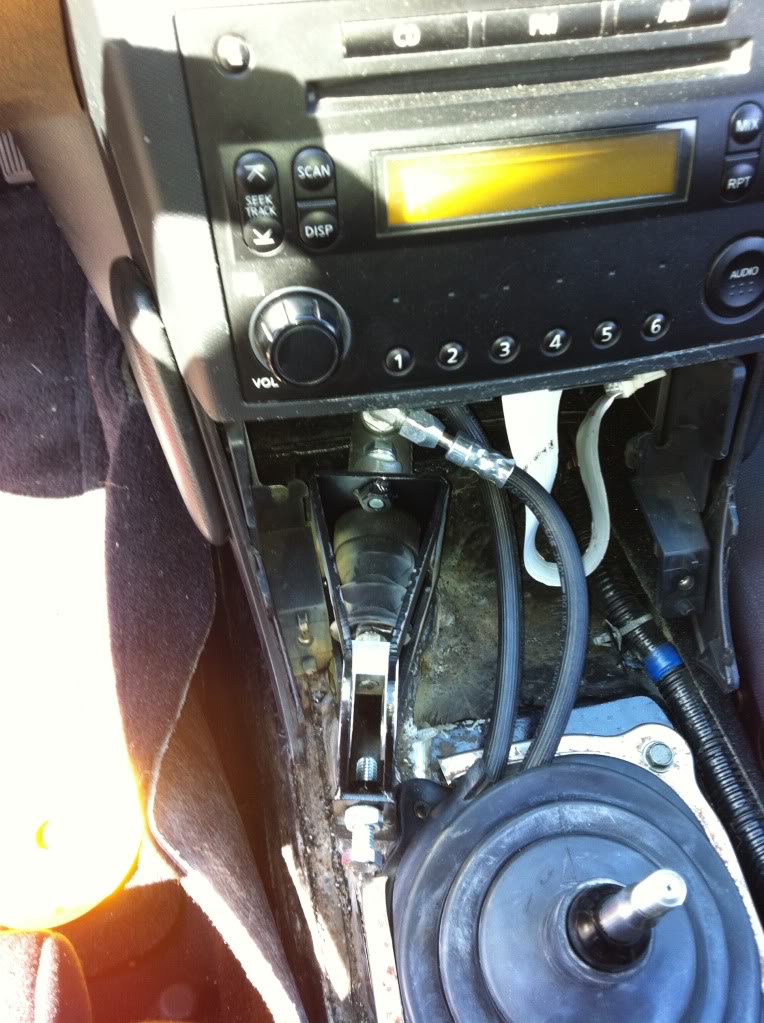
I decided not to drill anything and just use whatever factory holes were in the chassis. I also wanted to keep my stock parking brake for parking duties. So I decided to modify the shifter hole and route my lines through there.
Down through the tranny tunnel.
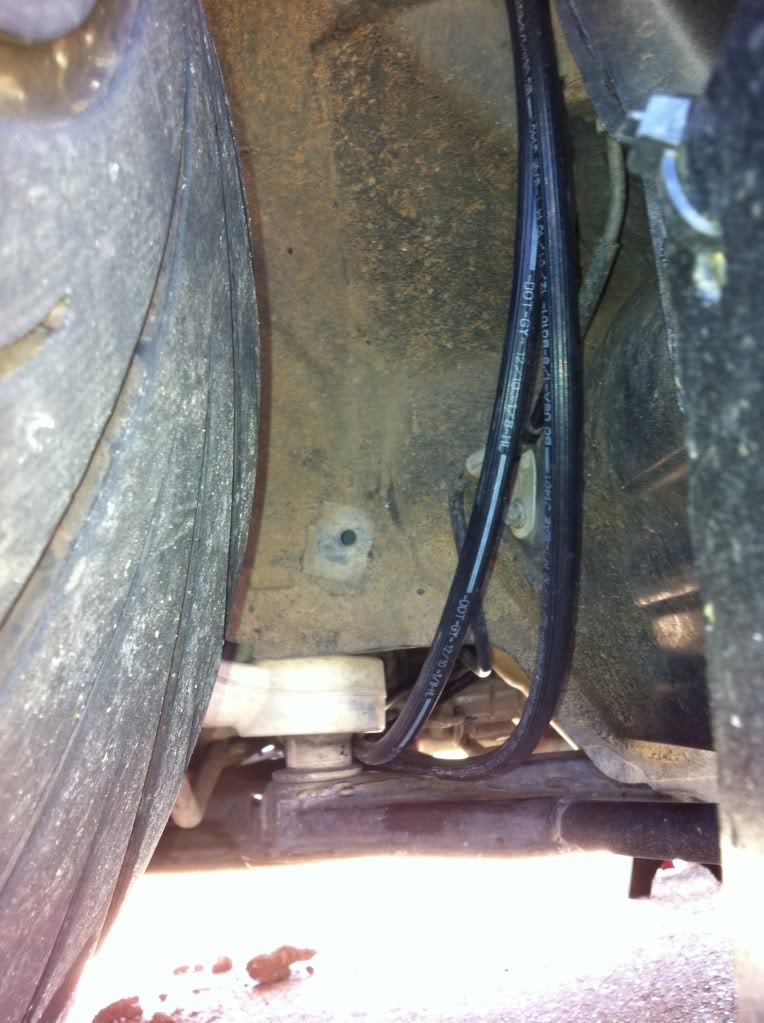
Past the transmission.
Over the front subframe.
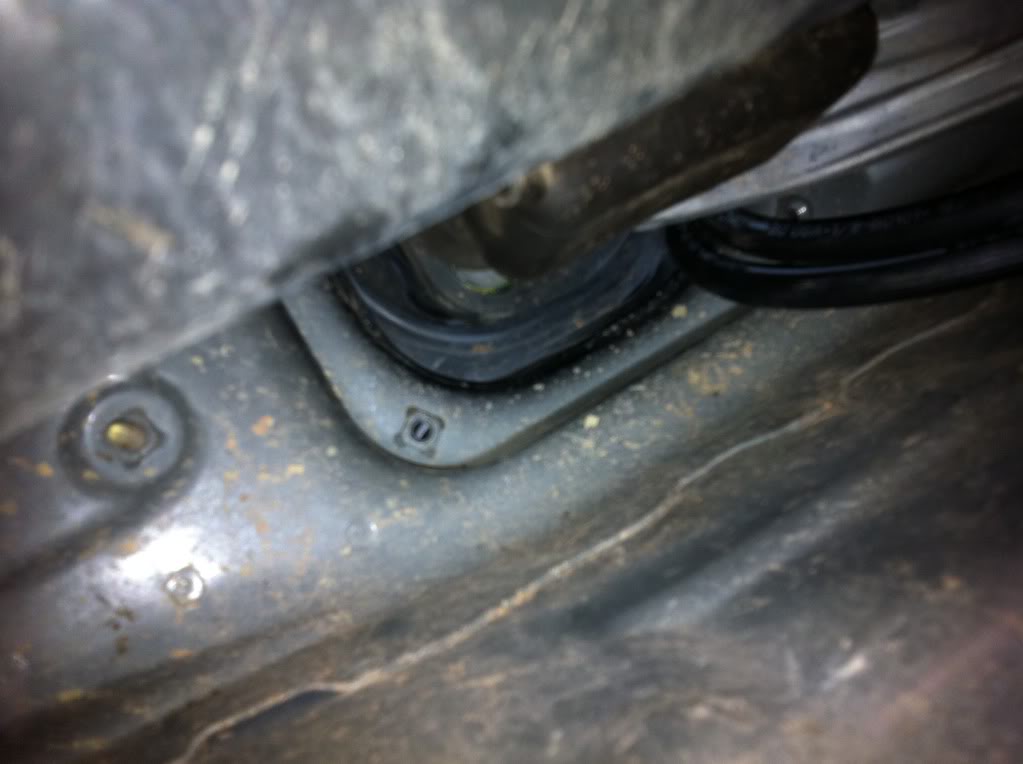
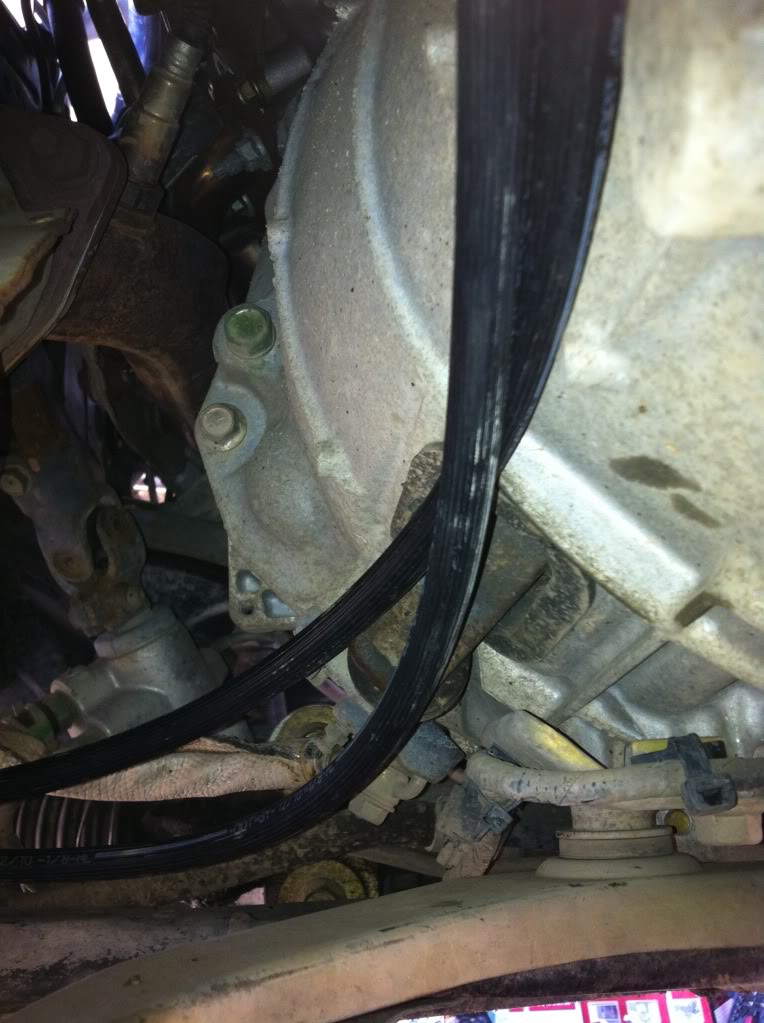
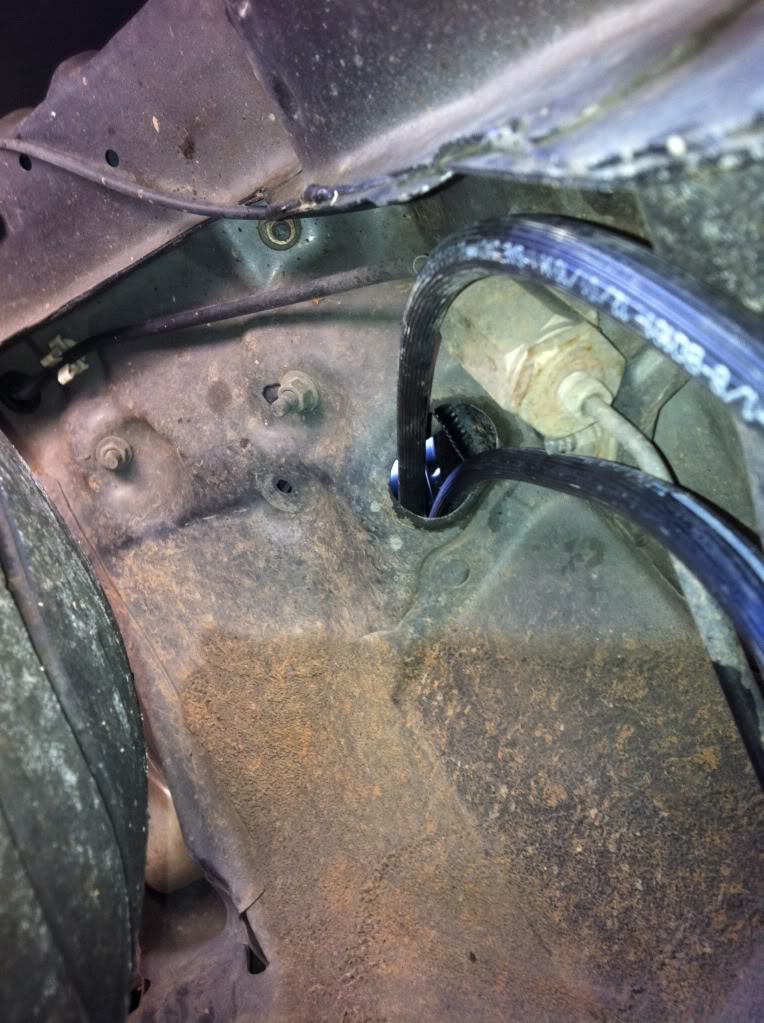
Up through a hole in the driver side fender well that goes into the brake sides secondary firewall.
Line that goes from the master to the hydro.
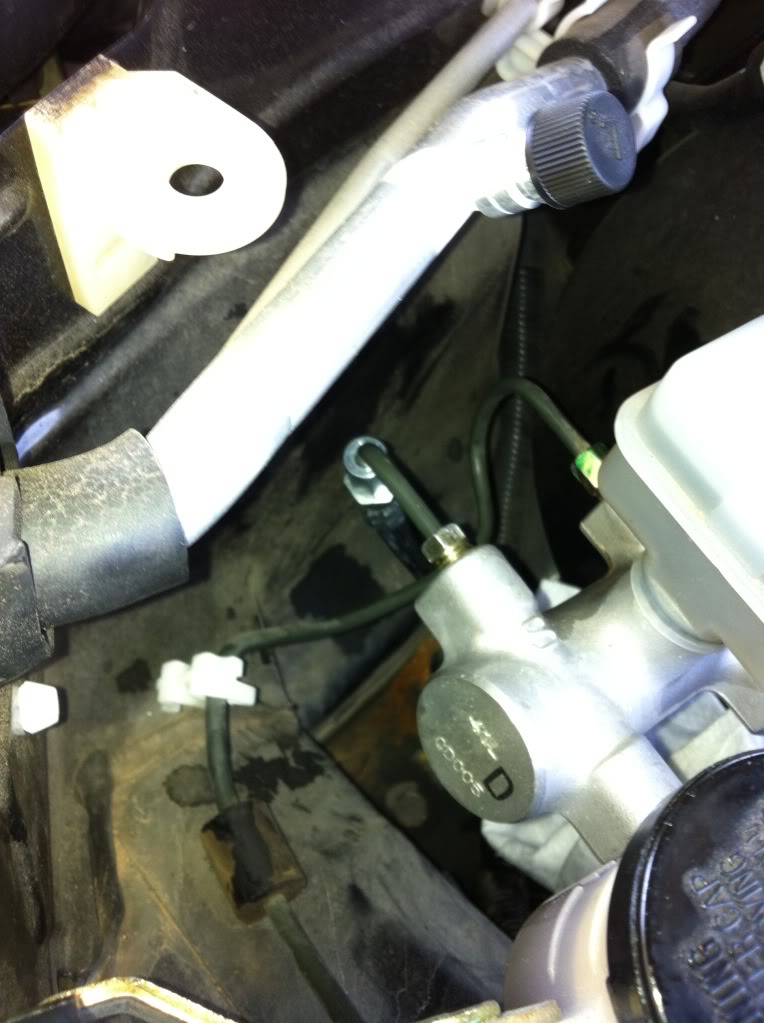
Line that goes from the hydro to the secondary port of the abs block.
(Both lines were secured away from moving parts and high heat areas with hose guides and angle iron and wrapped in chaffe wrap or rubber coolant hose near high vibration/tight clearance areas)
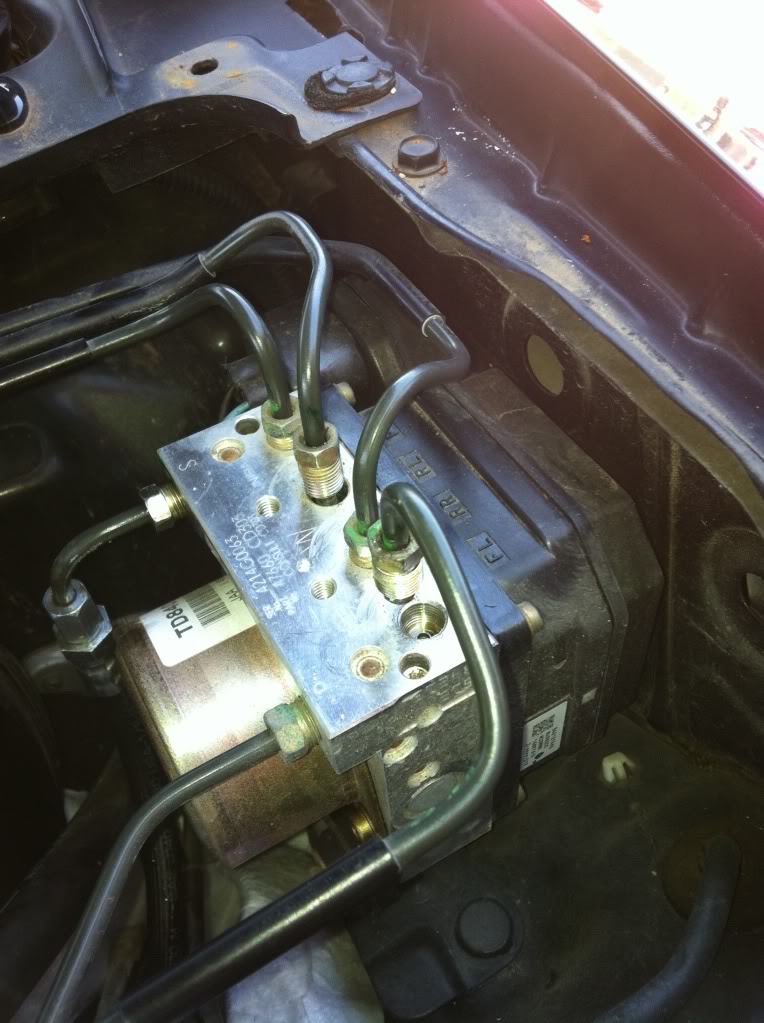
Next step is to swap the lines at the abs block. This step is the most complicated part and easiest to mess up but is actually annoyingly simple. On my base model all of the lines are marked on the abs block (FL, RR, RL, FR). The primary and secondary lines coming from the master cylinder to the abs block control these lines in an X pattern. Meaning the primary controls the FL and RR and the secondary controls the FR and RL brakes. In order to have the hydro ebrake lock the rear brakes you have to change this setup. So now you want to swap the hardlines at the abs block so that the secondary controls the two rear brakes and the primary controls the two front brakes. Of course in doing this you are also disabling your ABS (you need to unplug it or you will have some major problems).
(DO NOT!!! I REPEAT!! DO NOT SWAP THE LINES THAT ARE REMOVED IN THIS PICTURE!!! YOU WANT TO SWAP THE LINES THAT ARE STILL INSTALLED IN THIS PICTURE, THE RR AND FR!! YOU ARE WARNED.)
After this your brakes need to be bled of course, and of course you still need to follow the FSM. Make sure to check for leaks at all of the brake lines you removed and reinstalled including the ones in the hydraulic ebrake.
Before you actually install the hydro into the car it would be in your best interest to double check to make sure you got your lines correct. If you remember my caution from earlier, this is why. I'm not too big headed to admit that I made a mistake, I just so happened to get confused about swapping lines on the abs block. I swapped the lines so that the secondary controlled the front brakes instead of the rear. This means that when the hydro is pulled the front brakes lock, AKA catastrophe if done while trying to initiate. We checked this while the car was still in the air on a hunch and happened to catch this issue before it was too late. Spin the front wheels (one at a time, or two at a time if you have enough people to check both at the same time and another to pull the lever), if the lines were swapped improperly one (or both) the front wheels will abruptly stop spinning. Don't be overly cocky about your work and check this regardless of how much you know, it only takes a second.
After bleeding your brakes, checking for leaks, and precautionary checks of the hydro the next step is to actually install the hydro.
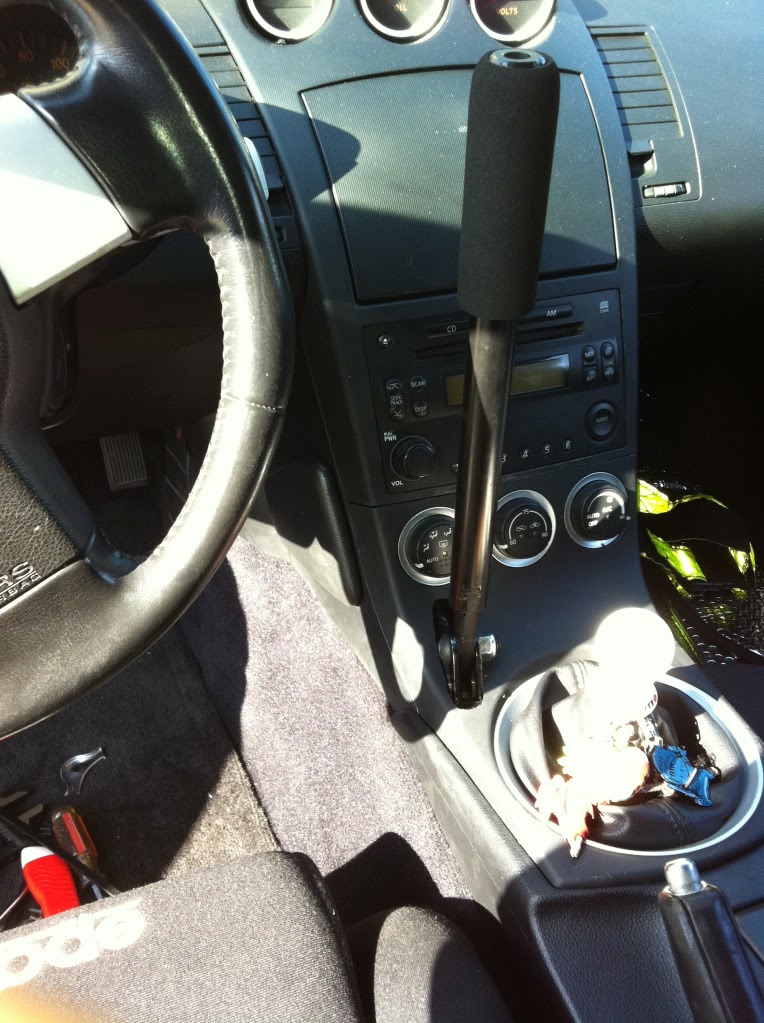
There are a lot of options about where you want this installed, all depends on your preference and what you want to compromise. This is the spot I chose to have my hydro installed.
Mock up how you want the hydro positioned, check clearance and all that jazz.
I decided to have mine welded in (they can also be bolted in, there are holes in the bottom of the hydro's frame for bolts, but the reinforcement plate that's provided, or of some kind, should be used for ridgidity and added strength), so I invited a friend with a welder over =).
The clearances in here are pretty crazy, we used a dremel and tin snips for most of it. Had to cut a slit in the shifter boot and snip a portion of the shifter boot frame out in order to clear the brake lines. There's a tad bit more noise from the undercarriage, but it's not even noticeable to anyone but me so I guess that's good. Not sure about how well it seals tire smoke, I'll provide that info after the event this weekend.
(the welds were cleaned up and the area was wiped down and painted so the final product under the panels looks much better than this lol)
See these references and read them thoroughly before attempting this:
https://my350z.com/forum/drift/39963...ing-the-z.html
https://my350z.com/forum/brakes-and-...rs-ebrake.html
https://my350z.com/forum/brakes-and-...e-install.html
http://www.gtfactory.jp/cms/page.php?4
Keep in mind that there are a few ways to install a hydraulic ebrake, this is simply the method I chose. This method is not necessarily the best, but I felt it was the best for me. The method you choose should only be done after thorough research done by yourself on the benefits and disadvantages of each setup.
CAUTION: This modification requires tampering with the factory brake lines and design. If you do not feel you are mechanically inclined enough to perform something like this, then don't. Take it to a reputable shop that can do it for you. Any incorrect step can result in dangerous results that can pontentially damage your car, or worse, put you in danger.
CAUTION: Make sure to adhere to the FSM's specifications for brake fluid and follow it's directions for bleeding your brakes.
CAUTION: This disables ABS
NOTE: These are not specific instructions on how to do this modification, I am simply showing how I went about it. How you go about this modification is solely up to you and you take all risk in attempting it.
So I finally got my Powered by Max SLC hydraulic ebrake in. The OEM parking brake on the Z33 is just that.... for parking. It won't lock the rear wheels at all while moving, it will only slow them down at best, even when pressing in the clutch and turning the steering wheel. I replaced the stock brake shoes with P.Mu "drift" brake shoes a couple of years ago but they only lasted for one event and then just reverted to something exactly like stock. Years later I want to improve my driving with more techniques but without an ebrake that can lock the rear wheels I felt extremly limited. That's where this thing comes in.
I started out with the hydro. It didn't come with any instructions or anything helpful for installation. But fortunately I had been pestering my friend Kim (Ktran), who also has a Z with a ksport hydro ebrake (now upgraded to a Wilwood cylinder), about information pertaining to installing this thing. After scouring forums and studying the FSM I had a pretty good idea on how to go about this.
The first step was to have two lines made. One line comes from the secondary port of the master cylinder to the inlet of the hydro cylinder (the port on the end), the other goes from the outlet of the hydro (the port closest to the frame) to the secondary port of the abs block. These two lines replace the factory hard line that goes from the secondary outlet of the master cylinder to the secondary port of the abs block, tying in the hydraulic ebrake to the braking system (hence the hydro being an "in-line" setup).
First you have to get an idea of how long you need the lines. I just used some string and zipties and threaded them from where I wanted to mount the hydro in the car to where the lines need to go in the engine bay. Then you have to get your lines made to length and have the right size fittings fitted to the lines. Luckily there is an amazing shop in town that specializes in things like this, I had both lines made in a few minutes (after a little begging and pleading that I needed the lines done in a day lol). I had them remove the stock fittings from the secondary hardline I removed to use for the lines going back to the master and abs block, they used all new fittings for the ports in the hydro cylinder. The lines were about $80, which isn't bad considering other people pay from $120-$160 for their lines.
After installing the lines into your hydro it would be in your best interest to bench bleed the hydraulic cylinder. It saves a huge amount of time and effort. All I did was pour brake fluid into a crappy pot and actuate the hydro. Pretty simple process, just pump until you don't see any more bubbles. Make sure that the lines and pot are higher than the hydro cylinder so the air can actually escape, you also want to make sure that both lines stay submerged in brake fluid.
The next step was to actually install the lines and remove the factory hardline. Easy enough, just have to make sure you don't mix up the lines, again zipties came to the rescue lol. I just put a ziptie on the line going into the inlet side of the hydro that goes to the master cylinder to identify it after threading it through the car.
I decided not to drill anything and just use whatever factory holes were in the chassis. I also wanted to keep my stock parking brake for parking duties. So I decided to modify the shifter hole and route my lines through there.
Down through the tranny tunnel.
Past the transmission.
Over the front subframe.
Up through a hole in the driver side fender well that goes into the brake sides secondary firewall.
Line that goes from the master to the hydro.
Line that goes from the hydro to the secondary port of the abs block.
(Both lines were secured away from moving parts and high heat areas with hose guides and angle iron and wrapped in chaffe wrap or rubber coolant hose near high vibration/tight clearance areas)
Next step is to swap the lines at the abs block. This step is the most complicated part and easiest to mess up but is actually annoyingly simple. On my base model all of the lines are marked on the abs block (FL, RR, RL, FR). The primary and secondary lines coming from the master cylinder to the abs block control these lines in an X pattern. Meaning the primary controls the FL and RR and the secondary controls the FR and RL brakes. In order to have the hydro ebrake lock the rear brakes you have to change this setup. So now you want to swap the hardlines at the abs block so that the secondary controls the two rear brakes and the primary controls the two front brakes. Of course in doing this you are also disabling your ABS (you need to unplug it or you will have some major problems).
(DO NOT!!! I REPEAT!! DO NOT SWAP THE LINES THAT ARE REMOVED IN THIS PICTURE!!! YOU WANT TO SWAP THE LINES THAT ARE STILL INSTALLED IN THIS PICTURE, THE RR AND FR!! YOU ARE WARNED.)
After this your brakes need to be bled of course, and of course you still need to follow the FSM. Make sure to check for leaks at all of the brake lines you removed and reinstalled including the ones in the hydraulic ebrake.
Before you actually install the hydro into the car it would be in your best interest to double check to make sure you got your lines correct. If you remember my caution from earlier, this is why. I'm not too big headed to admit that I made a mistake, I just so happened to get confused about swapping lines on the abs block. I swapped the lines so that the secondary controlled the front brakes instead of the rear. This means that when the hydro is pulled the front brakes lock, AKA catastrophe if done while trying to initiate. We checked this while the car was still in the air on a hunch and happened to catch this issue before it was too late. Spin the front wheels (one at a time, or two at a time if you have enough people to check both at the same time and another to pull the lever), if the lines were swapped improperly one (or both) the front wheels will abruptly stop spinning. Don't be overly cocky about your work and check this regardless of how much you know, it only takes a second.
After bleeding your brakes, checking for leaks, and precautionary checks of the hydro the next step is to actually install the hydro.
There are a lot of options about where you want this installed, all depends on your preference and what you want to compromise. This is the spot I chose to have my hydro installed.
Mock up how you want the hydro positioned, check clearance and all that jazz.
I decided to have mine welded in (they can also be bolted in, there are holes in the bottom of the hydro's frame for bolts, but the reinforcement plate that's provided, or of some kind, should be used for ridgidity and added strength), so I invited a friend with a welder over =).
The clearances in here are pretty crazy, we used a dremel and tin snips for most of it. Had to cut a slit in the shifter boot and snip a portion of the shifter boot frame out in order to clear the brake lines. There's a tad bit more noise from the undercarriage, but it's not even noticeable to anyone but me so I guess that's good. Not sure about how well it seals tire smoke, I'll provide that info after the event this weekend.
(the welds were cleaned up and the area was wiped down and painted so the final product under the panels looks much better than this lol)
Now for the finished product.........
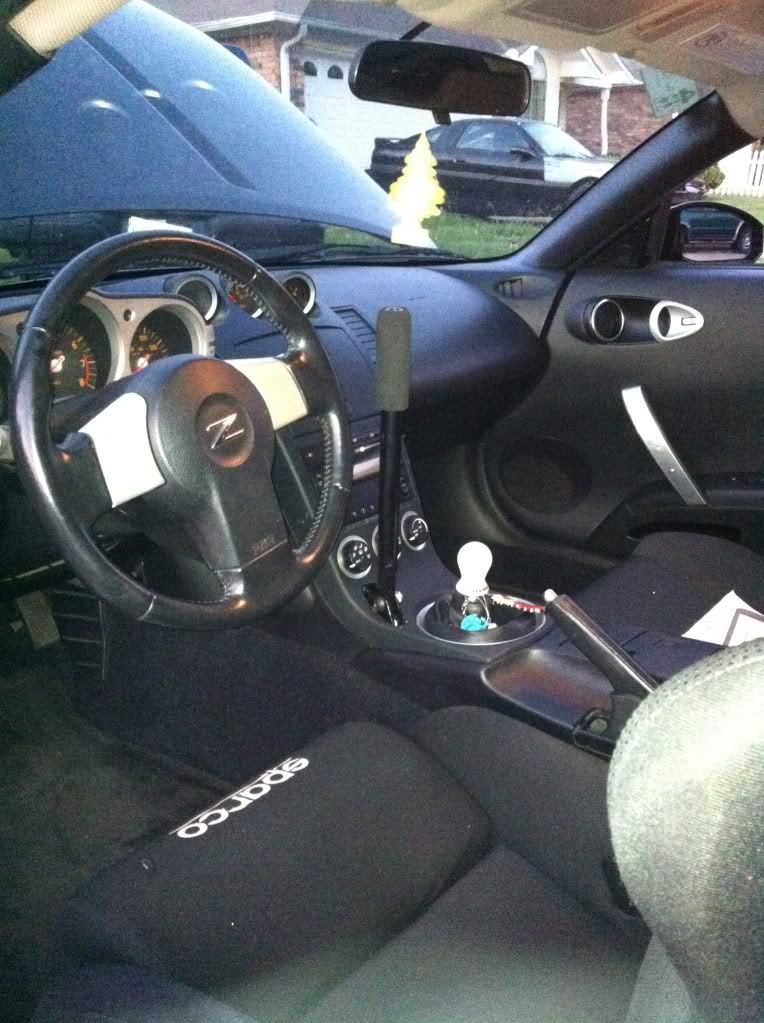
All in all it was definitely worth all of the work and it came out looking pretty clean imo. Took us a total of about 9hrs of work, it actually took about two days but that included running around getting supplies and such.
The rear end locks up so easily with this setup, nothing like the stock parking brake (going from using the brake shoes to using the pads), hardly takes any effort, and it will actually lock the wheels hard enough to make smoke (I know that's a trivial thing to people who have ebrakes that will lock the rear lol). I've been drifting my Z since I got it and have pretty much been without an ebrake for the entire time, now that I have one that works as well as this does it's taking me a little bit to get used to it. I recommend this to anyone who wants to drift and has a 350Z or any similar car that has an ebrake that can't really lock the rear by design (I hear Z32's have the same issue). The improved access is pretty nice as well, no adjusting in your seat needed to fully pull the brake or anything like a stock ebrake requires. Really nice if you have a bucket seat. Other than that I don't really see any reason for someone with a conventional ebrake that uses pads to do this mod, but a lot of s-chassis people do it anyway so I'm sure they all have their reasons.
Because this setup is in-line the foot pedal and hand brake do kind of work against eachother but it's nothing that you can't get used to. It's definitely not a reason to avoid this setup imo.
If you have any problems or are concerned or confused about anything please let me know and I'll help to the best of my ability. I hope this helps anyone looking into hydro ebrakes.
EDIT: CAUTION: There was a little bit of confusion about the routing of the lines (I guess people just looked at the pictures instead of thoroughly reading what I posted). The pictures I took of the path the lines took are just to show where they are going, they are not the final resting place of the lines. Leaving the lines in these places provides a chance for them to be pinched, cut, chaffed, or nicked. It also leaves them in close proximity to high heat areas. I used hose guides mated to angle iron to keep the lines high up in the tranny tunnel and away from the ground (my car is low enough as it is), I also used chaffe wrap in places where the lines are in close proximity to eachother and/or touching the chassis.
Where the lines go through the shifter hole is where there is the least amount of clearance. The lines are wedged between the upper part of the transmission and the shifter hole, if there is nothing protecting the lines they will have a very short life, even if not driving the car hard. To alleviate this problem use heater hose or coolant hose, anything that is tough and can be wrapped around the lines to keep them from getting cut by the chassis.
I also recommend getting your lines made out of steel braided or steel hardlines (like stock). The shop I went to did not have steel braided line in stock and I was short on time so couldn't take the measurements or bend the hardlines myself.
This is optional but recommended, but I will be buying heat shield padding to wrap my lines in for where they come closest to my exhaust. There are OEM lines that come closer to it than the lines I ran for my hydro, but you can never be too cautious.
Last edited by o.g.darkdrifter; May 30, 2011 at 12:07 PM.

Derrick Rogers (reputable race car builder who has done several FD/D1 USA cars) read through my write up and left his input on rubber brake lines.
"On the rubber brake hose. . . *Statistically, properly crimped rubber lines are much more durable than braided stainless and have much, much lower failure rates. *It's no coincidence that nearly every production car on the planet uses rubber for brake lines, and it has little to do with cost. *The reason why one may want braided lines in their performance car is strictly to reduce deflection and produce a firmer pedal.
Braided line may look tougher than rubber, but the reality is braided stainless line is more easily damaged to the point of failure. *The braiding supports the teflon lining underneath and it is not properly an "armor" of any kind. If the braiding is damaged in any way, the structure of the braid is compromised and the lining is left unsupported and can rupture. *By contrast, the outer lining of rubber hose is a thick rubber armor that protects a woven fiber braiding, which supports the inner channel.
In short - nothing wrong with rubber brake hose, but the ebrake may not be as firm as it could be with hard lines the whole way or stainless braided..."
wish i saw this before i changed my route to CNC staging brakes lol. I like CNC only because of their awesome ebrake handle.
Its been a couple of days since i installed it. I can't lock up the rear for some reason.
Maybe it locks up but i can't feel it or hear it? doesn't seem to work going 40mph straight.
Maybe i have to bleed more? it feels firm though..
nothing goes right
Its been a couple of days since i installed it. I can't lock up the rear for some reason.
Maybe it locks up but i can't feel it or hear it? doesn't seem to work going 40mph straight.
Maybe i have to bleed more? it feels firm though..
nothing goes right
How did you plumb the lines? Did you route the lines to the abs block or did you route them to the fitting(s) in the passenger side wheel well? It should definitely be very noticeable if the rear is locking up. I can lock my rear going 15 mph in a straight line without pressing the clutch.
What kind of pads do you have? From what I understand OEM or "street" pads work best since they are designed to perform better while "cold" in comparison to racing/high performance pads.
Also you can try to bleed your brakes again and see if it helps. Your problem seems kind of uncommon but I have read of people having similar problems on Zilvia, so if you search on there you might be able to find some solutions.
I routed mine behind the wheel well, following Nackers DIY.
I have stock non brembo with StopTech street performance pads. it wouldn't lock in cold or warm.
I've been searching around for a solution, yet to find any
I have stock non brembo with StopTech street performance pads. it wouldn't lock in cold or warm.
I've been searching around for a solution, yet to find any
Trending Topics
Ran my setup through it's paces this weekend. Drifting in Houston (GGP) in 100-110 farenheit heat (concrete didn't help keep things cool). Used the ebrake to scrub speed, extend, and initiate and it did all with ease. All of the fittings held up, no leaks at all, the lines did just as well, held strong even with the extreme heat. I'm extremely happy with it.

^ good to hear. Few questions for ya.
- What would you guess the total cost of this is?
- I'm just starting to get into drifting and was able to lock up my rears with my e-brake on my 08. Would you still recommend this mod? I wasnt really going that fast so that might be why i was able to lock them up
- Any disadvantage with the this setup?
- To use the hydro brake ,do you pull down on the lever or push it up?
-Some Z's have the ability to lock the rear but usually, just barely. Eventually your cables will get stretched (they seem to be a lot weaker than other car's cables) and snap or you'll get to the point where you can't even use the adjustment screw enough to get the brakes to keep the car parked. It's all up to your discretion but I recommend this if you want to have more options while drifting.
-No disadvantage at all other than being inexperienced with traditional ebrakes. The technique is the same, but it might just take some getting used to. Having a hydro almost makes doing ebrake initiations too easy.
-With my setup I pull the handle towards me, but I've seen all kinds of different setups. It can be push, pull, mounted like the factory hand brake, mounted on the passenger side, etc
Royal_T- Thanks homie. Your setup was an inspiration
akbayati- Funny thing is I'm actually originally from the bay area. I don't think I'd want to do the setup again though. I could supervise though
 lol
lol
I made sure that it sits straight before he stitch welded
I guess because I didn't tightened down the base bolt completely before everything was welded, it kinda threw off the position when the bolt was tightened
I guess because I didn't tightened down the base bolt completely before everything was welded, it kinda threw off the position when the bolt was tightened

Registered User
Joined: Sep 2010
Posts: 99
Likes: 1
From: puyallup
I'm in the process of this right now and have a ? For anyone who can help I have a touring so my block is different (abs) than the one pictured two of my lines come out the side and two on the top with that said there isn't enough room to switch the lines around I know I could extend the factory lines and make it work but my question is.....
If I take the secondary side plumb it into the handle and back to a tee with the two rear lines hooked up and take the primary and run it to a separate tee aswell but have the fronts hooked up to it effectivelyeliminating the factory abs box will this cause me any other issues? Thanks
If I take the secondary side plumb it into the handle and back to a tee with the two rear lines hooked up and take the primary and run it to a separate tee aswell but have the fronts hooked up to it effectivelyeliminating the factory abs box will this cause me any other issues? Thanks