My SIKKY LS2 install thread
 07-30-2011, 11:47 AM
#121

I may try and give Chasebays a call on Monday about the wiring. Thanks Vas.
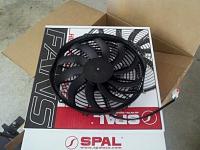
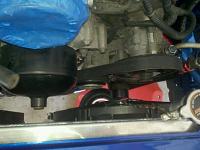
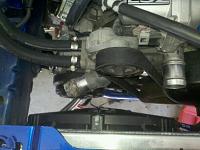
Got the fans mounted up today. No real issues there. The 12" Spal's fit great, I even had room to go bigger, but figured better safe than sorry. Also, I would recommend mounting the fans prior to getting the assembly in the car, it would be eiaier that way for sure.
Sorry about the smaller pics, my wife has the camera at the beach this weekend.
The only issue I see is that I may need to invest in the Fan Relay Harness from Jegs because the harness has 4 wires and the fan only has 2


 07-30-2011, 11:52 AM
#122
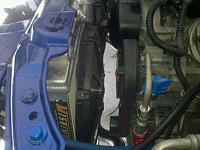
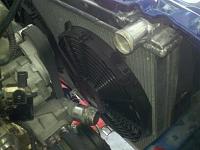
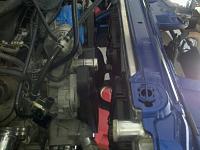
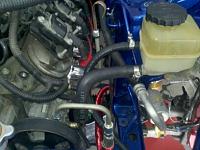
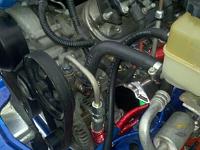
Couple more of the fans. As you can see, there is plenty of room still:
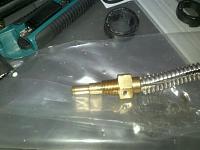
This is the NAPA hose number that I got to connect the botton of the PS reseroir to the PS pump. I had to trim it a bit, but it fits great.
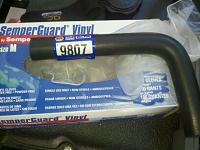
PS reservoir is all finished!!


This is the NAPA hose number that I got to connect the botton of the PS reseroir to the PS pump. I had to trim it a bit, but it fits great.

PS reservoir is all finished!!

 07-30-2011, 12:02 PM
#123
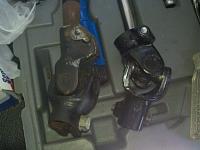
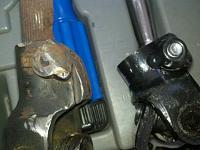
Tomorrow afternoon or Monday I will tackly replacing the PS knuckle. I have to get my grinding wheel from one of my stores so I can grind the knuckle and bolt in half and free the top section of shaft. It was rounded off to make clearance for the APS kit because it was rubbing the turbo housing 
I also got the base for the oil filter relocation head mounted. It was a bit of a project, but the mount is soild and it will fit the lines well and keep the filter in a good spot. I just have 2 issues with the setup now.
First, I have to find a large domestic style filter that has the same thread pattern as the stock VQ filter does. This is proving to be harder than expected. Or I can have a custom piece made the screws into the head and then has the 13/16ths threads on the other side to mount the large stock LS filter.
Second, I have ports on this head to mount oil pressure and oil temp. The pressure is fine, but the temp fitting (Defi) bottoms out on the fitting after 3 turns in the head. Does anyone know if I can grind down the Defi temp sensor a bit to get a deeper fit?


 07-30-2011, 10:56 PM
#124

They are making my custom harness for me and then I am going to run a SpeedWire switch panel to run with it.. should be sick and clean..
07-31-2011, 02:19 PM
#125
New Member
iTrader: (8)

Join Date: Jan 2007
Location: terre haute, IN; STL, MO
Posts: 6,457
Likes: 0
Received 7 Likes
on
6 Posts
cass, don't grind the temp sensor down. Get a 1/8" to 1/8" straight fitting (assuming that's the thread size on the temp sensor) and put that on the outside of the housing to extend the temp sensor from the unit.
08-01-2011, 08:39 AM
#126
Thanks Jeff. I got the same advice from my local speed shop this morning. I am going to see if the sensor threads into the oil pan plug as well. Since its a side drain there is no issue with it getting caught on anything, just have to see if the baffle is in the way or not.
08-01-2011, 02:46 PM
#128
I took out the drain plug and it is not the same size
I will try and find a fitting tomorrow that solves this issue or I'm off to the machine shop I worked at in college to have something made.
I also called Chase Bays today and left a message, no return call
I will try and find a fitting tomorrow that solves this issue or I'm off to the machine shop I worked at in college to have something made.
I also called Chase Bays today and left a message, no return call
08-04-2011, 11:13 AM
#129
Finally got around to solving the oil and fuel line plumbing problems today. i went to Fastenal and got a fitting to thread into the SIKKY oil pan drain and then threads the Defi Oil Temp sensor into that.
Went to NAPA and got filter #1347 which is the largest oil filter with an M20 x 1.5mm thread they could find. It is the same diameter as the VQ filter, just much longer and is similar in size to the stock LS filter.
Finally, went to American Speed Center and they have a connection that replaces the stock LS2 fuel line connection and joins to a -6AN fitting that will connect to my main fuel line.
I also purchased the stock GTO lower radiator hose. It connects to the 1-1/2" lower fitting on the LS and tapers to a 1-3/8" fitting at the bottom, but it faces the wrong direction at the bottom This would be a perfect fit if you moved the lower radiator inlet to the passenger side like bbs has done. I will have to cut, rotate and join the hose, but its tricky because of the taper.
Pics of everything by mid next week I hope.
Went to NAPA and got filter #1347 which is the largest oil filter with an M20 x 1.5mm thread they could find. It is the same diameter as the VQ filter, just much longer and is similar in size to the stock LS filter.
Finally, went to American Speed Center and they have a connection that replaces the stock LS2 fuel line connection and joins to a -6AN fitting that will connect to my main fuel line.
I also purchased the stock GTO lower radiator hose. It connects to the 1-1/2" lower fitting on the LS and tapers to a 1-3/8" fitting at the bottom, but it faces the wrong direction at the bottom
This would be a perfect fit if you moved the lower radiator inlet to the passenger side like bbs has done. I will have to cut, rotate and join the hose, but its tricky because of the taper.Pics of everything by mid next week I hope.

 08-10-2011, 02:10 PM
#133
I have both harnesses fully removed from the car now... what a PITA!! I may update post one to read "DO THE WIRING HARNESS FIRST!!"
If you have any aftermarket things, like gauges or an EDFC, boost control and such, you will have to disconnect everything to get the wires out of the rubber grommet before you can remove the VQ harness. Also, you should do the LS harness with the engine out of the car. I had to pull the starter to get the connection behind it and the loom was zip tied to the top of the trans housing. I look like I got in a fight with a cat and the car is a complete mess inside. LABEL EVERYTHING AS YOU REMOVE THE CONNECTIONS!!
Todays dose of fail came courtesy of the steering rod. Mine came off at the plastic piece that connects the two rods when I was pulling the VQ. I bought a new knuckle as I mentioned before and now the rod won't slide all the way back in to where its supposed to mount. The car fights me at every turn
I will try to massage it in place tomorrow with a BFH (big f'in hammer) and see if it seats properly. If not, Frank Hill gave me a primer on how to remove the steering column from inside the car, that is the next option. It feels like zero steps forward and two steps back the past few days.I'm trying hard not to get discouraged
08-10-2011, 04:49 PM
#134
Registered User
iTrader: (5)

Join Date: Oct 2004
Location: On dicks
Posts: 1,914
Likes: 0
Received 0 Likes
on
0 Posts
Looks like it is coming along great cass! Thanks for taking the time to post all of this info!
The steering knuckle will go on it just takes some finagling. I had trouble getting mine on a couple of times. Sometimes all it takes is taking the knuckle completely off the input shaft to the steering rack and starting over to take the bind out of the knuckle joint. Don't work backwards ( ie taking the steering column off) if u don't have to
The steering knuckle will go on it just takes some finagling. I had trouble getting mine on a couple of times. Sometimes all it takes is taking the knuckle completely off the input shaft to the steering rack and starting over to take the bind out of the knuckle joint. Don't work backwards ( ie taking the steering column off) if u don't have to
I have both harnesses fully removed from the car now... what a PITA!! I may update post one to read "DO THE WIRING HARNESS FIRST!!"
If you have any aftermarket things, like gauges or an EDFC, boost control and such, you will have to disconnect everything to get the wires out of the rubber grommet before you can remove the VQ harness. Also, you should do the LS harness with the engine out of the car. I had to pull the starter to get the connection behind it and the loom was zip tied to the top of the trans housing. I look like I got in a fight with a cat and the car is a complete mess inside. LABEL EVERYTHING AS YOU REMOVE THE CONNECTIONS!!
Todays dose of fail came courtesy of the steering rod. Mine came off at the plastic piece that connects the two rods when I was pulling the VQ. I bought a new knuckle as I mentioned before and now the rod won't slide all the way back in to where its supposed to mount. The car fights me at every turn
I will try to massage it in place tomorrow with a BFH (big f'in hammer) and see if it seats properly. If not, Frank Hill gave me a primer on how to remove the steering column from inside the car, that is the next option. It feels like zero steps forward and two steps back the past few days.I'm trying hard not to get discouraged
If you have any aftermarket things, like gauges or an EDFC, boost control and such, you will have to disconnect everything to get the wires out of the rubber grommet before you can remove the VQ harness. Also, you should do the LS harness with the engine out of the car. I had to pull the starter to get the connection behind it and the loom was zip tied to the top of the trans housing. I look like I got in a fight with a cat and the car is a complete mess inside. LABEL EVERYTHING AS YOU REMOVE THE CONNECTIONS!!
Todays dose of fail came courtesy of the steering rod. Mine came off at the plastic piece that connects the two rods when I was pulling the VQ. I bought a new knuckle as I mentioned before and now the rod won't slide all the way back in to where its supposed to mount. The car fights me at every turn
I will try to massage it in place tomorrow with a BFH (big f'in hammer) and see if it seats properly. If not, Frank Hill gave me a primer on how to remove the steering column from inside the car, that is the next option. It feels like zero steps forward and two steps back the past few days.I'm trying hard not to get discouraged
Last edited by chris'smax; 08-10-2011 at 04:51 PM.
08-10-2011, 05:20 PM
#135
Thanks chris, but its not the knuckle that is the issue. I can get the knuckle on, but the top part of the shaft bottoms out in the knuckle and binds because the shaft is not going in completely (thats what she said ") ). I will attempt a fix tomorrow and post up some pics to go with the past few posts.
). I will attempt a fix tomorrow and post up some pics to go with the past few posts.
). I will attempt a fix tomorrow and post up some pics to go with the past few posts.
08-11-2011, 04:36 AM
#136
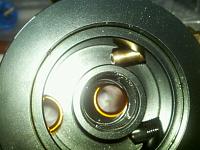
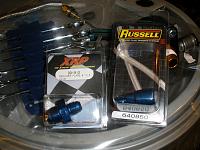
DO NOT PUT TEFLON TAPE ON THE BOTTOM OF THE RELOCATOR HEAD FITTINGS AS YOU SEE IN THE FIRST PICTURE... PUT THIS CONNECTION TOGETHER DRY.
Just some follow up pics to what I have been working on.
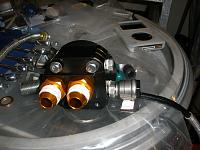
The oil filter relocator head with the Defi pressure gauge attached and fittings plumbed.
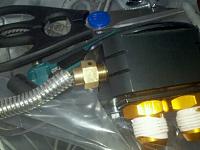
I got these for the fuel line connection. Its a -8AN to -6AN fitting to come off the main line, then using one of my exsisting -6AN rail hoses to the quick disconnect on the LS with a -6AN fitting on the other end. I need to go out and get the 3/8" quick release tool to get the stock fitting off though.. I have every other size but the one I need.
Just some follow up pics to what I have been working on.
The oil filter relocator head with the Defi pressure gauge attached and fittings plumbed.

I got these for the fuel line connection. Its a -8AN to -6AN fitting to come off the main line, then using one of my exsisting -6AN rail hoses to the quick disconnect on the LS with a -6AN fitting on the other end. I need to go out and get the 3/8" quick release tool to get the stock fitting off though.. I have every other size but the one I need.

Last edited by Cass007; 08-31-2011 at 04:55 AM.
08-11-2011, 04:45 AM
#137
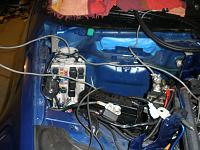
Battery compartment after removing the VQ harness... there were at least 8 aftermarket wires that I had to remove from the grommet to release the harness. It took a couple hours
VQ harness removed and all connections labeled:
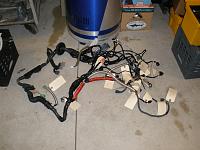
LS harness removed and all connections labeled:
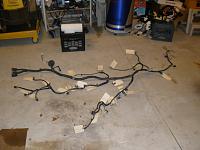
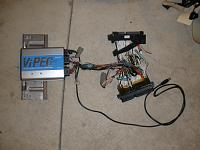
ViPEC and patch harness removed:
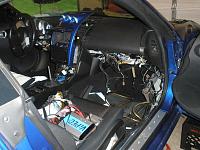
The carnage that is left inside the car
Ordering the battery relocation kit today and shipping out the harnesses. Then back to work on the steering rod and maybe mounting the oil filter today.

VQ harness removed and all connections labeled:

LS harness removed and all connections labeled:

ViPEC and patch harness removed:

The carnage that is left inside the car

Ordering the battery relocation kit today and shipping out the harnesses. Then back to work on the steering rod and maybe mounting the oil filter today.
 08-11-2011, 07:29 AM
#139
New Member
iTrader: (8)
Join Date: Jan 2007
Location: terre haute, IN; STL, MO
Posts: 6,457
Likes: 0
Received 7 Likes
on
6 Posts
That's the one i was telling you about chris! It's the filter that comes standard on a vq45 engine (fx45 is what i usually look up in the parts catalouge) I use it on my g35 for extra filter media.
08-11-2011, 02:44 PM
#140
Started out today by trying to finish the steering rod mess. After 30 mins of trying it was apparent that I would have to do the nasty and remove the rod from inside the car behind the pedals.
Thanks to directions from Frank Hill, I got the rod assembly off and out of the car with no issues. A hammer and a block of wood later and the two rods were fully seated... just like new.
Then I had to reinstall the rod in the car. This is where it all started to go down hill. The top of the rod had flared just slightly from me hitting it with the hammer. Several minutes of sanding later and I had smoothed it out enough to slide back into place. Let me be very clear here. This was not a fun job. Working in the footwell behind the pedals is the most awkward thing to do IMO. Trying to hold the knuckle with one hand and the rod assembly with the other while sliding the retainer nut through the plastic clamp
Next up was the oil filter relocation head. Easy enough, except the lines kept not wanting to rotate freely and not bind or pinch shut as they were tightened down. I need to get a special set of wrenches for the -AN fittings. Getting a 1-1/16" wrench into such a tight spot is a fail. I'm sure the fitting will leak somewhere, but I will have to have Hill's or the tuner tighten it up for me.
Next I tried to remove the stock oil pressure sensor... I don't have a large enough socket If one of you guys knows the correct size, please let me know. Half the stuff is metric and the other half is standard, so it could be anything.
Continuing the theme of working upside down, I moved on to the front brace. How hard could that be? Like everything else... DRAMA. The passenger side header hit the brace just enough to keep the bolts from lining up correctly. Had to take it back off and bust out the 7" sanding wheel with some awesome 24 grit paper. It made quick work of some of the extra material on the brace and gave me 1/16" or two between the header and the brace. After that, it went on like butta.
Finally, I needed something to make the car look closer to completion and that I knew would go smoothly on the first shot, so I put the headlights back on and rewired in all my headlight mods. This simple thing made me fee soooo much better about the day.
Pics coming tomorrow, the wife stole the camera again today.
Thanks to directions from Frank Hill, I got the rod assembly off and out of the car with no issues. A hammer and a block of wood later and the two rods were fully seated... just like new.
Then I had to reinstall the rod in the car. This is where it all started to go down hill. The top of the rod had flared just slightly from me hitting it with the hammer. Several minutes of sanding later and I had smoothed it out enough to slide back into place. Let me be very clear here. This was not a fun job. Working in the footwell behind the pedals is the most awkward thing to do IMO. Trying to hold the knuckle with one hand and the rod assembly with the other while sliding the retainer nut through the plastic clamp
Next up was the oil filter relocation head. Easy enough, except the lines kept not wanting to rotate freely and not bind or pinch shut as they were tightened down. I need to get a special set of wrenches for the -AN fittings. Getting a 1-1/16" wrench into such a tight spot is a fail. I'm sure the fitting will leak somewhere, but I will have to have Hill's or the tuner tighten it up for me.
Next I tried to remove the stock oil pressure sensor... I don't have a large enough socket
If one of you guys knows the correct size, please let me know. Half the stuff is metric and the other half is standard, so it could be anything.Continuing the theme of working upside down, I moved on to the front brace. How hard could that be? Like everything else... DRAMA. The passenger side header hit the brace just enough to keep the bolts from lining up correctly. Had to take it back off and bust out the 7" sanding wheel with some awesome 24 grit paper. It made quick work of some of the extra material on the brace and gave me 1/16" or two between the header and the brace. After that, it went on like butta.
Finally, I needed something to make the car look closer to completion and that I knew would go smoothly on the first shot, so I put the headlights back on and rewired in all my headlight mods. This simple thing made me fee soooo much better about the day.
Pics coming tomorrow, the wife stole the camera again today.