My SIKKY LS2 install thread
 08-14-2011, 10:33 AM
#161

Confirmed by Franz that the bolts for the starter are the grounding mechanism for the unit and oly the AC condensor has the ground wire. Wiring sucks!!
What did everyone do for the power brake booster? I am considering just drilling yet another hole in the brake compartment and running a male to male barb fitting and hose from the Nissan brake unit to the main vacuum on the rear of the engine. I know this needs to be done, but it always seems that I procrastinate about these things when it comes to drilling holes and such.
BTW, I got the Defi oil temp sensor mounted where the stock LS sensor was. No apparent issues other than having to bu a set of uber large standard deep well sockets (it takes a 1-1/16" socket).

 08-15-2011, 08:19 AM
#165
The gauges and such are pulled off the same wire that gives the radio power in the acc position. If you have an aftermarket head unit just go online and look at the wiring diagram to get the right wire and follow it back to the harness. Dimming for the gauges works in reverse, so you tap the parking light positive and when you turn the lights on, it dims the gauges. I have 5 Defis hooked up, so I had to increase the fuse to 20amp I believe.
The walbros are wired for power to the battery, but the pump switch is controlled by the factory Nissan unit, I had Frank Hill install the SP pump assembly so I can't say exactly how is wired. I do know that when I turn the key one position I can hear the pumps prime and build pressure. The fuse is in the box near the battery, top right fuse I believe (15amp), not sure if that helps at all.
I also have a few switched outputs on the ViPEC as well.
 08-15-2011, 07:21 PM
#168
Tomorrow or Wednesday. my brother-in-law that works for me is on vacation, so I actually have to work a few days this week. Do you just need the wiring at the top? That triple is a b1tch to install, so I'm not trying to pull it out or anything.
08-17-2011, 02:21 PM
#170
Just a heads up... my boy Franz solved the tach issue 
Using a sppedhut tach stepper motor integrated into our cluster setup and controlled by the stand alone. Factory appearing tach setup!!! The speedhut gauge will only allow travel to 7750rpms, so I will have to just spin the LS to less than that (I know I will, just having some fun). Custom harness is on its way in the next two weeks
Using a sppedhut tach stepper motor integrated into our cluster setup and controlled by the stand alone. Factory appearing tach setup!!! The speedhut gauge will only allow travel to 7750rpms, so I will have to just spin the LS to less than that (I know I will, just having some fun). Custom harness is on its way in the next two weeks
 08-17-2011, 08:21 PM
#173
Registered User

Just run your 350Z Starter wire, Yellow and black to the Gm starter. I ran 3 Ground wires to the engine block so I didn't need to ground my starter. Also I did the exact same setup for my rad and fans to the T and ran into problems. I kept and still get my engine to around 230 and I'm using bigger fans now. Havent solved the issue but trying everything. If you do leave the 12" fans on there you will have to have a fan shroud. Don't forget to plumb the steam line. Good Luck.
08-18-2011, 02:26 AM
#175
He is working on my harness right now and is also putting together a solution for the AC switch so the factory push **** will still control the on/off function.
 08-18-2011, 02:32 AM
#177
Just run your 350Z Starter wire, Yellow and black to the Gm starter. I ran 3 Ground wires to the engine block so I didn't need to ground my starter. Also I did the exact same setup for my rad and fans to the T and ran into problems. I kept and still get my engine to around 230 and I'm using bigger fans now. Havent solved the issue but trying everything. If you do leave the 12" fans on there you will have to have a fan shroud. Don't forget to plumb the steam line. Good Luck.
Secondly, I had a friends Corvette over the weekend with the LS2 in it and it was showing normal operating temp to be in the 220*F range. Isn't that normal? Are we applying the VQ temp standard to the LS?
cass would that speedhut tach stepper motor work with an ls ecu as opposed to a standalone?
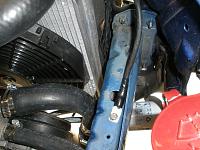
 08-21-2011, 04:58 AM
#180
Finished the negative side of the charging system the other day. Took the negative side of the LS sub harness and separated it from the starter wire and positive side. Then I cut the battery terminal head off, attached the other side to the AC compressor (stock location) with the wire oriented towards the front of the car. Ran the wire up along side the radiator, put a fresh connector on the end, then attached it to the stock Nissan ground point on the pass side frame rail.