
I'm Making a Sparco Harness Bar DIY. Anyone Have Installation Tips?

Thread Starter
Administrator
iTrader: (25)
Joined: Jun 2005
Posts: 58,609
Likes: 2,747
From: Down Under & Dirty
I reviewed Sparco's website. They do not have any downloadable installation manual PDF files. I've spoken to a couple people. They've all told me their were no instructions included with the bar either. Search results on the forum did not yield any explicit instructions on how to install it. I found very few pictures that showed actual close-ups of the bar's brackets. From what I understand, it's a pretty straight foward to install.
Last week I purchased a used silver Sparco harness bar from a local user who was parting out his car. The 2 bolts that attach the bar to the brackets were a tad stripped, so I picked up some new ones at the harward store. They were only .44 cents each. No biggie. I also removed the Sparco decal and sent the bar to a local body shop to have the bar/brackets smoothened out and painted to match my Bride seats. I should recieve it today.
I plan on documenting the install with lots of pictures and illustrations. I plan on tackling this project by myself tonight. If anyone has any pointers or tips, I'd love to hear them. Thanks!

It is pretty straight forward. I also bought new bolts when doing my install. The one thing I remember having to do was taking apart the stock seat belt guide to re-install it with the sparco bar.
You shouldnt have any problems once you get everything apart it will all come together in your head. Oh yeah, remove the end mounts from the bar and then install the bar after the mounts are hung. just leave the bolts loose for wiggle room.
You shouldnt have any problems once you get everything apart it will all come together in your head. Oh yeah, remove the end mounts from the bar and then install the bar after the mounts are hung. just leave the bolts loose for wiggle room.
Thread Starter
Administrator
iTrader: (25)
Joined: Jun 2005
Posts: 58,609
Likes: 2,747
From: Down Under & Dirty
I have Brides that not only slide back and forth, but also recline and incline all the way to the dash board. Is it necessary to remove the seats? Member=MethodRN was telling me that it might be in my best interest to remove the seats entirely. I was hoping to avoid this...
Thread Starter
Administrator
iTrader: (25)
Joined: Jun 2005
Posts: 58,609
Likes: 2,747
From: Down Under & Dirty
not necessary, just made it a little easier for me since I was adding the bracket and it is about 5mm thick.
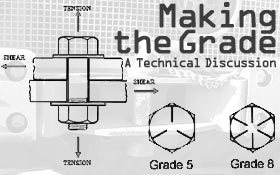
Grade 8 are some of the strongest bolts you can buy.
here is a picture of what a grade 8 end looks like.
Grade 8 are some of the strongest bolts you can buy.
here is a picture of what a grade 8 end looks like.
Thread Starter
Administrator
iTrader: (25)
Joined: Jun 2005
Posts: 58,609
Likes: 2,747
From: Down Under & Dirty
Ah! I understand now. Thanks for the info John. I'll swing by the hardware store and pick up a couple. I agree, it should make the installation easier...
Trending Topics


Thread Starter
Administrator
iTrader: (25)
Joined: Jun 2005
Posts: 58,609
Likes: 2,747
From: Down Under & Dirty


Thread Starter
Administrator
iTrader: (25)
Joined: Jun 2005
Posts: 58,609
Likes: 2,747
From: Down Under & Dirty
Thanks Jason.
I took the belts off already. It was simple as pie. I'm going to install both brackets 1st, then the bar last. This way I don't have to fight with the weight of the bar...
I took the belts off already. It was simple as pie. I'm going to install both brackets 1st, then the bar last. This way I don't have to fight with the weight of the bar...
Oh yeah, I forgot that the actual bar and L shaped brakets are seperate pieces. Since you had your's painted, I can already predict that it will get scratched up as you try and install the bar into the brackets. It's a tight fit as is, but since you painted it, the thickness might have changed slightly. Just something to watch for. I remember now, that the "tabs" that slide into the brackets on mine got scratched when I tried to slide it into position.
Thread Starter
Administrator
iTrader: (25)
Joined: Jun 2005
Posts: 58,609
Likes: 2,747
From: Down Under & Dirty
The body shop should be removing the old paint, then painting on new primer and paint, so the thickness shouldn't change. 
Last night was a breeze. I pulled my seats all the way foward, then pulled the back part of the seat all the way down to the dashboard. I then placed throw blankets over everything in the back, to avoid scratching any interior panels during installation. I have tons of room in the back to install it. Then again, I'm a small guy.
I'm headed to Home Depot during lunch to see if I can score some new bolts. If not, I know where to get them, I'd just have to wait until Friday to pick them up...

Thread Starter
Administrator
iTrader: (25)
Joined: Jun 2005
Posts: 58,609
Likes: 2,747
From: Down Under & Dirty

I snapped tons of pics last night. When I get the bar installed, I'll edit all the pics and post them up. It shows the bolt length, inner workings of the seat belt chassis, and how everything looks disassembled...