
Installing Greddy TT kit myself...advice/tips
 01-06-2008, 12:29 PM
#1
Registered User
Thread Starter
iTrader: (8)

Join Date: Jun 2003
Location: Cordova, TN
Posts: 563
Likes: 0
Received 0 Likes
on
0 Posts
Well, I finally getting around to installing my greddy TT kit on my built motor I got from Forged. Im going to try and document most of the install in this thread with pics. Hopefully I can point out some things that arent included in the vague Greddy instructions. Im hoping to get some help from those who have already done the install so I can prevent problems (heat, leaks, cooling, etc) and make sure everything is done right the first time around.
I have a fully built long block, but I am still driving my Z since its a daily driver, so I plan to document the build this way.
first, I will be putting the engine on an engine stand and installing as much of the turbo kit I can possibly install before tearing the engine out of my car to transfer the rest of the parts.
My first questions:
1) How do you put the VQ on an engine stand. I have seen this done several ways, and I know at nissan (where I work) they have a brace that goes around the the motor mounts, but they wont let me take it home.
There are only about 5 bolt holes that arethreaded on the upper portion of the tranny housing. Is it safe to just use these or will it be unbalanced on the stand? Or should I just use two bolts on the bottom with some washers and nuts on the other side?
2)Im trying to gather most of the materials needed for installing the manifolds, turbos, turbo lines, wastegates, and downpipes, and oil pan. (this is my first step on themotor side)
What RTV should be used on these parts where gaskets arent provided? Should I use any loctite or similar on any of these bolts?
What should be heat wrapped, or double heat wrapped in this area?
Heard bad things about the w/g gaskets on the greddy kit, should i replacethese, or use RTV?
Well Ithink thats all for now...I will post pics of progressand parts in the next few days. If I have any questions or findings I will post.
 01-06-2008, 01:08 PM
#2

https://my350z.com/forum/engine-drivetrain-and-forced-induction-diy/288630-assembly-of-my-new-built-short-block.html
https://my350z.com/forum/engine-drivetrain-and-forced-induction-diy/111571-how-to-swap-your-own-built-engine-by-bruschijr-updated-6-17-2005-a.html
and this forum https://my350z.com/forum/engine-drivetrain-and-forced-induction-diy-458/
most of us in here are Credit Card Ballers
https://my350z.com/forum/engine-drivetrain-and-forced-induction-diy/111571-how-to-swap-your-own-built-engine-by-bruschijr-updated-6-17-2005-a.html
and this forum https://my350z.com/forum/engine-drivetrain-and-forced-induction-diy-458/
most of us in here are Credit Card Ballers

 01-06-2008, 05:42 PM
#6
Registered User
Thread Starter
iTrader: (8)
Join Date: Jun 2003
Location: Cordova, TN
Posts: 563
Likes: 0
Received 0 Likes
on
0 Posts
Thanks for the links, they will definately help!
As for the engine stand, Im not sure which tranny mounting holes to use to best stabalize the engine. Not all the holes have threads. I have seen pics of some just using the top 5-6 holes on the upper half of the bell housing, which is the only ones that have threads for a bolt. The lower half, I could use a nut, if the bolt is long enough to go through the engine stand and the tranny housing. I have build several engine before, but they have been 4cyl and have threads all the way around. I just wanted to know the proper way to do it on an engine like the VQ.
As for the engine stand, Im not sure which tranny mounting holes to use to best stabalize the engine. Not all the holes have threads. I have seen pics of some just using the top 5-6 holes on the upper half of the bell housing, which is the only ones that have threads for a bolt. The lower half, I could use a nut, if the bolt is long enough to go through the engine stand and the tranny housing. I have build several engine before, but they have been 4cyl and have threads all the way around. I just wanted to know the proper way to do it on an engine like the VQ.
01-06-2008, 06:26 PM
#7
you engine stand will only have 4 mounting arms.....so you can only use 4 hole son the back of the engine. In fact, it is kind of hard to get the arms into a nice alignment using all 4 arms. You can get away with using 3 arms, but try to balance out their locations on the block.
Trending Topics


 01-07-2008, 04:48 AM
#13
Registered User
iTrader: (2)

Join Date: Mar 2007
Location: Hawaii
Posts: 1,268
Likes: 0
Received 0 Likes
on
0 Posts
use the tranny mount. the ones that dont have thread on the engine stand there should be a peice that goes through that you just put a nut on it. use the grey silicon bottle. you should only need one. for the exhaust manifold alot of the nuts that go on the stud you can use the gun but others gotta use an open end wrench. make sure you face the turbos the correct way and the clamp that connects the hot and cold side make sure you face them down for easy access later in the engine bay. other than that installing it when it when the motor is out is fairly easy. oh yeah you might wanna buy some extra heat wrap and wrap everything GOOD. hope this post helps
 01-07-2008, 10:04 AM
#16
Registered User
Thread Starter
iTrader: (8)
Join Date: Jun 2003
Location: Cordova, TN
Posts: 563
Likes: 0
Received 0 Likes
on
0 Posts
Originally Posted by andyisphat2004
on a side note...your TN kit is still running strong, but i am going down the same path as you
01-07-2008, 10:12 AM
#17
Registered User
Thread Starter
iTrader: (8)
Join Date: Jun 2003
Location: Cordova, TN
Posts: 563
Likes: 0
Received 0 Likes
on
0 Posts
Originally Posted by QuadCam
you engine stand will only have 4 mounting arms.....so you can only use 4 hole son the back of the engine. In fact, it is kind of hard to get the arms into a nice alignment using all 4 arms. You can get away with using 3 arms, but try to balance out their locations on the block.
Anyone have any pics of the engine on an engine stand???
Here is a pic off of one of those links posted above:
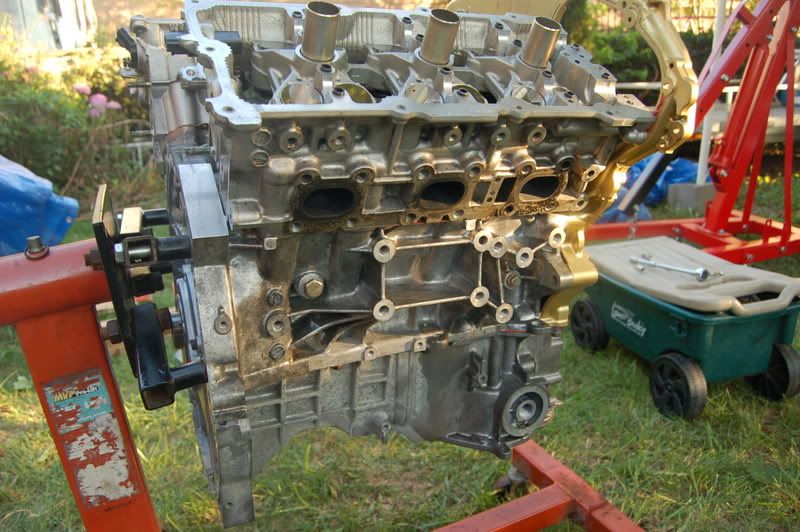
As you can tell the bottom one does not appear to have abolt going through it.
Last edited by dank311; 01-07-2008 at 10:16 AM.
01-07-2008, 10:23 AM
#18
Originally Posted by dank311
Yes, I do realize there are 4 mounting arms. Im not new at putting engines on an engine stand. Like I stated before, I have built several 4cyl motors, but none of the tranny housings have been like this (the lower half not being threaded). I wasnt sure if mounting all 4 arms on the upper half of the tranny housing would strip the threads being so much weight on the one side, and the engine being aluminum.
Anyone have any pics of the engine on an engine stand???
Here is a pic off of one of those links posted above:
As you can tell the bottom one does not appear to have abolt going through it.
Anyone have any pics of the engine on an engine stand???
Here is a pic off of one of those links posted above:
As you can tell the bottom one does not appear to have abolt going through it.
01-08-2008, 06:56 AM
#19
Do me a favor and just call me if you have any questions. I have been in and out of my engine about 3 times already along with the Greddy Kit. I can probably do the install with my eyes closed. I'll PM you my cell #. And please use the links posted above, I have already photo documented every step in detail, including answers to your tranny question.
01-08-2008, 11:06 AM
#20
Originally Posted by dank311
I wasnt sure if mounting all 4 arms on the upper half of the tranny housing would strip the threads being so much weight on the one side, and the engine being aluminum.
Anyone have any pics of the engine on an engine stand???
Anyone have any pics of the engine on an engine stand???