MREV2 & 5/16" MD Spacer Installed
 07-11-2008, 04:26 PM
#1

Well I had an eventful morning today. I called out from work yesterday and got up at 7 this morning to install my brand new motordyne mrev2 and 5/16" spacer  It took me about 4 hours because I made a few 'oops' and had to back track, and had some trouble getting out the strut bar mounting bolts, but all is well that ends well. I got the manifold and spacer installed and as far as I can tell there are no leaks, the engine seems to idle properly, and the car definitely pulls harder than before I installed it (and I did not reset the ECU). The sound is, to me, incredible. I will get some sound clips hopefully this weekend.
Here are a few pictures I took during the install.
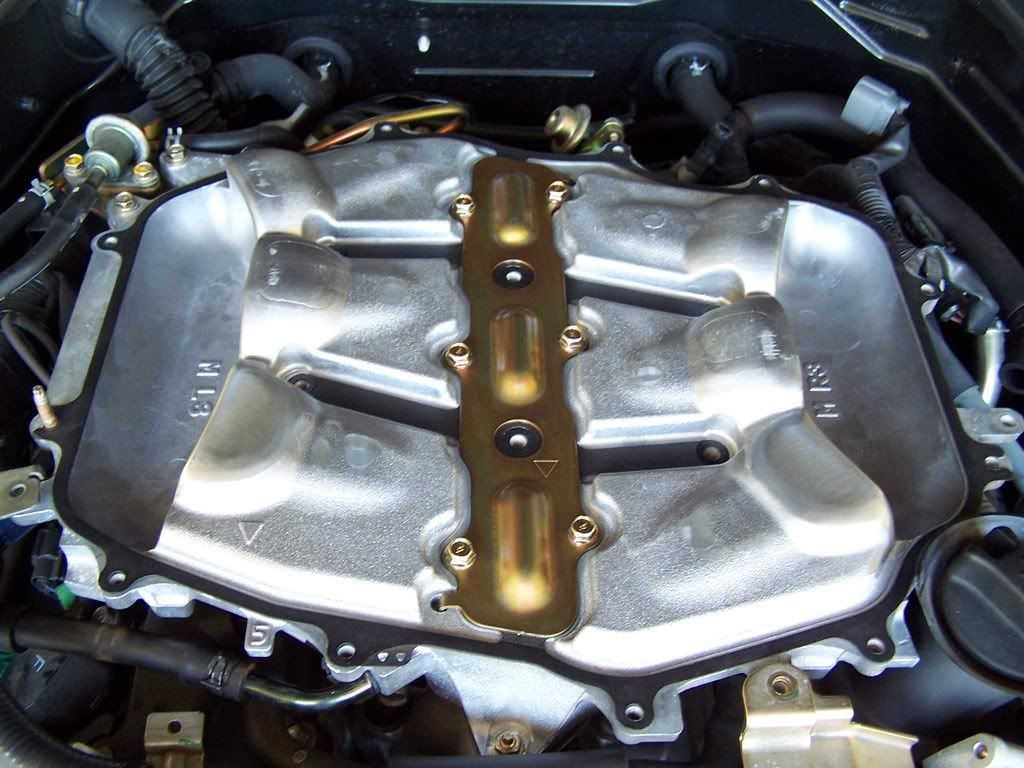
OEM plenum opened up (using shoe laces to hold the upper half up while I worked).
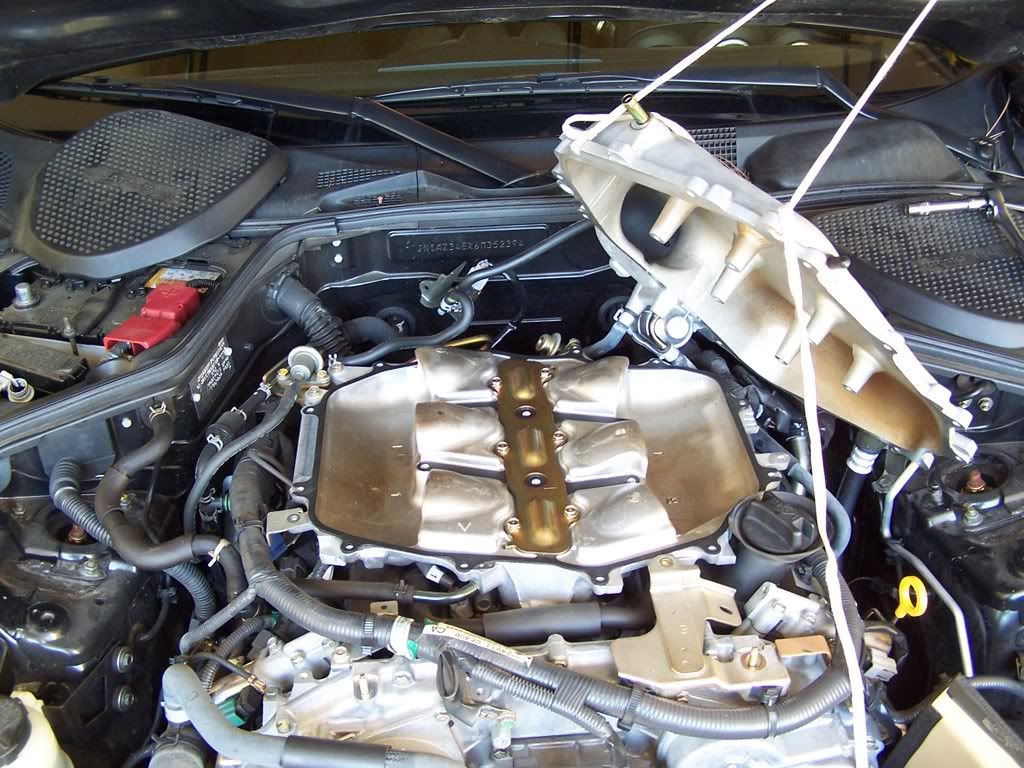
Entire plenum and manifold removed
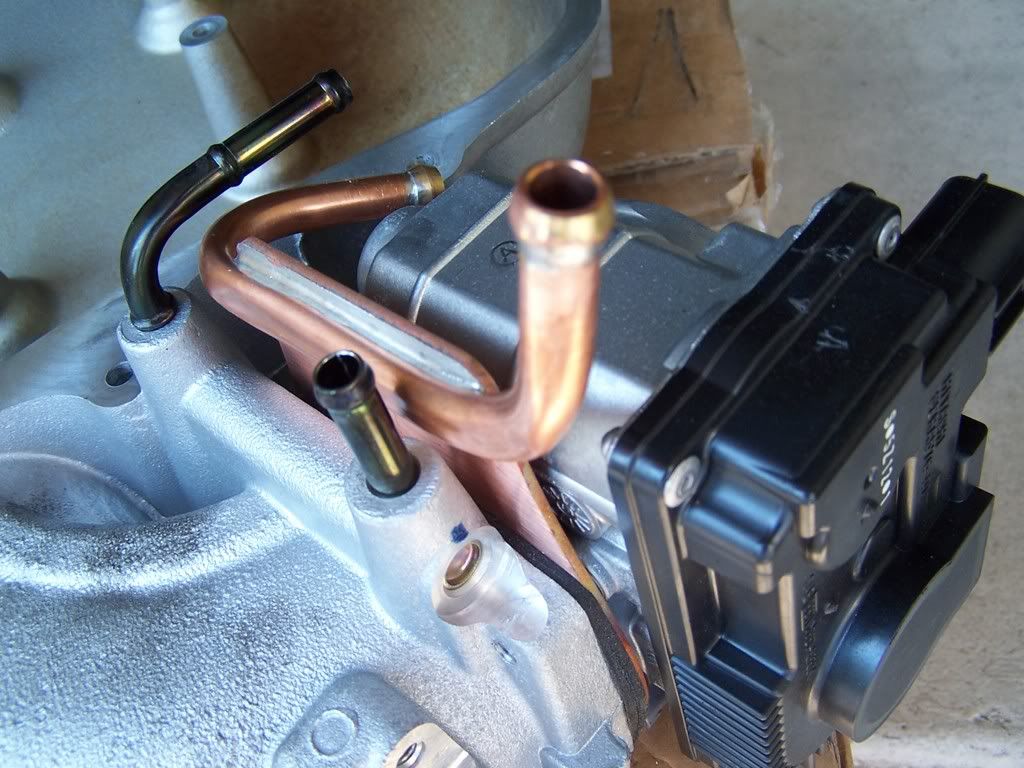
Copper throttle body heater installed (I didn't end up installing it ultimately, because in my opinion the fittings on the copper heater were too big for the OEM hoses, so I'll forgo that extra advertised 1-2 HP)
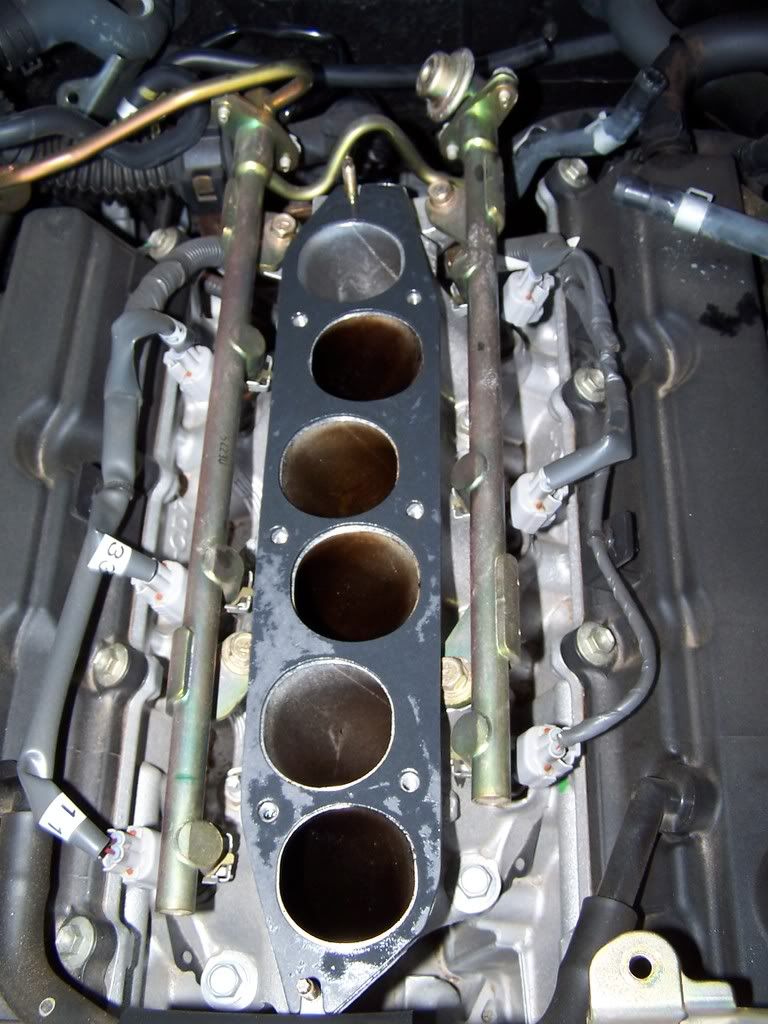
New aramid gasket coated with some motor oil
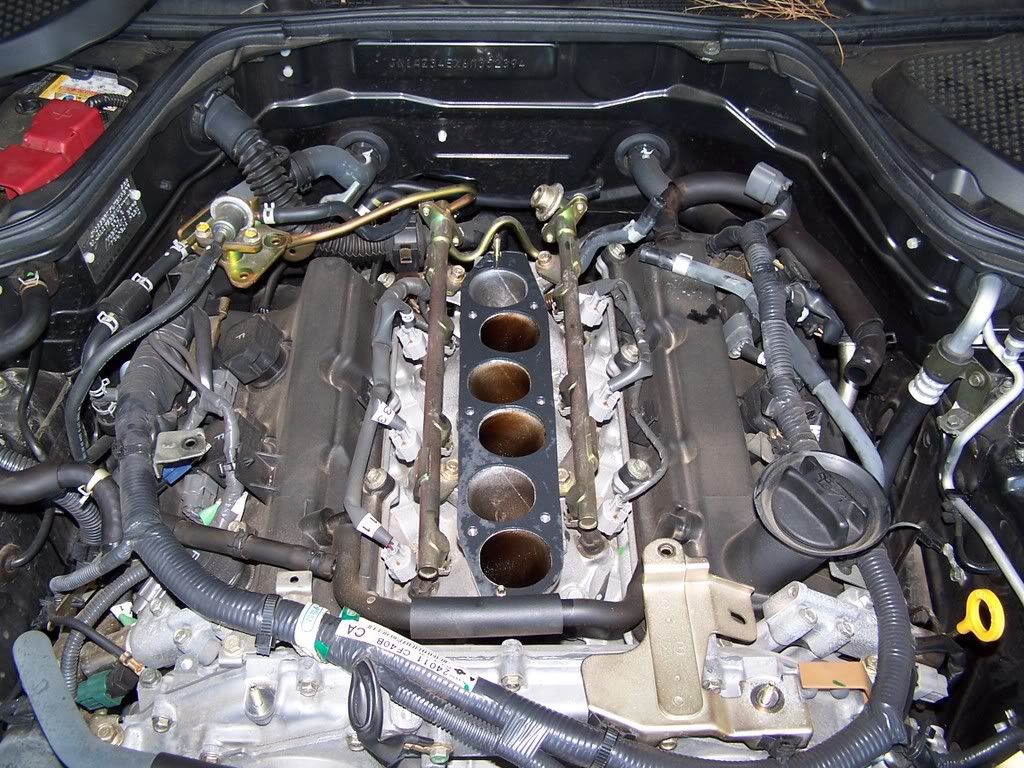
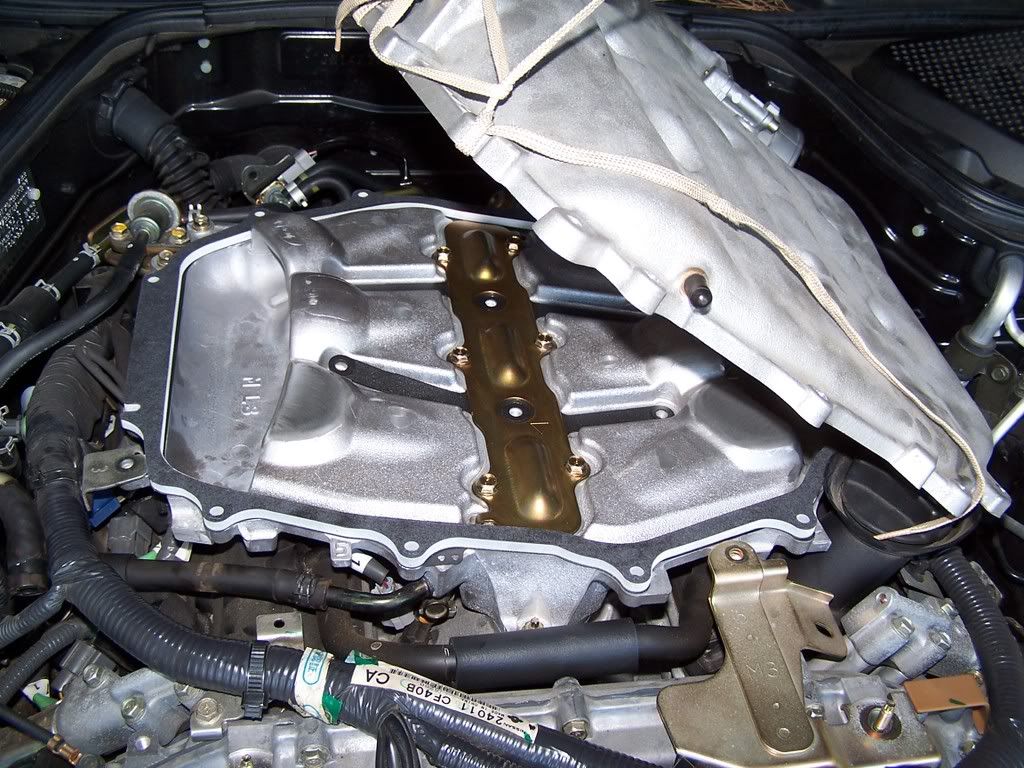
MREV2 installed w/ OEM plenum gasket
5/16" spacer in place and ready to close it up
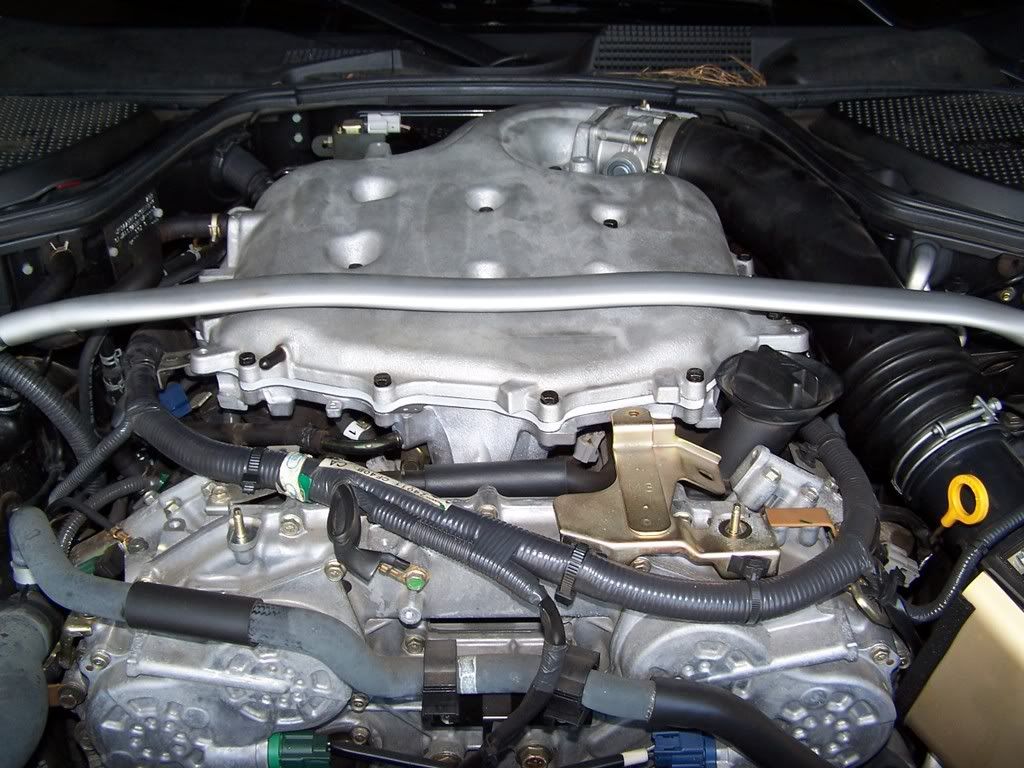
All done!
It took me about 4 hours because I made a few 'oops' and had to back track, and had some trouble getting out the strut bar mounting bolts, but all is well that ends well. I got the manifold and spacer installed and as far as I can tell there are no leaks, the engine seems to idle properly, and the car definitely pulls harder than before I installed it (and I did not reset the ECU). The sound is, to me, incredible. I will get some sound clips hopefully this weekend. Here are a few pictures I took during the install.
OEM plenum opened up (using shoe laces to hold the upper half up while I worked).
Entire plenum and manifold removed
Copper throttle body heater installed (I didn't end up installing it ultimately, because in my opinion the fittings on the copper heater were too big for the OEM hoses, so I'll forgo that extra advertised 1-2 HP)
New aramid gasket coated with some motor oil
MREV2 installed w/ OEM plenum gasket
5/16" spacer in place and ready to close it up
All done!
 07-11-2008, 04:29 PM
#2
I had to play with the strut bar setting a little bit to get ample clearance between the bar and the plenum. When I first went out for a drive I heard a slight vibration / rumble which I think was the bar rubbing the plenum, so I loosened it up a bit and the sound went away.
Another thing I noticed is that the throttle seems to respond differently. I haven't put my finger on it yet, but every time I start out in 1st gear the engine revs later relative to the clutch engagement point than it used to, which results to a near-stall bucking until the thing dampens out and lets me apply some power smoothly. Not sure if I have to do the throttle re-learn or what. I might try it and see what happens.
Another thing I noticed is that the throttle seems to respond differently. I haven't put my finger on it yet, but every time I start out in 1st gear the engine revs later relative to the clutch engagement point than it used to, which results to a near-stall bucking until the thing dampens out and lets me apply some power smoothly. Not sure if I have to do the throttle re-learn or what. I might try it and see what happens.
Last edited by sry110; 07-11-2008 at 05:14 PM.
07-11-2008, 10:24 PM
#3
Registered User

Join Date: Feb 2008
Location: kuwait
Posts: 268
Likes: 0
Received 0 Likes
on
0 Posts
Originally Posted by sry110
I had to play with the strut bar setting a little bit to get ample clearance between the bar and the plenum. When I first went out for a drive I heard a slight vibration / rumble which I think was the bar rubbing the plenum, so I loosened it up a bit and the sound went away.
Another thing I noticed is that the throttle seems to respond differently. I haven't put my finger on it yet, but every time I start out in 1st gear the engine revs later relative to the clutch engagement point than it used to, which results to a near-stall bucking until the thing dampens out and lets me apply some power smoothly. Not sure if I have to do the throttle re-learn or what. I might try it and see what happens.
Another thing I noticed is that the throttle seems to respond differently. I haven't put my finger on it yet, but every time I start out in 1st gear the engine revs later relative to the clutch engagement point than it used to, which results to a near-stall bucking until the thing dampens out and lets me apply some power smoothly. Not sure if I have to do the throttle re-learn or what. I might try it and see what happens.

p.s : with throttle body cleaner nothing else
07-12-2008, 06:11 AM
#6
Originally Posted by mark88Z
great pics. how did you find the install hard or easy did evrything bolt back together smoothly?
1) The 6 screws and 2 nuts (all 14mm hex) that hold the OEM strut bar into place were a bear to break loose. My supposedly 'complete' mechanic's tool set did not have a 14mm socket for the 1/2" drive wrench, so I was stuck using the 3/8" drive which of course is shorter so I needed to put in a whole hell of a lot more force to break torque on those fasteners. Eventually I squirted some WD40 around the head of each screw / nut and played with the strut bar tension to relieve the mounting bolt s bit, and they all (reluctantly) broke loose.
2) Motordyne's instructions advise that the strut bar nuts should be torqued to 20 lb-ft and the bolts to 24 lb-ft, but I had the same problem of not having a 14mm socket to fit the 1/2" drive on my lb-ft torque wrench. Again, no fault of Motordyne, I just didn't have the proper socket adapter. So for now I just torqued them down until they were tight, but not so tight that I can't get them back out.
3) When you are remounting the upper plenum to the lower half with a spacer installed, you no longer use the two guide pins that the OEM lower half has, so you need to align it yourself. This is probably common sense anyway, but before tightening any of the bolts that hold the top to the bottom, thread all of the bolts in a few turns by hand. This will ensure that all of the bolts can go where they need to. Since bolts #1 thru 6 of the torquing sequence were the ones in the middle of the plenum, I just put those 6 bolts in an torqued them to the initial torque value. Then when I tried to install bolts #7 thru 18, some of the holes were lined up and some weren't. So then I had to loosen those 6, then install the rest and start over with the torque sequence.
4) Use an inch-lb torque wrench if possible. It's amazing how little force you put on the wrench to achieve the 100 lb-in seating torque. And by the time you get to torquing these things down, you've already been bending over your engine bay for 2 hours and your lower back is burning and the last thing you need is to crack off one of these studs.
5) There are a few brackets that hold various plugs and hoses around the peripheral of the plenum, and the brackets are held to the upper plenum by screws. When re-fitting the upper plenum to the lower, save yourself some aggravation by making sure these brackets end up on top of the plenum. Also make sure you don't pinch the edge of the rubber oil-fill sleeve between the upper and lower plenum (or spacer if you install one).
Last edited by sry110; 07-12-2008 at 06:15 AM.
07-12-2008, 06:20 AM
#7
Originally Posted by 350ZTheStandard
Nice write up, I am doing mine this Sunday. I wasn't going to mess with the settings on the strut bar brace, as the directions stated, guess now I will have to prevent rubbing and clearance issues.
Good luck on your install!
Trending Topics
07-12-2008, 06:37 AM
#8
350ZStandard,
Yes, definetly make any necessary adjustments on your strut bar.
Each car will vary, but when the plenum is raised up by the spacer the strut bar clearance will need to be checked and re-adjusted accordingly.
Yes, definetly make any necessary adjustments on your strut bar.
Each car will vary, but when the plenum is raised up by the spacer the strut bar clearance will need to be checked and re-adjusted accordingly.
Last edited by Hydrazine; 07-12-2008 at 06:42 AM.
07-12-2008, 10:15 AM
#9
Registered User

Join Date: Jul 2008
Location: Pueblo Colorado
Posts: 44
Likes: 0
Received 0 Likes
on
0 Posts
Originally Posted by sry110
Everything was pretty straight-forward, I just took my time and paid attention to all of the little details and everything seemed to drop right into place. Here are a few issues I ran into:
1) The 6 screws and 2 nuts (all 14mm hex) that hold the OEM strut bar into place were a bear to break loose. My supposedly 'complete' mechanic's tool set did not have a 14mm socket for the 1/2" drive wrench, so I was stuck using the 3/8" drive which of course is shorter so I needed to put in a whole hell of a lot more force to break torque on those fasteners. Eventually I squirted some WD40 around the head of each screw / nut and played with the strut bar tension to relieve the mounting bolt s bit, and they all (reluctantly) broke loose.
2) Motordyne's instructions advise that the strut bar nuts should be torqued to 20 lb-ft and the bolts to 24 lb-ft, but I had the same problem of not having a 14mm socket to fit the 1/2" drive on my lb-ft torque wrench. Again, no fault of Motordyne, I just didn't have the proper socket adapter. So for now I just torqued them down until they were tight, but not so tight that I can't get them back out.
3) When you are remounting the upper plenum to the lower half with a spacer installed, you no longer use the two guide pins that the OEM lower half has, so you need to align it yourself. This is probably common sense anyway, but before tightening any of the bolts that hold the top to the bottom, thread all of the bolts in a few turns by hand. This will ensure that all of the bolts can go where they need to. Since bolts #1 thru 6 of the torquing sequence were the ones in the middle of the plenum, I just put those 6 bolts in an torqued them to the initial torque value. Then when I tried to install bolts #7 thru 18, some of the holes were lined up and some weren't. So then I had to loosen those 6, then install the rest and start over with the torque sequence.
4) Use an inch-lb torque wrench if possible. It's amazing how little force you put on the wrench to achieve the 100 lb-in seating torque. And by the time you get to torquing these things down, you've already been bending over your engine bay for 2 hours and your lower back is burning and the last thing you need is to crack off one of these studs.
5) There are a few brackets that hold various plugs and hoses around the peripheral of the plenum, and the brackets are held to the upper plenum by screws. When re-fitting the upper plenum to the lower, save yourself some aggravation by making sure these brackets end up on top of the plenum. Also make sure you don't pinch the edge of the rubber oil-fill sleeve between the upper and lower plenum (or spacer if you install one).
great info this will definitly help when putting mine in
how do you like the spacer so far?
07-12-2008, 04:15 PM
#10
Originally Posted by mark88Z
great info this will definitly help when putting mine in how do you like the spacer so far?
how do you like the spacer so far?Not to mention the sound of this thing, coupled with jwt intake and fujitsubo exhaust, is amazing.
 07-12-2008, 04:45 PM
#12
One way to appreciate the mod even more is to temporarily put it back to stock to hear and feel the difference.
Try putting the stock plenum back on. The pull is anemic and the sound is weak. Its a big disappointment
Fortunatly, you'll never want to do that unless you plan to sell the car.
Try putting the stock plenum back on. The pull is anemic and the sound is weak. Its a big disappointment
Fortunatly, you'll never want to do that unless you plan to sell the car.
 07-13-2008, 02:04 AM
#16
Registered User
Join Date: Feb 2008
Location: kuwait
Posts: 268
Likes: 0
Received 0 Likes
on
0 Posts
very great tips you added ,thanks
i`ll do main today (hopefully i got the time)
one thing guys ,,,how can i know how much is 20 inch-lbs torque ,40 ,80 and 100 ,, i use regular torque wrench and break-bar ,how can i know how much i torque ?? to much torque i`ll crack the plenum , less torque there will be leak
pics Incas there is different names for them ?
torque wrench
break-bar
i`ll do main today (hopefully i got the time)
one thing guys ,,,how can i know how much is 20 inch-lbs torque ,40 ,80 and 100 ,, i use regular torque wrench and break-bar ,how can i know how much i torque ?? to much torque i`ll crack the plenum , less torque there will be leak
pics Incas there is different names for them ?
torque wrench

break-bar
 07-13-2008, 04:38 AM
#17
Registered User
iTrader: (1)

Join Date: Mar 2008
Location: NJ
Posts: 1,406
Likes: 0
Received 0 Likes
on
0 Posts
a torque wrench should allow you to set the torque you want. when you apply that amount of torque, it will break away or click to let you know to stop.
is that a normal rachet set? no need for breaker bars
gloved hand with that nut driver will give you about 90 inch/lbs unless you are superman
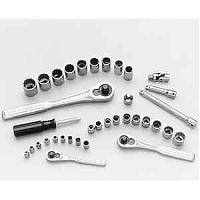
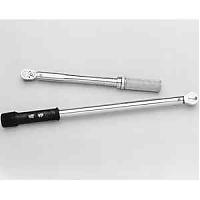
EDIT: attached pic of the torque wrench i used
is that a normal rachet set? no need for breaker bars
gloved hand with that nut driver will give you about 90 inch/lbs unless you are superman
EDIT: attached pic of the torque wrench i used
Last edited by CSF; 07-13-2008 at 04:42 AM.
07-13-2008, 04:53 AM
#18
Registered User
Join Date: Feb 2008
Location: kuwait
Posts: 268
Likes: 0
Received 0 Likes
on
0 Posts
Originally Posted by CSF
a torque wrench should allow you to set the torque you want. when you apply that amount of torque, it will break away or click to let you know to stop.
is that a normal rachet set? no need for breaker bars
gloved hand with that nut driver will give you about 90 inch/lbs unless you are superman
EDIT: attached pic of the torque wrench i used
is that a normal rachet set? no need for breaker bars
gloved hand with that nut driver will give you about 90 inch/lbs unless you are superman
EDIT: attached pic of the torque wrench i used
07-13-2008, 07:25 AM
#19
Originally Posted by Darkness75
thanks a 1,000,000/- ,,,you replay at a perfict timming for me ,,thanks again
Another issue I forgot to add before was the (4) socket-head cap screws that hold the throttle body to the plenum (this applies only if you are removing the TB to install the copper iso-thermal heater). The Motordyne instructions give a torque spec for installing the new bolts, similar to the torque spec for the plenum bolts, to ensure proper sealing between the TB / heater / gasket / plenum. The problem I had was that the bolts require a metric-sized hex key (allen key) and I do not have a set of hex-key sockets for a 3/8" drive (lb-in torque wrench). So I ended up using a regular hex-key and tightening them progressively by hand, tight enough to seal but not so tight to prevent me from ever getting them out again.
Last edited by sry110; 07-13-2008 at 07:32 AM.
07-13-2008, 07:44 AM
#20
+1 to the nut driver with leather gloves. This method deserves more credit than it is often given.
Turning the nut driver as hard as you can will give you about 90 inch lbs TQ. If you really try hard you can do about 100 inch lbs, but your hands will be getting raw.
To get various level of TQ its pretty easy to do.
40 inch lbs will be approximatly 1/2 as hard as the maximum you can apply.
60 inch lbs will be approximatly 2/3 as hard as the maximum you can apply.
This may not be scientific, but its safe and it works.
Last edited by Hydrazine; 07-13-2008 at 08:02 AM.