
Interior Scratches - Repair Discussion

Registered User
Joined: Jun 2004
Posts: 78
Likes: 0
From: Suburban Chicago
I am about to refinish my interior trim pieces (rubberized handles, etc), and have not been able to remove the grab handle on the passenger side. I have used every possible socket in my toolbox but can't remove the hex screw that holds it in place.
If I can't get the bolt out, I can't sand and paint it. Has anyone else had this problem.
If I can't get the bolt out, I can't sand and paint it. Has anyone else had this problem.

Registered User
Joined: Sep 2012
Posts: 1
Likes: 0
From: Eugene
This is a really good write up, thank you very much. Your other one regarding to restoring the dash enclosure was also extremely well written. Instruction was simple and easy to follow, great job and a big thank you for helping me making my interior like new again.
If I may add, I tried to use scrap off the paint on the door handle pieces but it was painfully tedious. Instead I used 60grit sandpaper and took it down to the plastic, then washed with soap. Sanded with 600 grit sandpaper, wash again. After drying and apply 2 coats of primer like instructed. I sanded again with 800grit sandpaper, wash again. Blow dried the pieces then 5 coats of black then 2 thin coats of gloss finish. 10 minutes between each coat. It looks great.
If I may add, I tried to use scrap off the paint on the door handle pieces but it was painfully tedious. Instead I used 60grit sandpaper and took it down to the plastic, then washed with soap. Sanded with 600 grit sandpaper, wash again. After drying and apply 2 coats of primer like instructed. I sanded again with 800grit sandpaper, wash again. Blow dried the pieces then 5 coats of black then 2 thin coats of gloss finish. 10 minutes between each coat. It looks great.
If you'd like to return it to the stock look but have it be more durable then i'd go with painting. I just did mine and it was pretty easy. Only takes a few hours.
Sanding the original rubbery paint was pretty much impossible, so i scraped it all off with a knife instead. Just keep the knife perpendicular to the part so that you don't accidentally cut into it. It should only scrape off the black paint and get you down to the brown primer underneath.
After it's scraped down to primer you can sand the part. I used 800 grit. Make sure sand off any remaining bits of the black paint as well as smooth out any scratches you made with the knife. If you missed a spot with sanding you'll be able to tell once you start painting.
Now wash the part. I just ran it under water in the tub and rubbed hand soap all over it. I then tried it with a towel. Oh.. and be sure to wash your own hands each time before you start painting.. if you leave an oily finger print then the paint wont adhere very well.
I hit it with 2 coats of primer then sanded it down a bit to make sure it was nice and smooth. I waited 10 minutes between the 1st and 2nd coat. Then waited 30 minutes before i sanded it.
Wash the part with soapy water again. Make sure it's dry. Now paint on the black paint. I had a lot of problems with this paint at first. It would look nice when wet but it kept drying splotchy. I eventually learned that if it dries splotchy then just hit that spot with a very light coating.. basically a dusting, and it seems to smooth it out. If you get one spot with too much paint then it is sure to dry with a visible splotch.You only have to wait about 5 minutes to see the splotches.. at which point you can hit it with the light dusting to smooth it out.
I let it dry for about 20 minutes (i had about 5-7 coats of black paint on it due to learning/failing at fixing the splotching). I then did a light sprinkle of clearcoat on it and it gave it a nice little sheen. It was a very thin coat of clear though.
Since i had so much paint on the part i let it dry/cure for a few hours before installing it. That wasn't quite enough time though. When i was pressing in the mirror control i left a slight fingerprint indentation in the part. If i were doing it again i would wait a day or two before installing it.
I attached before/during/after pics plus a pic of the 3 cans of paint i used.
here are the UPC codes:
primer = 026916946928
black = 026916399823
clear = 724504013013


I am about to refinish my interior trim pieces (rubberized handles, etc), and have not been able to remove the grab handle on the passenger side. I have used every possible socket in my toolbox but can't remove the hex screw that holds it in place.
If I can't get the bolt out, I can't sand and paint it. Has anyone else had this problem.
If I can't get the bolt out, I can't sand and paint it. Has anyone else had this problem.
Take a socket wrench, a 6" extender with a 10mm socket on it, and simply pull the handle towards you, wiggliging it back and fourth while trying to unscrew the boldt. Its a PITA, but you'll eventually get it. You have to pull with some force.
Sometimes I have to do the top boldt a bit, then the bottom, then the top, etc, pulling them out with the handle.
I've read through this, may have past over it, anyone know how to remove the pieces behind the silver door handles? These are the pieces I'm needing to redo.
Edit: Nvm, found the answer in another thead.
Edit: Nvm, found the answer in another thead.
Last edited by Nismo350z#0310; Mar 10, 2013 at 06:14 PM.

Registered User
Joined: May 2013
Posts: 37
Likes: 2
From: Louisville
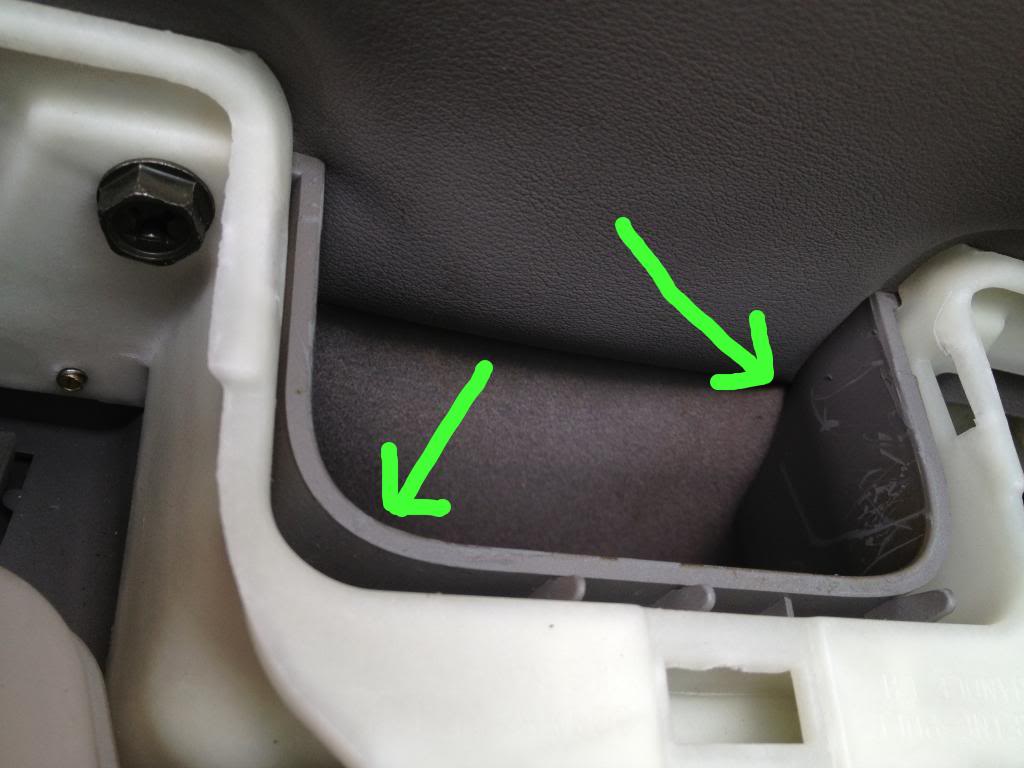
does anybody know how to remove this panel? I took off the switch cover to wrap in and noticed this inner thing is going to have to come out as well. But I have no idea how to get it out.

Last edited by justin428; Jun 11, 2013 at 07:37 AM.

I'm done with all this crap. Sending my waterfall, cubby door, shifter surround, door a/c vents, and interior door handles off to be hydro-dipped. Done right, it looks really good IMO, and will be the permanent solution.
Registered User
Joined: May 2013
Posts: 37
Likes: 2
From: Louisville
I didnt plan on having to take this other lower panel off. What a PITA.
Here's where I'm sending the parts to be dipped:
https://my350z.com/forum/vendor-grou...-industry.html
The brushed aluminum might look like the interior on some of the Infiniti G's, if you want to get an idea. I'd probably go black CF, though, as I never did like the G interiors.
Registered User
Joined: May 2013
Posts: 37
Likes: 2
From: Louisville
I'll decide on the am. It's so easy for you black interior guys! Google frost 350z for a reminder what I'm dealing with.
Get some sample pieces of the wrap and see what you think by holding them next to the frost. Some of the newer CF vinyl is looking better, but the brushed stuff still looks too plastic to me. Frost is tough to deal with.
Registered User
Joined: May 2013
Posts: 37
Likes: 2
From: Louisville
Keep track of my progress on the center stack here. It's scary, I admit. Not knowing how all this will turn out.
https://my350z.com/forum/body-interi...by-guages.html

Its not that hard to get these off. Take off the door panel. Then remove the bolts that hold the assembly together on the inside of the door panel. Takes about 10 min to get each one off.
Registered User
Joined: May 2013
Posts: 37
Likes: 2
From: Louisville
Pro tip!
I found a quick way to remove that pesky rubbery crap paint from the handles.
http://s42.photobucket.com/user/wr20...6c4af.mp4.html
I found a quick way to remove that pesky rubbery crap paint from the handles.
http://s42.photobucket.com/user/wr20...6c4af.mp4.html

Registered User
Joined: Jun 2013
Posts: 24
Likes: 0
From: Canada
did you just wrap if with CF then paint a layer or 2 of gloss?
thx


Registered User
Joined: Aug 2013
Posts: 10
Likes: 0
From: Gilbert, AZ
Here was my attempt. This is literally my very first attempt at painting something, so it's not perfect (mainly because the dremel and brush I used to get the crappy paint off - well it got away from me once or twice!) I decided I didn't want to go straight back to black, so did a brushed nickel. A few coats of primer, a few coats of the brushed nickel, and two light coats of clear.
It's not an exact match with the silver interior parts, but I am happy with the results (for now).
The biggest pain was getting that original primer off. I was going to leave it, but the first few times I put the new primer on, the stuff underneath would bubble up. I finally was able to get the primer off too (after much swearing).
It was fun, I'll probably try it again and hope for better results. I'd like to get all the aluminum parts to match at some point (steering wheel, shifter, etc.)
Last edited by Crypto13; Nov 13, 2013 at 05:54 AM.